
Why Print Multiple Slides on One Page in PowerPoint?
Printing slides from a PowerPoint presentation is a common practice for many individuals, whether for personal or professional use. However, sometimes you may want to conserve paper or create handouts that are easier to read. In such cases, printing multiple slides on one page can be incredibly useful. This feature allows you to reduce the number of printed pages while maintaining the content’s legibility.
There are several benefits to printing multiple slides on one page:
- Save paper: When you print multiple slides on a single page, you can significantly reduce the amount of paper used. This is especially advantageous when printing large presentations or when you need to print multiple copies.
- Easier to read: Sometimes slides with complex content can be challenging to read when printed in a standard one-slide-per-page format. By condensing multiple slides onto a single page, you can enlarge the content and improve readability.
- Convenient handouts: If you plan to distribute printed copies of your presentation to your audience, printing multiple slides on one page can create compact, easily manageable handouts. This way, participants can follow along with the presentation without carrying around numerous pages.
Whether you are a student, teacher, professional, or presenter, the ability to print multiple slides on one page can come in handy. Not only does it help you save resources, but it also improves the overall user experience by providing a more compact and readable format. So, let’s explore how you can achieve this using Microsoft PowerPoint.
Step 1: Open your PowerPoint Presentation
To begin, you’ll need to open the PowerPoint presentation that you want to print multiple slides on one page. Follow these steps:
- Launch Microsoft PowerPoint on your computer.
- Click on the “File” tab located in the top-left corner of the screen. This will open the File menu.
- In the File menu, select “Open.” A new window will appear, allowing you to browse your computer’s files and folders.
- Navigate to the location where your presentation is saved and select the file.
- Click on the “Open” button to open the selected presentation in PowerPoint.
Once you’ve successfully opened your PowerPoint presentation, you’re ready to proceed to the next step and start configuring the print settings.
It’s important to note that the specific steps may vary slightly depending on your version of PowerPoint and operating system. However, the general process remains the same. If you encounter any difficulties, refer to the software’s official documentation or seek assistance from the support team.
Step 2: Go to the “File” Tab
Once you have your PowerPoint presentation open, you need to access the “File” tab to access the necessary print settings. Follow these simple instructions:
- In the PowerPoint window, look at the top-left corner of the screen. You will see a ribbon with various options. Locate and click on the “File” tab.
- Clicking on the “File” tab will open the File menu, which contains a range of options and settings for your presentation.
- From the File menu, you can access essential features, such as opening and saving files, printing options, and more.
Once you’ve successfully accessed the “File” menu, you’re one step closer to configuring the print settings and printing multiple slides on one page. Remember, the location of the “File” tab may differ slightly depending on the version of PowerPoint you’re using, but it’s typically located at the top-left corner of the window.
If you’re unsure of how to locate the “File” tab or encounter any difficulties, consult PowerPoint’s documentation or reach out to their support team for further assistance.
Step 3: Click on “Print”
After accessing the “File” tab, you need to proceed to the next step, which is clicking on the “Print” option. This will allow you to access the printing settings for your PowerPoint presentation. Here’s how to do it:
- Once you have the “File” menu open, look for the “Print” option on the left-hand side of the screen. It is usually represented by a printer icon or the word “Print.”
- Click on the “Print” option to continue.
By clicking on the “Print” option, you will be directed to the printing settings page, where you can configure various options to suit your needs. These settings include selecting the printer, choosing the number of copies, specifying the print range, and more.
Remember, the specific location and appearance of the “Print” option may vary slightly depending on the version of PowerPoint you’re using. However, in most cases, it is easily identifiable on the “File” menu, providing a straightforward way to access the printing settings.
If you’re having trouble finding the “Print” option or have any difficulties, refer to PowerPoint’s official documentation or contact their support team for further assistance.
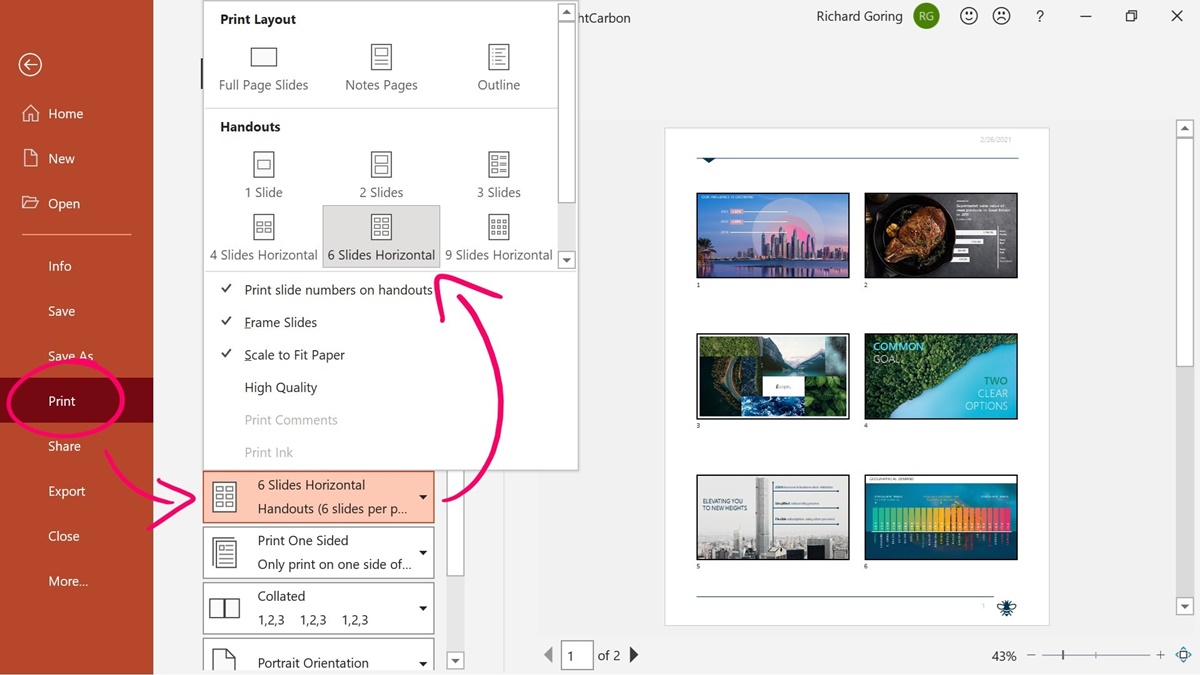
Step 4: Choose the “Full Page Slides” Option
Once you have accessed the printing settings by clicking on the “Print” option, the next step is to choose the “Full Page Slides” option. This setting allows you to print multiple slides on one page in PowerPoint. Here’s how you can do it:
- On the printing settings page, you will see various options related to printing. Look for the “Settings” or “Print Layout” section.
- Within this section, locate the option titled “Full Page Slides.” This option is typically accompanied by a drop-down menu or a list of choices.
- Click on the drop-down menu or select the appropriate choice to enable the “Full Page Slides” option.
By choosing the “Full Page Slides” option, you are instructing PowerPoint to print multiple slides on each page. This will help reduce the number of printed pages while maintaining the content’s legibility.
It’s worth noting that PowerPoint provides additional options to customize the number of slides per page. These options may include printing 2, 3, 4, 6, or more slides on a single page. Depending on your needs and preferences, you can select the appropriate setting.
Remember to explore the various options available in the printing settings to ensure that you achieve the desired layout and appearance for your printed slides.
If you need further assistance or encounter any difficulties, consult PowerPoint’s official documentation or reach out to their support team for guidance.
Step 5: Select the Number of Slides per Page
After choosing the “Full Page Slides” option in the printing settings, it’s time to specify the number of slides you want to print on each page. This step allows you to customize the layout and density of your printed slides. Follow these instructions to select the number of slides per page:
- Look for the “Settings” or “Print Layout” section on the printing settings page in PowerPoint.
- Within this section, you will find options related to the number of slides per page. These options might be displayed as “Slides per Page,” “Page Layout,” or something similar.
- Select your desired number of slides per page from the available options. Common choices include 2, 3, 4, 6, or more slides per page.
Choosing the appropriate number of slides per page allows you to optimize the space and readability of your printouts. Consider factors such as font size, slide complexity, and available space when selecting the number of slides per page.
Remember, the specific options and layout settings may vary depending on your version of PowerPoint. However, most versions offer similar options to customize the number of slides per page.
If you have any difficulties or need further assistance, consult PowerPoint’s official documentation or contact their support team for guidance. Experimenting with different slide layout options can help you find the most suitable arrangement for your printed slides.
Step 6: Specify Other Printing Options
In addition to selecting the number of slides per page, PowerPoint provides various other printing options that you can specify to further customize your printouts. These options allow you to adjust the print settings according to your preferences and requirements. Follow these steps to specify other printing options:
- On the printing settings page, look for additional settings related to printing, which may include options like “Print Range,” “Print Quality,” “Color or Grayscale,” “Page Orientation,” and more.
- Select the desired settings based on your specific needs. For example:
- Print Range: Choose whether to print all slides, a specific range, or a selection of slides.
- Print Quality: Select the desired print quality, such as “High,” “Standard,” or “Draft.”
- Color or Grayscale: Decide whether to print in color or grayscale, depending on your preferences and the availability of a color printer.
- Page Orientation: Choose between “Portrait” or “Landscape” orientation to match your content’s layout.
By specifying these additional printing options, you can further customize the appearance and output of your printed slides. For example, printing in grayscale may be more cost-effective if color is not essential, while adjusting the print quality can save ink or enhance the overall printing result.
Take some time to explore and experiment with these options to achieve the desired outcome. Remember to consider factors such as printing resources, audience preferences, and your specific presentation needs when specifying these settings.
If you encounter any difficulties or have specific questions about these printing options, consult PowerPoint’s official documentation or seek guidance from their support team. They can provide further clarification and assistance based on your specific software version and requirements.
Step 7: Click on “Print” to Start Printing
Once you have configured all the printing options for your PowerPoint presentation, you’re ready to proceed with the final step: clicking on the “Print” button. This action will initiate the printing process and generate the desired output. Follow these simple instructions to start printing:
- Double-check that all your printing settings, including the number of slides per page and any other customizations, are accurately configured to meet your requirements.
- Ensure that your printer is properly connected to your computer and turned on.
- On the printing settings page, locate the “Print” button, which is usually located at the bottom or top-right corner of the window.
- Click on the “Print” button to start the printing process.
After clicking on the “Print” button, PowerPoint will communicate with your printer and begin printing your presentation slides based on the specified settings. The progress of the printing process and the number of pages printed will be displayed on your computer screen or on your printer’s display panel.
It’s important to note that the printing time may vary depending on the number of slides, the complexity of the content, and the printing speed of your printer. It’s recommended to wait until the printing process is complete before removing the printed pages from the printer tray.
If you encounter any issues during the printing process or if the output does not meet your expectations, verify that your printer settings, such as ink levels and paper size, are correct. Additionally, consult PowerPoint’s official documentation or contact their support team for further assistance.
Once the printing is complete, you can review and distribute the printed slides according to your needs, whether for personal reference, presentations, or for providing handouts to your audience.
Additional Tips and Considerations
As you navigate through the process of printing multiple slides on one page in PowerPoint, there are a few additional tips and considerations that can enhance your experience and help you achieve the best results. Keep the following tips in mind:
- Preview your printout: Before printing a large number of slides, it’s a good idea to preview the print layout to ensure everything appears as expected. This can help you avoid any formatting or content issues that may arise.
- Experiment with different layouts: Don’t be afraid to try different combinations of slides per page to find the layout that best suits your needs. Some slides may work better as full-page prints, while others can be easily read in smaller sizes.
- Consider paper size and orientation: Depending on the content and the desired effect, you may want to adjust the page size or orientation. For example, landscape orientation may be more suitable for slides with wide graphics or diagrams.
- Check for legibility: Ensure that your printed slides are still readable after reducing the size. Test readability by reviewing the printouts or asking others to provide feedback before distributing the final versions.
- Use good quality paper: Investing in higher-quality paper can result in better printouts with enhanced color and durability. Consider using a slightly heavier or glossy paper for a more professional look.
- Save ink or toner: If you’re concerned about ink or toner consumption, adjust the print settings to draft mode or grayscale if color is not crucial. This can help minimize costs and prolong the lifespan of your printer cartridges.
Remember to acquaint yourself with your printer’s settings and capabilities to ensure optimal print quality. Additionally, always be mindful of the environment and practice eco-friendly printing habits by using paper responsibly and recycling whenever possible.
By considering these additional tips and factors, you can fine-tune your printing process and achieve the desired outcomes with your PowerPoint presentations.