
What is Outline View
Outline view is a feature available in presentation software such as PowerPoint and OpenOffice Impress. It provides a convenient way to organize and structure the content of your presentation in a hierarchical format. In outline view, you can create, edit, and format the text of your slides in a streamlined manner, making it easier to manage the flow and structure of your presentation.
Unlike the default slide view, where each slide is displayed as a separate entity, outline view presents your presentation as a series of headings and subheadings, allowing you to focus on the overall structure and content organization. It is especially useful when you need to quickly rearrange or reorganize your presentation without having to switch between individual slides.
In outline view, the main points of your presentation are represented as top-level headings, while supporting details and subtopics are indented underneath. This hierarchical structure makes it easy for you to visualize the logical progression of your presentation and ensures a smooth flow of information.
By utilizing outline view, you can easily review and revise the content of your slides without being distracted by the design elements. It allows you to concentrate solely on the textual content, making it ideal for content creation and organization. Once you have completed the outline, you can switch back to the slide view to apply formatting, add visuals, and enhance the overall visual appeal of your presentation.
Outline view is particularly beneficial for larger presentations or when working with complex topics that require careful organization. It enables you to see the big picture and identify any gaps or redundancies in the content. Additionally, outline view facilitates collaboration and teamwork as it allows multiple contributors to focus on the structure and content of the presentation.
Overall, outline view is a powerful tool that enhances efficiency and productivity in creating and managing presentations. It provides a structured and logical approach to organizing your content, allowing you to create impactful presentations that effectively communicate your message to your audience.
How to Access Outline View
To access the outline view in PowerPoint or OpenOffice Impress, follow these simple steps:
- Open your presentation in PowerPoint or OpenOffice Impress.
- Click on the “View” tab in the top navigation menu.
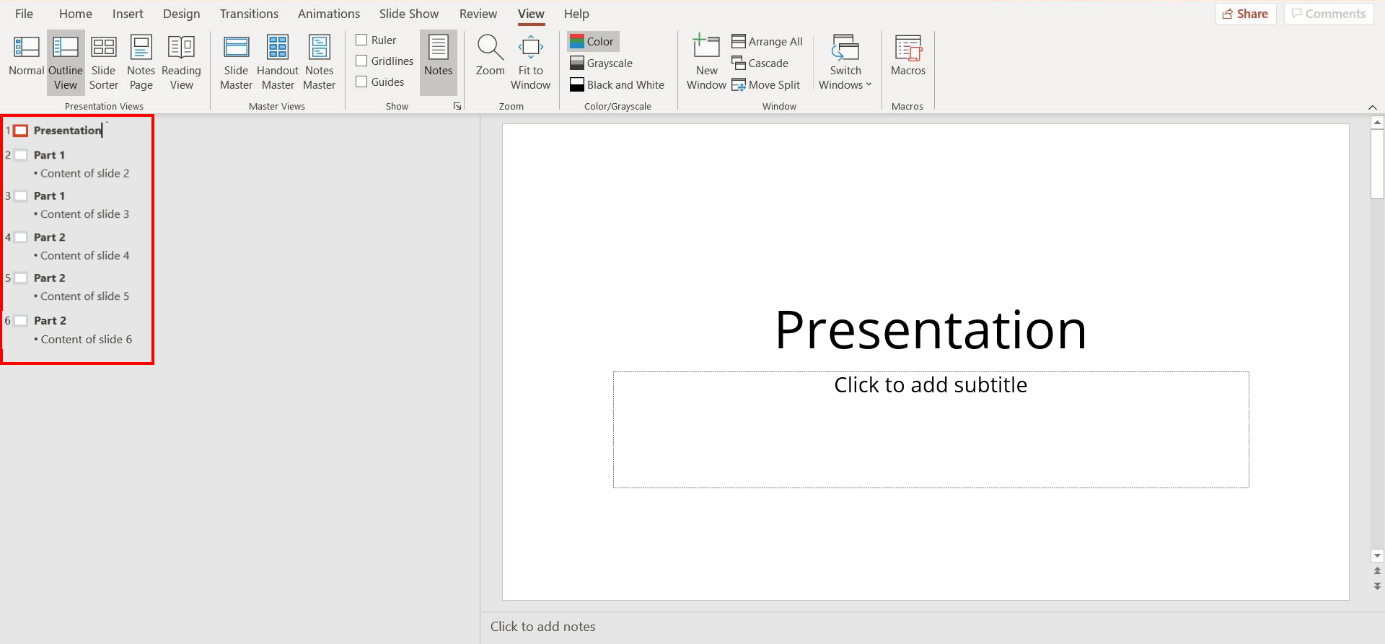
- In PowerPoint, locate the “Presentation Views” section and click on “Outline View.” In OpenOffice Impress, click on “Outline” in the task pane on the left side of the window.
- Alternatively, you can use the shortcut keys to switch to outline view. In PowerPoint, press “Alt+Shift+1”, and in OpenOffice Impress, press “Ctrl+Shift+O”.
Once you are in outline view, you will see your presentation displayed as a structured list of headings and subheadings. The text of each slide is displayed as a bulleted item, with the main points at the top level and supporting details indented below.
To exit outline view and return to the default slide view, simply click on the “Normal View” or “Slide View” button in the top navigation menu, or use the shortcut keys “Alt+Shift+2” in PowerPoint or “Ctrl+Shift+D” in OpenOffice Impress.
Note that outline view is available in most versions of PowerPoint and OpenOffice Impress, but the exact steps to access it may vary slightly depending on the version you are using. If you cannot locate the outline view option, refer to the software’s documentation or help resources for guidance.
Now that you know how to access outline view, you can take advantage of this powerful feature to effectively organize and structure your presentation content.
Navigating in Outline View
Navigating in outline view allows you to effectively navigate through the structure of your presentation’s content. Here are some helpful tips and techniques to make the most out of outline view:
- Scrolling: Use the scroll bar on the right side of the window to navigate up and down the outline. This allows you to view the entire content of your presentation and easily locate specific sections.
- Expanding and collapsing: In outline view, you can expand or collapse sections to focus on specific parts of your presentation. To collapse a section, click the “-” button next to the heading. To expand it again, click the “+” button. This feature is particularly useful for managing complex presentations with multiple levels of subheadings.
- Selection: Click on any heading or bullet point to select it. This highlights the selected text and allows you to perform various actions such as formatting, deleting, or moving the text.
- Keyboard shortcuts: Utilize keyboard shortcuts to navigate quickly in outline view. For example, press the down arrow key to move to the next item, and the up arrow key to move to the previous item. To promote or demote a selected item, use the “Tab” or “Shift+Tab” keys.
- Jumping to a specific slide: If you have a large presentation with numerous slides, it might be helpful to jump directly to a specific slide. Simply click on the desired slide in outline view, and it will be displayed in the main slide view. This allows you to quickly navigate to a specific part of your presentation without having to scroll through the entire outline.
- Searching for text: In some cases, you may need to locate specific text within your presentation. Many presentation software applications provide a search function that allows you to search for keywords or phrases. Look for the search bar or search icon within the outline view and enter your desired search term.
By utilizing these navigation techniques in outline view, you can easily move through the content of your presentation, focus on specific sections, and effectively manage the structure of your presentation. Whether you need to reorganize your content, make revisions, or review the flow of information, outline view provides a convenient and efficient way to navigate through your presentation’s outline and ensure a seamless presentation experience.
Creating and Formatting Text
In outline view, you can create and format the text of your presentation slides in a streamlined and efficient manner. Here are some tips for creating and formatting text in outline view:
- Adding text: To add a new slide or text, simply navigate to the desired location within the outline and start typing. Each line of text in the outline represents a slide or a bullet point within a slide.
- Formatting text: Outline view allows you to easily apply formatting to your text. To format text, select the desired heading or bullet point, and use the formatting options available in the toolbar. You can change the font, size, color, alignment, and other formatting attributes to match the style of your presentation.
- Applying styles: Another way to format text is by using pre-defined styles. Many presentation software applications provide a range of built-in styles that you can apply to your text with a single click. These styles ensure consistency and streamline the formatting process.
- Adding numbering or bullets: In outline view, you can easily add numbering or bullets to your text. Simply select the text or bullet point and click on the numbering or bullet icon in the toolbar. This helps to organize and structure your content, making it easier to follow and understand.
- Indentation: Outline view allows you to easily control the indentation of your text. You can promote or demote a bullet point or subheading by using the relevant buttons in the toolbar or by using the keyboard shortcuts. Indentation helps to create hierarchy and visually represents the level of importance or subordination of each point.
- Spell check: Most presentation software applications offer a spell-check feature that helps you identify and correct spelling errors. Take advantage of this feature to ensure your presentation has accurate and error-free text.
By using these techniques to create and format text in outline view, you can efficiently structure your presentation, ensure consistency, and enhance readability. Remember to save your work regularly and switch to the slide view to preview the visual impact of your formatting choices.
Promoting and Demoting Text
In outline view, you have the flexibility to promote or demote text to adjust the hierarchy and organization of your presentation. This feature allows you to easily reposition and restructure your content. Here are some tips for promoting and demoting text in outline view:
- Promoting text: To promote a bullet point or subheading, select the desired text and click on the “Promote” button in the toolbar or use the keyboard shortcut (often the “Tab” key). This action moves the selected text up one level in the hierarchy, making it a higher-level heading or subheading. Promoting text helps to emphasize its importance or elevate its position within the structure of your presentation.
- Demoting text: To demote a bullet point or subheading, select the desired text and click on the “Demote” button in the toolbar or use the keyboard shortcut (often “Shift+Tab”). This action moves the selected text down one level in the hierarchy, making it a lower-level heading or subheading. Demoting text allows you to create subtopics or provide additional details under a main point.
- Indentation: Another way to promote or demote text is by adjusting the indentation. In the toolbar, you will find indent buttons that allow you to increase or decrease the level of indentation for selected text. Similarly, you can use keyboard shortcuts to indent or outdent (in some software, the “Tab” and “Shift+Tab” keys).
- Reordering sections: Outline view enables you to easily reorder your sections by dragging and dropping them to new positions. This feature is especially useful when you want to rearrange the flow of your presentation or change the sequence of your main points.
- Visual representation: Promoted text appears more prominent and higher up in the outline, while demoted text is indented and visually subordinate. This visual representation helps you quickly identify the hierarchical structure of your content and ensure a logical progression throughout your presentation.
By utilizing the promoting and demoting features in outline view, you can easily adjust the structure and organization of your presentation content. Whether you need to highlight key points, create subtopics, or reorganize the flow of information, promoting and demoting text provides the flexibility and control you need to create a well-structured and visually appealing presentation.
Moving Text
In outline view, you have the ability to move text easily, allowing you to rearrange and reorganize the content of your presentation. Whether you need to change the order of your points or restructure your entire presentation, moving text in outline view is a convenient and efficient way to do so. Here are some tips on how to move text:
- Select the text: To move text, start by selecting the desired bullet point or section heading in the outline view. You can click and drag your mouse to select multiple paragraphs or headings.
- Drag and drop: Once the text is selected, simply click and hold on the selected text, then drag it to the desired location within the outline. You can move the text up or down the outline, rearranging its position as needed.
- Visual feedback: As you drag the text, the outline view will provide visual feedback by displaying a highlighted area that indicates where the text will be placed. This allows you to preview the new position before releasing the mouse button to drop the text.
- Repositioning subpoints: When moving a heading or a bullet point that has subpoints beneath it, the subpoints will move along with their parent. This ensures that the hierarchical structure of your content remains intact.
- Reorder sections: Moving text in outline view allows you to easily reorder sections or main points within your presentation. By dragging and dropping sections, you can change the sequence of your content and create a more logical flow.
- Refining and adjusting content: The ability to move text in outline view gives you the flexibility to refine and adjust the content of your presentation. You can experiment with different arrangements, rephrase points, or incorporate new information as needed.
By utilizing the simple drag and drop functionality in outline view, you can easily move text and restructure your presentation. This feature provides you with the freedom to organize your content in a way that best communicates your message, ensuring a cohesive and engaging presentation.
Collapsing and Expanding Text
In outline view, you have the ability to collapse and expand text for better organization and focus. This feature allows you to manage large presentations or complex sections by hiding or revealing content as needed. Here are some tips on how to collapse and expand text in outline view:
- Collapsing sections: To collapse a section, click on the “-” button next to the heading. This action hides the subpoints or content beneath the heading, providing a concise and streamlined view of your presentation. Collapsing sections is particularly useful when you want to temporarily remove distractions or focus on a specific part of your presentation.
- Expanding sections: To expand a collapsed section, click on the “+” button next to the heading. This action reveals the hidden subpoints or content, allowing you to view and work with the detailed information. Expanding sections is helpful when you need to review or revise specific points within your presentation.
- Collapsing all sections: Some presentation software applications offer the ability to collapse all sections at once. Look for the corresponding option in the toolbar or right-click menu. This feature can be useful when you want to quickly collapse your entire outline to get an overview of your presentation’s structure.
- Expanding all sections: Similarly, you may also have the option to expand all sections at once. This allows you to quickly expand your entire outline to see all the content within your presentation. Look for the corresponding option in the toolbar or right-click menu.
- Hierarchical view: When you collapse sections, you can see a high-level view of your presentation’s structure. This helps you identify the main points and their organization. It also allows you to easily navigate through larger presentations, enhancing efficiency and productivity.
- Flexible workflow: Collapsing and expanding text provides a flexible workflow, allowing you to focus on specific sections or dive deep into the details when needed. This feature is particularly useful when collaborating on presentations or when you need to present complex information in a coherent manner.
By utilizing the collapsing and expanding features in outline view, you can effectively manage your presentation’s content, improve organization, and maintain focus. This enhances your ability to navigate through your presentation and work with larger or more intricate presentations with ease.
Printing from Outline View
In outline view, you have the option to print your presentation in a concise and organized format. Printing from outline view allows you to have a physical copy of your presentation’s content for reference or distribution. Here are some tips on how to print from outline view:
- Accessing the print option: To print your presentation from outline view, navigate to the “File” or “Print” menu located in the top navigation bar. In some software applications, you may find a printer icon or a keyboard shortcut, such as “Ctrl+P” or “Command+P,” that takes you directly to the print options.
- Selecting print settings: Once you access the print options, you can customize various settings based on your printing needs. These settings may include the number of copies, paper size, orientation (portrait or landscape), and print range (all slides or specific pages). Adjust the settings according to your requirements.
- Previewing the printout: Many presentation software applications provide a preview window that allows you to see how your outline will appear when printed. Use this feature to review the formatting, layout, and overall appearance of the printed document. Make any necessary adjustments before going ahead with the print process.
- Paper options: Depending on your printer and the available options, you may be able to choose different paper types, such as plain paper or heavier stock. Consider the purpose and audience of your presentation and select an appropriate paper option to enhance the printed output.
- Printing multiple slides per page: In some cases, you may want to conserve paper or create handouts by printing multiple slides per page. This can be achieved by adjusting the settings in the print menu. Select the desired number of slides per page and preview the output to ensure readability.
- Print quality: When printing your presentation from outline view, make sure to select the desired print quality. Higher print quality will result in crisper text and images, but it may take longer and consume more ink or toner. Consider the importance and nature of your presentation before choosing the print quality option.
- Print to PDF: If you do not have access to a physical printer or prefer digital copies, many software applications offer the option to print to PDF. This creates a digital version of your presentation in PDF format, which can be easily shared, emailed, or archived.
By following these tips for printing from outline view, you can obtain a well-organized and professionally formatted printout of your presentation’s content. Printing from outline view allows you to have a tangible reference or handout for yourself, your audience, or your collaborators.
Collaboration and Exporting
Outline view not only facilitates individual content creation and organization but also promotes collaboration and enables the exporting of your presentation in various formats. Here are some key aspects to consider when it comes to collaboration and exporting:
- Collaboration: Outline view simplifies the collaboration process as multiple users can work on the same presentation simultaneously. Each collaborator can access and edit the outline view, making it easier to divide and conquer tasks, provide feedback, or contribute to the content creation process.
- Sharing the outline: By sharing the outline view of your presentation with collaborators, you can ensure everyone is on the same page. Whether you share it digitally or discuss it in person, the outline serves as a common reference point and helps maintain consistency in the overall structure and messaging of the presentation.
- Exporting options: Most presentation software applications allow you to export your presentation into different formats. You can export the outline as a plain text file, a PDF, or in a format that can be opened by other software applications. This flexibility ensures that your content is accessible and compatible with different systems and devices.
- Reuse and repurpose: Exporting the outline view provides the opportunity to repurpose your presentation content. You can use the exported outline as a basis for creating handouts, designing infographics, or transforming it into a script for a video presentation. This allows you to maximize the value of your content and adapt it to different formats and mediums.
- Importing and integrating: In some cases, you may need to import an existing outline into a new presentation. Presentation software applications generally allow you to import an outline file or copy and paste the content from one outline view to another. This facilitates the integration of previously created content and ensures consistency across multiple presentations.
- Version control: Collaborative work often involves multiple iterations and updates. Outline view makes it easier to manage different versions of the presentation by keeping track of changes and allowing collaborators to provide comments or suggestions. By leveraging version control features, you can ensure that the most recent version is always accessible to all stakeholders.
- Accessibility: Exporting the outline view into alternative formats enhances accessibility for individuals with different needs, such as those who require screen readers or those who prefer to view content in a simplified text format. By making your presentation content accessible, you can reach a wider audience and ensure inclusivity.
By leveraging the collaborative features and exporting capabilities inherent to outline view, you can streamline the collaboration process, repurpose your content, maximize the reach of your presentation, and ensure its accessibility to a broader audience.