
Removing the Battery
Removing the battery is often the first step when opening an HP laptop. Follow these steps to safely remove the battery:
1. Power off the laptop: Shut down the laptop completely by clicking on the “Start” button and selecting “Shut Down.”
2. Unplug the power cord: Disconnect the charger from the laptop to ensure there is no power supply.
3. Flip the laptop over: Turn the laptop upside down so that the bottom is facing up.
4. Locate the battery release latch: Look for a small latch or slider near the battery compartment.
5. Slide the latch to the unlock position: Slide the latch to the side or push it in to unlock the battery.
6. Remove the battery: While holding the latch in the unlock position, gently pull the battery out from the compartment.
7. Store the battery safely: Place the removed battery in a cool, dry place away from direct sunlight.
It is important to remove the battery before performing any internal repairs or upgrades to prevent any potential electrical hazards. By following these steps, you can safely remove the battery in no time.
Removing the Back Panel
Once you have removed the battery from your HP laptop, you may need to remove the back panel to gain access to the internal components. Here’s how you can remove the back panel:
1. Ensure the laptop is powered off and unplugged: Before proceeding, make sure your laptop is turned off and disconnected from any power sources.
2. Flip the laptop over: Carefully turn the laptop upside down, so the backside is facing up.
3. Locate the screws: Look for screws that secure the back panel in place. These screws are usually located along the bottom edge of the laptop.
4. Remove the screws: Use a screwdriver that matches the size of the screws and carefully remove them. Make sure to keep the screws in a safe place so that they don’t get misplaced.
5. Pry open the back panel: Once the screws are removed, gently insert a plastic opening tool or your fingers between the back panel and the laptop’s frame. Gradually apply pressure to separate the panel from the frame.
6. Continue prying open: Work your way around the edges of the back panel, gently prying it open. Be cautious not to rush or use excessive force, as this may damage the panel or other components.
7. Remove the back panel: Once the back panel is loosened on all sides, carefully lift it away from the laptop’s frame. Keep in mind that there may still be connectors or cables attached to the panel, so handle it with care.
With the back panel successfully removed, you now have access to the internal components of your HP laptop. It’s essential to exercise caution and patience during this process to avoid any accidental damage. Remember to keep track of the screws and cables for reassembly later.
Locating the Hard Drive
Before you can remove or upgrade the hard drive of your HP laptop, you need to locate its position. Follow these steps to find the hard drive:
1. Power off and unplug the laptop: Make sure your laptop is turned off and disconnected from any power sources.
2. Flip the laptop over: Carefully turn the laptop upside down so that the bottom side is facing up.
3. Remove the back panel: Refer to the previous section on removing the back panel and follow the steps to access the internal components.
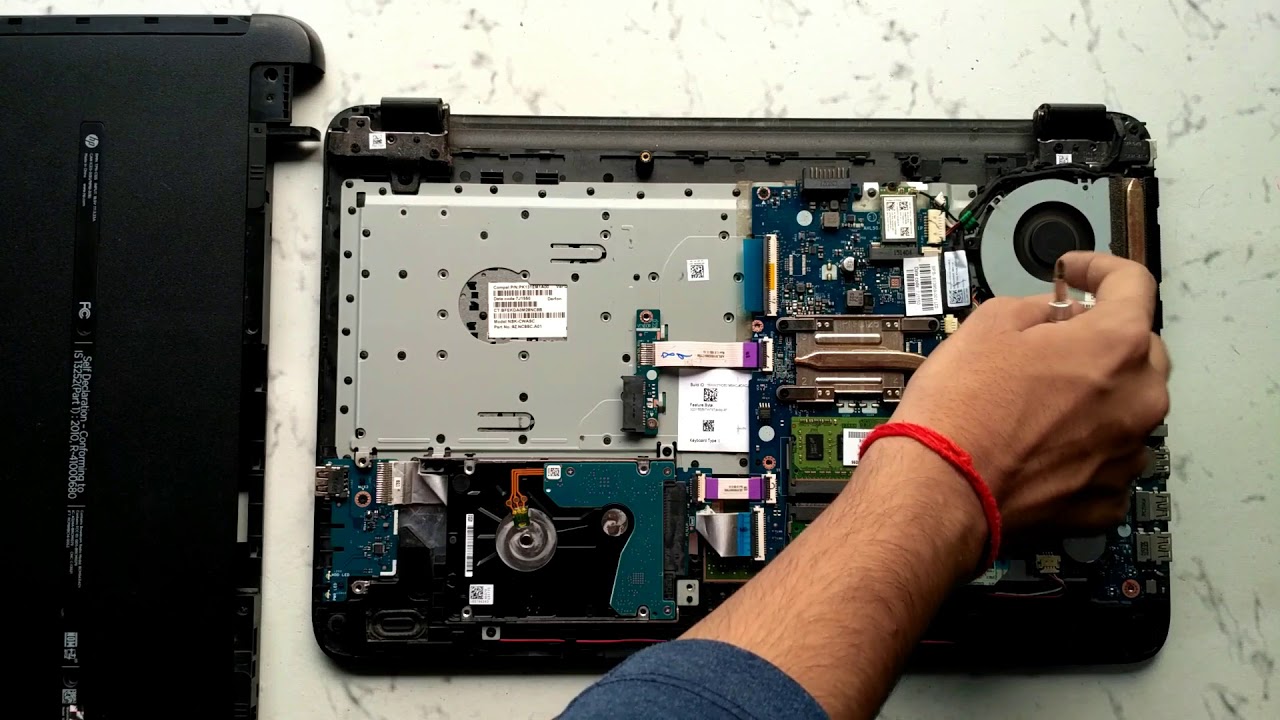
4. Identify the hard drive: Look for a rectangular-shaped component inside the laptop. It is usually located towards the center or side of the laptop, connected to the motherboard using cables or screws.
5. Check for labeling or markings: The hard drive may have a label indicating the make, model, or capacity. Look for any identification marks to confirm that you have found the correct component.
6. Note the connectors: Observe the cables or connectors attached to the hard drive. These connectors help to transfer data and power to the hard drive. Make a mental note or take a picture of their positions to facilitate easy reassembly.
By following these steps, you can easily locate the hard drive in your HP laptop. The location may vary slightly depending on the model, but it is typically found in a designated compartment accessible through the back panel. Once you have identified the hard drive, you can proceed with removing or upgrading it as needed.
Removing the Hard Drive
When it comes to replacing or upgrading the hard drive of your HP laptop, removing the existing one is necessary. Follow these steps to remove the hard drive:
1. Power off and unplug the laptop: Ensure your laptop is turned off and disconnected from any power sources before proceeding.
2. Flip the laptop over: Carefully turn the laptop upside down, with the bottom side facing up.
3. Remove the back panel: Refer to the previous section on removing the back panel and follow the steps to access the internal components.
4. Locate the hard drive: Identify the hard drive component inside the laptop. It is typically a rectangular-shaped device connected to the motherboard with cables or screws.
5. Disconnect the cables: Gently unplug the cables attached to the hard drive. Most modern laptops feature a SATA connector for data and a power connector. Carefully remove both connectors to disconnect the hard drive from the motherboard.
6. Remove screws, if applicable: Some hard drives may be secured by screws. If this is the case, use a screwdriver to carefully remove the screws and set them aside in a safe place for later use.
7. Slide out the hard drive: Once the cables are disconnected and screws removed, gently slide the hard drive out of its compartment.
8. Store the hard drive safely: If you are not replacing the hard drive immediately, store it in an anti-static bag or a safe place away from dust and moisture.
It’s important to handle the hard drive with care during removal to avoid any damage. By following these steps, you can successfully remove the existing hard drive from your HP laptop and proceed with upgrading or replacing it to suit your needs.
Installing a New Hard Drive
If you’ve acquired a new hard drive for your HP laptop, you can now proceed with installing it. Follow these steps to install a new hard drive:
1. Power off and unplug the laptop: Make sure your laptop is turned off and disconnected from any power sources before proceeding.
2. Flip the laptop over: Carefully turn the laptop upside down, so the bottom side is facing up.
3. Remove the back panel: Refer to the earlier section on removing the back panel and follow the steps to access the internal components.
4. Locate the empty hard drive bay: In some laptops, there may be a dedicated bay for additional hard drives. Identify the empty bay, usually positioned nearby the location of the existing hard drive.
5. Insert the new hard drive: Position the new hard drive carefully in the empty bay, ensuring the connectors align with the corresponding sockets in the laptop.
6. Secure the hard drive: If there are screws provided with the new hard drive or from the previous installation, use them to secure the hard drive in place. Tighten the screws gently to avoid damaging the components.
7. Connect the cables: Attach the SATA data cable and power cable to the new hard drive. Ensure they are securely plugged in to provide data and power connectivity.
8. Replace the back panel: Place the back panel back onto the laptop’s frame. Align it correctly and ensure all the edges are properly aligned. Secure the panel by tightening the screws that you removed in the earlier steps.
9. Power on the laptop: Finally, power on your laptop and check if the new hard drive is recognized in the system. You may need to format and partition the new drive before it can be used for storage.
By following these steps, you can successfully install a new hard drive in your HP laptop. Ensure that you handle the components with care and work in a static-free environment to prevent any static discharge damage. Enjoy the increased storage capacity and improved performance with your new hard drive!
Accessing the RAM
If you’re looking to upgrade or replace the RAM (Random Access Memory) in your HP laptop, you’ll need to access it first. Here’s how you can access the RAM:
1. Power off and unplug the laptop: Before working on any internal components, ensure your laptop is turned off and disconnected from any power sources.
2. Flip the laptop over: Gently turn the laptop upside down, so the bottom side is facing up.
3. Remove the back panel: Refer to the earlier section on removing the back panel and follow the steps to access the internal components.
4. Locate the RAM slots: The RAM slots are usually located near the center or edge of the laptop’s motherboard. They are rectangular slots with small metal clips on each side to hold the RAM sticks in place.
5. Identify the existing RAM sticks: Take note of the existing RAM sticks installed in the laptop. This will help you determine the type of RAM you can upgrade or replace with.
6. Release the clips: Gently spread the metal clips on each side of the RAM slot to release the existing RAM stick. Apply equal pressure on both sides until the RAM stick pops up at a slight angle.
7. Remove the RAM stick: Pull the RAM stick out of the slot by holding it at the edges. Be careful not to touch the gold contacts on the bottom of the stick, as it may damage the RAM module.
8. Repeat for additional RAM sticks: If your laptop has multiple RAM slots, repeat steps 6 and 7 for each RAM stick you wish to replace or upgrade.
By following these steps, you can easily access the RAM in your HP laptop. Remember to handle the RAM sticks with care, avoiding excessive force or touching the metal contacts. This will help ensure a successful RAM upgrade or replacement and improve your laptop’s performance.
Upgrading the RAM
Upgrading the RAM (Random Access Memory) in your HP laptop can significantly improve its performance and multitasking capabilities. Follow these steps to upgrade the RAM:
1. Access the RAM slots: Refer to the previous section on accessing the RAM and follow the steps to access the RAM slots.
2. Determine compatible RAM: Check your laptop’s specifications or consult the manufacturer’s website to identify the compatible RAM type and maximum supported capacity.
3. Purchase the new RAM: Purchase the appropriate RAM modules according to the specifications of your laptop. Make sure to buy from a reliable and reputable manufacturer.
4. Handle the RAM modules with care: Before installing the new RAM, ensure that you are working in a static-free environment. Avoid touching the gold contacts on the bottom of the RAM modules to prevent any damage.
5. Insert the new RAM: Align the notch on the RAM module with the slot in the RAM slot. Gently insert the RAM module into the slot at a slight angle and press down until the metal clips on both sides snap into place.
6. Verify installation: Once you have inserted the new RAM modules, ensure that they are securely seated in the slots. Check that the metal clips are engaged properly.
7. Replace the back panel: Put the back panel back onto the laptop’s frame. Align it correctly and ensure all the edges are properly aligned. Secure the panel by tightening the screws.
8. Power on the laptop: Power on your laptop and check the system information to verify that the new RAM has been recognized correctly. You may also run a memory test to ensure proper functionality.
By following these steps, you can successfully upgrade the RAM in your HP laptop. Once the upgrade is complete, you should notice improved performance and the ability to run more demanding applications and multitask with ease.
Removing the CD/DVD Drive
If you no longer use the CD/DVD drive in your HP laptop or need to replace it with a different device, removing it is a simple process. Follow these steps to remove the CD/DVD drive:
1. Power off and unplug the laptop: Before working on any internal components, make sure your laptop is turned off and disconnected from any power sources.
2. Flip the laptop over: Gently turn the laptop upside down, so the bottom side is facing up.
3. Remove the back panel: Refer to the earlier section on removing the back panel and follow the steps to access the internal components.
4. Locate the CD/DVD drive: The CD/DVD drive is usually located towards the front or side of the laptop, secured by screws or clips.
5. Remove the securing screws or clips: If there are screws holding the CD/DVD drive in place, use a screwdriver to carefully remove them. If there are clips, gently push or slide them to release the drive.
6. Gently slide out the CD/DVD drive: Once the screws or clips are removed, gently pull the CD/DVD drive out of its slot. Be cautious not to apply excessive force or damage the connectors.
7. Store the CD/DVD drive: If you are not replacing the drive immediately or don’t plan to use it in the future, store it safely in an anti-static bag or a secure location.
With the CD/DVD drive removed, you can now consider alternative options such as installing a different type of drive or leaving the slot empty for a more streamlined design. Remember to handle the drive and laptop components with care during the removal process.
Installing or Upgrading the CD/DVD Drive
If you need to install a new CD/DVD drive or upgrade your existing one in your HP laptop, follow these steps to complete the installation:
1. Power off and unplug the laptop: Before working on any internal components, ensure your laptop is turned off and disconnected from any power sources.
2. Flip the laptop over: Gently turn the laptop upside down, so the bottom side is facing up.
3. Remove the back panel: Refer to the earlier section on removing the back panel and follow the steps to access the internal components.
4. Obtain a compatible CD/DVD drive: Ensure that you purchase a CD/DVD drive that is compatible with your HP laptop model. Check the specifications or consult the manufacturer’s website for the correct specifications.
5. Slide the new drive into the slot: Carefully slide the new CD/DVD drive into the empty slot in the laptop. Ensure that the connectors on the drive align with the corresponding connectors in the laptop.
6. Secure the drive: If there are screws provided with the new CD/DVD drive, use them to secure the drive in place. Tighten the screws gently to avoid damaging the drive or other components.
7. Replace the back panel: Put the back panel back onto the laptop’s frame. Align it correctly and ensure all the edges are properly aligned. Secure the panel by tightening the screws.
8. Power on the laptop: Power on your laptop and wait for the system to recognize the newly installed CD/DVD drive. Ensure that it appears in the device manager or the BIOS/UEFI settings.
9. Install necessary software and drivers: If required, install any necessary software or drivers for the CD/DVD drive to ensure optimal performance.
By following these steps, you can successfully install or upgrade the CD/DVD drive in your HP laptop. Enjoy the convenience of using CDs or DVDs for data storage, software installations, or multimedia playback with your newly installed or upgraded drive.
Removing the Keyboard
If you need to replace a faulty keyboard or clean it thoroughly, removing the keyboard from your HP laptop is usually necessary. Follow these steps to safely remove the keyboard:
1. Power off and unplug the laptop: Before working on any internal components, ensure your laptop is turned off and disconnected from any power sources.
2. Flip the laptop over: Gently turn the laptop upside down so that the bottom side is facing up.
3. Remove the back panel: Refer to the earlier section on removing the back panel and follow the steps to access the internal components.
4. Identify the keyboard screws: Look for screws or tabs near the top of the keyboard, usually located on the top corners or sides.
5. Remove the screws or tabs: Use a screwdriver or your fingers to carefully remove the screws or push tabs securing the keyboard in place.
6. Lift the keyboard: Once the screws or tabs are removed, gently lift the keyboard from the top. Be cautious not to pull too hard, as there may be delicate ribbon cables connecting the keyboard to the laptop.
7. Disconnect the ribbon cables: Locate the ribbon cables connecting the keyboard to the laptop’s motherboard. Carefully unlock the connector by lifting the small plastic tab and gently slide out the ribbon cables.
8. Remove the keyboard: With the ribbon cables detached, you can now fully remove the keyboard from your laptop.
Remember to handle the keyboard and ribbon cables with care to avoid any damage. If you’re only cleaning the keyboard, you can use compressed air or a soft brush to remove dust and debris. If you’re replacing the keyboard, ensure that you have the correct replacement model compatible with your HP laptop.
Replacing the Keyboard
If you need to replace a faulty or damaged keyboard in your HP laptop, follow these steps to successfully replace it:
1. Power off and unplug the laptop: Before working on any internal components, ensure your laptop is turned off and disconnected from any power sources.
2. Flip the laptop over: Gently turn the laptop upside down so that the bottom side is facing up.
3. Remove the back panel: Refer to the earlier section on removing the back panel and follow the steps to access the internal components.
4. Obtain a replacement keyboard: Make sure to purchase a replacement keyboard that is compatible with your specific HP laptop model. Verify the specifications and connectivity before purchasing.
5. Disconnect the ribbon cables: Locate the ribbon cables that connect the keyboard to the laptop’s motherboard. Carefully unlock the connector by lifting the small plastic tab and gently slide out the ribbon cables.
6. Remove the faulty keyboard: With the ribbon cables detached, you can now fully remove the faulty keyboard from your laptop.
7. Install the replacement keyboard: Align the new keyboard with the slots on the laptop’s chassis. Make sure it sits evenly and the screw holes match up.
8. Reconnect the ribbon cables: Gently insert the ribbon cables back into their respective connectors on the laptop’s motherboard. Ensure they are securely connected by pushing the small plastic tabs back down.
9. Secure the keyboard: If there were screws or tabs holding the old keyboard in place, use them to secure the new keyboard. Insert and tighten the screws or push the tabs back into place.
10. Replace the back panel: Put the back panel back onto the laptop’s frame. Align it correctly and ensure all the edges are properly aligned. Secure the panel by tightening the screws.
11. Power on the laptop: Power on your laptop, and test the new keyboard to ensure all keys are functioning properly.
By following these steps, you can successfully replace the keyboard in your HP laptop. Enjoy a fully functional keyboard and resume your computing tasks with ease.
Removing the Touchpad
If you need to replace or repair the touchpad in your HP laptop, you will need to remove it first. Follow these steps to safely remove the touchpad:
1. Power off and unplug the laptop: Before working on any internal components, ensure your laptop is turned off and disconnected from any power sources.
2. Flip the laptop over: Gently turn the laptop upside down, so the bottom side is facing up.
3. Remove the back panel: Refer to the earlier section on removing the back panel and follow the steps to access the internal components.
4. Locate the touchpad: The touchpad is typically positioned near the center of the laptop, below the keyboard. It is a rectangular-shaped component with a smooth surface.
5. Disconnect the touchpad ribbon cable: Locate the ribbon cable that connects the touchpad to the laptop’s motherboard. Carefully unlock the connector by lifting the small plastic tab and gently slide out the ribbon cable.
6. Remove any securing screws: Depending on the laptop model, there may be screws securing the touchpad in place. Use a screwdriver to remove any screws found near the touchpad.
7. Gently lift the touchpad: Once the ribbon cable and securing screws are detached, you can gently lift the touchpad from the laptop’s chassis. Be cautious not to apply excessive force.
When removing the touchpad, ensure you handle it with care to avoid any damage. If you’re replacing the touchpad, make sure to purchase a compatible replacement that matches your HP laptop model. If you’re cleaning the touchpad, use a soft cloth or an approved cleaning solution suitable for electronics. Remember to follow the manufacturer’s instructions and recommendations for cleaning.
Installing a New Touchpad
If you need to install a new touchpad in your HP laptop or replace a faulty one, follow these steps for a successful installation:
1. Power off and unplug the laptop: Ensure your laptop is turned off and disconnected from any power sources before proceeding.
2. Flip the laptop over: Gently turn the laptop upside down, so the bottom side is facing up.
3. Remove the back panel: Refer to the earlier section on removing the back panel and follow the steps to access the internal components.
4. Obtain a compatible replacement touchpad: Ensure you purchase a touchpad that is compatible with your specific HP laptop model. Verify the specifications and connectivity requirements before making a purchase.
5. Insert the new touchpad: Align the new touchpad with the slot in the laptop’s chassis. Make sure it sits evenly and aligns with the screw holes if any.
6. Connect the touchpad ribbon cable: Carefully insert the touchpad ribbon cable into the correct connector on the laptop’s motherboard. Make sure it is securely connected by pushing down the small plastic tab.
7. Secure the touchpad: If there were any screws that secured the previous touchpad, use them to secure the new touchpad in place. Insert and tighten the screws as necessary.
8. Replace the back panel: Put the back panel back onto the laptop’s frame. Align it correctly and ensure all the edges are properly aligned. Secure the panel by tightening the screws.
9. Power on the laptop: Power on your laptop and test the new touchpad to ensure it is working correctly. Move your finger across the touchpad, and check if the cursor responds accurately.
By following these steps, you can successfully install a new touchpad in your HP laptop. Enjoy the smooth and responsive operation of your new touchpad, and resume your tasks with ease.
Opening the Screen Assembly
If you need to perform repairs or replacements to the display or internal components of the screen assembly in your HP laptop, you’ll first need to open it. Follow these steps to safely open the screen assembly:
1. Power off and unplug the laptop: Before working on any internal components, ensure your laptop is turned off and disconnected from any power sources.
2. Be cautious of the screen: The screen is fragile and can be easily damaged. Handle it with care throughout the process to avoid any cracks or breakages.
3. Identify the display bezel: The display bezel is the frame surrounding the screen. It is usually made of plastic or metal.
4. Locate and remove the screws or clips: Look for screws or clips that secure the display bezel to the laptop’s chassis. The number and position of screws/clips may vary depending on the laptop model.
5. Use a plastic opening tool: Insert a plastic opening tool or a thin and flat object, such as a plastic card or guitar pick, between the display bezel and the laptop’s chassis. Carefully and gently move the tool along the edges to detach the display bezel.
6. Separate the display bezel: Continue to slide the plastic opening tool along the edges, gently separating the display bezel from the laptop’s chassis. Be cautious not to use excessive force to prevent damaging the bezel or the screen.
7. Lift and remove the display bezel: Once the display bezel is fully detached, carefully lift and remove it from the laptop’s chassis. Place it in a safe location, ensuring it is protected from any damage.
With the screen assembly opened, you now have access to the internal components and can proceed with necessary repairs or replacements. Remember to be patient and gentle throughout the process to avoid any accidental damage to the screen or other components.
Replacing the Screen Assembly
If you need to replace the entire screen assembly of your HP laptop due to a damaged or malfunctioning display, follow these steps for a successful replacement:
1. Power off and unplug the laptop: Ensure your laptop is turned off and disconnected from any power sources before proceeding.
2. Open the screen assembly: Refer to the earlier section on opening the screen assembly and follow the steps to safely open it.
3. Disconnect the display cable: Locate the display cable that connects the screen assembly to the laptop’s motherboard. Carefully unplug the cable from its connector by gently pulling it straight out. Note the position and orientation of the cable for later reassembly.
4. Remove any screws holding the screen: Look for screws securing the screen assembly to the laptop’s chassis. Use a screwdriver to carefully remove these screws, keeping them in a safe place for reassembly.
5. Gently lift the screen assembly: With the screws removed, carefully lift the screen assembly from the laptop’s chassis. Support the screen assembly from behind to avoid any undue stress on the screen itself.
6. Place the new screen assembly: Take the replacement screen assembly and position it in the same orientation as the original one. Align the screw holes and ensure the display cable can reach its connector on the laptop’s motherboard.
7. Secure the new screen assembly: Insert and tighten the screws that held the original screen assembly in place. Be careful not to overtighten the screws, as it could damage the screen or the laptop’s chassis.
8. Reconnect the display cable: Carefully plug the display cable back into its connector on the laptop’s motherboard. Ensure it is fully inserted and secure.
9. Close the screen assembly: Gently lower the screen assembly back onto the laptop’s chassis. Align it properly and ensure it sits flush. Avoid applying excessive pressure to the screen.
10. Power on the laptop: Power on your laptop and check the new screen assembly for proper functionality. Verify that it displays content correctly and responds to your inputs.
By following these steps, you can successfully replace the screen assembly of your HP laptop. Enjoy a crisp and clear display once again, allowing you to resume your work or entertainment with confidence.