
Importance of Merging Microsoft Word Documents
Merging Microsoft Word documents is a crucial task that can save you time, effort, and ensure a streamlined workflow. Whether you are collaborating on a project with colleagues, combining multiple drafts into a final version, or merging different chapters of a book, the ability to merge documents seamlessly is essential. Here are key reasons why merging Microsoft Word documents is important:
- Consolidation of Content: One of the primary benefits of merging documents is the ability to consolidate all relevant information into a single file. Instead of searching through multiple files, you can have all the content in one place, making it easier to organize, review, and edit.
- Enhanced Collaboration: Merging is especially valuable when working on group projects or documents that require input from multiple contributors. By merging individual contributions, you can ensure that all ideas, edits, and revisions are included, creating a comprehensive and cohesive document.
- Seamless Document Flow: When creating a document that spans multiple sections or chapters, merging allows for a smooth transition between different parts. It eliminates the need to manually copy and paste content, ensuring a consistent layout and formatting throughout the document.
- Improved Organization: Merging documents helps maintain a more organized file structure. Instead of dealing with a cluttered folder containing numerous individual files, you can store related documents together, simplifying file management and reducing the risk of misplacing important files.
- Efficiency and Time-saving: The ability to merge documents saves time and increases efficiency. Instead of opening and closing multiple files, you can merge them into a single document, eliminating the need for repetitive actions and improving productivity.
Merging Microsoft Word documents is a valuable skill that streamlines collaboration, improves organization, and saves time. By consolidating content, enhancing collaboration, ensuring a seamless document flow, and boosting efficiency, you can create professional and polished documents that effectively convey your message. Now that we understand the importance of merging documents, let’s explore various methods to merge Microsoft Word documents.
Understanding the Different Methods of Merging
When it comes to merging Microsoft Word documents, there are multiple methods you can use, depending on your specific needs and preferences. Each method offers its own set of features and functions, allowing you to choose the one that best suits your requirements. Let’s explore the different methods of merging:
- Method 1: Copying and Pasting Content: This is a simple and straightforward method where you copy the content from one document and paste it into another. It is useful for merging smaller sections of text or specific elements, such as paragraphs or tables. However, this method can be time-consuming if you have to merge large amounts of content or maintain the formatting.
- Method 2: Using the Insert Object Feature: This method involves using the “Insert Object” feature to merge documents. You select the document you want to merge and insert it as an object into the primary document. This method is beneficial for combining entire documents while preserving their original formatting. However, it may result in larger file sizes and can be less flexible when it comes to editing the merged content.
- Method 3: Using the Combine Documents Feature: Microsoft Word offers a built-in feature called “Combine Documents” that allows you to merge multiple documents into a single file. This method is efficient and time-saving, as it automatically combines the selected documents while maintaining formatting and updating page numbering. It is particularly useful when merging larger documents or when there are multiple contributors involved.
- Method 4: Using the Compare and Combine Feature: This method is useful when you need to merge documents that have been edited separately. The “Compare and Combine” feature in Microsoft Word helps identify and reconcile differences between two or more versions of a document. It highlights the changes and allows you to merge the modifications into a single document, making it ideal for collaboration and revision.
Understanding the different methods of merging in Microsoft Word gives you the flexibility to choose the most suitable approach based on your specific merging requirements. Whether you need to merge smaller sections of text, combine entire documents while preserving formatting, or reconcile changes made in separate versions, Microsoft Word provides the necessary tools to accomplish these tasks. In the following sections, we will explore each method in detail and provide step-by-step instructions for merging Microsoft Word documents. Let’s start with Method 1: Copying and Pasting Content.
Method 1: Copying and Pasting Content
Copying and pasting content is a simple yet effective method to merge Microsoft Word documents. This method is especially useful when you only need to merge smaller sections of text or specific elements, like paragraphs or tables. Here’s how you can merge documents using this method:
- Step 1: Open the primary Word document where you want to merge the content.
- Step 2: Open the secondary Word document from which you want to copy the content.
- Step 3: Select the content that you want to merge. You can do this by clicking and dragging your cursor over the desired text, or by pressing Ctrl + A to select everything in the document.
- Step 4: Right-click on the selected content and choose “Copy” from the context menu. Alternatively, you can press Ctrl + C to copy the content.
- Step 5: Go back to the primary Word document and navigate to the location where you want to insert the merged content.
- Step 6: Right-click in the desired location and choose “Paste” from the context menu. Alternatively, you can press Ctrl + V to paste the copied content.
- Step 7: Repeat steps 2-6 for any additional Word documents you want to merge into the primary document.
- Step 8: Review the merged content and make any necessary adjustments, such as formatting or alignment.
By following these steps, you can merge Microsoft Word documents by copying and pasting content. While this method is suitable for merging smaller sections or specific elements, it may become time-consuming and tedious if you need to merge large amounts of content or maintain complex formatting. In such cases, it may be more efficient to explore alternative methods, such as using the “Combine Documents” feature or the “Compare and Combine” feature. In the next sections, we will delve into these methods and provide step-by-step instructions to help you merge your Microsoft Word documents effortlessly.
Steps to Merge Documents by Copying and Pasting
Merging Microsoft Word documents using the copy and paste method is a straightforward process. Follow these steps to successfully merge your documents:
- Step 1: Open the primary document in Microsoft Word, which will serve as the destination for the merged content.
- Step 2: Open the secondary document from which you want to copy the content. You can do this by going to “File” in the menu bar, selecting “Open,” and navigating to the location of the document.
- Step 3: Select the content that you want to merge. This can be a specific section, paragraphs, or tables. To select all the content in the document, press Ctrl + A.
- Step 4: Right-click on the selected content and choose “Copy” from the context menu. Alternatively, you can press Ctrl + C to copy the content.
- Step 5: Return to the primary document and navigate to the location where you want to insert the merged content.
- Step 6: Right-click in the desired location and choose “Paste” from the context menu. Alternatively, you can press Ctrl + V to paste the copied content.
- Step 7: Repeat steps 2-6 for any additional documents you want to merge into the primary document.
- Step 8: Review the merged content and make any necessary adjustments, such as formatting, alignment, or fixing any broken links or references.
- Step 9: Save the merged document by going to “File” in the menu bar and selecting “Save” or “Save As.” Choose a location and name for your merged document.
Following these steps will enable you to merge multiple Microsoft Word documents by copying and pasting content. It’s important to review the merged document carefully to ensure that the formatting is consistent and all content has been successfully merged. If you encounter any issues, double-check the original documents for formatting inconsistencies or compatibility issues. Consider using other merging methods, such as the “Combine Documents” feature or the “Compare and Combine” feature, if you need to merge larger documents or preserve complex formatting. In the next sections, we will explore these methods in detail, providing step-by-step instructions to help you seamlessly merge your Microsoft Word documents.
Method 2: Using the Insert Object Feature
The Insert Object feature in Microsoft Word allows you to merge documents by inserting them as objects. This method is particularly useful when you want to combine entire documents while preserving their original formatting. Here’s how you can merge documents using the Insert Object feature:
- Step 1: Open the primary Word document where you want to insert the merged content.
- Step 2: Go to the location where you want to insert the secondary document.
- Step 3: Click on the “Insert” tab in the menu bar and select “Object.” This will open the Object dialog box.
- Step 4: In the Object dialog box, switch to the “Create from file” tab.
- Step 5: Click on the “Browse” button and navigate to the location of the secondary Word document.
- Step 6: Select the document and click on the “Insert” button.
- Step 7: Optional: Check the “Display as icon” checkbox if you want the merged document to appear as an icon in the primary document. This can be useful if you have multiple merged documents and want to save space.
- Step 8: Click on the “OK” button to insert the secondary document as an object into the primary document.
- Step 9: Resize and reposition the object as needed by clicking and dragging its edges or corners.
- Step 10: Save the merged document by going to “File” in the menu bar and selecting “Save” or “Save As.” Choose a location and name for your merged document.
By following these steps, you can merge Microsoft Word documents using the Insert Object feature. This method allows you to combine entire documents while preserving their original formatting. You can resize and reposition the inserted object to fit your desired layout. However, keep in mind that using the Insert Object feature may result in larger file sizes, and editing the merged content can be less flexible compared to other methods. In the next sections, we will explore additional merging methods, such as using the “Combine Documents” feature and the “Compare and Combine” feature, which offer different advantages and functionalities for merging Microsoft Word documents.
Steps to Merge Documents Using Insert Object
Merging Microsoft Word documents using the Insert Object feature allows you to combine entire documents while preserving their formatting. Follow these steps to merge your documents:
- Step 1: Open the primary document in Microsoft Word, where you want to insert the merged content.
- Step 2: Navigate to the location in the primary document where you want to insert the secondary document.
- Step 3: Click on the “Insert” tab in the menu bar.
- Step 4: Click on the “Object” button in the “Text” group. This will open the Object dialog box.
- Step 5: In the Object dialog box, switch to the “Create from file” tab.
- Step 6: Click on the “Browse” button and navigate to the location of the secondary Word document.
- Step 7: Select the document and then click on the “Insert” button.
- Step 8: Optional: If you want the merged document to appear as an icon in the primary document, check the “Display as icon” checkbox in the “Object” dialog box.
- Step 9: Click on the “OK” button to insert the secondary document as an object into the primary document.
- Step 10: Resize and reposition the object as needed by clicking and dragging its edges or corners.
- Step 11: Review the merged document to ensure that the formatting and content have been preserved as desired.
- Step 12: Save the merged document by going to “File” in the menu bar and selecting “Save” or “Save As.” Choose a location and name for your merged document.
By following these steps, you can merge Microsoft Word documents using the Insert Object feature. This method allows you to combine entire documents while maintaining their original formatting. Remember to resize and reposition the inserted object to fit your desired layout. However, keep in mind that using the Insert Object feature may result in larger file sizes, and editing the merged content might be less flexible compared to other methods. In the next sections, we will explore additional merging methods, such as using the “Combine Documents” feature and the “Compare and Combine” feature, which offer different advantages and functionalities for merging Word documents.
Method 3: Using the Combine Documents Feature
The Combine Documents feature in Microsoft Word is a built-in function that allows you to seamlessly merge multiple documents into a single file. This method is efficient and time-saving, particularly when merging larger documents or collaborating with multiple contributors. Here’s how you can merge documents using the Combine Documents feature:
- Step 1: Open Microsoft Word and create a new document that will serve as the destination for the merged documents.
- Step 2: Go to the “Review” tab in the menu bar.
- Step 3: Click on the “Compare” button in the “Compare” group, and then select “Combine” from the dropdown menu. This will open the Combine Documents dialog box.
- Step 4: Click on the “Add Files” button in the Combine Documents dialog box.
- Step 5: Browse and select the documents you want to merge. You can hold the Ctrl key to select multiple documents.
- Step 6: Click on the “Insert” button to add the selected documents to the list of files to be merged.
- Step 7: Optional: Use the “Up” and “Down” buttons to rearrange the order of the documents in the list if needed.
- Step 8: Click on the “OK” button to start the merging process.
- Step 9: Review the merged document and make any necessary adjustments, such as formatting, section breaks, or page numbering.
- Step 10: Save the merged document by going to “File” in the menu bar and selecting “Save” or “Save As.” Choose a location and name for your merged document.
By following these steps, you can use the Combine Documents feature in Microsoft Word to efficiently merge multiple documents into a single file. This method ensures that formatting and layout are preserved, making it ideal for merging larger documents or collaborating on joint projects. Remember to review the merged document carefully and make any necessary adjustments to ensure a seamless integration. In the next sections, we will explore additional merging methods, such as using the “Copy and Paste” feature and the “Compare and Combine” feature, which offer different functionalities for merging Microsoft Word documents.
Steps to Merge Documents Using Combine Documents
Merging multiple Microsoft Word documents can be done easily using the Combine Documents feature in Microsoft Word. Follow these steps to merge your documents:
- Step 1: Open Microsoft Word and create a new document that will serve as the destination for the merged documents.
- Step 2: Go to the “Review” tab in the menu bar.
- Step 3: Click on the “Compare” button in the “Compare” group, and then select “Combine” from the dropdown menu. This will open the Combine Documents dialog box.
- Step 4: Click on the “Add Files” button in the Combine Documents dialog box.
- Step 5: Browse and select the documents you want to merge. Hold the Ctrl key to select multiple documents, or use Shift to select a range of documents.
- Step 6: Click on the “Insert” button to add the selected documents to the list of files to be merged.
- Step 7: Use the “Up” and “Down” buttons to rearrange the order of the documents in the list, if needed.
- Step 8: Click on the “OK” button to start the merging process.
- Step 9: Review the merged document. Check for any formatting issues, section breaks, or page numbering inconsistencies that may have occurred during the merging process.
- Step 10: Make necessary adjustments to the merged document to ensure a seamless integration. This may include reformatting, adjusting margins, correcting numbering, or applying styles uniformly.
- Step 11: Save the merged document by going to “File” in the menu bar and selecting “Save” or “Save As.” Choose a location and name for your merged document.
Following these steps will allow you to merge multiple Microsoft Word documents using the Combine Documents feature. It is an efficient method that preserves formatting and layout, making it ideal for merging larger documents or collaborating on joint projects. However, after the merging process, it is important to carefully review the merged document for any formatting inconsistencies or inconsistencies in page numbering or section breaks. By making necessary adjustments, you can ensure a seamless integration of the merged documents. In the next sections, we will explore additional merging methods, such as using the “Copy and Paste” feature and the “Compare and Combine” feature, which offer different functionalities for merging Microsoft Word documents.
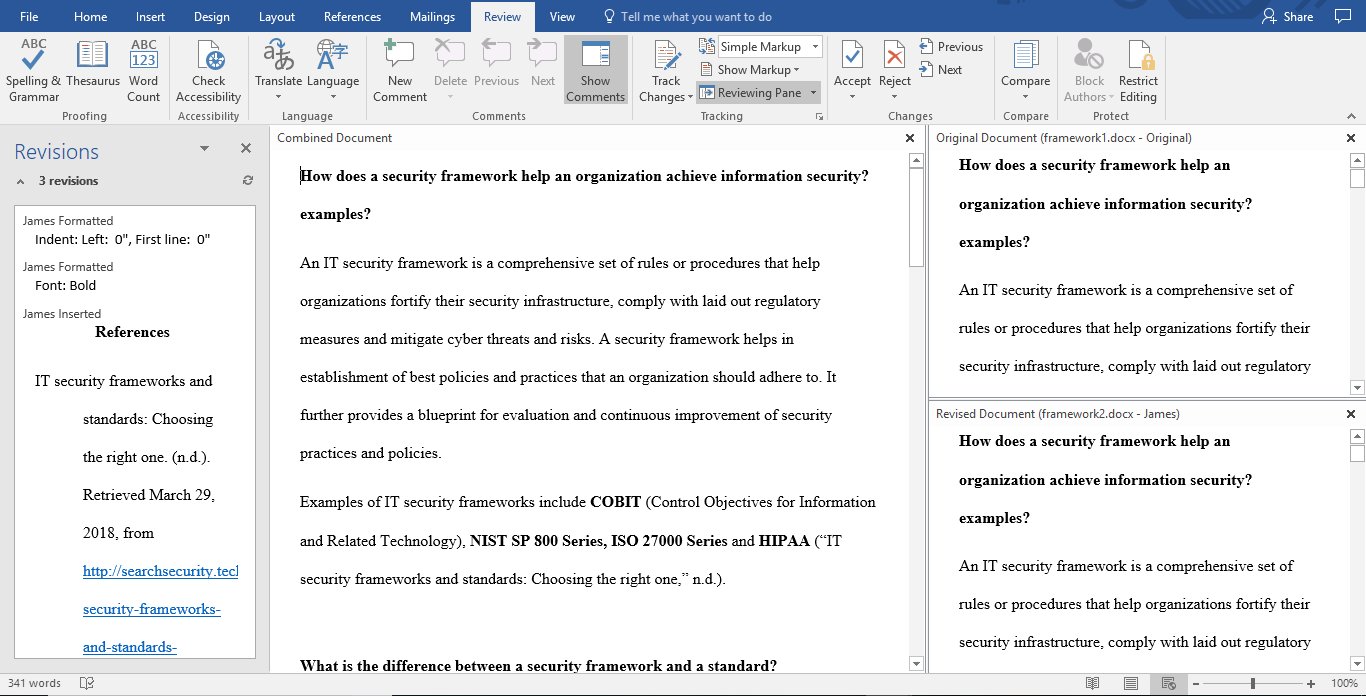
Method 4: Using the Compare and Combine Feature
The Compare and Combine feature in Microsoft Word is a powerful tool that allows you to merge documents that have been edited separately. This method is particularly useful when you need to reconcile changes made in multiple versions of a document. Here’s how you can merge documents using the Compare and Combine feature:
- Step 1: Open the primary Word document that you want to merge the other documents into.
- Step 2: Go to the “Review” tab in the menu bar.
- Step 3: Click on the “Compare” button in the “Compare” group, and then select “Combine” from the dropdown menu. This will open the Combine Documents dialog box.
- Step 4: Click on the “More” button in the Combine Documents dialog box, and then select “Compare and Combine.” This will open the Compare and Combine Documents dialog box.
- Step 5: Click on the “Original document” button and select the primary document.
- Step 6: Click on the “Revised document” button and select the document that contains the changes. You can select multiple revised documents by holding the Ctrl key.
- Step 7: Optional: Adjust the “Comparison settings” based on your preferences. This includes options to exclude comments or formatting changes.
- Step 8: Click on the “OK” button to start the merging process.
- Step 9: Review the changes marked by Microsoft Word. It will display the differences between the original and revised documents.
- Step 10: Accept or reject the changes as needed. You can do this by right-clicking on each change and selecting “Accept” or “Reject.”
- Step 11: Save the merged document by going to “File” in the menu bar and selecting “Save” or “Save As.” Choose a location and name for your merged document.
By following these steps, you can effectively merge documents using the Compare and Combine feature in Microsoft Word. This method is especially useful when you need to reconcile changes made in separate versions of a document. The tool highlights the differences between versions, allowing you to accept or reject changes as needed. Through this process, you can successfully merge the modifications into a single document. Remember to save your merged document and review it carefully to ensure that all changes have been correctly incorporated. In the next sections, we will explore additional merging methods, such as using the “Copy and Paste” feature, the “Insert Object” feature, and offer best practices for merging Microsoft Word documents.
Steps to Merge Documents Using Compare and Combine
Merging documents using the Compare and Combine feature in Microsoft Word allows you to merge changes made in separate versions of a document. Follow these steps to successfully merge your documents:
- Step 1: Open the primary Word document in which you want to merge the changes.
- Step 2: Go to the “Review” tab in the menu bar.
- Step 3: Click on the “Compare” button in the “Compare” group, and then select “Combine” from the dropdown menu. This will open the Combine Documents dialog box.
- Step 4: Click on the “More” button in the Combine Documents dialog box, and then select “Compare and Combine.” This will open the Compare and Combine Documents dialog box.
- Step 5: Click on the “Original document” button and select the primary document.
- Step 6: Click on the “Revised document” button and select the document that contains the changes. You can select multiple revised documents by holding the Ctrl key.
- Step 7: Optional: Adjust the “Comparison settings” based on your preferences. This includes options to exclude comments or formatting changes.
- Step 8: Click on the “OK” button to start the merging process.
- Step 9: Review the changes marked by Microsoft Word. It will display the differences between the original and revised documents, indicating additions, deletions, and modifications.
- Step 10: Right-click on each change and select “Accept” or “Reject” based on your judgment. Accepting a change preserves it in the merged document, while rejecting a change removes it.
- Step 11: Continue reviewing and accepting or rejecting changes until all modifications are addressed.
- Step 12: Save the merged document by going to “File” in the menu bar and selecting “Save” or “Save As.” Choose a location and name for your merged document.
By following these steps, you can merge documents using the Compare and Combine feature in Microsoft Word. This method is particularly useful when you need to merge changes made in separate versions of a document. Reviewing and accepting or rejecting changes allows you to merge the modifications into a single document. Remember to carefully review the merged document to ensure that all changes have been correctly incorporated. In the next sections, we will explore additional merging methods, such as using the “Copy and Paste” feature, the “Insert Object” feature, and provide best practices for merging Microsoft Word documents.
Best Practices for Merging Microsoft Word Documents
Merging Microsoft Word documents requires careful attention to detail to ensure a seamless integration of content, formatting, and layout. Here are some best practices to follow when merging your documents:
- Prepare Documents for Merging: Before merging, it’s essential to review and organize your documents. Remove any unnecessary content, check for consistency in styles and formatting, and ensure that the documents are compatible with each other.
- Check for Formatting and Compatibility: Ensure that the fonts, headings, paragraphs, and other formatting elements are consistent across the merged documents. Check for compatibility issues, such as different versions of Word, to prevent any unexpected formatting changes after the merging process.
- Use Heading Styles: Utilize heading styles (e.g., Heading 1, Heading 2, etc.) consistently throughout your documents. This helps in maintaining a clear hierarchy and facilitates easy navigation within the merged document.
- Resolve Formatting Conflicts: If there are conflicting formatting styles between documents, resolve them appropriately. You may choose to use the formatting from the primary document or apply consistent formatting across all merged documents.
- Check Section Breaks and Page Numbering: Ensure that section breaks and page numbering in the merged document are consistent and logical. Adjust or remove any unnecessary or incorrect section breaks to maintain a smooth flow.
- Review and Edit: Carefully review the merged document after completing the merging process. Check for any inconsistencies, missing content, or formatting errors. Make necessary edits to ensure a cohesive and professional final document.
- Save Backup Copies: Before merging documents, make backup copies of the original files. This ensures you have a safety net in case any issues arise during the merging process. Additionally, it’s a good practice to save the merged document under a new name to differentiate it from the original files.
- Collaborate and Communicate: When merging documents as part of a collaborative effort, communication is key. Regularly communicate with other contributors to ensure everyone is aware of changes and work together to address any conflicts or issues that may arise during the merging process.
- Test and Iterate: Test the merged document thoroughly before finalizing it. Check for any broken links, missing images, or other errors that may have occurred during the merging process. If needed, iterate and make necessary adjustments to ensure a polished and error-free merged document.
By following these best practices, you can streamline the merging process and create a cohesive merged document that maintains the integrity of the original content and formatting. Remember to review, edit, and test the merged document diligently to ensure a professional and polished final product. Now that you have a good understanding of the best practices, you can confidently merge your Microsoft Word documents and produce seamless and well-organized documents.
Preparing Documents for Merging
Before merging your Microsoft Word documents, it is crucial to adequately prepare them to ensure a smooth and successful merging process. Preparing your documents involves reviewing and organizing them to ensure compatibility and consistency. Follow these best practices to effectively prepare your documents for merging:
- Remove Unnecessary Content: Take the time to review each document and remove any unnecessary content. This includes deleting duplicate paragraphs, redundant information, or any sections that are no longer relevant to the final merged document. Removing unnecessary content helps streamline the merging process and improves the overall quality of the final document.
- Check Compatibility: Ensure that all the documents you plan to merge are compatible with the version of Microsoft Word you are using. Different versions of Word may have slight variations in formatting or feature availability, which could cause issues during the merging process. If necessary, upgrade or convert the documents to a compatible format before merging.
- Review and Resolve Formatting Inconsistencies: Carefully review each document to identify and resolve any formatting inconsistencies. Check for variations in font styles and sizes, paragraph spacing, indentation, and other formatting elements. Ensure that the formatting is consistent throughout all the documents to maintain a professional and cohesive appearance in the merged document.
- Standardize Styles and Formatting: If your documents make use of styles, ensure that the styles are standardized across all the documents. Use a consistent set of heading styles, paragraph styles, and other formatting styles to ensure a unified look and feel in the merged document. This will enhance readability and make the document structure more coherent.
- Resolve Conflicting Formatting: If there are conflicting formatting styles between the different documents, resolve them before merging. Decide on the desired formatting for each element, such as headings, lists, tables, or images, and apply that formatting consistently throughout the merged document. This will avoid any inconsistencies or jarring transitions between the different sections.
- Ensure Document Integrity: Verify that all the documents are intact and complete before merging. Check for any missing pages, corrupted content, or broken links, particularly if the documents contain hyperlinks or references to external sources. Fix any issues to ensure that the merged document is comprehensive and error-free.
- Organize File Structure: Arrange the documents in a logical order based on the desired sequence for the merged document. Rename the files with clear and descriptive names that reflect their content or order. This will help you navigate the files efficiently and ensure a seamless merging process.
- Make Backup Copies: Before you begin merging the documents, make backup copies of all the original files. This is a precautionary measure to ensure that you can revert to the original documents if any issues arise during the merging process. It provides an additional layer of protection and peace of mind.
By following these best practices, you can effectively prepare your Microsoft Word documents for merging. Taking the time to remove unnecessary content, check compatibility, resolve formatting inconsistencies, and ensure document integrity will streamline the merging process and result in a high-quality merged document. Remember to maintain consistency in styles and formatting, organize the file structure, and make backup copies of the original files to safeguard your work. Once you have prepared your documents, you are ready to proceed with the merging process and create a seamless final document.
Checking for Formatting and Compatibility
When preparing to merge Microsoft Word documents, it is essential to check for formatting inconsistencies and ensure compatibility across all the documents. This step is crucial to maintain a consistent and professional appearance in the merged document. Follow these best practices to effectively check for formatting and compatibility:
- Consistency in Font Styles and Sizes: Review each document to ensure that the font styles and sizes are consistent. Check for variations in font families, such as Times New Roman or Arial, and ensure that the font sizes are uniform throughout. Consistency in font styles and sizes enhances readability and creates a cohesive visual experience in the merged document.
- Alignment and Indentation: Pay attention to alignment and indentation in your documents. Verify that paragraphs and sections are consistently aligned, such as left-aligned or justified, and indentations are consistent. This includes ensuring that bulleted lists and numbered lists use the same indentation level and style.
- Page Margins and Spacing: Check the page margins and spacing in each document to ensure consistency. Make sure that top, bottom, left, and right margins are set uniformly. Check line spacing to ensure that it is consistent throughout the document, whether it’s single-spaced or double-spaced.
- Headers and Footers: Compare the headers and footers of each document to ensure uniformity. Check that headers, footers, and page numbers are consistent and properly aligned. Make any necessary adjustments to ensure a seamless transition between the different sections of the merged document.
- Tables and Images: If your documents contain tables or images, review them to ensure that they are appropriately formatted and aligned. Verify that tables have consistent column widths and cell formatting. Check image placement, size, and caption formatting to ensure uniformity.
- Hyperlinks and Cross-References: If your documents contain hyperlinks or cross-references, check that they are working correctly and pointing to the intended locations. Ensure that all references are accurate and update any broken or outdated hyperlinks. Make sure that hyperlinks are properly formatted and distinguishable from regular text.
- Styles and Template Consistency: If your documents use styles or templates, ensure that they are consistent across all the documents. Check that the styles being used, such as heading styles, paragraph styles, or character styles, are the same or have consistent formatting attributes. This will help maintain a consistent visual hierarchy throughout the merged document.
- Compatibility with Word Version: Before merging, verify that all the documents are compatible with the version of Microsoft Word you are using. Different versions may have variances in features or formatting options. Ensuring compatibility will help mitigate any unexpected formatting changes or loss of content during the merging process.
- Review on Different Devices: To ensure compatibility beyond your current device, consider reviewing the merged document on different devices or operating systems. This allows you to identify any rendering or compatibility issues that may arise when viewing the document on different platforms.
By following these best practices, you can effectively check for formatting inconsistencies and ensure compatibility across all your Microsoft Word documents before merging. Taking the time to ensure consistency in font styles and sizes, alignment and indentation, page margins and spacing, headers and footers, tables and images, hyperlinks and cross-references, styles and templates, and compatibility with the Word version will help create a smooth merging process and maintain a professional appearance in the merged document. Remember to review the document on different devices if possible to further ensure compatibility. Once you have verified the formatting and compatibility, you are ready to proceed with merging your documents.
Finalizing the Merged Document
After merging your Microsoft Word documents, it is important to take the necessary steps to finalize the merged document. This involves reviewing, making any necessary adjustments, and ensuring that the document is ready for distribution or further editing. Follow these best practices to effectively finalize the merged document:
- Review the Merged Document: Carefully review the entire merged document from start to finish. Pay close attention to formatting, alignment, headers and footers, tables, images, and any other elements that may require adjustment or correction.
- Make Formatting Adjustments: Look for any formatting inconsistencies that may have occurred during the merging process. Make the necessary adjustments to ensure a consistent and professional appearance. This may include adjusting font styles and sizes, line spacing, paragraph indentation, or table formatting.
- Update Table of Contents: If your merged document contains a table of contents, update it to reflect the new structure and page numbering of the merged document. Ensure that all headings and subheadings are accurately listed and their page numbers are correct.
- Check Cross-References and Hyperlinks: Double-check any cross-references or hyperlinks within the merged document. Verify that they are correctly linked to the intended sections or external sources. Update any broken or outdated links to maintain the document’s functionality.
- Verify Consistent Styles and Headers/Footers: Ensure that the styles, such as heading styles and paragraph styles, remain consistent throughout the merged document. Check that the headers and footers, including page numbers, document title, and author name, are uniform across all pages.
- Resolve Content or Language Inconsistencies: Review the content of the merged document to identify any inconsistencies in language, terminology, or tone. Make necessary adjustments to ensure the document’s text flows smoothly and maintains a cohesive narrative or structure.
- Proofread for Errors: Perform a thorough proofreading of the merged document to catch any spelling, grammar, or punctuation errors. Read the document carefully or consider using proofreading tools to assist in identifying and correcting any linguistic mistakes.
- Save a Backup Copy: Before finalizing the merged document, it is recommended to save a backup copy of your work. Creating a duplicate file ensures you can revert to the original merged document if needed, preserving your hard work and safeguards against accidental loss.
- Save in the Appropriate Format: Save the finalized merged document in the appropriate file format, such as .docx or .pdf, depending on your intended use. Choose a location and file name that are relevant and easy to identify for future reference.
- Share or Distribute the Document: Once you have reviewed and finalized the merged document, you can share it with others or distribute it as needed. Ensure that the document is compatible with the intended recipients’ software and devices, and consider using file-sharing platforms or email to send the document securely.
By following these best practices, you can effectively finalize your merged Microsoft Word document. Take the time to review and make necessary adjustments to formatting, update any impacted components like the table of contents or cross-references, and proofread the document for errors. Saving backup copies and choosing the appropriate file format are also essential steps to preserve your work. Once finalized, you can confidently share or distribute the merged document, knowing that it is polished and ready for its intended audience.