
Understand the Purpose of Comparing Word Documents
Comparing Word documents is a crucial task for various purposes, such as reviewing changes, identifying differences, and ensuring document integrity. Whether you are collaborating on a project, reviewing legal documents, or comparing versions of your work, understanding the purpose of comparing Word documents is essential.
One common reason for comparing Word documents is to track changes made by multiple authors. By comparing different versions of a document, you can easily identify additions, deletions, and modifications made by each person. This allows for effective collaboration and ensures that all changes are properly reviewed and approved.
Another purpose of comparing Word documents is to ensure accuracy and consistency. When working on large projects or lengthy documents, it can be challenging to keep track of all changes and revisions. By comparing different versions, you can quickly identify any discrepancies and resolve them to maintain document integrity and professionalism.
Comparing Word documents is also crucial in legal settings. Lawyers and legal professionals often need to compare different versions of contracts, agreements, or court documents. The ability to track changes, review comments, and ensure document accuracy is paramount to delivering reliable and error-free legal documents.
Moreover, comparing Word documents can be helpful in academic and research settings. Students and researchers frequently need to compare drafts, review feedback from supervisors, and ensure that their work is properly revised. By comparing documents, they can easily spot any errors, identify areas for improvement, and maintain consistency in their writing.
Furthermore, comparing Word documents can save valuable time and effort. Rather than manually reviewing each document side by side, the use of comparison tools and features within Microsoft Word or third-party software can automate the process. This increases efficiency and allows users to focus on analyzing differences and making informed decisions.
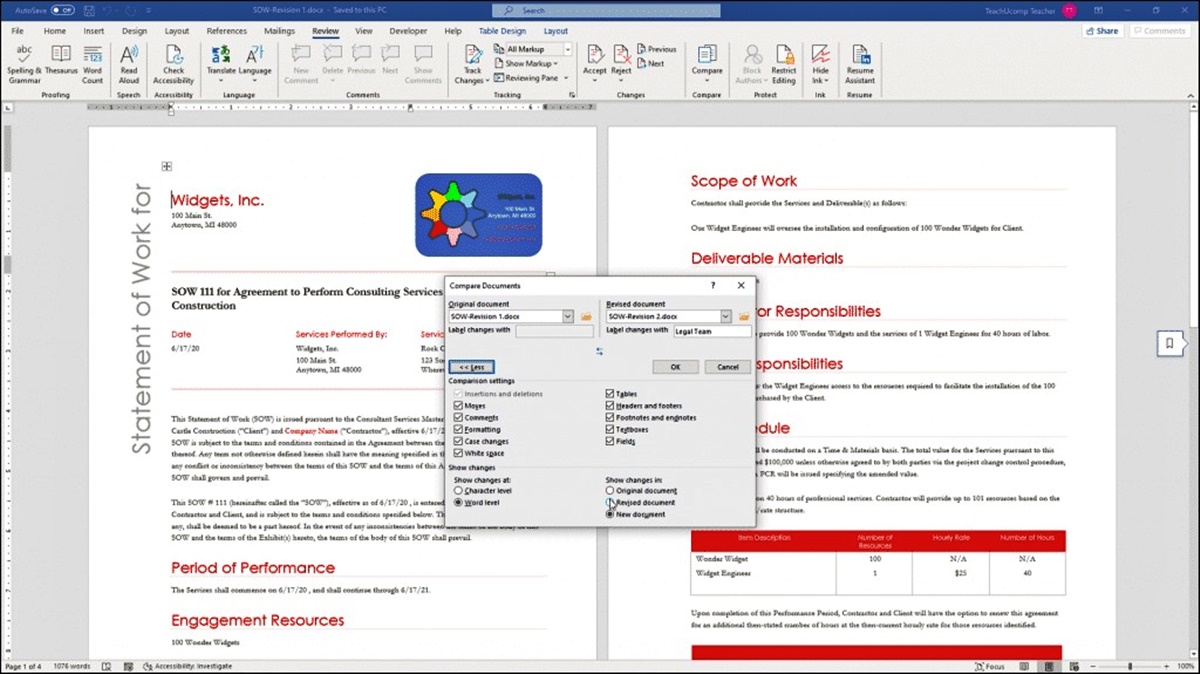
Use the Built-in Compare Feature in Microsoft Word
Microsoft Word provides a powerful built-in feature that allows users to easily compare two Word documents. This feature can be accessed through the “Review” tab in the Word toolbar. Here’s how to use the built-in compare feature in Microsoft Word:
1. Open both documents that you want to compare in Microsoft Word.
2. Navigate to the “Review” tab in the Word toolbar.
3. Click on the “Compare” button in the “Compare” group.
4. In the drop-down menu, select “Compare Two Versions of a Document.”
5. A pop-up window will appear. In this window, select the original document and the revised document using the provided browse options.
6. Click on the “OK” button to start the comparison process.
7. Microsoft Word will generate a new document that displays the differences between the two documents. The changes will be marked using track changes, allowing you to easily identify additions, deletions, and modifications.
8. Review the compared document, paying attention to the tracked changes and comments. You can navigate through the document using the “Next” and “Previous” buttons in the “Changes” group of the “Review” tab.
9. Accept or reject changes as needed. Right-click on a change or comment to access options such as accepting, rejecting, or replying to a comment.
10. Once you have reviewed and addressed all the changes, save the compared document with a new name or overwrite the original document with the revised changes.
The built-in compare feature in Microsoft Word offers a quick and convenient way to compare documents, track changes, and collaborate with others. It provides an efficient workflow for reviewing, revising, and finalizing documents, ensuring accuracy and consistency in your work.
Compare Documents Side by Side
When reviewing and comparing Word documents, it can be helpful to have them displayed side by side on your screen. This allows for a more convenient and efficient comparison process. Microsoft Word provides a “View Side by Side” feature that enables users to compare documents simultaneously. Here’s how to compare documents side by side:
1. Open both documents that you want to compare in Microsoft Word.
2. Navigate to the “View” tab in the Word toolbar.
3. Click on the “View Side by Side” button in the “Window” group.
4. The two documents will be displayed side by side on your screen, allowing you to see them simultaneously.
5. If the documents are not aligned properly, you can click on the “Synchronous Scrolling” button in the “Window” group to synchronize scrolling. This ensures that both documents scroll together, making it easier to compare corresponding sections.
6. As you review the documents side by side, you can use the scroll bars or arrow keys to navigate through the content. Alternatively, you can use the “Next Window” and “Previous Window” buttons in the “Window” group to switch between the compared documents.
7. Pay close attention to any differences between the documents, such as text variations, formatting changes, or layout discrepancies.
8. If you need to make changes or edits based on the comparison, select the desired section in one document and make the necessary adjustments in the other document.
9. You can also utilize the “Track Changes” feature to mark any modifications made during the comparison process. This is especially useful when collaborating with others or when you need to keep track of the changes made in the documents.
Comparing documents side by side in Microsoft Word gives you a visual representation of the differences and similarities between the documents. It allows for a more comprehensive and accurate comparison, ensuring that you can easily identify and address any inconsistencies or discrepancies.
Track Changes and Comments
When collaborating on Word documents or reviewing revisions, the “Track Changes” and “Comments” features in Microsoft Word are incredibly valuable. These features enable you to easily monitor and communicate changes made to a document. Here’s how to effectively use track changes and comments in Word:
1. Open the document you want to review or edit in Microsoft Word.
2. Navigate to the “Review” tab in the Word toolbar.
3. To enable track changes, click on the “Track Changes” button in the “Tracking” group. Once activated, any additions, deletions, or modifications will be marked with specific formatting to indicate the changes made.
4. As you make changes or edits in the document, Word will automatically track and highlight them. You can also choose to display the changes using different colors for each reviewer, making it easier to distinguish between multiple contributors.
5. To leave comments on specific sections of the document, place the cursor at the desired location and click on the “New Comment” button in the “Comments” group. A comment box will appear, allowing you to type your feedback, suggestions, or questions. Comments can be tied to specific text or left as general remarks.
6. Collaborators and reviewers can respond to comments by right-clicking on them and selecting the appropriate option, such as “Reply” or “Resolve.” This promotes effective communication and clarifies any points of contention or inquiries raised during the review process.
7. Reviewers can accept or reject changes made by others by right-clicking on the change and selecting the appropriate option. Accepted changes will be implemented in the document, while rejected changes will be disregarded.
8. To navigate between comments and changes, use the “Previous” and “Next” buttons in the “Comments” group. This allows you to easily move through the document and address each review comment or revision.
By utilizing the track changes and comments features in Word, you can effectively collaborate with others, keep track of modifications, and provide valuable feedback. These features enhance the reviewing process, ensuring that all changes are properly documented, discussed, and resolved.
Review and Accept/Reject Changes
When comparing and collaborating on Word documents, the ability to review and accept/reject changes is essential. Microsoft Word provides powerful tools that allow you to carefully evaluate each modification made to a document and decide whether to incorporate or discard them. Here’s how to effectively review and accept/reject changes in Word:
1. Open the document that contains tracked changes in Microsoft Word.
2. Navigate to the “Review” tab in the Word toolbar.
3. In the “Tracking” group, make sure the “Track Changes” feature is enabled. This will display all the changes made in the document.
4. Carefully go through each tracked change one by one. The changes will be highlighted or marked in the document, making them easily identifiable.
5. To review a specific change, place the cursor within the modified text and the corresponding change will be highlighted.
6. Evaluate each change to determine its impact on the document. Consider factors such as accuracy, clarity, consistency, and adherence to guidelines and requirements.
7. Accept or reject changes by right-clicking on the modified text and selecting the appropriate option. Alternatively, you can use the “Accept” or “Reject” buttons in the “Changes” group.
8. When accepting a change, the modified text will be integrated into the document, maintaining the formatting and style of the original content.
9. When rejecting a change, the modified text will be removed, reverting it back to its original form.
10. Review the comments made by collaborators or reviewers. You can consider the suggestions, feedback, and questions raised in the comments to further improve the document.
11. Respond to comments by right-clicking on them and selecting the appropriate option, such as “Reply” or “Resolve.” This facilitates efficient communication and allows for a clear understanding of the changes and queries raised.
12. Continue reviewing and addressing each tracked change and comment until you have thoroughly evaluated the entire document.
By carefully reviewing and accepting/rejecting changes in Word, you can ensure that the final document maintains accuracy, consistency, and compliance with desired standards. This process helps to refine and polish the content, resulting in a high-quality and refined document.
Merge Multiple Documents into One
When working on collaborative projects or combining information from various sources, it is often necessary to merge multiple Word documents into a single cohesive file. Microsoft Word offers a straightforward method for merging several documents together without losing any formatting or content. Here’s how to merge multiple documents into one in Word:
1. Open a new, blank Word document that will serve as your merged document.
2. Navigate to the “Insert” tab in the Word toolbar.
3. In the “Text” group, click on the “Object” button and select “Text from File.”
4. A file browser window will appear. Locate and select the first document you want to merge. Press the “Insert” button.
5. The contents of the selected document will be inserted into the new Word document. Repeat this process for each additional document you wish to include, inserting them one by one in the desired order.
6. As you add documents, Word will preserve the formatting, page layout, and other characteristics of each individual file. This ensures that the merged document maintains consistency and visual appeal.
7. Once you have inserted all the desired documents, review the merged document to ensure that everything is in the correct order and that all content appears as expected.
8. You can make any additional edits, such as rearranging sections, adjusting formatting, or adding headers and footers, to the merged document if needed.
9. Save the merged document with a new name or overwrite one of the original documents, depending on your preference.
Merging multiple documents in Microsoft Word provides a convenient way to consolidate information and create a unified, comprehensive file. Whether you are merging research papers, project reports, or chapters of a book, this feature streamlines the process, saving you time and effort while maintaining the integrity of each individual document.
Use Third-Party Comparison Tools
In addition to the built-in features of Microsoft Word, there are several third-party comparison tools available that can enhance and streamline the process of comparing Word documents. These tools offer advanced functionalities, customization options, and support for various file formats. Here are a few popular third-party comparison tools worth considering:
1. Beyond Compare: This tool provides a user-friendly interface and powerful features for comparing Word documents. It offers a side-by-side comparison view, highlighting differences and allowing users to merge changes easily. Beyond Compare also supports other file types such as PDF, Excel, and HTML, making it a versatile choice for document comparison.
2. Diff Doc: Diff Doc specializes in document comparison and is recognized for its accuracy and efficiency. It offers a range of comparison options, including word by word, character by character, or line by line. Diff Doc can handle various file formats and is a popular choice among professionals who need precise document comparison.
3. ExamDiff Pro: This tool provides a visually appealing and user-friendly interface for comparing Word documents. It offers both a side-by-side and a merged view of the compared documents, allowing users to easily identify and resolve differences. ExamDiff Pro also supports folder comparison and syntax highlighting for code files.
4. Compare Suite: Compare Suite is a comprehensive comparison tool that supports a wide range of file formats, including Word. It offers an intuitive interface, with various comparison options and customization features. Compare Suite allows users to compare not only content but also metadata, making it suitable for detailed document analysis.
5. DiffMerge: DiffMerge is a free and open-source tool that provides a simple yet effective solution for comparing Word documents. It offers a clear and concise comparison display, allowing users to quickly identify differences in text, formatting, and layout. DiffMerge is lightweight and easy to use, making it a suitable choice for basic document comparison needs.
Before choosing a third-party comparison tool, consider factors such as cost, compatibility with your operating system, availability of customer support, and specific features that align with your requirements. These tools can significantly enhance the efficiency and accuracy of your document comparison process, allowing you to save time and ensure the quality of your work.
Compare Documents in Google Docs
In addition to Microsoft Word, Google Docs provides a convenient and collaborative environment for comparing and reviewing documents. Whether you are working with co-authors, editing a shared document, or simply need to compare different versions, Google Docs offers built-in features that facilitate the comparison process. Here’s how to compare documents in Google Docs:
1. Open a new Google Docs document or navigate to an existing document that you want to compare.
2. Make sure you have the document versions you want to compare, either as separate files or different versions saved in the revision history of the document.
3. In Google Docs, go to “Tools” in the toolbar and select “Compare Documents” from the drop-down menu.
4. In the “Compare Documents” pop-up window, select the original document and the revised document, or the specific versions you want to compare.
5. Click on the “Compare” button to start the comparison process.
6. Google Docs will generate a new document that displays the differences between the compared documents. Changes will be highlighted using different colors and formatting, making them easily identifiable.
7. Review the compared document, paying close attention to the highlighted changes. These changes will include additions, deletions, and modifications made between the original and revised documents.
8. Collaborate and communicate with others by leaving comments on the compared document. Highlight specific changes or sections and click on the “Add Comment” button to provide feedback or ask questions.
9. Accept or reject changes by clicking on the respective buttons next to each modification. Accepting a change incorporates it into the final merged document, while rejecting a change reverts it back to its original form.
10. Collaborators can respond to comments, make additional edits, or suggest further changes in the compared document.
11. Once you have reviewed and addressed all the changes, save the compared document or make additional edits as necessary.
Google Docs’ native comparison feature allows for seamless collaboration and the ability to track and evaluate modifications made to a document. Whether you are working on a team project or reviewing revisions, comparing documents in Google Docs provides a convenient and efficient way to ensure the accuracy and consistency of your work.
Consider Compatibility Issues
When comparing Word documents, it’s important to consider compatibility issues that may arise, especially when dealing with documents created on different platforms or using different versions of Microsoft Word. These compatibility issues can affect the accuracy of the comparison and may cause formatting discrepancies or missing content. Here are a few considerations to keep in mind:
1. File Formats: Ensure that the document files you are comparing are in a compatible format. Microsoft Word supports various file formats, such as .docx, .doc, and .rtf. However, it’s essential to check the compatibility between different Word versions or other word processing software that may be used.
2. Font and Formatting: Fonts and formatting styles may differ between different versions or operating systems. It’s advisable to use standard and widely supported fonts to minimize formatting issues during comparison. Additionally, be aware that certain advanced formatting features may not be compatible across different platforms or older versions of Word.
3. Images and Graphics: Images and graphics embedded within the document may not appear correctly or may be missing when comparing documents on different platforms or versions of Word. Ensure that both documents have the necessary images and graphics embedded or linked properly.
4. Tables and Layouts: Tables and complex layouts may be affected during the comparison process. The structure, alignment, and spacing of tables and layout elements may change or become distorted when comparing documents with different versions or platforms. Review the compared documents carefully to identify any layout discrepancies.
5. Track Changes Compatibility: If you are comparing documents that were previously edited with track changes enabled in different versions of Word, there may be discrepancies in how the changes are displayed or tracked. Ensure that the track changes settings are consistent across all documents to ensure accurate comparison.
When encountering compatibility issues, consider using the same version of Microsoft Word or a compatible word processing software for all users involved in the document comparison. Communicate with collaborators or reviewers about the compatibility concerns and ensure that everyone is working with compatible files and software versions.
If compatibility issues persist, you can also consider converting the documents to a standardized format, such as PDF, which ensures consistent formatting regardless of the software used. PDF files can be easily compared using various third-party tools or online services.
By considering compatibility issues during the document comparison process, you can minimize discrepancies, ensure accurate results, and maintain the integrity and consistency of your documents across different platforms and software versions.
Verify Formatting and Layout Changes
When comparing Word documents, it is crucial to carefully verify all formatting and layout changes that may occur during the comparison process. Formatting discrepancies can affect the readability and professionalism of your documents. Here are some important steps to follow to verify and address formatting and layout changes:
1. Review Fonts and Styles: Pay close attention to fonts and text styles used in the compared documents. Check for any unexpected font changes, inconsistent styles, or differences in font sizes. Ensure that headings, subheadings, and body text remain consistent throughout the documents.
2. Check Paragraph and Line Spacing: Examine the paragraph spacing and line spacing in the compared documents. Make sure that consistent spacing is maintained after the comparison. Look out for any extra line breaks or unusual spacing between paragraphs or lines.
3. Inspect Margins and Indentations: Verify that margins and indentations remain consistent in the compared documents. Look for any changes in left or right indentation, as well as alterations in page margins. Inconsistent margins and indentations can disrupt the visual flow and structure of your documents.
4. Examine Tables and Charts: If your documents contain tables, charts, or other graphical elements, check that they remain intact and maintain their original formatting. Ensure that columns and rows in tables are aligned correctly and that data within charts and graphs is accurately displayed.
5. Consider Headers and Footers: Headers and footers provide important information and branding in documents. Verify that headers and footers remain consistent across the compared documents. Check for any changes in content, alignment, or formatting within headers and footers.
6. Inspect Page Breaks and Section Breaks: Check if there are any unexpected changes or disruptions in the page and section breaks. Make sure that the compared documents maintain consistent pagination and section divisions. Improper page and section breaks can disrupt the flow and structure of your documents.
7. Pay Attention to Bullets and Numbering: If your documents include bulleted or numbered lists, ensure that the formatting and the order of the lists remain intact. Verify that the spacing, indentation, and hierarchy of the bullets and numbering are consistent throughout the compared documents.
8. Consider Cross-References and Hyperlinks: If your documents contain cross-references or hyperlinks, make sure they are still functional and referencing the correct locations. Check that all links are properly displayed and navigate to the intended destination.
By carefully verifying formatting and layout changes during the document comparison process, you can maintain the professional appearance and integrity of your documents. Address any discrepancies or inconsistencies promptly to ensure that the final version retains a consistent and polished visual presentation.
Compare Documents for Legal Purposes
When it comes to legal matters, comparing Word documents is an essential task that helps ensure accuracy, consistency, and legal compliance. Whether you are reviewing contracts, court filings, or other legal documents, the comparison process plays a crucial role in maintaining document integrity. Here are some key considerations when comparing documents for legal purposes:
1. Accuracy and Completeness: When comparing legal documents, it is crucial to ensure that the content is accurate and complete. Carefully review the compared documents to identify any discrepancies, missing sections, or incorrect information. This is especially important when dealing with contracts or legal agreements that require precise wording and provisions.
2. Changes in Language or Terms: Compare the language used in the documents, paying close attention to any changes in wording, terms, or definitions. Legal documents often involve specific legal terminology that should remain consistent and accurate throughout the compared versions. Note any variations in terminology and assess the impact they may have on the legal meaning and interpretation of the document.
3. Identify Modifications and Additions: Utilize the track changes feature or other comparison tools to clearly identify modifications, additions, and deletions made between the compared documents. This ensures transparency and allows for a thorough analysis of the changes, ensuring that all parties involved are aware of the modifications made to the document.
4. Review Compliance with Legal Requirements: When comparing legal documents, consider the specific legal requirements and regulations that apply to the subject matter. Ensure that the compared versions meet these requirements and comply with relevant laws, regulations, or industry standards. Pay attention to any changes that may affect legal obligations, rights, or responsibilities of the parties involved.
5. Consider Formatting and Layout: Formatting and layout inconsistencies can undermine the professionalism and credibility of legal documents. Review and address any discrepancies in formatting, such as font styles, margins, numbering, and heading structures. Ensure that the compared documents maintain a consistent, organized, and easy-to-read format.
6. Collaboration and Document Sharing: When working on legal documents with multiple collaborators or sharing them with clients or legal professionals, consider using secure collaboration platforms or document management systems that provide version control and secure access. This minimizes the risk of unauthorized changes and ensures that everyone is working with the most recent and accurate version of the document.
7. Consult with Legal Professionals: When comparing documents for legal purposes, it is always advisable to consult with legal professionals who can provide guidance and ensure that the comparison process effectively addresses legal considerations and requirements. Their expertise can help identify potential legal issues and ensure that the compared documents remain legally sound.
By carefully comparing Word documents for legal purposes, you can ensure accuracy, compliance, and document integrity. Address any discrepancies promptly to avoid potential legal complications and maintain the reliability and enforceability of the legal documents involved.
Automate the Comparison Process using Macros
When it comes to comparing Word documents, automating the process using macros can save time and effort, especially when dealing with large volumes of documents or frequent comparisons. Macros are sets of instructions that automate tasks in Microsoft Word, allowing you to streamline the comparison process and reduce manual intervention. Here’s how you can leverage macros to automate document comparisons:
1. Enable the Developer Tab: To work with macros, you need to enable the Developer tab in Microsoft Word. Go to “File” > “Options” > “Customize Ribbon” and check the box for the Developer tab.
2. Record a Macro: Under the Developer tab, click on “Record Macro” to start the recording process. Perform the steps you want to automate, such as opening documents, comparing them, and saving the comparison results. Once you’re done, click “Stop Recording” to save the macro.
3. Assign a Shortcut: Assign a keyboard shortcut to the macro to make it easy to execute. Under the Developer tab, click on “Macros,” select the macro you recorded, and click on “Options” to set a shortcut key combination.
4. Edit the Macro: If needed, you can edit the recorded macro to customize its behavior. Under the Developer tab, click on “Macros,” select the macro, and click on “Edit” to modify the recorded instructions. This allows you to fine-tune the comparison process according to your specific requirements.
5. Run the Macro: To compare documents using the macro, simply use the assigned shortcut key combination. This will execute the recorded instructions and perform the comparison automatically. The macro will open the documents, compare them, and generate the desired output, such as a highlighted comparison document or a summary of the differences.
6. Save and Share the Comparison Results: Once the comparison is complete, the macro can also save the comparison results automatically. This ensures that the compared documents and their corresponding changes are properly documented and easily accessible for further review or sharing with collaborators.
7. Review and Modify Macros: Regularly review and modify your macros as needed. As your comparison needs evolve or as new versions of Microsoft Word are released, adjustments may be necessary to ensure the macros continue to function correctly and efficiently.
By automating the comparison process using macros, you can significantly reduce the time and effort required for manual comparisons. Macros allow for consistent and reliable comparisons, ensuring accurate results while improving your productivity and efficiency when working with Word documents.