
Setting Up Your Excel Spreadsheet
Before you can perform a Microsoft Word mail merge from within Excel, it’s crucial to configure your Excel spreadsheet properly. Follow these steps to ensure a seamless mail merge process:
- Open Excel and create a new spreadsheet: Launch Microsoft Excel on your computer and start a new workbook by selecting “New” from the File menu. This will provide you with a blank spreadsheet to work with.
- Organize your data: Determine the information you want to include in the mail merge, such as names, addresses, or other relevant data. Create columns in your spreadsheet to represent each category, and enter the corresponding data in the rows below.
- Use column headers: Assign clear and descriptive headers to each column in your Excel spreadsheet. These headers will serve as field names in your Word mail merge document, allowing you to easily match them later on.
- Format your data: Ensure that your data is correctly formatted to avoid any issues during the mail merge process. Use consistent date formats, avoid special characters, and make sure numeric values are formatted correctly (e.g., currency, decimal places).
- Check for duplicates: Scan your data for any duplicate entries and remove them if necessary. Duplicates can cause confusion and inaccuracies in the mail merge, so it’s important to clean up your spreadsheet before moving forward.
By following these steps, you’ll have a well-organized and error-free Excel spreadsheet ready for your Word mail merge. Taking the time to set up your data properly will save you headaches later on and ensure a smooth merging process.
Creating Your Word Document
Now that you have your Excel spreadsheet set up, it’s time to create the Word document that will serve as the template for your mail merge. Here’s how you can do it:
- Open Microsoft Word: Launch Microsoft Word on your computer and start a new document.
- Design your document: Decide on the layout, formatting, and content of your mail merge template. You can add a header, footer, logo, or any other elements that you want to include in the merged documents.
- Insert mail merge fields: To personalize the merged documents, you need to insert mail merge fields in the appropriate locations. These fields will retrieve the data from your Excel spreadsheet during the merging process. To insert a field, go to the “Mailings” tab in Word, click on “Insert Merge Field,” and select the desired field from your Excel spreadsheet.
- Format and style the document: Customize the font, color, and other formatting options to match your desired design. Make sure to maintain consistency and readability throughout the document.
- Preview the document: Before proceeding with the mail merge, it’s important to preview the document to ensure that the mail merge fields are correctly inserted and that the overall layout looks as expected. Use the “Preview Results” button in the “Mailings” tab to review how the merged documents will appear.
By following these steps, you can create a visually appealing and personalized Word document that will serve as the template for your mail merge. Taking the time to design and format your document properly will enhance the professionalism and effectiveness of the merged documents.
Designing Your Mail Merge Template
Designing an attractive and well-structured mail merge template is essential for creating professional and impactful merged documents. Here are some tips to help you design your mail merge template effectively:
- Keep it simple and uncluttered: Avoid overwhelming your template with excess text, images, or complicated formatting. A clean and minimalist design allows the focus to remain on the personalized content.
- Use a professional and readable font: Select a font that is clear, easy to read, and appropriate for the purpose of your merged document. Avoid using fancy or decorative fonts that can be difficult to read.
- Incorporate your branding: Include your company logo, colors, and other branding elements to maintain consistency and reinforce your brand identity. This helps to create a cohesive and professional look across all merged documents.
- Arrange content logically: Structure your template in a way that makes sense for the type of information you are merging. Use headings, subheadings, and bullet points to organize and present the data in a clear and logical manner.
- Consider using tables or grids: If you have tabular data or want to display information in a grid format, consider using tables. Tables can help organize the data and make it more visually appealing and readable.
- Include placeholders for personalization: Ensure that you include the appropriate mail merge fields at the desired locations in your template. These fields will be replaced with the corresponding information from your Excel spreadsheet during the merging process.
- Test and review: Before proceeding with the mail merge, thoroughly test your template by previewing a few merged documents. Review and make any necessary adjustments to ensure that the final result meets your expectations.
By following these guidelines and keeping your design clean, professional, and well-organized, you can create a visually appealing and effective mail merge template. Remember, the goal is to capture the reader’s attention while delivering personalized content in a clear and engaging manner.
Connecting Excel and Word
To perform a successful mail merge, you need to establish a connection between your Excel spreadsheet and Word document. This connection allows Word to access the data from your Excel spreadsheet. Follow these steps to connect Excel and Word:
- Open your Word document: Launch Microsoft Word and open the document you created for your mail merge template.
- Go to the “Mailings” tab: In Word, navigate to the “Mailings” tab located in the ribbon at the top of the application window. Click on the “Start Mail Merge” button to begin the process.
- Select “Normal Word Document”: From the drop-down menu under “Start Mail Merge,” choose “Normal Word Document.” This will maintain the layout and formatting of your existing document while merging the personalized data.
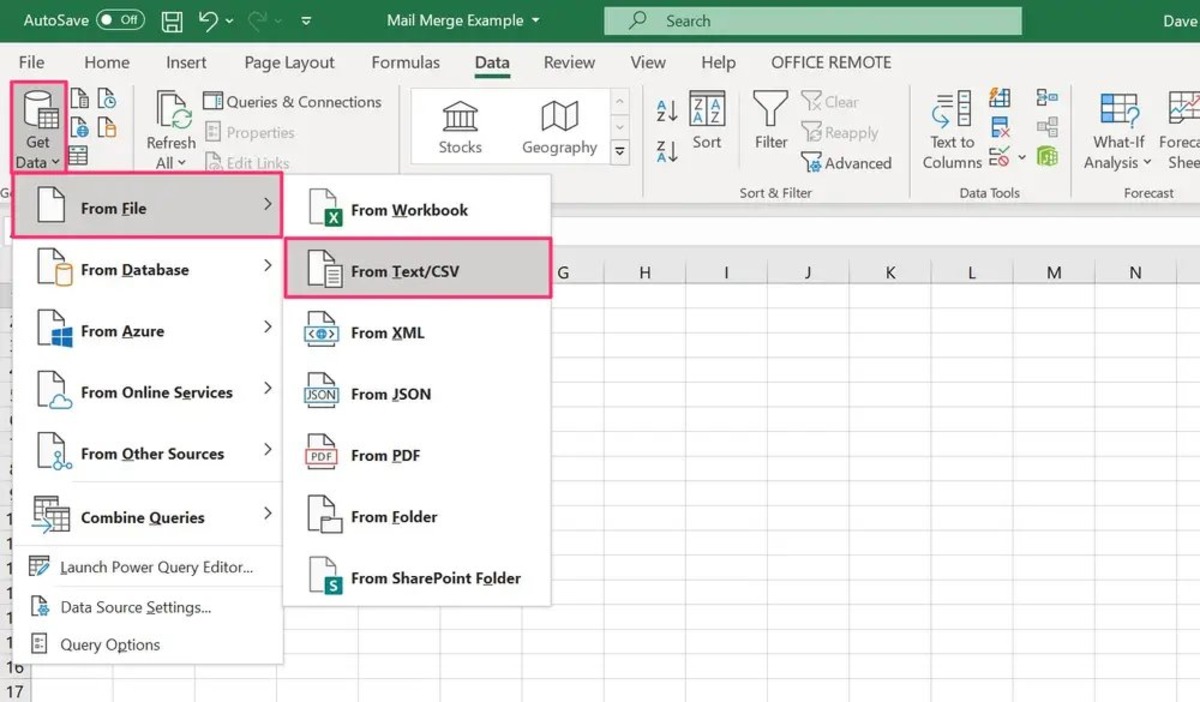
- Click on “Select Recipients”: Within the “Mailings” tab, click on the “Select Recipients” button and choose “Use Existing List.” Navigate to the location where your Excel spreadsheet is saved and select it.
- Choose the appropriate sheet in Excel: If your Excel spreadsheet contains multiple sheets, select the one that contains the data you want to merge with your Word document.
- Match the fields: Word will present a list of available fields from your Excel spreadsheet. Match the fields by clicking on each field placeholder in your Word document and selecting the corresponding field from the list.
- Insert additional merge fields: If needed, you can insert additional merge fields into your Word document by clicking on the “Insert Merge Field” button in the “Mailings” tab. This allows you to include more personalized information from your Excel spreadsheet.
By following these steps, you establish the necessary connection between your Excel spreadsheet and Word document. This connection enables Word to retrieve the data from Excel and merge it into the designated fields in your template.
Mapping Fields
Mapping fields is an essential step in the mail merge process that ensures the correct data from your Excel spreadsheet is inserted into the corresponding fields in your Word document. Here’s how you can map fields effectively:
- Review the field mappings: Once you’ve connected your Excel spreadsheet to your Word document, Word will automatically attempt to match the fields in your document with the column headers in your spreadsheet. Take the time to review these mappings to ensure they are accurate.
- Manually map fields: If Word is unable to automatically match some of the fields or if the mappings are incorrect, you can manually map the fields. To do this, click on the “Match Fields” button in the “Mailings” tab. A dialog box will appear, allowing you to select the correct field from your Excel spreadsheet for each field in your Word document.
- Check compatibility: Sometimes, field mappings can run into compatibility issues if the column headers in your Excel spreadsheet contain special characters or are formatted differently from the field names in your Word document. Make sure the field names in both Excel and Word match exactly to avoid any mapping problems.
- Verify data: It’s crucial to verify the data in your Excel spreadsheet to ensure accuracy. Check for any missing or incorrect data, as these errors will be reflected in the merged documents. Take the time to clean up and correct any issues in your Excel spreadsheet before proceeding.
- Run a test merge: Before conducting the final mail merge, it’s highly recommended to perform a test merge. This allows you to verify that the field mappings are correct, and the merged documents are displaying the expected data. Review the test merged documents carefully to catch any potential errors or inconsistencies.
By mapping fields accurately and ensuring data compatibility, you can guarantee that the correct values from your Excel spreadsheet are merged into the corresponding fields in your Word document. Taking the time to review and verify your field mappings will help you achieve successful and error-free merges.
Previewing and Filtering Data
Previewing and filtering data is an important step in the mail merge process as it allows you to ensure that the merged documents will display the desired information. Here’s how you can preview and filter your data effectively:
- Preview the merged documents: Before performing the final mail merge, it’s crucial to preview a few merged documents. This gives you an opportunity to review how the merged data appears in your Word document. To do this, click on the “Preview Results” button in the “Mailings” tab. You can navigate through the documents using the forward or backward arrow buttons.
- Verify data accuracy: While previewing the merged documents, carefully examine the data to ensure its accuracy and relevance. Check for any missing or incorrect information, formatting issues, or data mismatches. Make any necessary adjustments to your Excel spreadsheet or Word document at this stage.
- Filter the data: If you only want to merge specific records from your Excel spreadsheet, you can apply filters to narrow down the data. Click on the “Edit Recipient List” button in the “Mailings” tab to access the filtering options. You can filter by specific criteria, such as names, addresses, or any other relevant data fields. Filtering allows you to send personalized mailings to specific target groups.
- Remove or edit recipients: During the preview process, you may come across recipients who should be excluded from the mail merge or require specific modifications. Use the “Edit Recipient List” option to remove or edit specific recipients. This gives you control over the final list of recipients receiving the merged documents.
- Review and refine: Take the time to thoroughly review and refine the merged documents. Pay attention to grammar, spacing, page breaks, and overall formatting. Make any necessary adjustments to ensure that the final merged documents meet your desired standards.
By previewing and filtering your data, you can verify its accuracy, make any necessary modifications, and ensure that the merged documents display the desired information correctly. This allows you to deliver personalized and error-free content to your recipients.
Completing the Mail Merge
Once you have previewed and filtered your data, it’s time to complete the mail merge process. Follow these steps to finalize and complete the mail merge:
- Save your template: Before proceeding, make sure to save your mail merge template to avoid any potential loss of the merged data or template design. Save it in a location that is easily accessible for future use.
- Click on “Finish & Merge”: In the “Mailings” tab, click on the “Finish & Merge” button. This will open a drop-down menu with different options, such as “Edit Individual Documents” or “Print Documents.” Choose the option that best suits your needs for distributing or saving the merged documents.
- Choose your merge options: Depending on the option you selected in the previous step, you may be prompted to make additional choices. For example, when editing individual documents, you can choose to merge all records or a subset of records, specify the starting record, or apply conditional rules.
- Save your merged documents: If you selected the option to edit individual documents, you will be prompted to save the merged documents. Choose a filename and location where you want to save the merged documents. This will create individual documents for each record in your Excel spreadsheet.
- Print or distribute the merged documents: If you selected the option to print or directly distribute the merged documents, make sure your printer is properly set up and connected. Review the print settings and choose the appropriate options for the print job. Alternatively, if you chose to send the merged documents via email, double-check the recipient addresses and compose a concise and meaningful message to accompany the attachments.
By following these steps, you can successfully complete the mail merge process and generate the merged documents according to your preferences. Save and distribute the finalized documents as needed, whether in printed or electronic format.
Saving and Reviewing Merged Documents
After completing the mail merge, it’s important to save and review the merged documents to ensure their accuracy and quality. Here’s what you should do:
- Save the merged documents: If you haven’t already done so, save the merged documents in a designated location on your computer or cloud storage. Create a folder specifically for these documents to keep them organized and easily accessible for future reference.
- Review the merged documents: Open the merged documents and carefully review them to verify accuracy and consistency. Check that all the fields have merged correctly and that any personalized information is displayed accurately. Pay attention to formatting, spelling, and grammar errors, ensuring a high level of professionalism.
- Proofread the content: Take the time to proofread the merged documents thoroughly. Look for any typos, incorrect information, or formatting issues. Correct any errors or make necessary adjustments to ensure the final documents meet your desired standards.
- Check the layout and formatting: Confirm that the layout and formatting of the merged documents align with your original mail merge template. Verify that headers, footers, page numbers, borders, and other design elements are consistent and visually appealing across all the merged documents.
- Test the functionality of any links or interactive elements: If your mail merge template includes hyperlinks, buttons, or other interactive elements, make sure they are functioning correctly in the merged documents. Click on the links and test any interactive features to ensure they lead to the intended destination.
- Share the merged documents for feedback: If applicable, consider sharing the merged documents with colleagues or clients for their input and feedback. This can help identify any overlooked errors or areas for improvement, ensuring that the final documents are of the highest quality.
By saving and reviewing the merged documents, you can ensure their accuracy, fix any errors, and make necessary adjustments to meet your standards. Taking the time to carefully review and proofread the merged documents will result in professional and polished content.
Troubleshooting Common Issues
While performing a mail merge, you may encounter common issues that can hinder the process. Understanding these issues and knowing how to troubleshoot them can help ensure a successful mail merge. Here are some common issues and their troubleshooting steps:
- Incorrect data merging: If the merged documents contain incorrect or missing data, double-check the field mappings between your Excel spreadsheet and Word document. Ensure that the correct fields are matched, that column headers in Excel match field names in Word, and that the data in your Excel spreadsheet is accurate and complete.
- Formatting discrepancies: If the formatting of the merged documents appears inconsistent or different from your mail merge template, review the formatting settings in Word. Check for any formatting overrides or conflicting styles that may be affecting the appearance of the merged documents.
- Unexpected line breaks or spacing: If you notice unexpected line breaks or spacing issues in the merged documents, check your Word document’s paragraph settings. Adjust the spacing options to ensure consistency and eliminate any unwanted line breaks.
- Blank or empty fields: If certain fields in the merged documents appear blank or empty, confirm that the corresponding data exists in your Excel spreadsheet. Check for any formatting issues or hidden cells in Excel that may be causing the data to not merge properly. Make sure the field placeholders in Word are correctly matched with the column headers in Excel.
- Duplicate entries: If you encounter duplicate entries in the merged documents, review your Excel spreadsheet for any duplicate records. Eliminate any repetitions in your data to avoid duplication during the mail merge process.
- Saving or printing errors: If you experience issues when saving or printing the merged documents, verify that you have proper permissions to save or print the files. Check your printer settings and ensure that your printer is functioning correctly. Also, ensure that your merged documents are not locked or in use by another application.
By troubleshooting these common issues, you can overcome obstacles that may arise during the mail merge process. Take the time to carefully investigate the problem, review your settings, and make the necessary adjustments to ensure a successful outcome.