
Overview
Microsoft Word is a powerful word processing software that allows users to create and edit documents with ease. One of the key features of Word is the ability to insert tables, which can be extremely useful for organizing and presenting data in a structured format. Whether you’re creating a report, a budget sheet, or a simple list, tables in Word can help you convey information effectively.
In this article, we’ll guide you through the step-by-step process of inserting a table in Microsoft Word. We’ll cover everything from creating a new document to customizing the appearance and structure of the table. By following these instructions, you’ll be able to insert tables seamlessly into your Word documents and make them visually appealing.
Before we dive into the details, it’s important to note that Microsoft Word offers various options for table creation and customization. The steps outlined in this article are based on the most recent version of Microsoft Word, but they should be quite similar across different versions. With that in mind, let’s get started and learn how to insert a table in Microsoft Word.
Step 1: Opening Microsoft Word and Creating a New Document
The first step in inserting a table in Microsoft Word is to open the software and create a new document. Here’s how you can do it:
- Launch Microsoft Word by double-clicking on the desktop shortcut or searching for it in the Start menu.
- Once Word is open, you’ll be greeted with a blank document. If you already have an existing document that you want to add a table to, you can open it by clicking on the File tab in the top-left corner, selecting Open, and navigating to the document’s location.
- To create a new document, simply click on the Blank Document template. This will open a new untitled document where you can start working.
- Alternatively, you can use the keyboard shortcut Ctrl+N to create a new document quickly.
Once you have a new document open in Microsoft Word, you’re ready to move on to the next step of inserting a table. If you already have content in your document and want to insert a table at a specific location, make sure to place your cursor where you want the table to appear before proceeding.
Now that you have successfully opened Microsoft Word and created a new document, it’s time to continue with the process of inserting a table. Let’s move on to the next step and explore the options available in the “Insert” tab.
Step 2: Navigating to the “Insert” Tab
After opening Microsoft Word and creating a new document, the next step is to navigate to the “Insert” tab. This is where you’ll find all the tools and options for inserting various elements, including tables. Here’s how to do it:
- If you’re not already on the “Insert” tab, click on the “Insert” tab on the ribbon at the top of the Word window. This will activate the “Insert” tab, and you’ll see a range of options and tools related to inserting different objects into your document.
- Once on the “Insert” tab, you’ll notice several different sections, each with its specific functions. The most relevant section for our purpose is the “Tables” section.
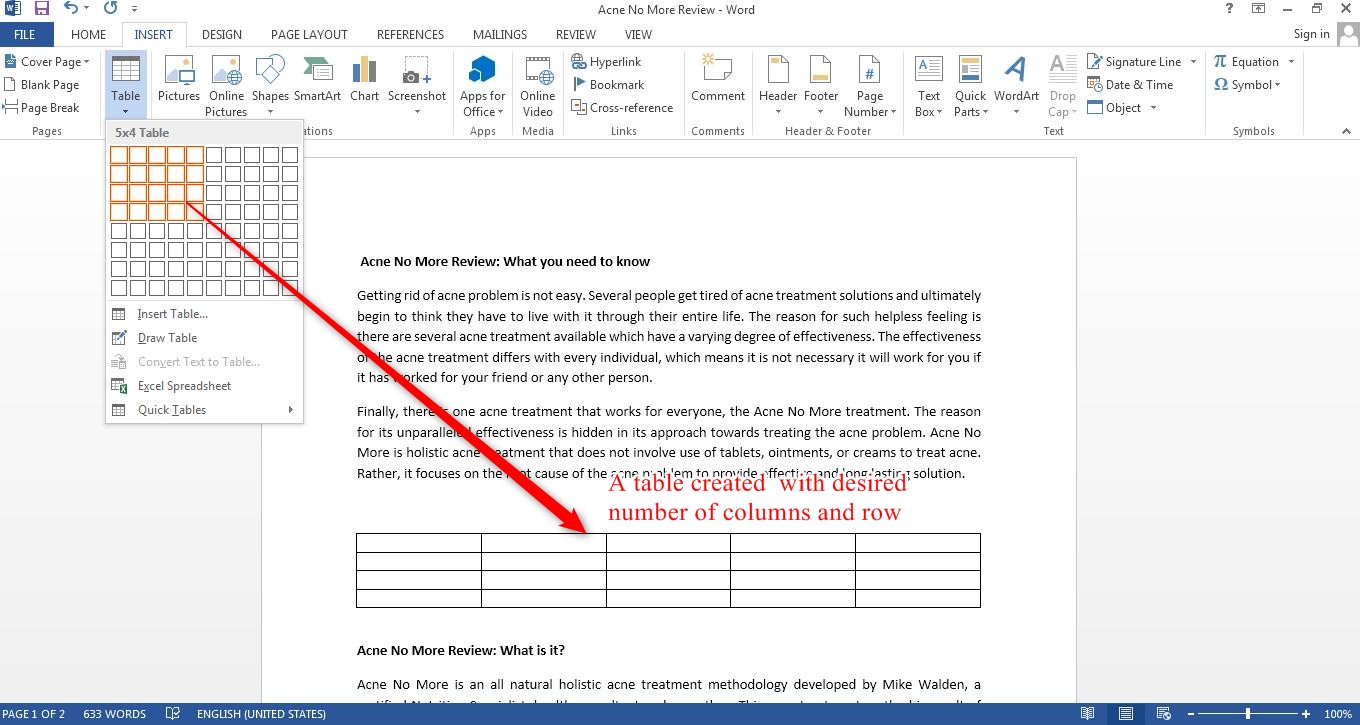
- In the “Tables” section, you’ll find the “Table” option. Click on this option to open a drop-down menu with some predefined table templates. You can choose one of these templates to quickly insert a table into your document.
- If you want more control over the table’s size and structure, you can choose the “Insert Table” option at the bottom of the drop-down menu. This will open a dialog box where you can specify the number of rows and columns for your table.
It’s important to note that the options and layout of the “Insert” tab may vary slightly depending on the version of Microsoft Word you’re using. However, the general principle of locating the “Insert” tab and accessing the “Tables” section should remain consistent.
Now that you’ve successfully navigated to the “Insert” tab and are familiar with the available table options, it’s time to move on to the next step: choosing the desired table size and style. Let’s explore this in the next section.
Step 3: Choosing the Desired Table Size and Style
After navigating to the “Insert” tab in Microsoft Word, the next step in inserting a table is to choose the desired table size and style. This will determine the number of rows and columns in the table and the overall aesthetic appearance. Here’s how to do it:
- If you decided to use one of the predefined table templates available in the “Tables” section, simply click on the template you prefer. The table will be inserted into your document, ready for you to populate with data.
- If you opted to use the “Insert Table” option, a dialog box will appear where you can specify the number of rows and columns for your table. Enter the desired values in the respective fields, and then click “OK.”
- In both cases, the table will be inserted into your document at the current cursor position.
Once the table is inserted, you can modify its size and style if needed. Here are a few additional steps you can take to customize your table:
- To resize the table, simply position the cursor over one of the table’s borders until it turns into a four-sided arrow. Click and drag the border to increase or decrease the width or height of the table.
- To apply a different style to the table, select the entire table by clicking on the small box that appears in the top-left corner when you hover over the table. Then, go to the “Table Tools” tab that appears on the ribbon and choose a different table style from the available options.
By choosing the desired table size and style, you can create a visually appealing and structured table in Microsoft Word. The next step is to populate the table with data, which we’ll cover in the next section.
Step 4: Populating the Table with Data
Now that you’ve inserted a table and chosen the desired size and style in Microsoft Word, it’s time to populate the table with data. Whether you’re creating a list, a budget sheet, or a report, you can input your information into the table cells. Here’s how to do it:
- Click inside a cell where you want to enter data. The cell will be highlighted, indicating that it’s active and ready for input.
- Type or paste the data into the cell. You can enter text, numbers, or even formulas, just like you would in a regular document.
- Press the Tab key on your keyboard or use the arrow keys to navigate to the next cell. The active cell will move to the adjacent cell in the selected direction.
- Continue entering data into the cells, moving from one cell to another as needed. You can also use the Tab key to move to the next cell in a row or press Shift + Tab to move to the previous cell.
- If you need to go to a specific cell in the table, simply click on the desired cell with your mouse. The active cell will change accordingly.
Additionally, you can apply various formatting options to the data in your table to enhance its appearance and readability. For example, you can change the font, adjust the cell alignment, add borders, or highlight specific values. These formatting options can be found in the “Table Tools” tab that appears on the ribbon when the table is selected.
By populating the table with data, you can organize and present your information in a structured manner. The next step is to customize the appearance of the table, which we’ll explore in the following section.
Step 5: Customizing the Appearance of the Table
After populating the table with data in Microsoft Word, you may want to customize its appearance to make it more visually appealing or align with your document’s overall design. Fortunately, Word offers various options to help you customize the table’s style, format, and layout. Here’s how to customize the appearance of your table:
- Select the entire table by clicking on the small box that appears in the top-left corner when you hover over the table. This will activate the “Table Tools” tab on the ribbon.
- Within the “Table Tools” tab, you’ll find several sections, including “Design,” “Layout,” and “Format.” These sections contain different options to customize the appearance of your table.
- Under the “Design” section, you can choose from a variety of built-in table styles. Clicking on a style will instantly apply it to your table, giving it a different look and feel.
- In the “Layout” section, you can modify the structure of your table. You can add or delete rows or columns, merge or split cells, adjust cell size, and even change the table’s orientation.
- The “Format” section offers additional formatting options for your table. Here, you can change the font, apply cell shading or borders, adjust cell alignment, and more.
- Explore these sections and experiment with different options until you achieve the desired appearance for your table.
Remember that customizing the appearance of your table can help it stand out, improve readability, and better align with your document’s design. However, be mindful of striking a balance between aesthetics and functionality, ensuring that the table remains clear and easy to understand.
Once you’ve customized the appearance of your table, you can move on to the next steps, such as merging or splitting cells, adding or deleting rows and columns, and adjusting table properties and formatting. We’ll cover these topics in the upcoming sections.
Step 6: Merging or Splitting Cells Within the Table
In Microsoft Word, you have the flexibility to merge or split cells within a table, allowing you to create customized layouts or combine cells for a specific purpose. This can be useful when you want to create a header row, merge cells for a table title, or split cells to accommodate additional information. Here’s how you can merge or split cells within your table:
- Select the cells that you want to merge or split by clicking and dragging your cursor to highlight them. You can select multiple adjacent cells or even cells from different rows or columns.
- After selecting the cells, go to the “Layout” section under the “Table Tools” tab, which appears when your table is selected.
- In the “Merge” group, you’ll find options to merge cells or split merged cells:
- To merge the selected cells into a single cell, click on the “Merge Cells” button. The selected cells will be combined, and their contents will be merged into one cell.
- If you have previously merged cells that you want to split, select the merged cell and click on the “Split Cells” button. A dialog box will appear where you can specify the number of rows and columns to split the cell into.
Using the merge and split features, you can create unique table layouts and adapt the structure of your table to fit your specific needs. For example, merging cells in the first row can create a header row with a larger cell spanning multiple columns. Splitting merged cells can help in separating previously combined cells that need to display individual information.
It’s important to note that merging and splitting cells can affect the overall structure and formatting of your table. Make sure to review the changes and adjust the table accordingly to maintain a consistent and organized layout.
Now that you’ve learned how to merge or split cells within your table, let’s move on to the next step: adding or deleting rows and columns.
Step 7: Adding or Deleting Rows and Columns
In Microsoft Word, you have the flexibility to add or delete rows and columns within your table, allowing you to adjust the size and structure of your table based on your needs. Adding rows or columns can help accommodate additional data, while deleting rows or columns can remove unnecessary or redundant information. Here’s how to add or delete rows and columns within your table:
- Select the row or column next to where you want to add a new row or column. To select a row, click on the row number on the left side of the table. To select a column, click on the column letter at the top of the table.
- After selecting the row or column, go to the “Layout” section under the “Table Tools” tab, which appears when your table is selected.
- In the “Rows & Columns” group, you’ll find options to add or delete rows and columns:
- To add a new row above the selected row, click on the “Insert Above” button. A new row will be inserted, shifting the existing rows down.
- To add a new row below the selected row, click on the “Insert Below” button. A new row will be inserted, appearing just below the selected row.
- To add a new column to the left of the selected column, click on the “Insert Left” button. A new column will be inserted, pushing the existing columns to the right.
- To add a new column to the right of the selected column, click on the “Insert Right” button. A new column will be inserted, appearing just to the right of the selected column.
- To delete a selected row, click on the “Delete” button in the “Rows & Columns” group. The selected row will be removed from the table, and the remaining rows will adjust accordingly.
- To delete a selected column, click on the “Delete” button in the “Rows & Columns” group. The selected column will be removed from the table, and the remaining columns will adjust accordingly.
By adding or deleting rows and columns, you can fine-tune the structure and layout of your table, ensuring it accurately represents your data and enhances its readability. Remember to review your table after making changes to confirm that the table maintains its organization and proper formatting.
Now that you’ve learned how to add or delete rows and columns within your table, let’s move on to the next step: adjusting table properties and formatting.
Step 8: Adjusting Table Properties and Formatting
In Microsoft Word, you can further enhance and customize your table by adjusting various properties and formatting options. This step allows you to fine-tune the appearance and layout of the table to better suit your needs. Here’s how you can adjust table properties and formatting:
- Select the entire table by clicking on the small box that appears in the top-left corner when you hover over the table. The “Table Tools” tab will appear on the ribbon.
- Within the “Table Tools” tab, you’ll find several sections, including “Design,” “Layout,” and “Format.” These sections contain different options for customizing your table.
- In the “Design” section, you can choose from a variety of built-in table styles to change the overall appearance of your table. Clicking on a style will instantly apply it to your table, giving it a different look and feel.
- The “Layout” section offers options to modify the structure and organization of your table. Here, you can adjust the table’s alignment, set specific row and column heights and widths, and control the placement of cells within the table.
- Within the “Format” section, you can apply various formatting options to individual cells, rows, or columns. This includes changing the font, adjusting cell alignment, applying borders or shading, and more.
- Explore the available options in these sections to customize your table according to your preferences and requirements. Experiment with different styles, alignments, and formatting until you achieve the desired look for your table.
It’s important to strike a balance between visual appeal and readability when adjusting table properties and formatting. Ensure that the table remains clear and organized, even with added colors or styles.
By adjusting table properties and formatting, you can create a visually appealing, professional-looking table that effectively presents your data. The next step is to save and export your document with the inserted table, which we’ll cover in the final step.
Step 9: Saving and Exporting the Document with the Inserted Table
After inserting and customizing the table in Microsoft Word, it’s crucial to save your document to ensure that your work is preserved. Additionally, you might also need to export the document for sharing or using in different formats. Here’s how to save and export your document:
- Click on the File tab in the top-left corner of the Word window. This will open the backstage view, where you can access various options for managing your document.
- In the backstage view, click on the Save or Save As option to save your document. Saving the document will update the existing file, while Save As allows you to create a new document with a different name or in a different location.
- Choose the desired save location on your computer or cloud storage, and enter a name for your document in the respective field. Choose a location that is easily accessible and where you can easily find your document in the future.
- Click Save to save your document in the selected location.
- If you need to export your document in a different format, such as PDF or Word template, click on the File tab again and select the Save As option.
- In the Save As dialog box, choose the desired format from the drop-down menu next to the Save as type field. Select the appropriate format based on your specific needs.
- Specify the save location and enter a name for your exported document, if necessary.
- Click Save to export your document in the chosen format.
By saving and exporting your document with the inserted table, you ensure that your work is securely stored and can be easily shared or accessed in the desired format. Remember to regularly save your document as you work on it to avoid losing any progress or changes.
Congratulations! You have successfully learned how to insert a table in Microsoft Word, customize its appearance, and save or export your document. With this knowledge, you can create organized and visually appealing tables for various purposes, from simple lists to complex data analysis.