
Creating a Table
Microsoft Word offers a convenient way to organize and present data using tables. Whether you are working on a project report, resume, or simply want to showcase information in a structured format, creating a table in Word is a straightforward process. In this section, we will explore how to create a table from scratch.
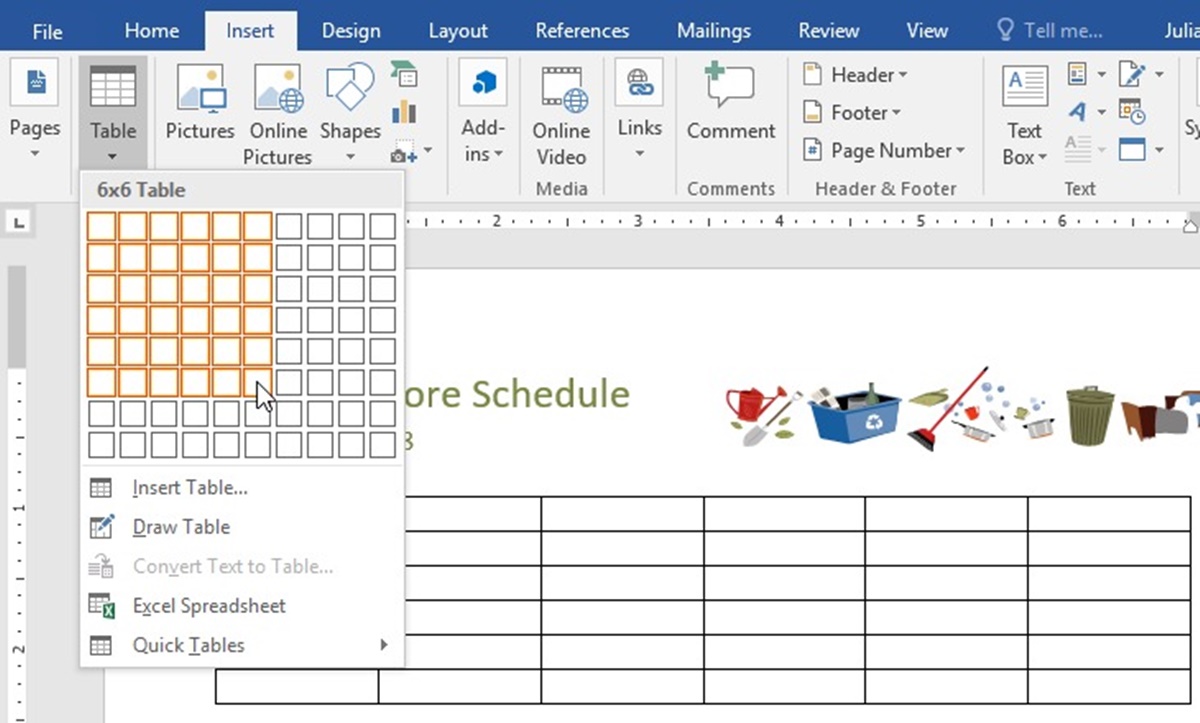
To create a table in Word, start by placing your cursor in the position where you want the table to appear. Then, navigate to the “Insert” tab in the menu bar and locate the “Table” button. Click on the button, and a drop-down menu will appear with options to insert a table.
You can choose to insert a table by specifying the number of columns and rows or draw a customized table by selecting the “Draw Table” option. If you prefer to specify the dimensions, simply hover over the grid to highlight the desired number of columns and rows, and then click to insert the table. A blank table will be created with the specified dimensions.
Once you have created the table, you can start populating it with data. Simply click inside a cell and start typing. You can move between cells using the tab key or arrow keys. If you need to insert an additional row or column, right-click inside the table and select the appropriate option from the contextual menu.
To adjust the size of the table, position your cursor at the edge of the table until it changes to a double-headed arrow cursor. Click and drag to resize the table as needed. You can also modify the width and height of individual columns and rows by hovering over the column separator until the cursor changes to a double-headed arrow pointer. Click and drag to resize the column or row.
Creating a table in Microsoft Word is an efficient way to organize and present data in a structured format. By following these simple steps, you can quickly create a table and populate it with content. Whether you’re working on a business document or a personal project, tables can help you present information in a visually appealing and organized manner.
Inserting and Deleting Rows and Columns
When working with tables in Microsoft Word, there may be instances when you need to add or remove rows and columns to accommodate your data or adjust the table layout. Word provides easy-to-use tools that allow you to insert and delete rows and columns seamlessly. In this section, we will explore how to perform these actions.
To insert a new row, place your cursor in the row where you want to insert the new one. Then, navigate to the “Layout” tab in the menu bar and locate the “Rows & Columns” group. Within this group, you will find options to insert rows above or below the selected row. Simply click on the appropriate icon, and a new row will be added accordingly.
Similarly, if you need to insert a new column, position your cursor in the column where you want the new one to be inserted. Again, navigate to the “Layout” tab and locate the “Rows & Columns” group. Within this group, you will find options to insert columns to the left or right of the selected column. Click on the desired icon, and a new column will be inserted accordingly.
If you need to delete a row or column, first select the row or column you wish to remove. Then, navigate to the “Layout” tab and locate the “Rows & Columns” group. Within this group, you will find options to delete rows and columns. Simply click on the appropriate icon, and the selected row or column will be deleted from the table.
It is important to note that when you delete a row or column, the data contained within it will also be deleted. Therefore, ensure that you have copied or saved any important information before deleting a row or column.
By mastering the skill of inserting and deleting rows and columns in Microsoft Word, you can manipulate your tables to fit your desired layout and accommodate your data more effectively. These simple steps allow you to adjust your tables quickly and efficiently without the need to recreate them entirely.
Adjusting Column Width and Row Height
When working with tables in Microsoft Word, it’s often necessary to adjust the column width and row height to ensure that your content fits neatly and is easily readable. Word provides intuitive tools that allow you to resize columns and rows to your desired specifications. In this section, we will explore how to adjust the column width and row height in your tables.
To adjust the width of a column, place your cursor in the column you wish to change. Then, navigate to the “Layout” tab in the menu bar and locate the “Cell Size” group. Within this group, you can directly specify a specific width value for the selected column, or you can utilize the “AutoFit” feature to automatically adjust the column width to fit the content it contains. To use “AutoFit”, click on the “AutoFit” button and select either “AutoFit Contents” or “AutoFit Window”.
If you prefer to adjust the row height, place your cursor in the row you wish to modify. Navigate to the “Layout” tab and locate the “Cell Size” group. Here, you can specify a specific height value for the selected row, or you can use the “AutoFit” feature to automatically adjust the row height to accommodate the content it contains. Click on the “AutoFit” button, and select either “AutoFit Contents” or “AutoFit Window” to apply the desired adjustment.
Alternatively, you can manually resize the columns and rows by hovering over the column or row separator until the cursor changes to the double-headed arrow pointer. Once the cursor changes, click and drag to resize the column width or row height as desired.
By adjusting the column width and row height in your tables, you can ensure that your table content is presented in a visually pleasing manner and avoids overcrowding or excessive empty space. Take advantage of the various resizing options provided in Microsoft Word to achieve the desired layout and readability for your tables.
Merging and Splitting Cells
In Microsoft Word, tables offer a flexible way to present and organize information. Sometimes, you may need to merge multiple cells into a single cell or split a single cell into multiple cells to accommodate your data or adjust the table structure. Word provides tools that allow you to merge and split cells easily, making it simple to customize your table layout. In this section, we will explore how to merge and split cells in your tables.
To merge cells, first, select the cells that you want to merge. Then, navigate to the “Layout” tab in the menu bar and locate the “Merge” group. Within this group, click on the “Merge Cells” button to merge the selected cells into a single larger cell. This is particularly useful when you want to create a header or span across multiple columns or rows with one piece of information.
If you need to split a cell into multiple cells, first, select the cell that you want to split. Then, navigate to the “Layout” tab and locate the “Merge” group. Within this group, click on the “Split Cells” button to open the “Split Cells” dialog box. In this dialog box, you can specify the number of rows and columns you want to split the cell into, as well as choose how to distribute the content within the cell. Click “OK” to split the cell.
It is important to note that when you merge cells, the content within each cell is combined into the merged cell. Conversely, when you split a cell, the content is distributed among the new cells as specified. Be mindful of the data within the cells and ensure that you have copied or saved any important information before merging or splitting cells.
By mastering the ability to merge and split cells in Microsoft Word, you can customize your table layout according to your specific needs. Whether you want to create a visually appealing design or accommodate complex data structures, the merge and split cell functions provide the flexibility required to achieve your desired table layout.
Formatting a Table
Formatting plays a crucial role in enhancing the visual appeal and readability of your tables in Microsoft Word. By applying various formatting options, you can make your tables more visually engaging and easier to comprehend. In this section, we will explore how to format your tables to create a polished and professional look.
One of the first ways to format a table is by adjusting the overall appearance. Start by selecting the entire table, then navigate to the “Table Tools Design” tab in the menu bar. Here, you can choose from a variety of table styles and apply them to your table with just a click. Experiment with different styles to find the one that best suits your document’s aesthetic.
Additionally, you can modify the table’s borders to give it a distinct look. With the table selected, navigate to the “Table Tools Design” tab and locate the “Table Styles Options” group. From here, you can customize the borders by selecting different line styles, changing the color, or adjusting the thickness to match your desired style.
Furthermore, you can apply shading to specific cells, rows, or columns to create visual hierarchy or draw attention to particular information. With the desired section of the table selected, navigate to the “Table Tools Design” tab and locate the “Shading” options in the “Table Styles” group. Choose a color and apply it to the selected area to add a compelling visual element to your table.
In addition to modifying the appearance, you can also format the content within the table. Adjust the alignment and formatting of text by selecting the desired cells or range of cells, then utilizing the alignment and formatting options available in the “Home” tab of the menu bar. You can change the font style, size, and color, as well as apply bold, italic, or underline formatting to the text.
Lastly, remember that tables are not limited to just rows and columns. You can insert additional elements such as headers and footers, captions, and even formulas to perform calculations. By leveraging these features, you can enhance the functionality and usability of your tables in Word.
By formatting your tables effectively, you can transform them from plain data showcases into visually appealing and organized pieces of content. Experiment with different styles, borders, shading, and alignments to create tables that are not just informative but also aesthetically pleasing.
Adding and Editing Table Content
In Microsoft Word, tables are a powerful tool for organizing and presenting data. Once you have created a table, the next step is to add and edit the content within the table cells. In this section, we will explore how to add and edit table content to ensure accurate and relevant information is displayed.
To add content to a table, simply click inside a cell and start typing. You can move between cells using the tab key or arrow keys, making it easy to navigate within the table. Alternatively, you can copy and paste content from other sources directly into the table cells.
When it comes to editing table content, Word offers various options to modify and enhance the data. To edit the existing content in a cell, click inside the cell and make the desired changes. You can also select text within a cell to apply formatting options like bold, italic, underline, or change the font style, size, or color using the formatting tools available in the “Home” tab of the menu bar.
If you need to delete content from a cell, simply select the text or data within the cell and press the delete key. The content will be removed, leaving the cell empty. Additionally, you can right-click within a cell and choose the “Delete Cells” option to remove the entire cell, shifting the surrounding cells accordingly.
Moreover, Word allows you to insert additional objects within table cells, such as images, shapes, or even hyperlinks. To insert an image, click inside the desired cell, navigate to the “Insert” tab, and locate the “Pictures” option. Choose an image from your computer and it will be inserted into the cell. You can also insert a shape or add a hyperlink in a similar manner.
By adding and editing table content effectively in Microsoft Word, you can present data in a structured and meaningful way. Whether you are creating a report, invoice, or organizing data for a research project, the ability to manipulate and refine table content ensures clarity and accuracy.
Sorting and Filtering Table Data
In Microsoft Word, tables not only provide a way to organize data but also offer powerful tools for sorting and filtering that data. These features allow you to manipulate the content within your tables to quickly find the information you need. In this section, we will explore how to sort and filter table data to streamline your workflow.
To sort the data in a table, start by selecting the entire table or the specific column you want to sort. Then, navigate to the “Table Tools Layout” tab and locate the “Sort” button in the “Data” group. Clicking on the “Sort” button will open the “Sort Text” dialog box, where you can specify the sorting criteria such as sorting by a specific column, ascending or descending order, and even sorting by multiple columns. Once you have selected the desired sorting options, click “OK” to apply the sorting to your table.
Filtering is another powerful feature that allows you to display only the specific data you need. To apply a filter to your table, select the entire table or the specific column you want to filter. Then, navigate to the “Table Tools Layout” tab and locate the “Filter” button in the “Data” group. Clicking on the “Filter” button will add filter arrows to each column header in your table. By clicking on the filter arrow for a specific column, you can choose to display specific values or use text and number filters to further refine the data displayed in your table.
Furthermore, you can perform advanced filtering using the “Custom Filter” option. With the desired column selected, click on the filter arrow and choose “Filter by Color,” “Filter by Cell Color,” or “Filter by Font Color” to further narrow down the data based on specific color criteria. This is particularly useful when working with tables that include color-coded information.
By utilizing the sorting and filtering options in Microsoft Word, you can quickly analyze and find specific data within your tables. These features are particularly valuable when dealing with large amounts of information or when you need to search for specific values or patterns within your table data.
Applying Table Styles
In Microsoft Word, table styles allow you to quickly and easily apply a consistent and professional look to your tables. With just a few clicks, you can transform your plain-looking tables into visually appealing and well-organized visual elements. In this section, we will explore how to apply table styles to enhance the appearance of your tables.
To apply a table style, start by selecting the entire table or the specific cells you want to format. Then, navigate to the “Table Tools Design” tab in the menu bar. Within this tab, you will find a variety of predefined table styles available in the “Table Styles” group.
Clicking on the different table style options will instantly apply the chosen style to your selected table or cells. As you hover over each style, you’ll get a live preview of how it will look. This allows you to quickly compare and choose the style that best fits your document’s overall design and layout.
If the predefined table styles don’t meet your exact requirements, you can customize them further. Once you have applied a table style, you can modify the specific elements such as the font, borders, shading, or alignment by right-clicking on the table and selecting “Table Properties.” In the “Table Properties” dialog box, you can change the desired formatting options to achieve a more personalized look for your table.
Additionally, you can create your own custom table style to match your specific document theme or branding. After formatting a table to your liking, you can save the formatting as a new table style. Simply select the table, right-click, and choose “Apply Styles” > “New Table Style.” Give your style a name and customize the formatting options, then click “OK.” Your custom table style will now be available for future use.
By applying table styles in Microsoft Word, you can add a professional and cohesive look to your tables. Whether you prefer a clean and minimalist style or a more vibrant and colorful appearance, the table styles feature allows you to customize and elevate the visual impact of your tables in just a few simple steps.
Converting a Table to Text
In Microsoft Word, tables are a valuable tool for organizing and presenting data. However, there may be instances where you need to convert a table back into plain text to facilitate further editing or formatting. Word provides a convenient feature to convert tables to text, allowing you to easily extract the table content without the table structure. In this section, we will explore how to convert a table to text in Word.
To convert a table to text, first, select the entire table or the specific cells you want to convert. Then, navigate to the “Table Tools Layout” tab in the menu bar. In the “Data” group, you will find the “Convert to Text” button.
Clicking on the “Convert to Text” button will open a dialog box where you can specify the delimiter that will be used to separate the text. The default delimiter is a paragraph mark, which creates each table cell as a separate paragraph. However, you can choose different delimiters such as commas or tabs depending on your needs.
After selecting the desired delimiter, click “OK” to convert the table to text. The table structure will be removed, and the content will now be displayed as plain, continuous text. Each former cell of the table will appear on its own line, separated by the chosen delimiter.
It is important to note that converting a table to text is a non-reversible action. Once a table is converted to text, it cannot be easily restored back to its original table structure. Therefore, make sure to keep a backup of the original table or make a copy before converting it to text.
Converting a table to text can be useful when you want to extract the content from a table and format it differently or perform advanced editing. It allows you to work with the text independently without the constraints of the table structure.
By mastering the ability to convert tables to text in Microsoft Word, you can easily extract and manipulate your table content to meet your specific document requirements.
Using Formulas in a Table
In Microsoft Word, tables are not limited to just organizing and presenting data—they also provide the functionality to perform calculations using formulas. This feature enables you to leverage the power of tables to automatically calculate values based on specified formulas. In this section, we will explore how to use formulas in a table to perform calculations and analyze data.
To use formulas in a table, start by positioning your cursor in the cell where you want the result of the formula to appear. Then, navigate to the “Table Tools Layout” tab in the menu bar and locate the “Formula” button in the “Data” group.
Clicking on the “Formula” button will open the “Formula” dialog box. Here, you can build your formula using the available functions and references. You can perform basic arithmetic operations such as addition, subtraction, multiplication, and division, as well as utilize more advanced functions like summing a range of cells or finding the average of a set of values.
Within the “Formula” dialog box, you can also reference other cells in your table by clicking on the cell reference buttons or manually inputting the cell references. This allows you to create formulas that dynamically update based on changes in the referenced cells.
Once you have entered the desired formula, click “OK” to apply it to the selected cell. The result of the formula will be calculated and displayed in the cell. As you modify the values of the referenced cells, the formula will automatically recalculate and update the result.
Formulas in tables are particularly beneficial when working with large sets of data. They allow you to perform complex calculations and analysis without the need for manual calculations or using external tools. Whether you need to calculate totals, averages, percentages, or other mathematical operations, formulas in tables offer a convenient and efficient way to handle your data.
By understanding how to use formulas in Microsoft Word tables, you can take your data analysis and calculations to the next level. Utilize the available functions, references, and arithmetic operations to create dynamic and accurate formulas that streamline your workflow and provide valuable insights from your table data.
Moving and Resizing a Table
In Microsoft Word, tables offer flexibility in terms of their placement and size within a document. You can easily move and resize tables to ensure they fit seamlessly within your content. In this section, we will explore how to move and resize tables to achieve the desired positioning and dimensions.
To move a table, hover your cursor over the table until it changes to a four-headed arrow. Click and hold the left mouse button, then drag the table to the desired location within your document. Release the mouse button to drop the table into its new position.
Resizing a table allows you to adjust its width and height to better accommodate your content. To resize a table, position your cursor over one of the table’s edges until it changes to a double-headed arrow. Click and hold the left mouse button, then drag the edge to expand or contract the table accordingly. Release the mouse button to set the new size.
You can also resize a table by selecting it and navigating to the “Layout” tab in the menu bar. In the “Table Size” group, you will find options to specify precise measurements for the table’s width and height. Enter the desired values or use the up and down arrows to adjust the size accordingly. Click “OK” to apply the changes.
Another way to move or resize a table is by utilizing the “Table Tools Layout” tab. Once you have selected the table, this tab provides additional options in the “Table Size” group, such as autofitting the table to the content or distributing columns evenly. These options can help you quickly adjust the table’s layout based on your content needs.
Remember, when moving or resizing a table, be mindful of its surrounding content to ensure a visually appealing and balanced layout. It may be necessary to adjust the surrounding text or other elements to maintain the document’s overall design.
By mastering the ability to move and resize tables in Microsoft Word, you can create visually pleasing and well-organized documents. Experiment with different placements and sizes to optimize the table’s appearance and maximize its impact within your content.
Using Table Tools Layout and Design Tabs
In Microsoft Word, the Table Tools Layout and Design tabs provide a wide range of options and features to help you customize and enhance your tables. These tabs offer a variety of tools that allow you to modify the structure, appearance, and functionality of your tables. In this section, we will explore how to utilize the Table Tools Layout and Design tabs to create and optimize your tables.
The Table Tools Layout tab is focused on the overall layout and structure of your table. It provides options to insert and delete rows, columns, and cells, as well as tools to merge or split cells. You can adjust the height and width of rows and columns, either manually or by using the AutoFit feature to automatically adjust the size based on content or window size. The Layout tab also allows you to align and distribute content within the table, making it easy to create visually balanced and organized tables.
The Table Tools Design tab, on the other hand, is dedicated to the visual appearance of your table. It offers various pre-designed table styles that can be applied with a single click. These styles provide consistent and professional formatting, including fonts, colors, borders, and shading. By selecting a style, you can quickly transform your table into a visually appealing element that matches your document’s theme or design.
In addition to pre-designed styles, the Design tab also allows you to customize your table further. You can modify the table borders, background colors, and font attributes to create a unique look for your table. This tab also offers options to add a header row or a total row, as well as options for sorting and filtering data within the table.
Both the Layout and Design tabs also provide access to advanced table properties and options. You can fine-tune cell margins, configure table properties such as the text direction, set the preferred size for specific cells, adjust padding, and more.
By utilizing the Table Tools Layout and Design tabs in Microsoft Word, you can have full control over the structure, appearance, and functionality of your tables. These powerful tabs offer a comprehensive set of tools that allow you to create visually appealing and well-organized tables that effectively communicate your data and information.