
Downloading Microsoft Edge for Android
Microsoft Edge is a fast and secure web browser that can be easily downloaded and installed on your Android device. By using Microsoft Edge, you can enjoy a seamless browsing experience and take advantage of its wide range of features and functionalities. Here’s a step-by-step guide on how to download and install Microsoft Edge on your Android device:
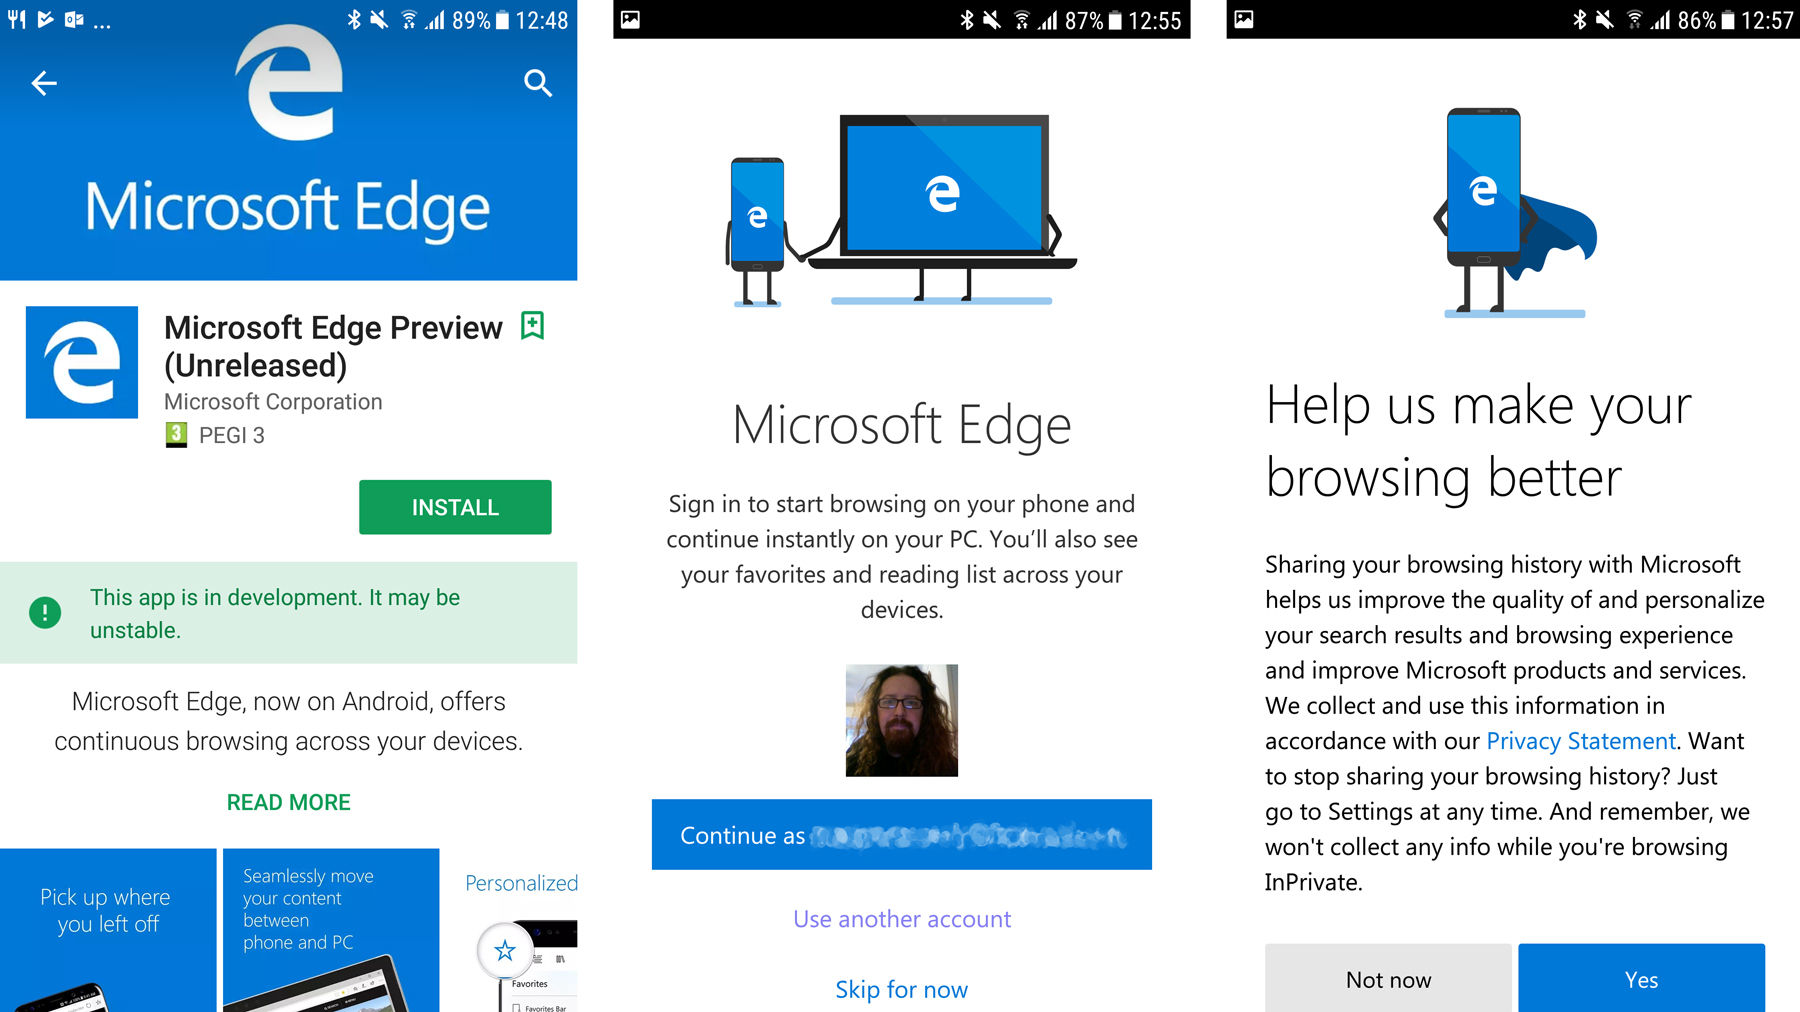
- Open the Google Play Store on your Android device.
- In the search bar, type “Microsoft Edge” and tap the search icon.
- From the search results, select the official Microsoft Edge app.
- Tap the “Install” button to start the download and installation process.
- Wait for the app to be downloaded and installed on your device.
- Once the installation is complete, you can find the Microsoft Edge icon on your home screen or app drawer.
- Tap the Microsoft Edge icon to launch the browser.
Congratulations! You have successfully downloaded and installed Microsoft Edge on your Android device. Now, you can start exploring the features and functionalities that the browser has to offer.
Microsoft Edge provides a user-friendly interface and offers numerous tools to enhance your browsing experience. Whether you’re searching for information, browsing websites, or managing your bookmarks, Microsoft Edge for Android is designed to provide a seamless and efficient experience.
Next, we will guide you through the process of setting up Microsoft Edge and customizing its settings to suit your preferences. Stay tuned!
Installing Microsoft Edge for Android
Installing Microsoft Edge on your Android device is a straightforward process. Once you have downloaded the app from the Google Play Store, follow these steps to complete the installation:
- Locate the Microsoft Edge app on your device’s home screen or app drawer.
- Tap on the app icon to launch Microsoft Edge.
- You will be presented with a welcome screen. Tap the “Get Started” button to proceed.
- Next, you will be prompted to choose your preferred browsing mode. You can select either “Personal” or “Work/School” mode, depending on your usage preferences.
- After selecting your browsing mode, Microsoft Edge will ask for certain permissions, such as access to your device’s location and storage. Grant the necessary permissions to continue.
- Once you’ve granted the required permissions, Microsoft Edge will proceed with the initial setup process.
- If you have a Microsoft account, you can sign in to sync your browsing data across devices. Simply enter your Microsoft account credentials and follow the on-screen instructions.
- If you don’t have a Microsoft account or prefer not to sign in, you can use Microsoft Edge as a guest by tapping the “Continue as Guest” option.
- Microsoft Edge will then ask if you want to set it as your default browser. You can choose to set it as the default or opt out if you prefer to keep your current default browser.
- Once you’ve made your selection, Microsoft Edge will finish the setup process and take you to the browser’s homepage.
That’s it! You have successfully installed Microsoft Edge on your Android device. You are now ready to explore all the features and functionalities offered by the browser.
Having Microsoft Edge on your Android device allows you to seamlessly browse the internet, sync your data across devices, and enjoy a variety of customization options. In the next section, we will guide you through the process of setting up Microsoft Edge and customizing its settings to enhance your browsing experience.
Setting up Microsoft Edge for Android
Now that you have installed Microsoft Edge on your Android device, it’s time to set it up and customize the browser according to your preferences. Here’s a step-by-step guide on how to set up Microsoft Edge:
- Launch Microsoft Edge by tapping on the app icon.
- If you have a Microsoft account, you can sign in to sync your browsing data across devices. Tap on the “Sign in” button and enter your Microsoft account credentials. If you prefer not to sign in, you can skip this step.
- Once you’re signed in, Microsoft Edge will start syncing your bookmarks, browsing history, and other data to your account.
- Next, you can customize your browsing experience by accessing the settings. To do this, tap on the three-dot menu icon located at the bottom right corner of the browser interface.
- From the menu that appears, select “Settings.”
- Within the settings, you’ll find various options to personalize your browsing experience. You can customize your home page, modify search engine preferences, manage downloads, and more.
- Explore the different sections within the settings menu and adjust the options to your liking.
- If you want to change the appearance of Microsoft Edge, you can access the “Appearance” section in settings. Here, you can choose from different themes and customize the browser’s overall look.
- Additionally, you can enable or disable features such as the built-in ad blocker, password manager, and dark mode to further enhance your browsing experience.
- Once you’ve made all the desired adjustments, you’re all set to start using Microsoft Edge on your Android device.
By setting up Microsoft Edge to your preferences, you can maximize your productivity and enjoy a seamless browsing experience tailored to your needs. In the next section, we will explore the various features and functionalities of Microsoft Edge that can enhance your browsing experience even further.
Navigating the Microsoft Edge Interface
Once you have set up Microsoft Edge on your Android device, it’s time to familiarize yourself with the browser’s interface. Navigating through Microsoft Edge is intuitive and user-friendly, allowing you to browse the web seamlessly. Here’s a guide on how to navigate the Microsoft Edge interface:
1. Address Bar: The address bar, also known as the Omnibox, is located at the top of the browser screen. You can use it to enter web addresses (URLs) or search queries.
2. Tab Management: Microsoft Edge allows you to browse with multiple tabs open simultaneously. To open a new tab, tap the plus (+) icon next to the currently open tab. You can switch between tabs by swiping left or right or by tapping the square icon at the top right corner of the browser, which shows a list of open tabs.
3. Navigation Buttons: Located just below the address bar, the navigation buttons allow you to go back or forward in your browsing history. You can use the arrow icons to navigate through the pages you have visited.
4. Menu Options: Tap the three-dot icon at the bottom right corner of the browser to access the menu options. From here, you can access various features and settings, such as bookmarks, history, downloads, settings, and more.
5. Reading View: Microsoft Edge offers a reading view feature that removes distractions from web pages and presents the content in a clean, easy-to-read format. To activate Reading View, tap the book icon located on the right side of the address bar when viewing an article or blog post.
6. Gestures: Microsoft Edge supports various gesture controls to make navigating the browser even more convenient. For example, you can swipe left or right on the address bar to switch between open tabs, or swipe downward on a webpage to refresh the content.
7. Customizable Start Page: You can customize the start page of Microsoft Edge to display your favorite websites or a custom layout. To customize the start page, go to settings and select “Customize Start Page.”
By understanding and utilizing these elements of the Microsoft Edge interface, you can navigate the browser with ease and make the most out of your browsing experience. In the next section, we will delve into how you can customize Microsoft Edge settings to further personalize your browsing experience.
Customizing Microsoft Edge Settings
Microsoft Edge offers a range of customizable settings that allow you to tailor the browser according to your preferences. By adjusting these settings, you can enhance your browsing experience and make Microsoft Edge work the way you want. Here’s a guide on how to customize Microsoft Edge settings:
1. Accessing Settings: Tap the three-dot icon located at the bottom right corner of the browser to open the menu. From the menu, select “Settings” to access the browser’s settings options.
2. General Settings: In the General settings section, you can customize various aspects of the browser, including the language, default search engine, and cookies preferences.
3. Appearance: The Appearance section allows you to personalize the look and feel of Microsoft Edge. You can choose from different themes, customize the layout of the home page, and even enable a dark mode for a more comfortable browsing experience in low-light environments.
4. Privacy and Security: Microsoft Edge prioritizes your privacy and offers several privacy and security settings. In this section, you can manage your privacy preferences, control how cookies and site data are handled, and even block unwanted pop-ups and advertisements.
5. Accessibility: Microsoft Edge includes accessibility features to make browsing easier for individuals with disabilities. In the Accessibility settings, you can enable features like read aloud, high contrast mode, and more to make browsing more inclusive.
6. Synchronization: If you have a Microsoft account, you can sync your browsing data across devices. In the Sync settings, you can choose which data to sync, including your bookmarks, history, passwords, and open tabs.
7. Advanced settings: The Advanced settings section provides additional options for advanced users. Here, you can manage site permissions, configure experimental features, change proxy settings, and more.
8. Reset and Cleanup: If you encounter any issues with Microsoft Edge, the Reset and Cleanup settings allow you to restore the browser’s default settings or clear browsing data like cookies, cache, and history.
By exploring and customizing these settings, you can make Microsoft Edge work in a way that aligns with your browsing preferences. Take the time to adjust the settings to suit your needs and enhance your overall browsing experience. In the next section, we will delve into how you can sync your data with Microsoft Edge to access your bookmarks, browsing history, and more across devices.
Syncing Your Data with Microsoft Edge
One of the key advantages of using Microsoft Edge is the ability to sync your browsing data across devices. By syncing your data, you can seamlessly access your bookmarks, browsing history, and other personalized settings on any device where you have Microsoft Edge installed. Here’s a step-by-step guide on how to sync your data with Microsoft Edge:
1. Sign in to your Microsoft Account: To enable data syncing, you need to sign in to your Microsoft account. Tap the three-dot icon at the bottom right corner of the browser to open the menu, select “Settings”, and then tap on your Microsoft account name to sign in or create a new account if you don’t have one.
2. Enable Sync: After signing in, go to the Sync settings. Here, you can choose what data you want to sync, such as bookmarks, open tabs, browsing history, and passwords. Toggle the switch for each option to enable or disable syncing according to your preference.
3. Sync Across Devices: Once you have configured the sync settings on your Android device, the data will automatically be synced across all devices where you have signed in with the same Microsoft account. This means that you can access your bookmarks, browsing history, and other data seamlessly on your Windows PC, iOS device, or any other device with Microsoft Edge installed.
4. Manage Synced Data: If you want to manage your synced data or remove specific items from your sync, you can do so by going to the Sync settings. From there, you can clear browsing history, remove specific bookmarks, or manage other synced data as per your preference.
By syncing your data with Microsoft Edge, you can have a unified browsing experience across multiple devices. Whether you’re on the go with your Android device or working from your desktop, you can pick up where you left off and have all your important data readily available.
Keep in mind that syncing your data requires an internet connection. Changes made on one device may take a short amount of time to reflect on other devices due to the synchronization process.
In the next section, we will explore how to make the most of the search bar in Microsoft Edge, allowing you to quickly find information on the web.
Using the Search Bar in Microsoft Edge
The search bar in Microsoft Edge is a powerful tool that allows you to quickly find information on the web. It provides a seamless browsing experience, enabling you to search for websites, navigate to specific URLs, or perform quick keyword searches without having to visit a search engine separately. Here’s how you can make the most of the search bar in Microsoft Edge:
1. Entering a URL: You can use the search bar as a traditional URL input by typing a complete web address (e.g., www.example.com) and hitting Enter. Microsoft Edge will then load the specified website.
2. Performing Keyword Searches: Simply type in a search query or keywords relevant to what you are looking for, and Microsoft Edge will display search results based on your query. You can also choose your preferred search engine by going to the browser’s settings and selecting your desired search engine.
3. Search Suggestions: As you type in the search bar, Microsoft Edge provides real-time search suggestions based on your input. These suggestions can help you refine your search and find desired information more quickly.
4. Search within a Website: Microsoft Edge also allows you to search within specific websites directly from the search bar. Type the website name followed by a space and your search query to narrow down your results to that particular website.
5. Voice Search: If your Android device supports it, you can also use voice search in Microsoft Edge. Simply tap the microphone icon in the search bar, speak your query, and Microsoft Edge will perform a voice search to find the information you need.
6. Instant Answers: Microsoft Edge provides instant answers for certain types of queries. For example, if you search for a weather forecast, Microsoft Edge will display the current weather conditions and forecast right within the search results page.
7. Managing Search Engines: In the browser’s settings, you can customize and manage the search engines available in the search bar. You can add, remove, or set a default search engine according to your preference.
By utilizing the search bar in Microsoft Edge, you can search the web efficiently, find relevant information, and navigate to websites without the need for multiple steps. It’s a convenient feature that streamlines your browsing experience and helps you find what you’re looking for with ease.
In the next section, we will delve into the browsing features offered by Microsoft Edge on Android, including tabs, bookmarks, and collections.
Browsing with Microsoft Edge on Android
Microsoft Edge on Android provides a seamless browsing experience, allowing you to explore the web efficiently and securely. With a user-friendly interface, customizable features, and a range of browsing tools, Microsoft Edge offers a robust browser experience on your Android device. Here’s a guide on how to browse the web effectively with Microsoft Edge:
1. Tab Management: Microsoft Edge enables you to browse with multiple tabs open. You can open a new tab by tapping the plus (+) icon next to the currently open tab. To switch between tabs, swipe left or right or tap the square icon at the top right corner of the browser to view a list of open tabs.
2. Bookmarks: Saving and organizing your favorite websites is easy with Microsoft Edge’s bookmarking feature. To bookmark a webpage, tap the star icon in the address bar. You can access your bookmarks by tapping the three-dot menu icon and selecting “Bookmarks.” From there, you can organize, edit, and delete your bookmarks as needed.
3. Collections: Microsoft Edge offers a Collections feature that allows you to gather and organize content from the web. You can use Collections to save articles, images, and information from different websites. To access Collections, tap the star icon in the address bar and select the “Collections” tab.
4. Reading View: Microsoft Edge’s Reading View removes unnecessary distractions from web pages, providing a clean and focused reading experience. When viewing an article or blog post, tap the book icon located on the right side of the address bar to activate the Reading View.
5. InPrivate Browsing: For enhanced privacy, Microsoft Edge offers an InPrivate Browsing mode. When you browse in InPrivate mode, your browsing history, cookies, and searches are not saved. To open a new InPrivate tab, tap the three-dot menu icon and select “New InPrivate tab.”
6. Downloads: Microsoft Edge allows you to download files from the web directly to your Android device. When you encounter a file you want to download, long-press the link or image and select “Download” from the context menu. You can access your downloads by tapping the three-dot menu icon and selecting “Downloads.”
7. Site Permissions: Microsoft Edge provides control over site permissions, allowing you to manage how websites access your location, camera, microphone, and other resources. You can modify site permissions by going to the browser’s settings and selecting “Site permissions.”
By utilizing these browsing features in Microsoft Edge, you can navigate the web efficiently, organize your favorite content, and enjoy a personalized and secure browsing experience on your Android device.
In the next section, we will explore additional features of Microsoft Edge, such as managing tabs, using the Reading View, and accessing extensions.
Using Tabs in Microsoft Edge
Microsoft Edge provides a robust tab management system that allows you to multitask and navigate the web efficiently. Tabs enable you to have multiple webpages open simultaneously, making it easy to switch between different sites and organize your browsing sessions. Here’s a guide on how to effectively use tabs in Microsoft Edge:
1. Opening New Tabs: To open a new tab in Microsoft Edge, tap the plus (+) icon located next to the currently open tab. This will open a blank tab where you can enter a URL or perform a search.
2. Tab Switching: Switching between tabs in Microsoft Edge is simple. You can swipe left or right on the screen to navigate through your open tabs, or tap the square icon at the top right corner of the browser interface to view a list of all your open tabs. From the list, you can easily switch to a different tab by tapping on it.
3. Closing Tabs: To close a tab in Microsoft Edge, navigate to the tab you want to close and swipe it off-screen, either towards the left or right side. Alternatively, you can tap the small “x” icon on the top right corner of the tab.
4. Opening Closed Tabs: If you accidentally close a tab and want to reopen it, tap the three-dot menu icon and select “Recent Tabs.” This will show a list of recently closed tabs from which you can choose the one you want to reopen.
5. Duplicating Tabs: If you want to have multiple instances of the same webpage open, tap and hold the tab you want to duplicate, then select “Duplicate” from the context menu. This will create an identical tab with the same page loaded.
6. Organizing Tabs: Microsoft Edge allows you to easily organize your tabs for a more streamlined browsing experience. You can rearrange the order of your tabs by long-pressing and dragging them to the desired position. You can also group tabs together by dragging one tab onto another, creating a tab group that you can expand or collapse for convenience.
7. Sending Tabs to Other Devices: If you have signed in with your Microsoft account, you can send tabs from your Android device to other synced devices running Microsoft Edge. To do this, tap the share icon on the tab you want to send and select the device you want to send it to.
By effectively using tabs in Microsoft Edge, you can manage your browsing sessions, keep track of multiple websites, and switch between them seamlessly. This feature enhances your productivity and allows you to stay organized while browsing the web on your Android device.
In the next section, we will explore how to add and manage bookmarks in Microsoft Edge, enabling you to save and access your favorite websites with ease.
Adding and Managing Bookmarks in Microsoft Edge
Bookmarks are a handy tool for saving and organizing your favorite websites in Microsoft Edge. They allow you to quickly access your preferred sites and keep your browsing experience efficient and personalized. Here’s a guide on how to add and manage bookmarks in Microsoft Edge:
1. Adding Bookmarks: To add a bookmark in Microsoft Edge, navigate to the webpage you want to save. Tap the star icon in the address bar, and a popup will appear. You can edit the bookmark’s name and choose the desired folder to save it in. Once you’re done, tap “Done” to add the bookmark.
2. Accessing Bookmarks: To access your bookmarks, tap the three-dot menu icon in the browser’s interface and select “Bookmarks.” Here, you’ll find all your saved bookmarks organized in folders. Tap on a folder to view its contents or tap on a specific bookmark to open the associated webpage.
3. Managing Bookmarks: Microsoft Edge allows you to organize and manage your bookmarks to suit your needs. To edit a bookmark’s name or folder, long-press on the bookmark and select “Edit.” You can also delete bookmarks by long-pressing on them and selecting “Delete” from the context menu.
4. Creating Folders: You can create folders to better organize your bookmarks. To create a folder, go to the bookmarks section and tap the three-dot menu icon. Select “New folder” and give it a name. You can then move bookmarks into the new folder by editing their properties.
5. Importing and Exporting Bookmarks: If you have bookmarks saved in another browser or device, you can import them into Microsoft Edge. From the bookmarks section, tap the three-dot menu icon, select “Import bookmarks,” and follow the on-screen instructions. You can also export your bookmarks from Microsoft Edge to a file, which can be useful for backup purposes or transferring them to another device.
6. Syncing Bookmarks: If you’re signed in to Microsoft Edge with your Microsoft account, your bookmarks will be automatically synced across all your devices. This means you can access your bookmarks from your Android device, Windows PC, or any other device with Microsoft Edge installed.
By adding and managing bookmarks in Microsoft Edge, you can save your favorite websites, keep them organized, and easily access them whenever you need. This feature enhances your browsing experience and helps you stay productive while exploring the web on your Android device.
In the next section, we will explore an additional feature of Microsoft Edge known as Collections, which allows you to gather and organize content from the web in a convenient way.
Using Microsoft Edge Collections Feature
The Collections feature in Microsoft Edge provides a convenient way to gather and organize content from the web. Whether you’re researching for a project, planning a trip, or simply collecting inspiration, Collections allows you to curate and manage information in a structured and efficient manner. Here’s how you can use the Collections feature in Microsoft Edge:
1. Create a New Collection: To create a new collection, click on the Collections icon located at the top right corner of the browser interface. From there, click on the “Start new collection” button. Give your collection a name and start adding content to it.
2. Add Content to a Collection: Once you have created a collection, you can begin adding content to it. You can add webpages, images, text snippets, and even PDFs. To add a webpage, click on the “Add current page” button in the collection interface. For other types of content, select the desired text or image, right-click, and choose “Add to collections.”
3. Organize and Edit Collections: Collections can be organized by grouping related content or reordering items within a collection. Use drag-and-drop functionality to rearrange items or group them together. To edit a collection, click on the collection’s title and make any necessary changes.
4. Exporting and Sharing Collections: Microsoft Edge allows you to export collections as a text file or send them directly via email. This can be useful for sharing information with colleagues, collaborators, or friends.
5. Working with Collections on Mobile: Collections seamlessly sync across your devices, including your Android device. You can view and edit collections on the go, making it convenient to access the information you’ve gathered from anywhere.
6. Using Collections for Productivity: Collections can be a powerful tool for productivity. You can use them to gather research material, create reading lists, compile recipes, or plan trips. The flexibility of the collections feature allows you to adapt it to various personal and professional needs.
By utilizing the Collections feature in Microsoft Edge, you can efficiently gather, organize, and manage content from the web. It’s a valuable tool for saving time, staying organized, and enhancing your productivity while browsing on your Android device or other devices with Microsoft Edge installed.
In the next section, we will explore how to use the Reading View feature in Microsoft Edge, providing a distraction-free reading experience for web articles and blog posts.
Using Microsoft Edge Reading View
Microsoft Edge’s Reading View feature provides a distraction-free reading experience for web articles and blog posts. With Reading View, you can eliminate clutter, focus on the content, and enhance your reading comprehension. Here’s how to use the Reading View feature in Microsoft Edge:
1. Activating Reading View: When viewing an article or blog post, look for the book icon located on the right side of the address bar. Simply tap the book icon to activate Reading View.
2. Optimizing Reading View: Once you activate Reading View, Microsoft Edge will reformat the page, removing unnecessary elements such as ads, sidebars, and navigation menus. The content will be presented in a clean, easy-to-read format.
3. Adjusting Reading Preferences: Microsoft Edge allows you to customize the appearance of Reading View to suit your preferences. To access the Reading Preferences, tap the “Aa” icon in the address bar. From there, you can adjust parameters such as text size, font, background color, and theme.
4. Changing the Reading View Layout: By default, Reading View displays the content in a single-column layout. However, you can switch to a multi-column layout for a newspaper-like reading experience. To change the layout, tap the two-column icon in the bottom bar while in Reading View.
5. Using Reading View with Immersive Reader: Microsoft Edge’s Reading View is seamlessly integrated with Immersive Reader, a feature that provides additional enhancements for reading. Immersive Reader allows you to adjust text spacing, line focus, and even have the text read aloud to you. To access Immersive Reader, tap the book icon at the top right corner of the Reading View interface.
6. Exiting Reading View: To exit Reading View and return to the regular webpage view, tap the book icon again. This will revert the webpage to its original format.
By utilizing the Reading View feature in Microsoft Edge, you can eliminate distractions, improve readability, and focus on the content of web articles and blog posts. Whether you’re engaged in research, studying, or simply enjoying a good read, the Reading View feature provides a comfortable and immersive reading experience on your Android device.
In the next section, we will explore the InPrivate browsing mode in Microsoft Edge, offering private and secure browsing sessions.
Using InPrivate Mode in Microsoft Edge
Microsoft Edge offers an InPrivate mode that allows you to browse the web privately and securely. When using InPrivate mode, your browsing history, cookies, and searches are not saved, ensuring a more confidential browsing experience. Here’s how to use InPrivate mode in Microsoft Edge:
1. Opening an InPrivate Tab: To open an InPrivate tab in Microsoft Edge, tap the three-dot menu icon at the bottom right corner of the browser interface. Then, select “New InPrivate tab.” A new tab will open, indicating that you’re in the InPrivate browsing mode.
2. Recognizing InPrivate Tabs: InPrivate tabs can be identified by the blue “InPrivate” indicator located in the address bar. This helps you differentiate between regular browsing tabs and InPrivate tabs.
3. Browsing Privately: When you browse in InPrivate mode, Microsoft Edge does not save your browsing history, cookies, form data, or any other browsing information. This ensures that your browsing activity remains private and is not stored on your device.
4. InPrivate Extensions: If you have installed browser extensions in Microsoft Edge, you can choose whether these extensions are allowed to run in InPrivate mode. To customize this setting, go to the browser’s settings, select “Privacy, search, and services,” and then navigate to the “InPrivate” section.
5. Exiting InPrivate Mode: To exit InPrivate mode and return to normal browsing, simply close the InPrivate tab. This will remove any traces of your browsing activity while in InPrivate mode, ensuring your privacy is maintained.
6. Using InPrivate for Specific Websites: If you want to open a specific website in InPrivate mode, you can do so by long-pressing a link on a webpage or in an external app and selecting “Open in new InPrivate tab.” This allows you to browse specific websites privately while keeping other tabs in regular browsing mode.
By utilizing the InPrivate mode in Microsoft Edge, you can browse the web without leaving a trace of your activity on your Android device. This feature is particularly useful when accessing sensitive information or using public computers where you want to ensure your privacy and security.
In the next section, we will explore how to download files with Microsoft Edge, making it convenient to save and access documents, images, and other files from the web.
Downloading Files with Microsoft Edge
Microsoft Edge allows you to download files from the web directly to your Android device, making it convenient to save and access documents, images, and other files. Whether it’s downloading a PDF for offline reading or saving an image to your gallery, here’s how you can download files with Microsoft Edge:
1. Identifying Downloadable Content: When you come across a file on a webpage that you want to download, tap and hold on the link or image. A context menu will appear with options related to the file.
2. Initiating the Download: From the context menu, select “Download” or “Save link” to initiate the download process. The file will begin downloading in the background, and you can monitor the progress in the notification panel.
3. Accessing Downloaded Files: After the download is complete, you can access the downloaded files by tapping the three-dot menu icon in Microsoft Edge and selecting “Downloads.” This will open the Downloads manager, where you can view and manage all your downloaded files.
4. Opening Downloaded Files: To open a downloaded file, tap on its entry in the Downloads manager. Microsoft Edge will utilize the appropriate app on your device to open the file based on its type. For example, PDF files will be opened in a PDF reader, images in the image viewer, and so on.
5. Changing the Download Location: By default, downloaded files are saved to the device’s Downloads folder. However, you can change the download location to a different folder on your device. To do this, go to the browser’s settings, select “Site permissions,” and then choose “Downloads.” From there, you can specify a custom download location.
6. Clearing Download History: If you want to remove files from your download history, go to the browser’s settings, select “Privacy, search, and services,” and then navigate to the “Clear browsing data” section. From there, you can choose to clear download history along with other browsing data.
With the ability to download files directly with Microsoft Edge, you can conveniently save and access various types of content from the web on your Android device. Whether it’s important documents, memorable images, or other files, Microsoft Edge offers a streamlined and intuitive downloading experience.
In the next section, we will explore how to manage cookies and site permissions in Microsoft Edge, giving you more control over website behavior and your browsing preferences.
Managing Cookies and Site Permissions in Microsoft Edge
Microsoft Edge provides you with control over cookies and site permissions, allowing you to manage how websites access your data and behave while browsing. By customizing these settings, you can enhance your privacy, security, and overall browsing experience. Here’s how to manage cookies and site permissions in Microsoft Edge:
1. Accessing Cookie and Site Permissions: To manage cookies and site permissions, tap the three-dot menu icon at the bottom right corner of the browser interface. From there, select “Settings,” and then navigate to the “Site permissions” section.
2. Managing Cookies: Microsoft Edge enables you to control how cookies are handled. Tap on “Cookies and site data” to access the cookie settings. From here, you can allow or block cookies, clear cookies and site data, and manage exceptions for specific websites.
3. Controlling Pop-ups and Redirects: In the “Pop-ups and redirects” section, you can enable or disable pop-ups and redirects from websites. This helps to prevent intrusive pop-up windows and unwanted website redirections.
4. Managing Permissions: Microsoft Edge allows you to manage various site permissions. Tap on “Permissions” to access settings such as location, camera, microphone, notifications, and more. You can control which websites have access to these resources, blocking or allowing them based on your preferences.
5. Handling Automatic Downloads: Under “Downloads,” you can control whether websites can automatically initiate file downloads. You can choose to block automatic downloads completely, or set specific permissions for certain websites.
6. Managing Insecure Content: The “Insecure content” section enables you to decide how Microsoft Edge handles HTTP content on secure (HTTPS) websites. You can block insecure content, allowing only secure elements to be loaded, or choose to display a warning when loading insecure resources.
7. Clearing Site Data: If you want to remove site data and permissions for specific websites, go to the “Clear browsing data” section in the browser’s settings. From there, you can choose to clear site data while preserving other browsing information.
By managing cookies and site permissions in Microsoft Edge, you have greater control over your online privacy and can customize your browsing experience. These settings enable you to protect your data, control website access to your resources, and ensure a more secure and personalized browsing environment on your Android device.
In the next section, we will explore how to access and manage extensions in Microsoft Edge, expanding the browser’s functionality and enhancing your browsing experience.
Accessing and Managing Extensions in Microsoft Edge
Microsoft Edge allows you to enhance your browsing experience by installing and managing extensions. Extensions are small software programs that add extra functionality and features to the browser. With a wide range of extensions available, you can customize Microsoft Edge to suit your needs and preferences. Here’s how to access and manage extensions in Microsoft Edge:
1. Accessing the Extensions Menu: Tap the three-dot menu icon at the bottom right corner of the browser interface, and then select “Extensions.”
2. Browsing the Extensions Store: The Extensions menu will display the installed extensions and provide options to manage them. To explore and install new extensions, tap on the “Get extensions from Microsoft Store” link. This will direct you to the Microsoft Edge Extensions Store.
3. Searching and Installing Extensions: In the Extensions Store, you can browse through various categories or search for specific extensions. Once you find an extension you want to install, tap the extension’s listing, and then select the “Get” or “Install” button. The extension will be downloaded and added to your browser.
4. Managing Installed Extensions: To manage your installed extensions, return to the Extensions menu. From there, you can view all your installed extensions and access individual extension settings. You can enable or disable individual extensions, access their options, or uninstall unwanted ones.
5. Working with Extension Options: Some extensions have specific settings or options that you can customize. To access an extension’s options, go to the Extensions menu, find the extension you want to configure, and click on the “Options” or “Settings” link provided for that extension.
6. Updating and Removing Extensions: Microsoft Edge will automatically update extensions to their latest versions. If you no longer need or want an extension, you can remove it by going to the Extensions menu, finding the extension you want to remove, and clicking on the “Remove” or “Uninstall” button.
By accessing and managing extensions in Microsoft Edge, you can extend the browser’s functionality and add features that enhance your productivity, security, and browsing experience. Whether it’s ad blockers, password managers, or productivity tools, extensions allow you to tailor and personalize Microsoft Edge according to your unique needs on your Android device.
In the next section, we will explore using Microsoft Edge on Android with a Microsoft account, unlocking additional features and syncing capabilities.
Using Microsoft Edge for Android with a Microsoft Account
By signing in to Microsoft Edge on your Android device with a Microsoft account, you unlock additional features and enjoy a more seamless browsing experience. With a Microsoft account, you can sync your browsing data, access personalized settings, and take advantage of various services offered by Microsoft. Here’s how to use Microsoft Edge for Android with a Microsoft account:
1. Signing in to Microsoft Edge: Open Microsoft Edge on your Android device and tap the three-dot menu icon in the browser interface. From there, select “Settings” and tap on your Microsoft account name. Sign in with your Microsoft account credentials or create a new account if you don’t have one.
2. Syncing Browsing Data: Once signed in, you can choose to sync your browsing data across devices. This includes bookmarks, history, open tabs, and more. To manage synchronization settings, go to the “Sync” section in Microsoft Edge settings, where you can toggle the specific types of data you want to sync.
3. Accessing Personalized Settings: With a Microsoft account, you can personalize your browsing experience by accessing and modifying settings specific to your account. These settings may include your preferred language, search engine, homepage layout, and other personalized options.
4. Connecting with Microsoft Services: By signing in to Microsoft Edge with your Microsoft account, you can link with other Microsoft services and access their features seamlessly. This may include integrations with Outlook.com, OneDrive, Microsoft Office online, and more.
5. Browsing Continuity: With a Microsoft account, you can seamlessly transition your browsing from one device to another. For example, you can start browsing on your Android device, and continue where you left off on your Windows PC or other devices with Microsoft Edge installed. This ensures your browsing sessions are always in sync.
6. Microsoft Rewards: By signing in to Microsoft Edge with your Microsoft account, you can participate in the Microsoft Rewards program. Earn points for searching the web and completing tasks, and redeem them for gift cards, discounts, or other rewards.
By using Microsoft Edge for Android with a Microsoft account, you can unlock additional features, enjoy personalized browsing settings, and seamlessly access your data and services across devices. This integration enhances your browsing experience, productivity, and connectivity with the broader Microsoft ecosystem on your Android device.
In the next section, we will explore troubleshooting common issues with Microsoft Edge on Android, providing solutions to common problems you might encounter.
Troubleshooting Common Issues with Microsoft Edge on Android
While Microsoft Edge on Android is generally a stable and reliable browser, you may encounter occasional issues that can disrupt your browsing experience. Here are some common issues and their solutions to help troubleshoot problems with Microsoft Edge on Android:
1. Browser Crashing: If Microsoft Edge crashes or becomes unresponsive, try closing the app and relaunching it. If the issue persists, clear the browser cache and data from your Android device settings, or uninstall and reinstall the app.
2. Slow Performance: If Microsoft Edge is running slow, make sure you have a stable internet connection. Slow performance can also be due to excessive cache and browsing data. Try clearing the browser cache and data from the app settings, or closing unnecessary tabs and extensions to free up system resources.
3. Compatibility Issues: Some websites may not display or function properly in Microsoft Edge due to compatibility issues. If you encounter this problem, try refreshing the webpage or opening it in a different browser to determine if the issue is specific to Microsoft Edge.
4. Syncing Issues: If your bookmarks, history, or other data is not syncing properly across devices, ensure that you’re signed in with the same Microsoft account on all devices. Check your sync settings in Microsoft Edge to ensure the data types you want to sync are enabled. Additionally, verify that you have a stable internet connection and that sync is not restricted by any firewall or security settings.
5. Website Login Problems: If you’re having trouble logging in to a website, ensure that you’re entering the correct username and password. Clear any saved passwords and try logging in again. If the issue persists, check if the website’s login functionality is working correctly by attempting to log in using a different browser.
6. Extension Compatibility: If an installed extension is causing issues or interfering with the browser’s functionality, try disabling or uninstalling the extension. You can manage extensions by going to the Extensions menu in Microsoft Edge settings.
7. Outdated App Version: Ensure that you have the latest version of Microsoft Edge installed on your Android device. Visit the Google Play Store and check for any available updates. Updating the app can resolve known issues and provide improved stability and performance.
If you encounter persistent issues with Microsoft Edge on Android that cannot be resolved through the above troubleshooting steps, consider contacting Microsoft Support or visiting the Microsoft Edge community forums for further assistance.
Remember that providing feedback to Microsoft through the app’s settings can also help the development team identify and address any bugs or performance issues.
In the next section, we will provide tips and tricks for optimizing your experience with Microsoft Edge on Android, enhancing your productivity and enjoyment while using the browser.
Tips and Tricks for Optimizing Your Experience with Microsoft Edge on Android
Microsoft Edge on Android offers a range of features and functionalities that can enhance your browsing experience. By utilizing these tips and tricks, you can optimize your experience with Microsoft Edge and make the most out of its capabilities:
1. Enable Dark Mode: If you prefer a dark color scheme, enable the Dark Mode in Microsoft Edge. Go to the browser’s settings, select “Appearance,” and toggle on the Dark Mode switch. This reduces eye strain, especially when browsing in low-light environments.
2. Use Reader View: When browsing articles or blog posts, activate Reading View by tapping the book icon in the address bar. This removes distractions and presents the content in a clean, easy-to-read format, improving your reading experience.
3. Customize the Start Page: Personalize your start page by customizing it with your preferred websites or a layout that suits your needs. Go to the browser’s settings, select “Customize Start Page,” and choose the desired options.
4. Try Immersive Reader: For an enhanced reading experience, take advantage of Immersive Reader. Tap the book icon at the top right corner of the Reading View interface to access Immersive Reader. Customize settings such as text spacing, line focus, and even listen to the text being read aloud.
5. Utilize Tab Groups: Organize your tabs by using the Tab Groups feature. Drag one tab onto another to create a tab group. This allows you to keep related tabs organized and easily switch between them.
6. Manage Permissions Wisely: Take control over website permissions by reviewing and managing them in the browser’s settings. Set permissions for location, camera, microphone, and notifications according to your preferences and the specific needs of each website.
7. Utilize Quick Actions: Take advantage of the Quick Actions feature, accessible by long-pressing the Microsoft Edge app icon. From here, you can quickly perform actions like opening a new tab, opening a new Incognito tab, or performing a voice search without having to open the browser first.
8. Use InPrivate Mode for Sensitive Browsing: Protect your privacy by using InPrivate mode for sensitive browsing sessions. Open an InPrivate tab by tapping the three-dot menu icon and selecting “New InPrivate tab.” This ensures that your browsing history, cookies, and searches are not saved.
9. Experiment with Edge Flags: Edge Flags are experimental features that can be enabled or disabled in Microsoft Edge. To access and enable Edge Flags, go to the browser’s flags settings. Use caution with experimental features as they may not be fully tested or stable.
10. Submit Feedback: If you encounter any issues or have suggestions for improvement, provide feedback to Microsoft through the browser’s settings. This helps the developers track and address any problems and make future enhancements to the browser.
By implementing these tips and tricks, you can optimize your experience with Microsoft Edge on Android, personalizing the browser to suit your preferences and making the most out of its features and functionalities. Enjoy a fast, secure, and seamless browsing experience on your Android device.