
Choose the Right Hard Drive
When it comes to installing a new hard drive on your laptop, the first and most crucial step is choosing the right one. With so many options available, it’s essential to consider your specific needs and requirements. Here are some factors to keep in mind when selecting a new hard drive:
- Capacity: Determine how much storage space you need. Consider the types of files you frequently work with and how much space they consume. If you deal with large media files or need ample room for software installations, opt for a higher capacity drive.
- Speed: The speed of a hard drive can significantly impact the overall performance of your laptop. Solid-State Drives (SSDs) offer faster read and write speeds compared to traditional Hard Disk Drives (HDDs). If you’re looking for improved speed and responsiveness, consider investing in an SSD.
- Interface: Check the interface compatibility between the hard drive you’re considering and your laptop. Common interfaces include SATA, NVMe, and M.2. Ensure that your laptop’s motherboard supports the chosen interface for seamless installation.
- Form Factor: Laptop hard drives come in various form factors, such as 2.5-inch and M.2. Determine which form factor is compatible with your laptop’s hard drive bay or slot to avoid any compatibility issues during installation.
Before purchasing a new hard drive, it’s a good idea to refer to your laptop’s user manual or manufacturer’s website for specific compatibility information. This will ensure that the new hard drive is fully compatible with your laptop’s hardware configuration.
By choosing the right hard drive, you’re setting yourself up for a successful and hassle-free installation process. Take the time to consider your storage needs, performance expectations, and hardware compatibility to find the perfect hard drive for your laptop.
Gather the Necessary Tools
Before you begin the process of installing a new hard drive on your laptop, it’s important to gather all the necessary tools. Having the right tools at hand will ensure a smooth and efficient installation process. Here are the essential tools you’ll need:
- Screwdriver: Depending on your laptop model, you may need a small Phillips head or a Torx screwdriver to remove the screws holding the hard drive compartment cover in place.
- Anti-static wrist strap: An anti-static wrist strap will help protect your laptop’s delicate components from electrostatic discharge. This is especially important when handling sensitive parts like the hard drive.
- Data transfer cable/enclosure: If you plan to transfer data from your old hard drive to the new one, you’ll need a data transfer cable or an external hard drive enclosure. This will facilitate easy data migration.
- Backup storage device: It’s always a good practice to back up your data before replacing the hard drive. Ensure you have an external hard drive or cloud storage account to securely store your important files and documents.
- Soft cloth or compressed air: It’s best to have a soft cloth or compressed air on hand to clean any dust or debris that may have accumulated inside the laptop’s hard drive compartment over time.
Before you start the installation, make sure you have all the necessary tools readily available. This will save you time and frustration during the process. It’s also a good idea to read through the laptop’s user manual or online documentation for any additional tools or precautions specific to your laptop model.
By gathering the necessary tools beforehand, you’ll be well-prepared to take on the task of installing a new hard drive on your laptop. A smooth and successful installation will ensure that your laptop is up and running with improved storage capacity and performance.
Back Up Your Data
Before diving into the process of installing a new hard drive on your laptop, it’s crucial to back up your data. This step ensures that you don’t lose any important files or documents during the installation process. Here’s how you can effectively back up your data:
- External Hard Drive: One of the easiest and most reliable methods is to connect an external hard drive to your laptop and manually copy all your important files to the external drive. This provides a secure backup that you can easily access after the installation.
- Cloud Storage: Another option is to utilize cloud storage services such as Google Drive, Dropbox, or OneDrive. Upload your files to the cloud before starting the installation process. This way, your files will be safely stored online and accessible from any device.
- Backup Software: There are various backup software solutions available that allow you to create a complete system backup. These tools offer features like automatic or scheduled backups, incremental backups, and system recovery options.
It’s essential to select a backup method that suits your preferences and ensures the security of your data. Be diligent in choosing a reliable storage solution that offers enough space to accommodate all your important files and documents.
Take the time to go through your files and determine which ones are essential to back up. Consider important documents, personal photos, videos, music, and any other files that you can’t afford to lose.
Once you have successfully backed up your data, you can proceed with confidence knowing that your important files are safe. This gives you peace of mind during the installation process, knowing that even if something goes wrong, you have a secure backup to rely on.
Shut Down Your Laptop
Before you start the process of installing a new hard drive on your laptop, it’s crucial to properly shut it down. Following the appropriate shutdown procedure ensures that your laptop’s components are protected and ready for the hardware replacement. Here’s how you can shut down your laptop:
1. Save your work: Make sure to save any open documents or projects that you’re currently working on. This will prevent any data loss or unfinished work when you shut down the laptop.
2. Close all programs: Close any running programs or applications on your laptop. This will free up system resources and ensure a smoother shutdown process.
3. Disconnect external devices: If you have any external devices connected to your laptop, such as USB drives, headphones, or printers, safely remove them before shutting down. This will prevent any potential data corruption or hardware conflicts during the shutdown.
4. Save and close any open browser tabs or files: If you have any web browser tabs or files open, save and close them to avoid any data loss or synchronization issues.
5. Click on the “Start” menu: On a Windows laptop, click on the “Start” button in the bottom left corner of the screen. Then, select the “Power” option to reveal the shutdown menu.
6. Choose “Shut down”: From the shutdown menu, select the “Shut down” option. This will initiate the shutdown process, and your laptop will begin to power off.
7. Wait for complete shutdown: It’s important to give your laptop enough time to fully shut down. Wait until the screen turns off, and you no longer hear any fan or hard drive activity.
Properly shutting down your laptop ensures that the system is in a clean state before you begin the hardware replacement process. This helps prevent any potential data loss, hardware issues, or other complications during the installation of the new hard drive.
Disconnect the Power Source
Before you proceed with installing a new hard drive on your laptop, it’s crucial to disconnect the power source to ensure your safety and avoid any potential damage to the hardware. Follow these steps to properly disconnect the power source:
- Save your work: Before shutting down your laptop, make sure to save any unsaved work to prevent data loss.
- Shut down your laptop: Follow the appropriate shutdown procedure as mentioned earlier to turn off your laptop completely.
- Unplug the power adapter: Locate the power adapter connected to your laptop and unplug it from the power outlet. This disconnects the flow of electricity to your laptop.
- Remove the power adapter from the laptop: Once the power adapter is unplugged, detach it from your laptop. This ensures that your laptop is not connected to any power source.
- Remove the battery: If your laptop has a removable battery, slide the battery release latch or unlock mechanism and carefully remove the battery from the laptop. This further ensures that no power is supplied to the device.
By disconnecting the power source, you eliminate the risk of electrical shocks or power surges while working with the internal components of your laptop. It’s essential to handle the hardware replacement safely and follow proper precautions to avoid any potential damage or accidents.
Ensure that you have a clean, stable surface to work on and keep all tools and components away from liquids and static-prone areas. Taking these precautions will make the installation process much smoother and safer.
Disconnecting the power source sets the stage for safely accessing and replacing the hard drive in your laptop. Once you have completed this step, you can proceed with confidence to the next stage of the installation process.
Remove the Battery
Before you start working on installing a new hard drive on your laptop, it’s important to remove the battery. This step ensures your safety and allows for easier access to the internal components. Follow these steps to remove the battery:
- Locate the battery release latch: Look for the battery release latch or unlock mechanism on the bottom or side of your laptop. It is typically marked with a battery icon.
- Slide or push the latch: Depending on your laptop model, slide or push the latch to unlock or release the battery.
- Simultaneously push and hold the latch: While holding the latch, gently slide or pull the battery out of its compartment. Make sure to pull straight, avoiding any excessive force that could damage the battery or laptop.
- Set the battery aside: Place the removed battery in a safe and dry location away from any liquids or heat sources. This will prevent any accidental damage to the battery.
Removing the battery allows you to disconnect the power supply completely and eliminates the risk of electric shock. It also ensures that your laptop is powered off and that there is no residual charge when you start working on the internal components.
Keep in mind that not all laptops have removable batteries. In some cases, the battery may be integrated into the laptop’s chassis and not easily removable. If you are unsure whether your laptop has a removable battery, refer to the manufacturer’s documentation or online resources for specific instructions.
By following these steps to remove the battery from your laptop, you are taking the necessary precaution to ensure a safe working environment and easy access to the internal components.
Locate the Hard Drive Compartment
Before you can replace the hard drive on your laptop, you need to locate the hard drive compartment. The exact location may vary depending on your laptop’s make and model, but here are some general guidelines to help you find it:
- Refer to the user manual: The user manual that came with your laptop is a valuable resource for finding specific instructions and diagrams on locating the hard drive compartment. It will provide accurate information tailored to your laptop.
- Check the laptop’s bottom panel: Many laptops have a dedicated access panel on the bottom that provides easy access to the hard drive compartment. Look for a panel with screw markings or icons indicating the hard drive.
- Inspect the side or back of the laptop: In some cases, the hard drive compartment may be located on the side or back of the laptop. Look for any labels, markings, or removable panels in those areas that may indicate the presence of the hard drive.
- Online resources: If you’re unable to locate the hard drive compartment using the above methods, you can search online for your laptop’s model number along with keywords like “hard drive compartment location.” This may lead you to user forums or guides that provide specific instructions for your laptop.
Once you have identified the location of the hard drive compartment, take note of its positioning in relation to other components to ensure a smooth and easy replacement process. It’s also a good idea to take a moment to clean any dust or debris that may have accumulated around the compartment using a soft cloth or compressed air.
Locating the hard drive compartment is the next step in replacing your laptop’s hard drive. By referring to the user manual, examining the laptop’s panels, or researching online resources, you’ll be able to find the compartment and proceed with confidence to the next stage of the installation process.
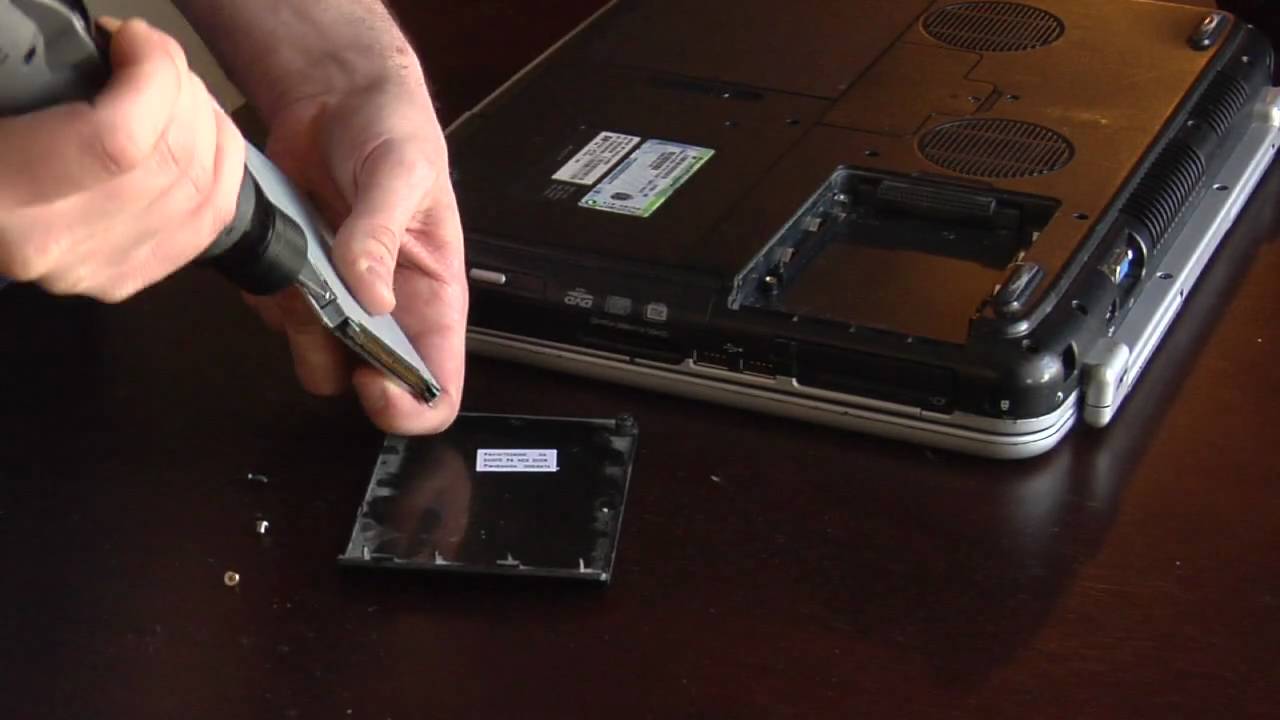
Remove the Cover Plate
Now that you’ve located the hard drive compartment on your laptop, the next step is to remove the cover plate. The cover plate provides access to the internal components, including the hard drive. Follow these steps to remove the cover plate:
- Turn your laptop upside down: Place your laptop on a flat surface and flip it over to access the bottom panel.
- Look for the screws: Examine the bottom panel for screws that secure the cover plate. They are usually marked with small icons or arrows.
- Use the appropriate screwdriver: Depending on the type of screws used, choose the correct screwdriver. It’s important to use the right size and head type to avoid damaging the screws.
- Unscrew the cover plate: Carefully loosen and remove the screws that secure the cover plate using the screwdriver. Keep the screws in a safe place to prevent loss or misplacement.
- Gently remove the cover plate: Once the screws are removed, gently pry off the cover plate using your fingers or a plastic pry tool. Start from one edge and work your way around until the cover plate is completely detached.
It’s important to be gentle when removing the cover plate to avoid any damage to the laptop’s casing or internal components. If you encounter resistance while removing the cover plate, double-check to ensure that all screws have been fully loosened before proceeding.
After removing the cover plate, set it aside in a safe location. Take a moment to inspect the interior for any signs of dust or debris, using a soft cloth or compressed air to clean if necessary. This will help ensure a clean and efficient installation process for the new hard drive.
Removing the cover plate is a crucial step in accessing the hard drive for replacement. Once the cover plate is removed, you’re one step closer to successfully installing the new hard drive in your laptop.
Disconnect the Old Hard Drive
Now that you’ve removed the cover plate, it’s time to disconnect the old hard drive from your laptop. This step involves safely disconnecting all cables and connectors connected to the old hard drive. Follow these steps to disconnect the old hard drive:
- Identify the old hard drive: Locate the old hard drive inside the hard drive compartment. It’s typically a rectangular or square-shaped component.
- Identify the cables and connectors: Take note of the cables and connectors connected to the old hard drive. These may include SATA data cables, SATA power cables, or ribbon cables depending on your laptop model.
- Disconnect the SATA data cable: Gently detach the SATA data cable from the old hard drive by releasing the locking mechanism. Carefully pull the cable straight out from the connector without applying excessive force.
- Disconnect the SATA power cable: If your old hard drive has a separate SATA power cable connected to it, unplug it by gently tugging on the connector. Make sure to grip the connector and not the cables themselves to avoid any damage.
- Disconnect any other cables: If there are any additional cables or connectors attached to the old hard drive, such as ribbon cables or jumper cables, remove them following the appropriate steps specific to your laptop model.
It’s important to handle the cables and connectors with care to avoid bending or damaging them. Take note of how the cables are connected and routed before disconnecting them. This will make it easier to reassemble everything correctly with the new hard drive later on.
Once you have safely disconnected all the cables and connectors, set the old hard drive aside in a secure location. This step prepares your laptop for the installation of the new hard drive, ensuring a smooth transition and avoiding any potential damage during the process.
By disconnecting the old hard drive, you’re one step closer to upgrading your laptop’s storage. Now it’s time to install the new hard drive and enjoy increased capacity and improved performance!
Install the New Hard Drive
With the old hard drive disconnected, it’s time to install the new hard drive into your laptop. Follow these steps to properly install the new hard drive:
- Locate the mounting area: Identify the mounting area inside the hard drive compartment where the new hard drive will be placed. It is usually a slot or bay specifically designed to accommodate the dimensions of the hard drive.
- Align the new hard drive: Align the new hard drive with the mounting area, making sure that the connectors on the hard drive are oriented correctly.
- Slide the new hard drive in: Gently slide the new hard drive into the mounting area, ensuring that it is securely seated. It should fit snugly without any forceful pushing or resistance.
- Secure the new hard drive: If there are screws or brackets provided with your laptop, use them to secure the new hard drive into place. Follow the manufacturer’s instructions or consult the user manual to properly fasten the hard drive.
- Reconnect the cables: Attach the necessary cables to the new hard drive. This includes reconnecting the SATA data cable and the SATA power cable to their respective connectors on the new hard drive.
- Ensure proper seating: Double-check that all cables are securely connected and that the new hard drive is seated properly. Make sure there are no loose connections or cables that might hinder the proper functioning of the hard drive.
When installing the new hard drive, it’s crucial to handle it with care and use gentle force when necessary. Avoid touching any exposed circuitry and hold the hard drive by its sides or edges to prevent any damage from static electricity.
By following these steps, you have successfully installed the new hard drive into your laptop. The new hard drive will provide you with increased storage capacity and potentially improved performance, allowing you to store more data and run applications more smoothly.
Connect the New Hard Drive
Now that you have installed the new hard drive in your laptop, the next step is to connect it properly. Follow these steps to ensure a secure and reliable connection:
- Locate the SATA connectors: Identify the SATA connectors on your laptop’s motherboard. These connectors are typically labeled and may be color-coded.
- Connect the SATA data cable: Take one end of the SATA data cable and insert it into the corresponding SATA connector on the motherboard. Align the holes on the connector and cable, then gently push until it is securely seated. The connector may click into place.
- Connect the SATA power cable: Take the SATA power cable and connect it to the appropriate port on the new hard drive. The power cable typically has a unique shape that only fits into the corresponding slot on the hard drive. Ensure a secure connection by inserting it firmly.
- Check the connections: Verify that both the SATA data cable and SATA power cable are securely connected to the new hard drive. Make sure there are no loose connections or cables that may come undone during use.
- Arrange the cables: Organize the cables neatly within the hard drive compartment, ensuring they do not obstruct any other components or moving parts. Use zip ties or cable clips to secure and manage the cables, if necessary.
- Replace the cover plate: Once you have connected the new hard drive, carefully place the cover plate back onto the laptop. Align the screw holes, then use the appropriate screwdriver to secure the cover plate in place. Tighten the screws firmly, but avoid over-tightening.
Double-check that all connections are secure before proceeding. A loose or improperly connected cable can cause issues with data transfer and overall functionality.
By properly connecting the new hard drive, you ensure that it is ready to be recognized by your laptop’s operating system. The secure and reliable connections will help ensure smooth data transfer and optimal performance from the newly installed hard drive.
Replace the Cover Plate
Now that you have connected the new hard drive and ensured secure and reliable connections, the next step is to replace the cover plate on your laptop. Follow these steps to properly secure the cover plate:
- Align the cover plate: Position the cover plate back onto the laptop, aligning it with the screw holes and making sure it fits snugly.
- Insert the screws: Insert the screws that you removed earlier to secure the cover plate. Use the appropriate screwdriver to tighten each screw, ensuring they are snug but not over-tightened.
- Tighten the screws: Starting from one corner, tighten each screw in a diagonal pattern until all screws are securely fastened. This helps ensure even pressure and a balanced fit of the cover plate.
- Double-check for any loose screws: After tightening all the screws, go back and double-check to ensure that there are no loose or missing screws. This helps maintain the structural integrity of the cover plate.
It’s important to handle the cover plate and screws with care to avoid any damage to the laptop’s casing. Use gentle force when tightening the screws, being mindful not to overtighten and strip the threads.
By replacing the cover plate, you are not only securing the new hard drive in its proper place but also protecting the internal components from dust and other potential damage.
Once you have securely replaced the cover plate, the new hard drive is now properly installed and protected within your laptop. The next steps involve reassembling your laptop and preparing it for use with the newly installed hard drive.
Reassemble Your Laptop
After securely replacing the cover plate, it’s time to reassemble your laptop and ensure all components are properly put back into place. Follow these steps to reassemble your laptop:
- Reinsert the battery: If you removed the laptop’s battery earlier, slide it back into its compartment until you hear a click or feel it securely snap into place.
- Reconnect any additional components: If you disconnected any other components or peripherals, such as USB devices or external monitors, reconnect them to the laptop.
- Position the laptop correctly: Place the laptop in the upright position on a stable surface, ensuring it is sitting securely and evenly.
- Power up the laptop: Press the power button to turn on your laptop and ensure that it boots up properly. Listen for any unusual noises or observe any error messages during the boot process.
- Check for proper hard drive detection: Once your laptop has booted up, go to the device manager or the BIOS settings to confirm that the new hard drive is detected and listed correctly.
- Perform a test: Run a quick test to ensure that the new hard drive is functioning properly. You can do this by accessing and moving files onto the new hard drive, launching applications, or performing a disk check for any errors.
Take your time during the reassembly process to ensure everything is properly aligned, connected, and functioning correctly. If you encounter any issues, refer to your laptop’s user manual or seek assistance from the manufacturer’s support team.
By reassembling your laptop, you’re putting all the components back together in their original positions, ensuring that the laptop is in working order and ready for regular use with the newly installed hard drive.
Power On Your Laptop
Now that you have reassembled your laptop, it’s time to power it on and ensure that everything is functioning correctly. Follow these steps to power on your laptop:
- Connect the power source: Plug your laptop’s power adapter into a power outlet or connect the laptop to a fully charged battery, depending on whether you are using an AC power source or battery power.
- Press the power button: Locate the power button on your laptop, typically located near the keyboard or on the side of the laptop. Press and hold the power button for a few seconds to initiate the boot-up process.
- Observe the startup sequence: Watch the screen as your laptop boots up. You should see the startup logo or a loading screen, indicating that the operating system is launching.
- Monitor for any error messages: While the laptop is starting up, pay attention to any error messages that may appear on the screen. If you encounter any error messages, note them down for further troubleshooting.
- Check the hard drive status: Once your laptop has booted up, go to the device manager or the storage settings to verify that the new hard drive is detected and listed correctly.
- Test functionality: Perform basic tests to ensure that the laptop and the new hard drive are functioning properly. Open applications, navigate through files, and perform disk checks to ensure smooth and error-free operation.
During the power-on process, listen for any unusual noises such as loud fans or clicking sounds. These may indicate potential hardware issues that need to be addressed.
If your laptop does not power on or if you encounter any issues during the boot-up process, refer to your laptop’s user manual or seek assistance from the manufacturer’s support team for troubleshooting steps and guidance.
By powering on your laptop, you are finalizing the installation of the new hard drive and ensuring that the laptop is ready for regular use with the increased storage capacity and potential performance improvements provided by the new hard drive.
Format and Initialize the New Hard Drive
Once you have successfully powered on your laptop with the new hard drive, the next step is to format and initialize the drive. Formatting and initializing the new hard drive prepares it for use by creating a file system and allocating storage space. Follow these steps to format and initialize the new hard drive:
- Open Disk Management: Access the Disk Management utility on your laptop. You can usually find it by right-clicking on the “Start” button and selecting “Disk Management” from the context menu.
- Locate the new hard drive: In the Disk Management window, identify the new hard drive. It should be listed as a new or unallocated disk in the list of drives.
- Right-click on the new hard drive: Right-click on the new hard drive and select the “Format” option from the dropdown menu. This will open the formatting options for the new hard drive.
- Select the file system and allocation unit size: Choose the desired file system for the new hard drive. The most common file system for Windows is NTFS. You can also specify the allocation unit size, or leave it as the default setting.
- Assign a drive letter: Assign a drive letter to the new hard drive, which will allow it to be recognized as a separate storage device on your laptop. Choose an available drive letter from the dropdown menu.
- Name the new hard drive: Provide a name for the new hard drive to make it easily identifiable. You can choose a descriptive name that reflects its intended use or leave it with the default name.
- Confirm the formatting: Review the formatting options and click “OK” or “Format” to confirm the formatting process for the new hard drive. This will initiate the formatting and initialization process.
- Wait for the process to complete: Be patient as the formatting and initialization process may take some time, depending on the capacity and speed of your new hard drive. Once completed, you will receive a notification indicating the success of the process.
Formatting and initializing the new hard drive prepares it for use and ensures compatibility with your laptop’s operating system. It is important to note that formatting will erase any data on the new hard drive, so make sure to back up any important files before proceeding.
By formatting and initializing the new hard drive, you are ready to start using it as a reliable storage solution for your data and applications. Enjoy the increased storage capacity and improved performance provided by the newly installed and properly formatted hard drive!
Restore Your Data from Backup
Now that you’ve formatted and initialized the new hard drive, it’s time to restore your data from the backup you created earlier. Restoring your data ensures that you have access to all your important files and documents on the new hard drive. Follow these steps to restore your data:
- Access your backup storage: Connect your backup storage device or access your cloud storage account where you saved your data backup.
- Locate your backup files: Navigate to the location where you have stored your backup files. This may be a specific folder or directory on your backup storage device or within your cloud storage account.
- Copy your files to the new hard drive: Select the files and folders you want to restore and copy them to the new hard drive. You can either drag and drop the files or use the copy/paste function to transfer them.
- Organize your restored data: Once the files are copied to the new hard drive, organize them into the appropriate folders and directories. This will make it easier for you to locate and access your data in the future.
- Verify file integrity: After restoring your data, it’s a good practice to verify the integrity of the restored files. Open a few files to ensure that they open correctly and appear to be intact.
- Delete the backup files: Once you have successfully restored your data to the new hard drive and verified its integrity, you can delete the backup files from your backup storage device or cloud storage account. This will free up space and keep your backup storage organized.
Restoring your data from backup ensures that you have a complete and up-to-date copy of your files and documents on the new hard drive. It allows you to seamlessly continue working with your important data without any loss or interruption.
Remember to periodically back up your data to prevent any potential data loss. It is always recommended to have multiple backups in different storage locations to ensure the safety and availability of your important files.
By restoring your data from backup, you can fully utilize the capacity of the new hard drive and continue your work with confidence, knowing that your important files are securely stored and accessible.