
Why Group Objects in PowerPoint?
Grouping objects in PowerPoint offers a range of benefits that can greatly enhance your presentation. Whether you’re creating slides for a business meeting, a school project, or a training session, grouping objects allows you to organize your content more effectively and create a cohesive visual experience for your audience. Here are a few reasons why you should consider grouping objects in PowerPoint:
- Organize and manage complex content: When you have multiple objects on a slide, such as text boxes, images, shapes, and icons, grouping them together can help you keep everything organized. This is especially useful when dealing with complex diagrams, flowcharts, or infographics. Grouping also makes it easier to select, move, and resize multiple objects at once, saving you time and effort in the editing process.
- Create custom animations and transitions: Grouping objects allows you to apply animations and transitions to the entire group, making your presentation more visually engaging. For example, you can fade in a group of images or have a set of text boxes fly in sequentially. This adds a professional touch to your slides and helps you deliver your message more effectively.
- Maintain consistent formatting: By grouping objects, you can ensure that they have consistent formatting, such as font styles, colors, and alignment. This is particularly useful when you have multiple elements that need to share the same visual properties. Instead of manually adjusting each object individually, you can group them and apply the desired formatting to the entire group, guaranteeing a cohesive design across your slides.
- Easily duplicate and reuse content: Grouping objects allows you to duplicate and reuse content in your presentation without having to recreate it from scratch. Once you have a group of objects that you’re satisfied with, you can easily copy and paste it onto other slides, saving you time and ensuring consistency throughout your presentation.
- Simplify complex interactions: If you’re creating interactive presentations or prototypes, grouping objects can simplify the process of adding interactivity. By grouping buttons, hyperlinks, and other interactive elements together, you can easily apply actions and triggers to the entire group. This simplifies the design and development of interactive slides, making it easier for your audience to navigate through your presentation.
By taking advantage of the grouping feature in PowerPoint, you can enhance the visual impact of your slides, improve the organization of your content, and deliver a more professional and polished presentation. Now that you understand the benefits of grouping objects, let’s explore how to group objects in PowerPoint.
How to Group Objects in PowerPoint
If you’re ready to start grouping objects in PowerPoint, follow these simple steps:
- Select the objects you want to group: Click on the first object you want to include in the group, then hold down the Ctrl key and click on the remaining objects. Alternatively, you can click and drag your mouse to create a selection box that encompasses all the objects you want to group.
- Right-click on the selected objects: Once you have the objects selected, right-click anywhere on the selected area to open the context menu. The context menu provides various options for manipulating objects in PowerPoint.
- Click on the “Group” option in the menu: In the context menu, hover your mouse over the “Group” option, and a sub-menu will appear. Click on “Group” again to create a group with the selected objects. The objects will now be visually grouped together as a single unit.
- Group objects with the keyboard shortcut: An alternative method for grouping objects is to use the keyboard shortcut. With the objects selected, press Ctrl+G on the keyboard to group them instantly. This shortcut can significantly speed up your workflow when grouping objects.
- Ungrouping objects in PowerPoint: To ungroup objects and restore their individual properties, simply select the group and right-click on it. In the context menu, choose the “Group” option again, but this time select “Ungroup.” The objects will be separated, and you can manipulate them individually once more.
- Group objects within a group: PowerPoint allows you to create nested groups, which means you can group multiple objects together and then group that larger group with other objects. This provides even more flexibility in organizing your content and allows you to maintain your desired grouping hierarchy.
- Arrange and align grouped objects: After grouping objects, you can easily arrange and align them using PowerPoint’s alignment and distribution tools. This ensures that the grouped objects are positioned precisely on your slide and maintain consistent spacing and alignment.
By following these steps, you can group objects in PowerPoint and take advantage of the many benefits that grouping offers. Organize your content, apply animations and transitions, maintain consistent formatting, easily duplicate and reuse content, simplify complex interactions, and deliver more impactful presentations.
Step 1: Select the objects you want to group
Grouping objects in PowerPoint starts with selecting the objects you want to include in the group. This step allows you to gather and organize your desired elements together as a cohesive unit. Here’s how you can select objects for grouping:
Method 1: Click and Ctrl-Click: To select multiple objects that are not adjacent, click on the first object you want to include in the group. Hold down the Ctrl key (Command key on a Mac) and click on each additional object one by one. This method allows you to select nonadjacent objects throughout your PowerPoint slide.
Method 2: Click and Drag: Another method for selecting multiple objects is by clicking and dragging your mouse. Simply click and hold on an empty area of the slide, then drag your mouse to create a selection box that encompasses all the objects you want to include in the group. This method is particularly useful when you have a cluster of objects close together on your slide.
Method 3: Select All: If you want to group all the objects on a slide, you can use the “Select All” command. Simply press Ctrl+A (Command+A on a Mac) to select all the objects within the slide. This method is convenient when you want to group everything on the slide without individually selecting each object.
As you select the objects for grouping, you’ll notice that they become highlighted or surrounded by a bounding box. This visual indication confirms that the objects are selected and ready to be grouped together.
Tip: If you accidentally select an object that you didn’t intend to include in the group, you can hold down the Ctrl key (Command key on a Mac) and click on the object to deselect it. This allows you to refine your selection and include only the desired objects in the group.
Once you have successfully selected the objects you want to group, you can proceed to the next step, which involves right-clicking on the selected objects to access the grouping options in PowerPoint.
Step 2: Right click on the selected objects
After selecting the objects you want to group in PowerPoint, the next step is to right click on the selected objects. Right clicking opens a context menu that provides various options for manipulating objects in PowerPoint. Follow these instructions to access the grouping options:
Method 1: Right click on any selected object: Position your mouse cursor over any of the selected objects, then right click on the object. This will open the context menu next to your cursor.
Method 2: Right click on the selected area: If you have a group of selected objects that are close together, you can also right click anywhere within the selected area. The context menu will appear at the location of your right click.
Keep in mind that when you right click on the selected objects, avoid clicking on an individual object within the group. To access the grouping options, ensure that you right click on the surrounding space of the selected objects or within the selected area.
Once you right click on the selected objects, a context menu will appear, displaying a variety of options for manipulating the objects. These options include grouping, aligning, ordering, formatting, and more. The specific options available may vary depending on the version of PowerPoint you are using and any additional plugins or add-ons you have installed.
In the context menu, you will find the “Group” option, which is what you need to select in order to group the selected objects together. Hover your mouse over the “Group” option, and a sub-menu will appear with additional grouping options.
Alternatively, you may notice that PowerPoint offers a shortcut key for grouping objects, usually displayed next to the “Group” option in the context menu. You can use this shortcut key as a faster alternative to grouping objects. Simply hover over the “Group” option and note the keyboard shortcut next to it. Then, press the indicated keys on your keyboard to group the selected objects without accessing the sub-menu.
Once you have successfully accessed the grouping options in the context menu, you are ready to proceed to the next step and group the selected objects together.
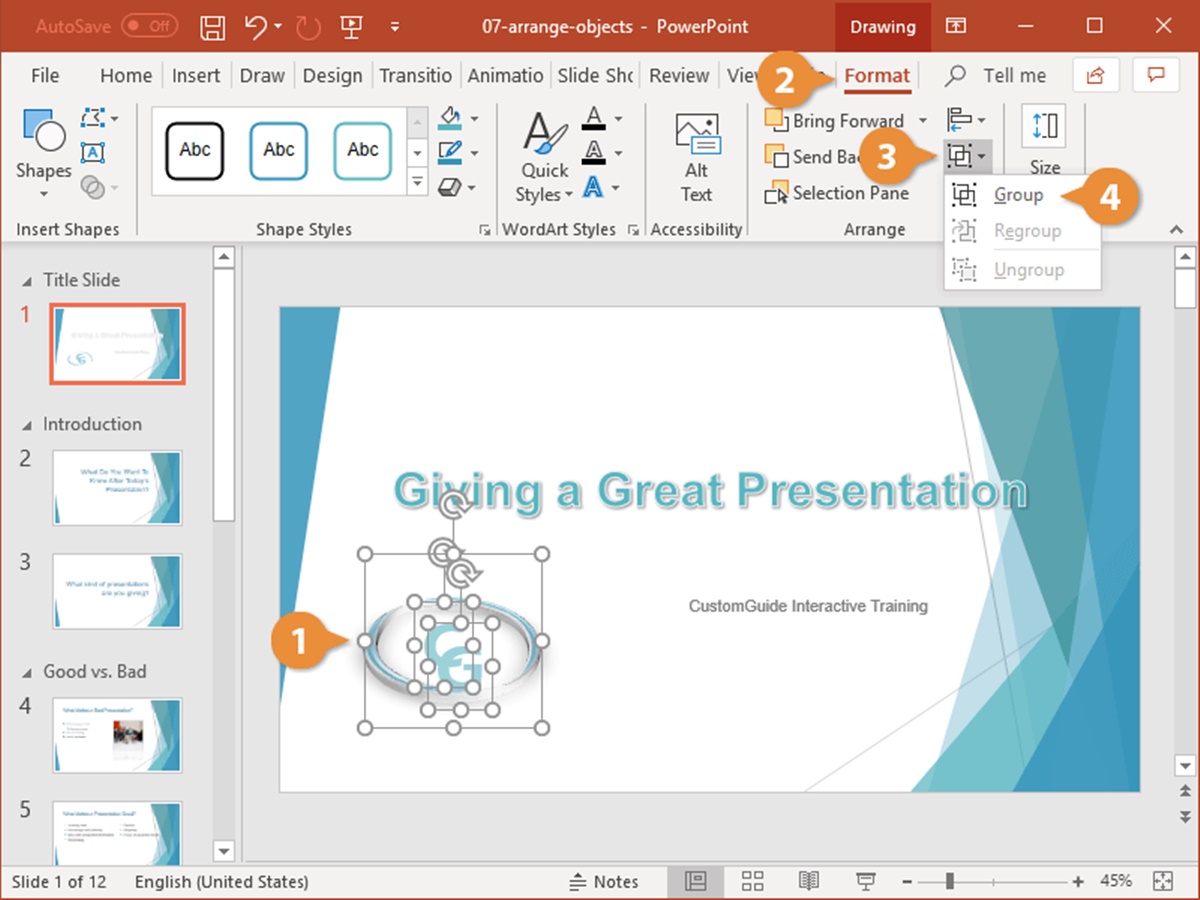
Step 3: Click on the “Group” option in the menu
After right-clicking on the selected objects in PowerPoint, you will see a context menu with various options. In this step, you need to click on the “Group” option to initiate the grouping process. Here’s how you can do it:
1. Right-click on the selected objects to open the context menu. Ensure that you have right-clicked on the surrounding space of the objects or within the selected area.
2. In the context menu, hover your mouse over the “Group” option. You will notice a sub-menu appearing next to it, which provides additional grouping options.
3. Click on the “Group” option in the sub-menu. By doing so, the selected objects will be grouped together as a single unit. You will notice that the objects are visually connected and can be moved, resized, or formatted as a group.
Alternatively, you may find a keyboard shortcut displayed next to the “Group” option in the context menu. If you prefer using a keyboard shortcut, note the keys mentioned next to the “Group” option and press them on your keyboard to group the selected objects instantly.
Upon successfully clicking on the “Group” option, the selected objects will be combined into a group. This grouping action allows you to treat the objects as a collective entity, making it easier to manage, format, and manipulate them as a whole.
By grouping objects, you can organize content more efficiently, apply animations and transitions to groups, maintain consistent formatting across objects, and simplify the manipulation of multiple elements in your PowerPoint presentation. The next step involves grouping objects using a keyboard shortcut, which can increase your workflow speed even further.
Step 4: Group objects with the keyboard shortcut
In addition to right-clicking and selecting the “Group” option, PowerPoint provides a convenient keyboard shortcut to quickly group objects. By using this shortcut, you can streamline the grouping process and save time. Here’s how you can group objects with the keyboard shortcut:
1. Select the objects you want to group by clicking on the first object and holding the Ctrl key (Command key on a Mac) while clicking on the other objects. Alternatively, you can use the click-and-drag method to create a selection box around the objects.
2. Once the objects are selected, press the Ctrl+G (Command+G on a Mac) keyboard shortcut. By pressing these keys simultaneously, PowerPoint will instantly group the selected objects together.
3. After using the keyboard shortcut, you will notice that the objects are visually grouped as a single entity. They can be moved, resized, and formatted as a group, just like when using the right-click method.
The keyboard shortcut provides a faster alternative to grouping objects, particularly if you frequently group objects in your PowerPoint presentations. Instead of accessing the context menu and selecting the “Group” option, you can simply press a few keys on your keyboard to achieve the same result.
It’s worth mentioning that the Ctrl+G (Command+G) keyboard shortcut is a default shortcut in PowerPoint, but it’s possible that it may have been modified or overridden in your installation. If the shortcut doesn’t work, you can check your PowerPoint settings or consult the software’s documentation to ensure the correct shortcut is being used.
Utilizing the keyboard shortcut for grouping objects not only enhances your productivity but also allows for a smoother workflow when organizing and managing multiple elements in your PowerPoint presentations. Whether you prefer the right-click method or the keyboard shortcut, the next step involves ungrouping objects, if needed.
Step 5: Ungrouping objects in PowerPoint
Ungrouping objects in PowerPoint allows you to restore their individual properties and manipulate them separately. If you need to make changes to specific objects within a group or modify their formatting individually, you can follow these steps to ungroup the objects:
1. Select the group of objects that you want to ungroup. Click on the grouped objects to ensure they are highlighted or surrounded by a bounding box.
2. Right-click on the selected group to open the context menu. Make sure that you right-click on the surrounding space or within the selected area, rather than on an individual object within the group.
3. In the context menu, hover your mouse over the “Group” option. A sub-menu will appear, offering additional grouping options.
4. Click on the “Group” option again, but this time select “Ungroup” from the sub-menu. By doing so, the selected group will be ungrouped, and the objects will be separated, allowing you to manipulate them individually.
After ungrouping the objects, you can adjust their positions, sizes, and formatting independently. This is useful when you want to modify specific elements within a group without affecting the rest of the objects or when you need to rearrange the layout of your slide.
It’s important to note that ungrouping can only be performed on objects that have been previously grouped together. If you try to ungroup objects that are not part of a group, the option will be grayed out in the context menu.
You may encounter scenarios where there are nested groups – groups within groups. In such cases, ungrouping will only remove one level of grouping at a time. You will need to repeat the ungrouping process to remove additional layers of grouping until you reach the individual objects.
Keep in mind that ungrouping objects in PowerPoint should be done with care. If you accidentally ungroup a group of objects and want to undo the action, you can use the Undo command (Ctrl+Z) or select the “Regroup” option from the context menu to revert the ungrouping.
By understanding how to ungroup objects, you have gained the ability to manipulate individual elements within a group, providing you with more control and flexibility in the design and arrangement of your PowerPoint slide.
Step 6: Group objects within a group
PowerPoint allows you to create nested groups, which means you can group objects together and then group that larger group with other objects. This provides even more flexibility in organizing your content and maintaining a hierarchical structure. Here’s how you can group objects within a group:
1. Select the objects you want to group together. This initial selection will become the first level of grouping.
2. Right-click on the selected objects to open the context menu, and click on the “Group” option. This will group the selected objects into a single entity.
3. With the initial group still selected, select additional objects that you want to include in the nested group. You can use methods such as Ctrl+click or click-and-drag to select the additional objects.
4. Right-click on the selected objects, similar to the previous steps, and click on the “Group” option. PowerPoint will create a nested group within the larger group, incorporating the additional objects.
By following these steps, you can create a hierarchy of grouped objects within your PowerPoint slide. This can be particularly useful when dealing with complex diagrams, flowcharts, or layered graphics.
To manage the nested groups effectively, keep in mind the following points:
- Selection: Clicking on a nested group will select that entire group as a single entity. If you want to select individual objects within the nested group, you can double-click on the group to access its contents. Double-clicking again will reselect the group as a whole.
- Ungrouping: Ungrouping will remove one level of grouping at a time. To ungroup objects within a nested group, follow the same steps as ungrouping non-nested groups. Repeat the ungrouping process until you reach the desired level of grouping.
- Formatting: Nested groups maintain their individual properties, such as formatting options and animations. You can apply formatting to the entire nested group or modify the attributes of individual objects within the nested group.
By grouping objects within a group, you can create a more organized and structured presentation layout. This can help you manage complex content, easily manipulate multiple elements, and maintain the visual integrity of your PowerPoint slide.
Step 7: Arrange and align grouped objects
Once you have grouped objects in PowerPoint, you can further enhance their visual appeal and organization by arranging and aligning them on your slide. This step allows you to fine-tune the positioning and alignment of the grouped objects for a more polished and professional look. Here’s how you can arrange and align grouped objects:
1. Select the grouped objects by clicking on the group. The group will be surrounded by a bounding box, indicating that it is selected.
2. On the PowerPoint ribbon, navigate to the “Format” tab. This tab contains various options for formatting and manipulating objects.
3. Within the “Arrange” group, you will find options such as “Bring Forward,” “Send Backward,” “Bring to Front,” and “Send to Back.” These options allow you to adjust the stacking order of the grouped objects relative to other objects on the slide. Click on the desired option to bring the grouped objects forward or send them backward as needed.
4. To align the grouped objects, click on the “Align” option within the “Arrange” group. This will open a sub-menu with alignment options such as “Align Left,” “Align Right,” “Align Top,” “Align Bottom,” and “Distribute Horizontally.” Choose the alignment options that best suit your needs to ensure the grouped objects are neatly aligned with each other or with other objects on the slide.
5. You can also use the “Align to Slide” option to align the grouped objects relative to the slide itself. This helps in ensuring the grouped objects are positioned perfectly within the slide’s layout.
6. In addition to alignment, you can use the “Group” option within the “Arrange” group to temporarily ungroup the objects. This allows you to make precise adjustments to individual objects within the group without permanently ungrouping them.
7. Finally, use the “Size” options within the “Arrange” group to resize the grouped objects proportionally or adjust their dimensions manually. This can be useful if you want to maintain a consistent size ratio or create a specific aspect ratio for the grouped objects.
By arranging and aligning grouped objects, you can create a clean and visually appealing layout for your PowerPoint slide. Proper alignment ensures that the objects on the slide appear organized and professional, enhancing the overall impact and clarity of your presentation.
Tips for Grouping Objects in PowerPoint
Grouping objects in PowerPoint can significantly improve the organization and visual appeal of your presentations. To make the most out of this feature, consider the following tips:
- Plan your groupings: Before grouping objects, take some time to plan and think about how you want to organize your content. Consider the logical relationships between objects and group them accordingly. This will help you create a more cohesive and meaningful arrangement.
- Group related elements: Group objects that are related to each other or have a similar purpose. For example, group images with corresponding captions or group data points with their labels. This makes it easier for your audience to comprehend and digest the information.
- Keep groups manageable: Avoid creating excessively large or complex groups. If a group becomes too cluttered, consider breaking it down into smaller sub-groups. This will make it easier to manipulate and format the objects within the group.
- Consider animation effects: Take advantage of grouping to apply consistent animation effects to a set of objects. By grouping them, you can create more visually appealing and coordinated animations, such as having multiple objects enter together or create synchronized movements.
- Use the correct grouping method: While right-clicking and accessing the context menu is the most common method for grouping, explore other ways to group objects. For example, you can use the “Group” option in the ribbon’s “Drawing Tools” tab or use keyboard shortcuts if available. Find the method that suits your workflow best.
- Experiment with grouping variations: Don’t limit yourself to standard grouping. Explore different variations, such as overlapping groups, nested groups, or grouped objects with different shapes. This can add depth and creativity to your slide designs.
- Create consistent formatting: When grouping objects, apply consistent formatting to ensure a unified look. This includes font styles, colors, alignment, and other visual attributes. Consistency helps maintain a cohesive and professional appearance throughout your presentation.
- Save grouped objects as custom shapes or placeholders: Once you have created a group with specific formatting or arrangement, you can save it as a custom shape or a placeholder. This allows you to reuse the grouped objects easily in future presentations.
By keeping these tips in mind, you can effectively leverage the grouping feature in PowerPoint to create visually appealing and organized presentations. Grouping objects enhances the clarity of your message, emphasizes key concepts, and captivates your audience’s attention.