
What is the Finder Path Bar?
The Finder Path Bar is a useful feature in the macOS Finder that displays the hierarchical path to the currently selected file or folder. It provides a visual representation of the file’s location within the file system, making it easier to navigate through folders and locate specific files.
When you open a new Finder window, the default view shows the sidebar on the left side and the Finder Path Bar at the bottom. The Finder Path Bar displays the names of folders leading up to the currently selected item, separated by arrows indicating the hierarchy.
This feature not only helps you navigate through your files and folders quickly but also provides valuable information about the current location within the file system. It shows the full path from the root directory to the selected item, allowing you to easily understand where the file is stored.
Having the Finder Path Bar enabled can enhance your productivity when working with files and folders. It allows you to quickly access parent folders, jump to specific locations, and provides context when organizing files or performing tasks that require tracking the file’s location.
Furthermore, the Finder Path Bar is especially helpful when you work with multiple folders or have complex file structures. It aids in reducing the chance of getting lost in the file system, as you can easily retrace your steps and jump to different folder levels.
By utilizing the Finder Path Bar, you can efficiently manage your files and folders in macOS, resulting in a more streamlined and organized workflow. Whether you’re a casual user or a power user, this feature can be a valuable addition to your macOS experience.
How to Enable the Finder Path Bar
The Finder Path Bar is not enabled by default in macOS, but you can easily enable it to start benefiting from its features. Here’s how to enable the Finder Path Bar:
- Open a new Finder window by clicking on the Finder icon in the dock or pressing Command + N on your keyboard.
- In the menu bar, click on “View” and then select “Show Path Bar” from the drop-down menu. Alternatively, you can use the keyboard shortcut Option + Command + P to toggle the visibility of the Path Bar.
Once enabled, you will see the Finder Path Bar displayed at the bottom of the Finder window. It will show the hierarchical path to the currently selected item or folder, making it easier for you to navigate and manage your files and folders.
To disable the Finder Path Bar, simply follow the same steps outlined above, but this time, uncheck the “Show Path Bar” option in the “View” menu or use the keyboard shortcut Option + Command + P to toggle it off.
Enabling the Finder Path Bar is a simple yet effective way to enhance your file management capabilities in macOS. Whether you’re a casual user or a power user, having the Path Bar enabled can greatly improve your workflow by providing a clear path to navigate through your file system.
Now that you know how to enable the Finder Path Bar, let’s explore how to make the most out of this feature.
Using the Finder Path Bar to Navigate
Once you have enabled the Finder Path Bar in macOS, you can utilize it to navigate through your files and folders with ease. Here are some helpful tips on using the Finder Path Bar:
- Clicking on a folder name in the Finder Path Bar will instantly navigate to that folder. This allows you to quickly jump to any level in the file hierarchy without manually navigating through each folder.
- Hovering over a folder name in the Finder Path Bar will display a dropdown menu that shows the contents of that folder. You can select a file or folder from this dropdown to open it directly.
- To go up one folder level, simply click on the arrow next to the folder name in the Finder Path Bar. This is particularly useful when you need to access the parent folder quickly.
- If you want to go back to a previous location, you can use the keyboard shortcut Command + [ (left bracket) or use the back arrow button in the Finder window’s toolbar.
- To reveal the selected item in the Finder window, you can either right-click on the folder name in the Finder Path Bar and choose “Open Enclosing Folder” or use the keyboard shortcut Command + R.
- If your Finder window doesn’t have enough horizontal space to display the complete path, you can adjust the width of the Finder Path Bar by dragging its edge to the desired size.
These tips will help you navigate efficiently through your files and folders using the Finder Path Bar in macOS. By leveraging this feature, you can save time and effort when searching for specific files or managing organizational tasks.
Next, let’s explore how you can customize the Finder Path Bar to suit your preferences.
Customizing the Finder Path Bar
In macOS, you have the flexibility to customize the Finder Path Bar based on your preferences and workflow. Here are some ways you can customize the Finder Path Bar:
- To change the display style of the Finder Path Bar, right-click on an empty area within the Finder Path Bar and choose between “Hierarchical” and “Pop-Up” views. The Hierarchical view shows the complete path, while the Pop-Up view displays a dropdown menu with folder names.
- You can resize the Finder Path Bar by dragging its bottom edge. If you need more space in the Finder window, you can make the Path Bar narrower. Conversely, if you want to see the complete file path, you can make it wider.
- If you prefer a minimalist look, you can hide the Finder Path Bar entirely. To hide it, go to the “View” menu, hover over “Show Path Bar,” and select “Hide Path Bar.” Alternatively, you can use the keyboard shortcut Option + Command + P to toggle the visibility of the Path Bar.
- To customize the appearance of the Finder Path Bar, you can adjust the font size and style by going to the “Finder” menu, selecting “Preferences,” and clicking on the “Sidebar” tab. From there, you can modify the font settings under the “Show Path Bar” section.
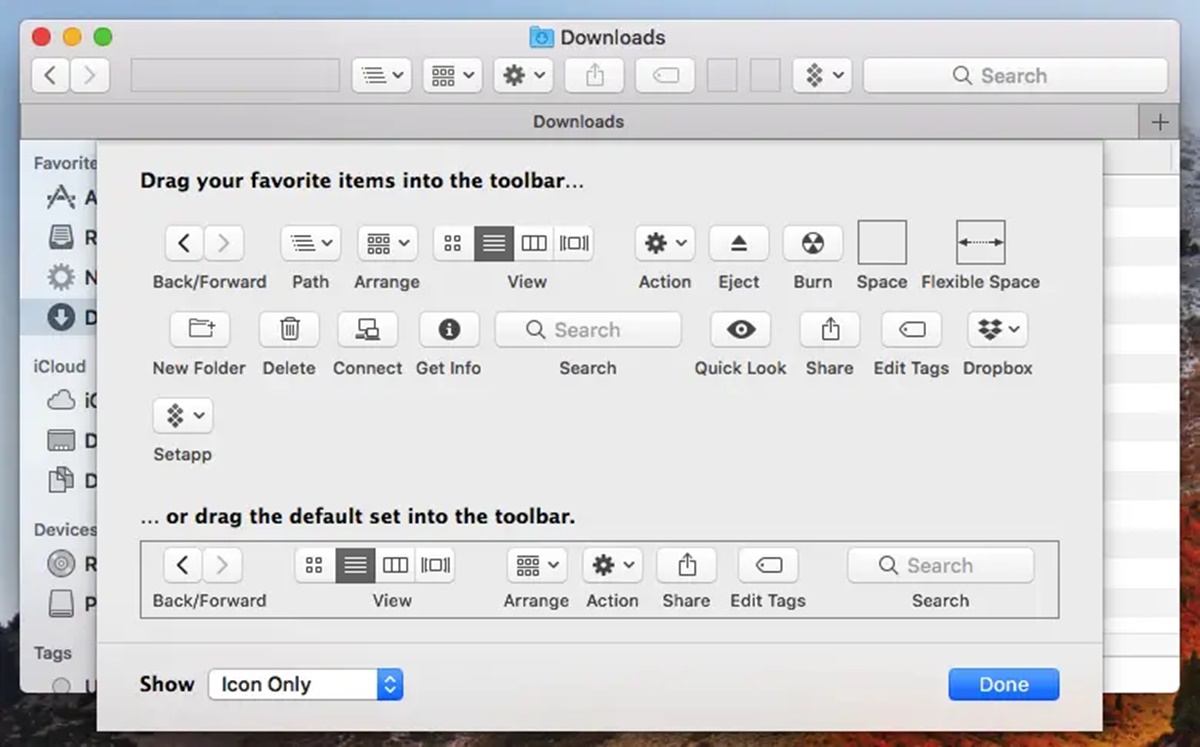
- Additionally, you can customize the icons displayed in the Finder Path Bar to your liking. Simply right-click on any folder name or icon in the Finder Path Bar, choose “Customize Toolbar,” and then drag and drop icons to add or remove them from the Path Bar.
- If you frequently use the Finder Path Bar, you can make it always visible by going to the “View” menu, selecting “Show Toolbar,” and ensuring the checkmark is next to “Path Bar.” This feature keeps the Finder Path Bar visible even when the toolbar is hidden.
By customizing the Finder Path Bar in macOS, you can tailor it to your specific needs and preferences. Experiment with the different customization options available and find the configuration that makes navigating and managing your files and folders most efficient for you.
Now that you know how to customize the Finder Path Bar, let’s explore how you can utilize keyboard shortcuts to enhance your navigation experience.
Using Keyboard Shortcuts with the Finder Path Bar
Keyboard shortcuts can greatly enhance your navigation experience in macOS when using the Finder Path Bar. Here are some useful keyboard shortcuts you can use:
- Command + click: Clicking on a folder name in the Finder Path Bar while holding down the Command key will open that folder in a new Finder window. This is helpful when you want to explore the contents of a particular folder without losing your current location.
- Command + Up arrow: Pressing Command + Up arrow will instantly navigate to the parent folder of the selected item, providing a quick way to move up one level in the file hierarchy.
- Command + Down arrow: Pressing Command + Down arrow will reveal the contents of the selected folder within the Finder window, allowing you to easily explore the folder’s contents without needing to manually navigate to it.
- Command + Return: Pressing Command + Return when a folder is selected in the Finder Path Bar will open that folder in a new Finder window, giving you a separate window to work with the contents of that folder.
- Command + Shift + G: Using this keyboard shortcut opens the “Go to Folder” dialog box, where you can quickly type or paste a specific path and navigate directly to that location within the file system.
- Option + Command + C: Pressing Option + Command + C will copy the selected folder’s path in the Finder Path Bar to the clipboard, allowing you to easily paste it into another location or document.
These keyboard shortcuts can significantly speed up your navigation and file management tasks when using the Finder Path Bar in macOS. By incorporating them into your workflow, you can save time and streamline your operations.
Now that you’re familiar with using keyboard shortcuts with the Finder Path Bar, let’s explore some additional tips and tricks for making the most out of this feature.
Tips and Tricks for Using the Finder Path Bar
As you continue to use the Finder Path Bar in macOS, here are some helpful tips and tricks to maximize its functionality:
- Utilize breadcrumbs navigation: Each folder name displayed in the Finder Path Bar is clickable. You can click on any folder name to navigate directly to that folder, making it easier to jump to specific locations in your file system.
- Combine the Finder Path Bar with other navigation methods: The Finder Path Bar is a powerful tool, but it works even better when used in conjunction with other navigation methods. You can use the sidebar, search bar, and keyboard shortcuts alongside the Finder Path Bar for a comprehensive file management experience.
- Drag and drop files: When you’re in a specific folder using the Finder Path Bar, you can easily drag and drop files from other folders onto the Path Bar to move or copy them to the location.
- Use the context menu: Right-clicking on a folder name in the Finder Path Bar reveals a context menu with options such as opening a new Finder window, revealing the selected item, or renaming the folder. Explore this menu to access additional functionalities.
- Preview items: Hovering over a folder name in the Finder Path Bar displays a popover with the folder’s contents. You can further enhance this feature by enabling Quick Look from the context menu, allowing you to quickly preview files without opening them.
- Take advantage of multiple Finder windows: If you need to compare or move files between different folders, use multiple Finder windows. You can open a new Finder window by pressing Command + N or by selecting “New Finder Window” from the File menu in the menu bar.
By implementing these tips and tricks, you can become a more efficient user of the Finder Path Bar in macOS. Experiment with these techniques and discover the workflow that works best for your specific needs and preferences.
Now that you have a solid understanding of how to enable, navigate, customize, and utilize keyboard shortcuts with the Finder Path Bar, you can leverage this powerful macOS feature to enhance your file management capabilities and improve your overall productivity.