
Importing photos to your iPhone
One of the first steps to edit multiple photos on your iPhone is to import them to your device. Thankfully, importing photos is a straightforward process that can be done in a few different ways.
If you have a digital camera or an SD card with the photos you want to edit, you can use the Lightning to SD Card Camera Reader or Lightning to USB Camera Adapter to connect your device directly to your iPhone. Once connected, you can use the Photos app to import the photos to your device.
Another option is to transfer photos from your computer to your iPhone. You can do this by connecting your iPhone to your computer using a USB cable and opening iTunes. In the “Photos” section of iTunes, you can select the photos you want to sync with your device and then click the “Apply” button to import them.
If you prefer to wirelessly transfer photos to your iPhone, you can use iCloud Photo Library. This feature automatically uploads your photos to iCloud, allowing you to access them on all your devices. Simply enable iCloud Photo Library in the settings of your iPhone and ensure that all your devices are signed in using the same iCloud account.
Additionally, you can import photos directly from email or messaging apps by opening the photo attachment and selecting the option to save it to the Photos app.
Once you have imported your photos to your iPhone, they will be available for editing. Whether you’re editing a few photos or a large number of them, the editing process can be made much easier by utilizing the ability to select and edit multiple photos at once.
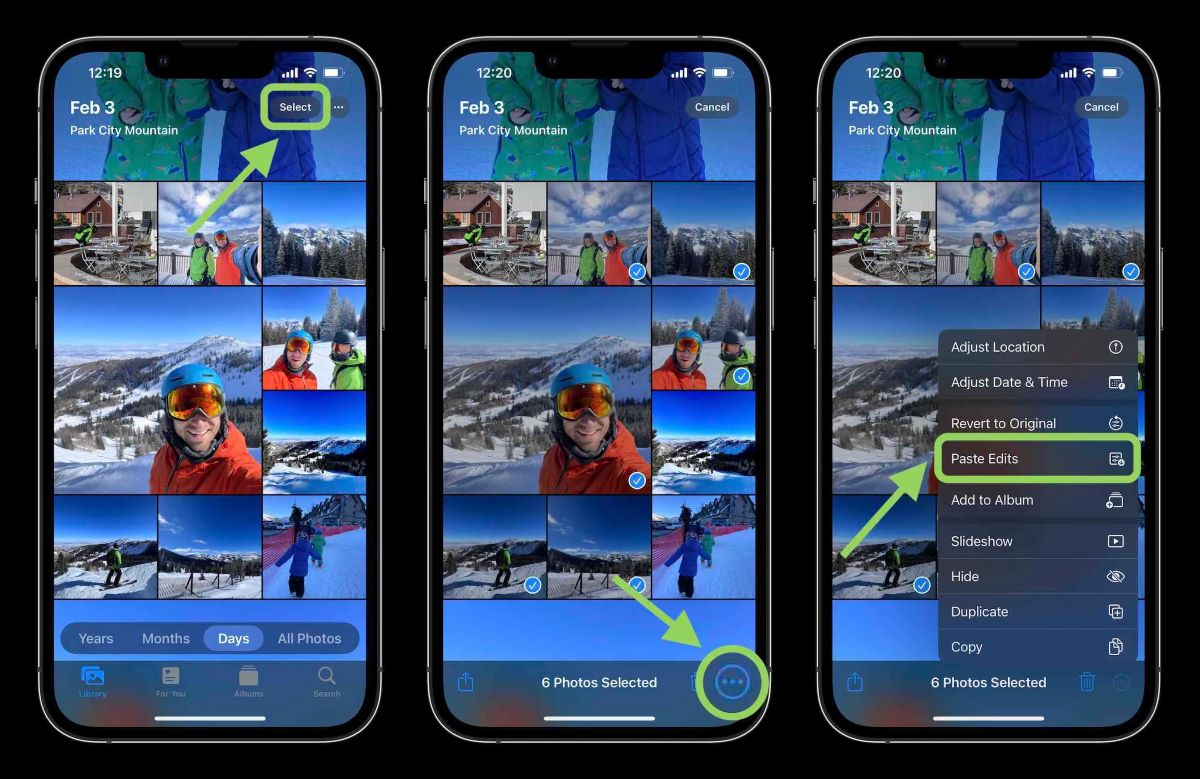
Selecting multiple photos at once
Editing multiple photos at once on your iPhone starts with selecting them in the Photos app. By selecting multiple photos, you can apply edits simultaneously, saving you time and effort. Here’s how to do it:
1. Open the Photos app on your iPhone.
2. Navigate to the album or folder containing the photos you want to edit.
3. To select multiple photos, tap on the “Select” button located in the top-right corner of the screen.
4. Once in selection mode, you can tap on individual photos to select or deselect them. Alternatively, you can slide your finger across the screen to quickly select multiple photos in a row.
5. If you want to select all the photos in the album, tap on the “Select All” option, typically located in the top-left corner of the screen.
6. As you select photos, you will notice a blue checkmark appearing on each selected photo. This indicates that the photo is ready for editing. You can also see the total number of selected photos at the bottom of the screen.
7. Once you have selected the photos you want to edit, you can proceed to apply various editing adjustments and enhancements to all the selected photos simultaneously.
8. If at any point you need to deselect photos, simply tap on the blue checkmark to remove it from a selected photo.
By efficiently selecting multiple photos at once, you can streamline your editing process and make consistent changes to a batch of photos. This feature is particularly useful when editing photos taken at the same time or in similar lighting conditions.
Basic editing features in the Photos app
The Photos app on your iPhone offers a range of basic editing tools that allow you to enhance and transform your photos. Here are some of the key editing features available:
1. Crop and straighten: Adjust the composition of your photos by cropping them to remove unwanted elements or straightening them to correct any tilted angles. The Photos app provides intuitive controls to resize and rotate your photos.
2. Adjust exposure and color: Fine-tune the brightness, contrast, and saturation of your photos to make them more visually appealing. The Photos app offers sliders to adjust exposure, highlights, shadows, and warmth to achieve the desired look.
3. Filters: Apply pre-designed filters to instantly change the mood and tone of your photos. The Photos app includes a variety of filters that can enhance colors, add vintage effects, or give your photos a black and white look.
4. Retouch: Remove blemishes or unwanted objects from your photos with the retouch tool. Simply tap on the area you want to retouch, and the Photos app will automatically blend and smooth it for a seamless result.
5. Adjustments: Fine-tune specific aspects of your photos, such as brightness, contrast, highlights, shadows, and more. The Photos app provides easy-to-use sliders that allow you to make precise adjustments to achieve the desired outcome.
6. Filters: Add creative effects to your photos using the Photos app’s collection of filters. Experiment with different styles and tones to give your photos a unique and artistic look.
7. Crop and rotate: Crop your photos to remove unnecessary elements and improve composition. You can also rotate your photos to correct any orientation issues.
8. Markup: Add text, drawings, and shapes to your photos with the Markup tool. This feature allows you to personalize your photos and add captions or annotations.
With these basic editing features in the Photos app, you can easily make adjustments to enhance the quality and overall appearance of your photos directly on your iPhone. Remember to experiment with different editing tools and techniques to find the perfect look for each photo.
Using third-party editing apps
While the Photos app provides basic editing features, you can further expand your editing capabilities by using third-party apps available on the App Store. These apps offer a wide range of advanced editing tools and creative options to take your photo editing to the next level. Here’s how you can make the most out of third-party editing apps:
1. Explore different apps: Visit the App Store and search for editing apps that suit your style and requirements. Popular options include Adobe Lightroom, Snapseed, VSCO, and Afterlight. Read reviews and explore the features of each app before making a selection.
2. Install and open the app: Once you’ve chosen an app, install it on your iPhone. Open the app to get started.
3. Import photos: Most editing apps allow you to import photos from your camera roll or directly from the app. Choose the photos you want to edit and import them into the app.
4. Explore editing tools: Third-party editing apps offer a variety of advanced tools that go beyond the basic features in the Photos app. Experiment with options like selective editing, curves adjustment, color grading, and advanced retouching to achieve professional-looking results.
5. Apply filters and presets: Many editing apps provide a range of filters and presets that can instantly transform the look of your photos. Explore different styles and tones to find the perfect one for your image.
6. Use advanced adjustment settings: Take advantage of advanced adjustment settings like noise reduction, sharpening, lens correction, and perspective correction to enhance the clarity and quality of your photos.
7. Save or export your edited photos: Once you’re happy with the edits, save or export the photos back to your camera roll or share them directly to social media platforms or other apps.
8. Explore additional features: Some editing apps offer features such as collage making, text overlays, and special effects. Take the time to explore these options and add additional creative elements to your photos.
By utilizing third-party editing apps, you can unlock a vast array of advanced editing tools and features that can significantly enhance your photo editing workflow and help you achieve professional-quality results right from your iPhone.
Editing multiple photos at once using a third-party app
If you have a large number of photos to edit and want to apply consistent changes across all of them, a third-party app can be a powerful tool. Here’s how you can edit multiple photos at once using a third-party editing app on your iPhone:
1. Choose a suitable app: Select a third-party editing app that offers batch editing capabilities. Look for apps that have good reviews and a user-friendly interface. Some popular options include Adobe Lightroom, Snapseed, and Darkroom.
2. Import your photos: Launch the chosen app and import the photos you wish to edit. Depending on the app, this can be done by selecting the photos directly from your camera roll or using the app’s import feature.
3. Enable batch editing mode: Look for the batch editing or multiple edit option within the app. This typically allows you to select multiple photos and apply changes to all of them simultaneously.
4. Apply edits and adjustments: Once in batch editing mode, you can make adjustments to the selected photos. This can include cropping, exposure adjustments, color enhancements, or applying filters. The exact editing tools and features will vary depending on the app you’re using.
5. Save or export your edited photos: After applying the desired edits, save or export the edited photos back to your camera roll or desired location. Some apps also allow you to directly share the edited photos to social media or other apps.
6. Review and fine-tune the edits: Take some time to review the edited photos and make any necessary adjustments. You may want to compare the changes across the batch of photos to ensure consistency and desired outcomes.
7. Save your editing as a preset: If the app supports creating presets or custom editing profiles, consider saving your edits as a preset. This allows you to easily apply the same changes to future photos with just a few taps.
8. Experiment and explore: Don’t be afraid to experiment with different editing techniques and adjustments to find the style that best matches your vision. Explore the features of the app and utilize tutorials or online resources to expand your editing skills.
Editing multiple photos at once using a third-party app can significantly speed up your editing process while maintaining consistency across your images. It provides the flexibility to make bulk edits and adjustments, saving you time and effort when working with a large number of photos.
Using batch editing to apply changes to multiple photos simultaneously
Batch editing is a powerful technique that allows you to apply changes to multiple photos simultaneously, saving you time and effort when editing a large number of images. Here’s how you can use batch editing to streamline your editing process:
1. Choose a photo editing tool: Select a photo editing tool that supports batch editing. Many popular photo editing apps, such as Adobe Lightroom, Snapseed, and Darkroom, offer this functionality. Install the app on your iPhone if you haven’t already.
2. Import your photos: Open the app and import the photos you want to edit. This can be done by selecting the photos from your camera roll or using the app’s import feature.
3. Select the batch editing mode: Look for the batch editing or multiple edit option within the app. This mode allows you to select multiple photos and make changes that will be applied uniformly to all of them.
4. Apply changes to the batch: Once in batch editing mode, you can make adjustments and enhancements to the selected photos. This can include cropping, exposure adjustments, color corrections, and more. The specific editing options will depend on the app you’re using.
5. Fine-tune individual photos: If necessary, you can still make individual adjustments to each photo within the batch. This allows you to cater to the unique characteristics of each image while maintaining the bulk changes you made.
6. Preview the changes: Take the time to review the changes made to the batch of photos. This ensures that the edits are consistent and achieve the desired outcome across all the images.
7. Save or export your edited photos: After applying the edits, save or export the edited photos back to your camera roll or desired location. Some apps also allow you to directly share the edited photos to social media platforms or other apps.
8. Experiment and refine your technique: Don’t hesitate to experiment with different editing styles and techniques to find the look that best suits your vision. Practice and refine your batch editing process to fine-tune your workflow and achieve consistent results.
Using batch editing can be a game-changer when it comes to editing multiple photos simultaneously. It allows you to save time and maintain a consistent aesthetic across your images. By leveraging the power of batch editing, you can streamline your editing process and achieve impressive results without having to edit each photo individually.
Saving edited photos to your camera roll or other applications
Once you have completed the editing process on your iPhone, it’s important to know how to save your edited photos to your camera roll or other applications. Here are several options to consider:
1. Save to camera roll: The most straightforward way to save your edited photos is to simply save them to your iPhone’s camera roll. Most photo editing apps have a dedicated “Save” or “Export” button that allows you to save the edited photo directly to your camera roll for easy access and sharing.
2. Share directly from the editing app: Many editing apps provide the option to share your edited photos directly from within the app itself. Typically, you can tap on the “Share” button and choose the platform or application you want to share the photo with, such as social media platforms like Instagram or Facebook, messaging apps like WhatsApp or iMessage, or email.
3. Export to other photo editing apps: If you prefer to further enhance your edited photos or apply additional effects using other photo editing apps, you can export your edited photos from one app to another. Look for options like “Open In” or “Export” to select the app you want to send the photo to for further editing or adjustments.
4. Save to cloud storage: If you use cloud storage services like Dropbox, Google Drive, or iCloud, you can save your edited photos directly to these platforms. This allows you to access and share your photos across devices and easily collaborate with others if needed. Look for options like “Save to Cloud” or “Export to Storage” within the editing app.
5. Print or order prints: If you want to preserve your edited photos in physical form, you can explore options to print and order prints directly from certain photo editing apps. These apps often offer integration with printing services, allowing you to select the size and type of prints you desire.
6. Save to a dedicated photo editing app: If you have multiple photo editing apps installed on your iPhone, you may prefer to save your edited photos to a specific app dedicated to organizing and managing your edited photos. This can help keep your edited photos separate from your camera roll and make it easier to locate and access them later on.
Regardless of which method you choose, it’s important to consider the quality and resolution of your edited photos. Some apps may offer different export options, allowing you to preserve the highest quality or reduce the file size to optimize sharing and storage.
By understanding how to save your edited photos to your camera roll, other applications, or the cloud, you can ensure that your hard work in editing your photos is preserved and easily accessible for future use or sharing with others.
Tips and tricks for efficient photo editing on your iPhone
Editing photos on your iPhone can be a fun and creative process. To make your photo editing more efficient and productive, here are some helpful tips and tricks to keep in mind:
1. Understand your editing tools: Familiarize yourself with the editing tools available in the app you are using. Take the time to explore and experiment with each tool to understand its purpose and how it can enhance your photos.
2. Start with the basics: Begin your editing process by adjusting basic elements such as exposure, contrast, and saturation. These adjustments can make a significant difference in the overall look of your photo.
3. Use presets or filters: Many editing apps offer presets or filters that can instantly apply a specific style or effect to your photo. Experiment with different presets to achieve the desired look and save time in the editing process.
4. Utilize batch editing: Take advantage of batch editing capabilities to apply changes to multiple photos simultaneously. This can save you time when editing a series of photos with similar lighting conditions or styles.
5. Make use of cropping and straightening: Crop your photos to improve composition and remove any distracting elements. Additionally, use the straightening tool to correct any tilted angles and make your photo more visually appealing.
6. Use selective editing: Don’t be afraid to use selective editing tools to adjust specific parts of your photo. This allows you to make targeted enhancements and bring focus to specific areas of interest.
7. Experiment with different styles: Explore various editing styles and techniques to find the look that best suits your vision. Don’t hesitate to try out different adjustments, filters, or creative effects to create a unique and engaging photo.
8. Preserve the original: When working with edited photos, make sure to keep a copy of the original image. This allows you to revert back to the original version or make further adjustments without losing any details or quality.
9. Take advantage of undo and redo: Most editing apps offer the ability to undo or redo edits. If you make a mistake or are unsure about a change you made, use these features to quickly revert or reapply edits as needed.
10. Save your favorite presets: If you create a specific set of adjustments or filters that you love, save them as presets or custom profiles. This allows you to apply your favorite edits to future photos with just a few taps.
11. Learn from others: Join photography and editing communities or follow photographers on social media platforms. This can help you discover new editing techniques, get inspired, and learn from experienced photographers.
12. Take breaks and review: Editing photos is a creative process, so remember to take breaks and review your edits with fresh eyes. Sometimes, stepping away and returning later can provide valuable perspective and help you make better decisions about your edits.
By implementing these tips and tricks, you can enhance your productivity and efficiency when editing photos on your iPhone. Keep experimenting and refining your editing techniques to develop your unique editing style and create stunning visuals.
Troubleshooting common issues when editing multiple photos
Editing multiple photos at once can sometimes pose challenges and lead to potential issues. Here are some common problems you may encounter when editing multiple photos and how to troubleshoot them:
1. Inconsistent lighting or exposure: When editing a batch of photos, you may encounter variations in lighting conditions or exposure settings. To address this, manually adjust the exposure or use the auto adjustment tool in your editing app to achieve a more consistent look across all photos.
2. Color discrepancies: Different photos may have variations in colors due to different shooting conditions or white balance settings. Use the white balance adjustment tool or apply a consistent color correction to ensure color uniformity among your edited photos.
3. Unwanted artifacts or noise: When applying filters or adjustments, you may notice unwanted artifacts or noise in your edited photos. To mitigate this issue, use noise reduction tools, or carefully adjust the intensity of effects to maintain a natural look.
4. Cropping inconsistencies: If you apply a batch crop and notice that some elements are not aligned or consistently framed across the photos, consider making individual adjustments to ensure a balanced composition for each photo.
5. Loss of photo quality: Applying too many edits or adjustments can sometimes result in a loss of photo quality or detail. To avoid this, be mindful of the intensity of your edits and use high-quality export settings to preserve the image’s clarity and sharpness.
6. Syncing or saving errors: When working with cloud-based editing apps, you may encounter issues with syncing or saving your edited photos. Make sure you have a stable internet connection, sufficient storage space, and check the app settings to ensure proper syncing and saving options are enabled.
7. Over-editing: It’s easy to get carried away and apply too many edits, resulting in an unnatural or overly processed look. To avoid over-editing, periodically step back and review your changes objectively. If necessary, dial back on certain adjustments or revert to a previous version of the photo.
8. Inconsistent editing styles: If you’re looking to maintain a consistent editing style across all your photos, pay attention to the adjustments and filters you apply. Create presets or custom styles that you can easily apply to ensure a cohesive look throughout your collection.
9. Editing time management: Editing a large number of photos can be time-consuming. To manage your time effectively, set realistic goals, prioritize accordingly, and use batch editing features to streamline your workflow. It may also help to break your editing process into smaller sessions to avoid fatigue or rushing through the edits.
10. Photo organization: When working with multiple edited photos, it’s important to stay organized. Consider creating separate folders or albums to keep track of your edited photos and make it easier to locate specific images when needed.
By addressing these common issues and following the troubleshooting tips discussed, you’ll be able to overcome challenges and achieve consistent and high-quality results when editing multiple photos on your iPhone.