
Why Would You Want to Mirror or Flip an Image on the iPhone?
There are several reasons why you might want to mirror or flip an image on your iPhone. Whether you’re a professional photographer, a social media enthusiast, or simply someone who loves experimenting with images, the ability to mirror or flip photos can provide a fresh perspective and unlock a whole new level of creativity. Here are a few scenarios where mirroring or flipping an image can come in handy:
- Artistic Expression: Mirroring or flipping an image can add a unique touch to your artistic compositions. It can create symmetrical patterns, interesting reflections, or surreal effects that make your photos stand out.
- Enhancing Social Media Posts: If you’re an avid Instagram user or enjoy sharing images on other social media platforms, mirroring or flipping your photos can help you create eye-catching content. It’s a simple yet effective way to grab attention and showcase your creativity to your followers.
- Fixing Composition Issues: Sometimes, you take a great photo, but the composition isn’t quite right. Mirroring or flipping the image can help you correct any composition flaws and make it more visually pleasing.
- Adding a Different Perspective: Mirroring or flipping an image can give it a fresh perspective and reveal hidden details. It allows you to see the subject in a different way, potentially uncovering new narratives or insights within the photo.
- Creating Optical Illusions: Mirrored or flipped images can be used to create captivating optical illusions. By playing with symmetry and reflection, you can manipulate the viewer’s perception and create intriguing visual effects.
No matter what your reason may be, the ability to mirror or flip an image on your iPhone can be a powerful tool in your creative arsenal. Fortunately, there are several methods available that allow you to accomplish this task easily and conveniently. So, let’s explore how you can mirror or flip images on your iPhone using various methods and apps.
Method 1: Using the Photos App
The Photos app on your iPhone provides a simple and straightforward way to mirror or flip an image. Here’s how you can do it:
- Open the Photos app on your iPhone and select the image you want to mirror or flip.
- Tap on the Edit option available at the top right corner of the screen.
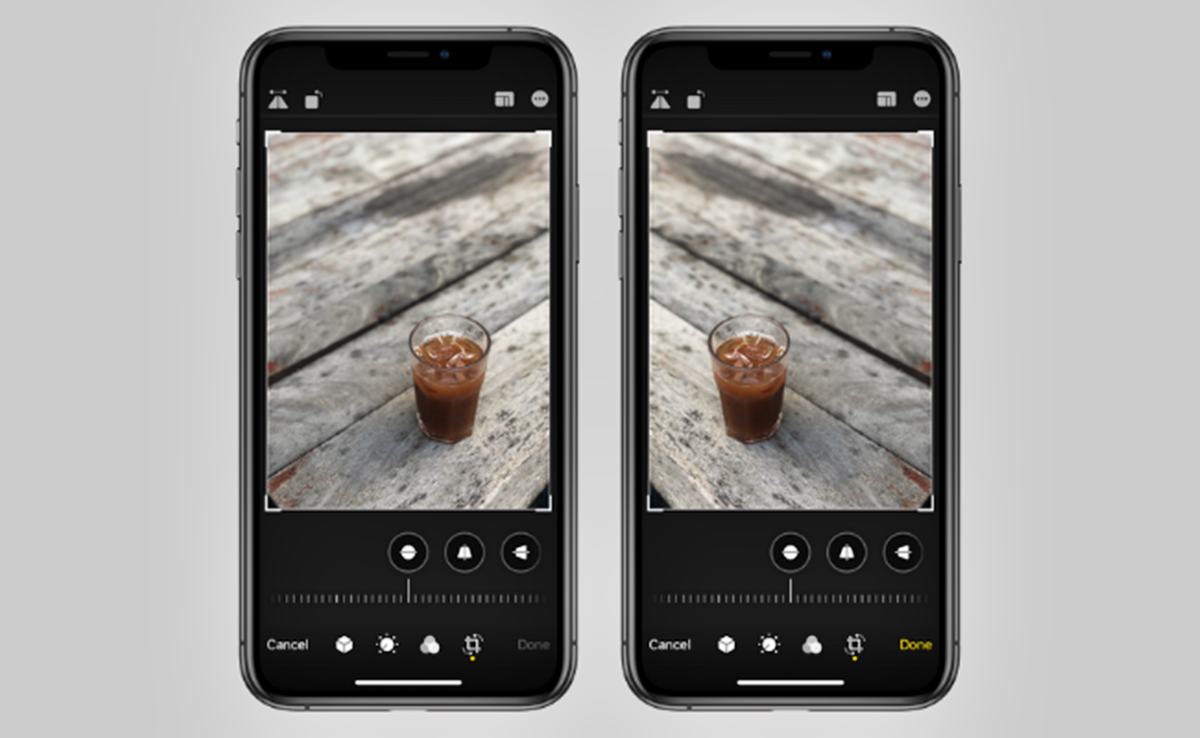
- At the bottom of the screen, you’ll find several editing tools. Tap on the crop icon (a square with arrows) to access additional editing options.
- Now, tap on the flip/mirror icon (two overlapping squares) located at the top right corner of the screen.
- You’ll see two options: Flip Horizontal and Flip Vertical. Select the option that best suits your needs.
- Once you’ve made your selection, tap on the Done button at the bottom right corner of the screen to apply the changes.
- Finally, tap on the Save button to save the mirrored or flipped image to your Photos library.
That’s it! Your image is now mirrored or flipped according to your preference. The Photos app allows you to easily undo any changes or revert back to the original image if needed.
Note that using the Photos app to mirror or flip an image is a non-destructive editing process, meaning it preserves the original image and creates a new version with the applied changes. This ensures that you can always go back to the original image if desired.
Using the Photos app is a convenient way to mirror or flip images on your iPhone. However, if you’re looking for additional features or more advanced editing options, you may want to consider using third-party apps specifically designed for photo editing. Let’s explore some of these options in the next section.
Method 2: Using a Third-Party App
If you’re looking for more advanced editing options or additional features, using a third-party app can be a great option to mirror or flip images on your iPhone. There are several apps available on the App Store that provide comprehensive photo editing tools. Here’s how you can use a third-party app to accomplish this:
- Visit the App Store on your iPhone and search for a photo editing app that offers the mirroring or flipping feature. Some popular options include Adobe Photoshop Express, Snapseed, and Pixlr.
- Once you’ve downloaded and installed the app, open it on your iPhone.
- Select the image you want to edit from your photo library or follow the app’s instructions to import it from your device.
- Look for an option or tool that allows you to mirror or flip the image. This may vary depending on the app you’re using, but it’s usually accessible through an editing toolbar or menu.
- Tap on the mirror or flip option and choose the desired orientation – horizontal or vertical.
- Preview the changes and make any adjustments if necessary.
- Once you’re satisfied with the mirrored or flipped image, save it to your photo library or export it to your desired location.
Using a third-party app gives you more control over the editing process and allows you to explore other advanced editing features as well. These apps often offer a wide range of tools, such as filters, adjustments, and effects, allowing you to further enhance your images.
Remember to explore different apps and find one that suits your editing style and preferences. Each app may have a different user interface and feature set, so take the time to familiarize yourself with the app’s functionality.
Now that you know how to mirror or flip an image using the Photos app and a third-party app, let’s explore a couple more methods that offer additional flexibility and creative options.
Method 3: Using Markup in the Photos App
The Markup feature in the Photos app allows you to annotate and make simple edits to your images, including mirroring or flipping them. Here’s how you can use Markup to mirror or flip an image on your iPhone:
- Open the Photos app on your iPhone and select the image you want to edit.
- Tap on the Edit option at the top right corner of the screen.
- Tap on the triple-dot icon at the top right corner and select Markup from the dropdown menu.
- In the Markup interface, you’ll find various tools at the bottom of the screen. Tap on the plus icon (+) to add a text box to the image.
- Tap on the text box and then tap on the mirror/flip icon (two overlapping squares) at the top right corner.
- You’ll see two options: Flip Horizontal and Flip Vertical. Choose the one that suits your needs.
- The image will be mirrored or flipped accordingly. You can resize or reposition the text box as needed to ensure it doesn’t obstruct any important parts of the image.
- Once you’re satisfied with the changes, tap on Done to save the edited image.
- Finally, tap on Save to save the mirrored or flipped image to your Photos library.
The Markup feature in the Photos app provides a quick and convenient way to mirror or flip images without the need for additional apps. It’s especially useful if you want to add annotations or text to your images along with the mirroring or flipping effect.
Experiment with different editing options and combine them to create unique and visually appealing images. Now that you’ve learned how to mirror or flip images using Markup, let’s explore another method that utilizes a third-party photo editing app for added flexibility.
Method 4: Using a Third-Party Photo Editing App
If you’re looking for a more comprehensive set of editing tools and advanced features, using a third-party photo editing app can unlock even more possibilities for mirroring or flipping images on your iPhone. Here’s how you can utilize a third-party app to achieve this:
- Head to the App Store on your iPhone and search for a photo editing app that offers the mirroring or flipping feature. Popular options include Adobe Photoshop Express, Snapseed, and Pixlr.
- Download and install the app of your choice, then open it on your iPhone.
- Select the image you wish to edit from your photo library or follow the app’s instructions to import it from your device.
- Explore the available editing tools within the app to find the option for mirroring or flipping the image. The exact location and method may vary depending on the app you choose, but it’s typically accessible through an editing toolbar or menu.
- Tap on the mirror or flip option and select the desired orientation – horizontal or vertical.
- Preview the changes and make further adjustments if needed, such as adjusting the brightness, contrast, or applying filters.
- Once you’re satisfied with the mirrored or flipped image, save it to your photo library or export it to your preferred location.
Third-party photo editing apps often provide a wide array of editing tools and effects, enabling you to enhance your images in various ways. These apps offer more advanced features than the native Photos app, allowing you to have greater control over the mirroring or flipping process and explore other creative edits.
Take some time to experiment with different photo editing apps and find the one that suits your preferences and editing style. Each app may offer a unique user interface, feature set, and level of complexity, so explore and familiarize yourself with the app’s functionality to make the most of your editing experience.
Now that you know how to utilize third-party photo editing apps for mirroring or flipping images on your iPhone, let’s move on to explore more methods for achieving this effect.
Method 5: Using the Shortcut App
The Shortcut app, available on iPhone, allows you to create custom shortcuts to automate various tasks. Using this app, you can create a shortcut to mirror or flip images effortlessly. Here’s how you can use the Shortcut app to achieve this:
- Open the Shortcut app on your iPhone. If you don’t have it installed, you can download it from the App Store.
- Tap on the Create Shortcut button to start creating a new shortcut.
- In the search bar, type Flip or Mirror and select the action that best suits your needs. You can also use keywords like Transform Image or Edit Image to find relevant actions.
- Once you’ve added the flip or mirror action to your shortcut, you can adjust the parameters, such as selecting the image you want to edit or specifying the flipping or mirroring orientation.
- Customize the shortcut by adding any additional actions or steps you may require. For instance, you might want to add an action to save the edited image to a specific album in your Photos library.
- Once you’re satisfied with the shortcut, tap on the Play button to test it out.
- If the shortcut works as expected, tap on the Done button to save it.
- Now, whenever you want to mirror or flip an image, simply open the Shortcut app and run the saved shortcut. It will automatically perform the mirroring or flipping action on the selected image.
The Shortcut app gives you the flexibility to automate various tasks on your iPhone, including editing images. By creating a shortcut specifically for mirroring or flipping images, you can save time and streamline your editing process.
Explore other actions and possibilities within the Shortcut app to create even more powerful shortcuts tailored to your unique needs. You can combine multiple actions, integrate shortcuts with other apps, and unleash the full potential of automation on your iPhone.
Now that you’ve learned how to create shortcuts in the Shortcut app for mirroring or flipping images, let’s proceed to the next method that utilizes the built-in Camera app on your iPhone.
Method 6: Using the Camera App
The built-in Camera app on your iPhone not only allows you to capture stunning photos but also offers a simple way to mirror or flip images before you take the shot. Here’s how you can use the Camera app to achieve this effect:
- Open the Camera app on your iPhone.
- Select the desired camera mode, such as Photo or Portrait.
- Tap on the two overlapping squares icon located at the top right corner of the screen. This enables the mirroring or flipping feature within the Camera app.
- Compose your shot, making sure to align the elements in a way that you want them to appear in the final mirrored or flipped image. Keep in mind that the image will be mirrored or flipped horizontally or vertically depending on your selection.
- Once you’re satisfied with the composition, tap the shutter button to capture the image.
- The photo will be saved to your Photos library, automatically applying the mirroring or flipping effect you selected.
- If you’re using the front-facing camera for a selfie, the Camera app will automatically mirror the image to match your perspective. If you want to disable this feature, you can go to Settings > Camera and toggle off the Mirror Front Camera option.
Using the Camera app to mirror or flip images provides a convenient option if you want to capture the effect directly while taking the photo. It allows you to preview the composition and make any adjustments before saving the image.
Experiment with different angles, positions, and perspectives to create unique and visually captivating mirrored or flipped images right from the Camera app.
Now that you know how to use the Camera app for mirroring or flipping images, let’s explore another method that involves using a third-party camera app for more advanced features and capabilities.
Method 7: Using a Third-Party Camera App
If you’re looking for more advanced camera features and greater control over your photos, using a third-party camera app can provide additional options for mirroring or flipping images on your iPhone. Here’s how you can utilize a third-party camera app to achieve this effect:
- Visit the App Store on your iPhone and search for a third-party camera app with the desired features. Some popular options include ProCamera, Camera+, and Halide.
- Download and install the camera app of your choice from the App Store.
- Open the third-party camera app on your iPhone.
- Explore the various camera modes and settings available in the app to find the option for mirroring or flipping images.
- Activate the mirroring or flipping feature within the camera app by selecting the appropriate option or toggling the relevant setting.
- Compose your shot and position the elements of the image to achieve the desired mirrored or flipped effect.
- Capture the photo using the third-party camera app, and the image will be saved to your camera roll, automatically applying the mirroring or flipping effect based on your settings.
Third-party camera apps often offer advanced features like manual controls, additional shooting modes, and in-depth customization options. They provide you with greater flexibility and creative opportunities when it comes to mirroring or flipping images.
Take some time to explore the features and settings within the third-party camera app you choose. Familiarize yourself with the interface and experiment with different shooting modes and adjustments to make the most of your photography experience.
Remember that each camera app may have its own unique features, so try out multiple apps to find the one that best suits your needs and style. Don’t hesitate to test different apps and utilize their various features to capture stunning mirrored or flipped images.
Now that you know how to utilize a third-party camera app for mirroring or flipping images on your iPhone, you have even more options to unleash your creative vision.
Tips for Mirror or Flip Images on the iPhone
When dealing with mirroring or flipping images on your iPhone, there are a few tips to keep in mind to ensure the best results. These tips will help you effectively utilize the mirroring or flipping effect to enhance your images and unleash your creativity:
- Experiment with Different Orientations: Try both horizontal and vertical mirroring or flipping to see which orientation works best for your image. Each orientation can produce a unique visual impact and create different compositions.
- Consider Symmetry: Mirroring an image can create symmetrical patterns and compositions. Use this feature to add balance and visual harmony to your photos.
- Pay Attention to Details: When flipping an image, make sure to pay attention to any text, logos, or recognizable elements that may appear backward after the flip. Adjust the composition accordingly to maintain readability and visual coherence.
- Explore Advanced Editing Options: While the native Photos app provides basic mirroring and flipping tools, third-party photo editing apps offer more advanced features like blending, distortion, and layering effects. Experiment with these options to take your mirrored or flipped images to the next creative level.
- Combine Mirroring with Other Edits: Don’t limit yourself to just mirroring or flipping. Explore other editing techniques like cropping, adjustments, and filters to create a unique and visually appealing final result.
- Keep the Original: Before applying any changes, make sure to save a copy of the original image. This way, you can always go back to the original if you’re not satisfied with the mirroring or flipping result.
- Share and Seek Feedback: After applying the mirroring or flipping effect, don’t be afraid to share your creation with others. Seek feedback and opinions to gain insights and improve your editing skills.
- Practice and Experiment: The more you practice and experiment, the better you’ll become at utilizing the mirroring or flipping effect. Don’t be afraid to try new ideas and push the boundaries of your creativity.
By following these tips, you’ll be able to effectively mirror or flip images on your iPhone and create captivating, visually striking compositions. Whether you’re using the native Photos app or exploring third-party options, don’t hesitate to experiment and infuse your own style into your mirrored or flipped images.
Now armed with these tips, go ahead and start exploring the exciting world of mirroring and flipping images on your iPhone!