
Why Use Electronic Signatures?
Electronic signatures have become increasingly popular in today’s digital landscape, revolutionizing the way we sign and manage documents. These digital signatures offer a range of benefits that make them an attractive choice for individuals and businesses alike. Here are some compelling reasons why you should consider using electronic signatures:
- Convenience: One of the primary reasons to use electronic signatures is the convenience they offer. With electronic signatures, you can sign documents from anywhere, at any time, using your iPhone. There’s no need to print, sign, and scan documents, saving you valuable time and effort.
- Efficiency: Electronic signatures streamline the document signing process. You can receive, review, and sign documents digitally, eliminating the need for physical copies, postage, or in-person meetings. This improves workflow efficiency and accelerates business transactions.
- Cost savings: Traditional paper-based signatures can be costly. From printing and shipping costs to storing and organizing physical documents, expenses can quickly add up. Using electronic signatures eliminates these expenses, allowing you to save money in the long run.
- Security: Electronic signatures provide a higher level of security compared to traditional signatures. They use advanced encryption technology to ensure document integrity and authenticity. Additionally, many electronic signature providers offer robust security measures, such as multi-factor authentication, to protect your sensitive information.
- Legally binding: Contrary to popular belief, electronic signatures are legally binding in many countries and jurisdictions. They hold the same legal weight as handwritten signatures, as long as they meet specific criteria. These include demonstrating the signer’s intent to sign, providing a reliable method of identifying the signer, and ensuring the integrity and non-repudiation of the signed document.
Overall, electronic signatures provide a convenient, efficient, and cost-effective solution for signing and managing documents. By adopting electronic signatures on your iPhone, you can simplify your document workflows, save time and money, and enhance the security of your business transactions.
Benefits of Electronic Signatures
Electronic signatures offer a plethora of benefits for individuals and businesses alike. By harnessing the power of digital technology, these signatures streamline the document signing process and provide numerous advantages. Let’s explore some of the key benefits of using electronic signatures:
- Time-saving: With electronic signatures, you can say goodbye to the lengthy process of printing, signing, and scanning documents. Instead, you can sign your documents electronically with just a few taps on your iPhone. This saves valuable time and allows you to focus on more important tasks.
- Improved efficiency: Electronic signatures eliminate the need for physical paperwork and mailing services. This results in faster document turnaround times, as documents can be signed and shared instantly. You can collaborate with clients, colleagues, or partners seamlessly, facilitating smoother business operations.
- Cost reduction: Printing and distributing physical documents can be costly, especially for businesses that deal with a high volume of paperwork. By switching to electronic signatures, you can eliminate printing, postage, and storage costs. This can lead to significant cost savings over time.
- Enhanced security: Electronic signatures provide robust security measures to protect your sensitive information. They utilize encryption technology to ensure document integrity and validity. Additionally, some electronic signature platforms offer features like audit trails, which provide a detailed record of who has accessed or made changes to a document.
- Environmentally friendly: Going paperless with electronic signatures contributes to the preservation of our environment. By reducing paper usage, we can help conserve forests, save water, and reduce carbon emissions associated with the production and transportation of paper.
By leveraging electronic signatures on your iPhone, you can enjoy these benefits and more. From saving time and money to improving efficiency and security, electronic signatures are a valuable tool for modern document management. Make the switch today and experience the convenience and advantages of electronic signatures.
How to Set Up an Electronic Signature on iPhone
Setting up an electronic signature on your iPhone is a straightforward process that allows you to sign documents with ease. There are multiple methods available, including using the Markup feature in the iPhone Mail app or utilizing a third-party electronic signature app. Let’s explore both options:
Option 1: Use the Markup Feature in the iPhone Mail App
The Markup feature in the iPhone Mail app allows you to add your signature directly to documents you receive via email. Here’s how to set up your electronic signature using this method:
- Open the Mail app on your iPhone and tap on the email containing the document you want to sign.
- Tap on the attachment to open it.
- At the bottom of the screen, you’ll find the Markup icon. Tap on it.
- Tap on the (+) icon and select “Signature” to create a new signature.
- Sign your name on the screen using your finger or stylus. You can also choose to use your initials or a more customized signature.
- Once you’re satisfied with your signature, tap on “Done”.
- You can now position and resize your signature as needed. Tap on “Done” when finished.
- Finally, tap on “Save” to save the signed document with your electronic signature.
Option 2: Use a Third-Party Electronic Signature App
If you prefer a more comprehensive electronic signature solution, you can use a third-party app dedicated to electronic signatures. Here’s a general guide on how to set up an electronic signature using a third-party app:
- Download and install a reputable electronic signature app from the App Store, such as Adobe Sign or DocuSign.
- Create an account with the app, following the provided instructions.
- Customize your signature by selecting your preferred style, size, and color.
- Import the document you want to sign either by uploading it from your iPhone or syncing it with cloud storage services such as Dropbox or Google Drive.
- Add your signature to the document by tapping on the designated signature field. Depending on the app, you may have options to draw your signature, use a stored signature, or type your name in a predefined font.
- Review the document to ensure accuracy and make any necessary adjustments.
- Save and share the signed document as required, using the sharing options provided by the app.
With these options, you can easily set up an electronic signature on your iPhone, providing you with the flexibility to sign documents digitally. Choose the method that suits your needs and preferences, and enjoy the convenience and efficiency of electronic signatures.
Option 1: Use the Markup Feature in the iPhone Mail App
The Markup feature in the iPhone Mail app provides a convenient and built-in solution for adding your electronic signature to documents received via email. This method allows you to sign documents directly on your iPhone without the need for any additional apps. Here’s how to use the Markup feature to set up your electronic signature:
- Open the Mail app on your iPhone and navigate to the email containing the document that needs your signature.
- Tap on the attachment to open the document.
- At the bottom of the screen, you’ll see the Markup icon. Tap on it to access the markup tools.
- Within the Markup toolbar, tap on the (+) icon to reveal additional markup options.
- Select “Signature” from the options to create a new electronic signature.
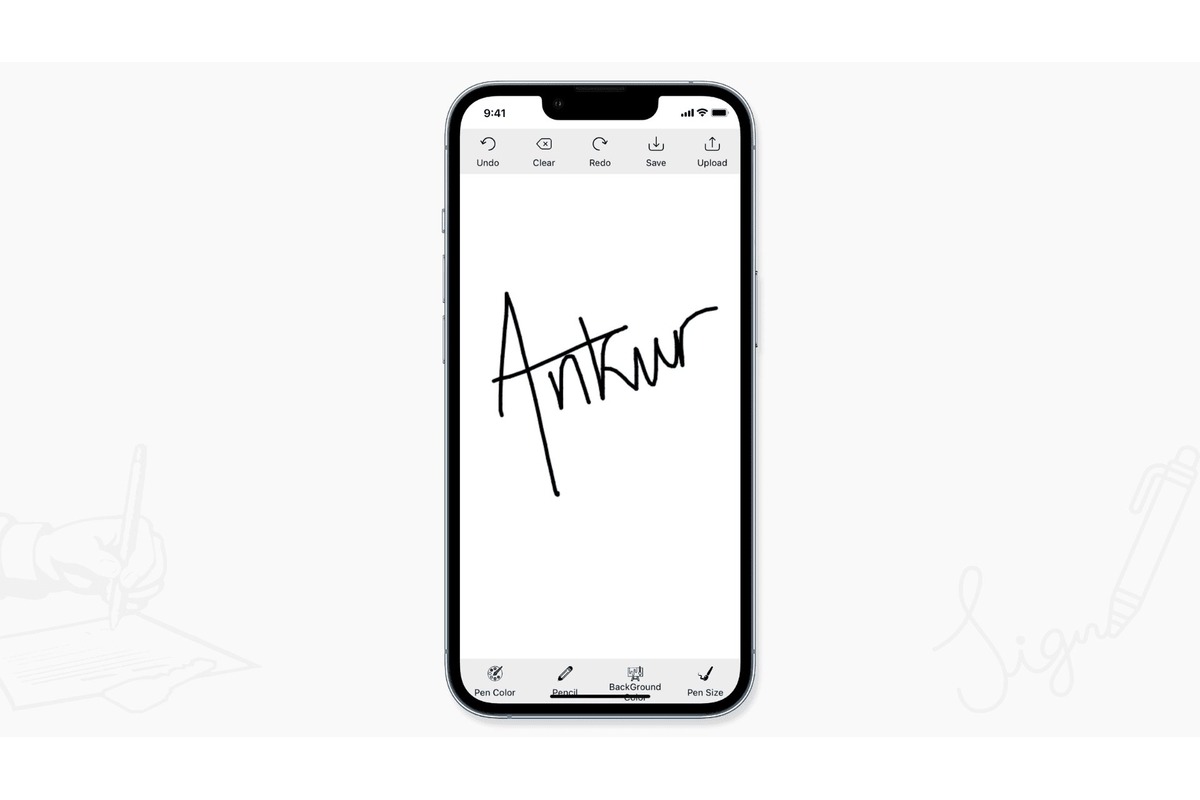
- Using your finger or a stylus, sign your name on the screen. You can also choose to sign with your initials or create a more personalized signature.
- Once you’re satisfied with your signature, tap on “Done”.
- You can now position and resize your signature by dragging and resizing the signature box. Ensure it aligns correctly with the signature line in the document.
- When you’ve placed the signature in the desired location, tap on “Done” to finalize the process.
- Finally, tap on “Save” to save the signed document with your electronic signature. The document will be automatically attached to a new email draft for easy sharing.
The Markup feature in the iPhone Mail app provides a simple and efficient way to add your electronic signature to documents. By taking advantage of this built-in function, you can sign important documents without the need for additional apps or complex processes. Enjoy the convenience and ease of using the Markup feature on your iPhone to create your electronic signature.
Option 2: Use a Third-Party Electronic Signature App
If you’re looking for a more comprehensive electronic signature solution on your iPhone, you can utilize a third-party app dedicated to electronic signatures. These apps offer advanced features and a seamless signing experience. Here’s a guide on how to set up an electronic signature using a third-party app:
- Download and install an electronic signature app: Visit the App Store on your iPhone and search for reputable electronic signature apps like Adobe Sign, DocuSign, or HelloSign. Download and install the app that suits your needs.
- Create an account: Launch the app and follow the instructions to create an account. You may need to provide some personal information and create a secure password.
- Customize your signature: Once you’ve created an account, you’ll have the opportunity to customize your electronic signature. Choose your preferred style, size, and color to make it unique to you.
- Import the document: To sign a document, you’ll need to import it into the electronic signature app. You can typically upload documents from your iPhone’s storage or connect the app to cloud storage services like Dropbox or Google Drive.
- Add your signature: Once the document is imported, locate the designated area where your signature should be placed. Depending on the app, you’ll have options to draw your signature directly on the screen, use a previously saved signature, or type your name in a predefined font.
- Review and make adjustments: Before finalizing the signature, review the document to ensure accuracy. If needed, you can make adjustments to the size or placement of your signature within the app.
- Save and share the signed document: Once you’re satisfied with the placement of your signature, save the document within the app. You can then choose to share the signed document via email, messaging apps, or other digital platforms directly from the app.
By using a third-party electronic signature app, you can take advantage of advanced features and a more comprehensive signing experience on your iPhone. These apps offer a wide range of capabilities, including document management, secure storage, and collaboration tools. Choose the app that best suits your needs to sign documents with ease and efficiency.
Step 1: Download and Install the Electronic Signature App
To start using an electronic signature app on your iPhone, you’ll need to download and install a reputable app from the App Store. There are several electronic signature apps available, including Adobe Sign, DocuSign, HelloSign, and many more. Follow these steps to download and install the electronic signature app:
- Open the App Store: Locate and tap on the App Store icon on your iPhone’s home screen. The App Store has a blue icon with a white letter “A” inside a circle.
- Search for an electronic signature app: Once you’re in the App Store, tap on the search icon located at the bottom right corner of the screen. Enter relevant keywords such as “electronic signature,” “digital signing,” or the specific name of the app you’re interested in.
- Browse the search results: The App Store will display a list of search results related to your query. Take your time to explore the different apps by reading the descriptions, reviews, and ratings. Look for one that meets your requirements and has positive user feedback.
- Select the app: Once you’ve identified the electronic signature app you wish to use, tap on its icon to access its App Store page. Here, you’ll find more detailed information about the app, including screenshots and user reviews.
- Check compatibility and requirements: Before installing the app, make sure it’s compatible with your iPhone model and operating system version. The App Store page will provide this information, ensuring a smooth installation process.
- Download and install: To proceed with the installation, tap on the “Get” or “Install” button located on the app’s page. You may need to confirm your Apple ID or use Touch ID/Face ID to authenticate the download. The app will begin downloading and automatically install on your iPhone.
- Wait for installation to complete: Depending on your internet connection and the size of the app, the installation process may take a few moments. Ensure you have a stable internet connection and sufficient storage space on your device.
- Access the app: Once the installation is complete, you can find the app’s icon on your iPhone’s home screen. Tap on the icon to launch the electronic signature app.
Downloading and installing an electronic signature app on your iPhone is the first step towards unlocking the power of digital signing. Take your time to research and choose an app that suits your needs, and follow the installation instructions to gain access to a range of convenient features for signing and managing documents.
Step 2: Create an Account with the App
After downloading and installing the electronic signature app on your iPhone, the next step is to create an account. Creating an account allows you to access the full functionality of the app and securely manage your signed documents. Follow these steps to create an account with the electronic signature app:
- Launch the app: Locate the app’s icon on your iPhone’s home screen and tap on it to launch the electronic signature app.
- Sign up or register: Upon launching the app, you will likely be greeted with a welcome screen or a sign-up page. Look for options like “Sign up,” “Register,” or “Get Started” to initiate the account creation process.
- Provide your information: To create an account, the app will require you to provide certain information. This may include your full name, email address, and sometimes a password. Follow the prompts and input the necessary details accurately.
- Read and accept the terms and conditions: The app will usually have terms and conditions or a user agreement that outlines the rules and policies of using the electronic signature services. Take the time to read through these terms and conditions, and if you agree, indicate your consent by checking the appropriate box or tapping the “Accept” button.
- Verify your account (if required): Depending on the app, you may need to verify your account before you can start using all the features. This could involve confirming your email address or receiving a verification code via SMS. Follow the app’s instructions to complete the verification process.
- Set up additional security features (optional): Some electronic signature apps offer additional security measures to protect your account and documents. These may include options like two-step verification or fingerprint/face recognition. Enable any desired security features to enhance the privacy and integrity of your account.
- Complete the account creation process: Once you’ve provided all the required information and verified your account (if necessary), the app will guide you through the final steps to complete the account creation process. This may involve setting up a profile picture or adding any other relevant personal details.
- Access your account: Congratulations! You’ve successfully created an account with the electronic signature app. You can now access all the features and functionality the app offers to sign and manage your documents.
By creating an account with the electronic signature app, you can make the most of its features and enjoy a seamless signing experience on your iPhone. Take the time to input your information accurately and review any terms and conditions before proceeding. With your account created, you’re one step closer to efficiently signing and managing your important documents.
Step 3: Customize Your Signature
Customizing your electronic signature is an essential step in personalizing and ensuring the authenticity of your signed documents. By tailoring your signature to your preferred style, you can add a personal touch to your digital signing process. Here’s how to customize your signature within the electronic signature app:
- Access the settings: Open the electronic signature app on your iPhone and navigate to the account settings or profile section. This is typically indicated by an icon or tab in the app’s interface.
- Locate the signature settings: Within the account settings or profile section, look for options related to signature customization. This may be labeled as “Signature Settings,” “Personalize Signature,” or something similar.
- Choose your signature style: The app may offer various signature styles or fonts for you to choose from. Explore the available options and select the one that best represents your desired signature style. You may find options ranging from a simple cursive style to more elaborate and artistic designs.
- Select the signature size: The app may allow you to adjust the size of your signature. This can be beneficial if you prefer a larger or smaller signature appearance on your signed documents. Experiment with different sizes and select the one that suits your preference.
- Consider adding additional information: Depending on the purpose of your documents, you may have the option to add extra information alongside your signature. This could include your job title, contact information, or any other relevant details. Decide if adding such information is necessary for your signature and adjust the settings accordingly.
- Preview and save: Once you’ve customized your signature to your liking, take a moment to preview how it will appear on a document. This allows you to ensure that the size, style, and any additional information are visually appealing and legible. If you’re satisfied with the result, save your signature settings.
By customizing your electronic signature within the app, you can create a unique and personalized signature that reflects your professional identity. Take the time to explore the available options and adjust the settings according to your preferences. With your signature customized, you’ll be ready to sign documents digitally in a way that is both professional and uniquely yours.
Step 4: Import the Document You Want to Sign
Once you have customized your electronic signature, the next step is to import the document that you want to sign into the electronic signature app on your iPhone. Whether it’s a contract, agreement, or any other type of document, the app provides various options for importing and accessing your files. Follow these steps to import the document you want to sign:
- Launch the electronic signature app: Open the app on your iPhone by tapping on its icon from the home screen.
- Locate the document import feature: In the app’s interface, look for a button, icon, or menu option that indicates document import. This is typically labeled as “Import,” “Upload,” or represented by a cloud icon.
- Select the source of the document: Depending on the app, you’ll have different options for importing your document. You may be able to choose from sources such as your iPhone’s local storage, cloud storage services like Dropbox or Google Drive, or even email attachments. Tap on the appropriate source to proceed.
- Navigate to the document: After selecting the source, navigate to the folder or location where your document is saved. Use the provided file browser or navigation tools to find and select the document you want to sign.
- Confirm the document selection: Once you’ve located the document, review the file name and other details to ensure it’s the correct one. If everything looks correct, confirm the selection to proceed.
- Wait for the document to import: Depending on the document’s size and your internet connection, the app may take a few moments to import the document. Be patient and allow it to complete the import process.
- Verify the imported document: After the import is complete, the app will usually display a preview of the imported document. Take a moment to review the document and ensure that it has imported correctly without any issues.
By successfully importing the document you want to sign into the electronic signature app, you can prepare it for the next steps of the signing process. Take the time to choose the appropriate source, confirm the document selection, and verify that it has imported correctly. With the document imported, you’re ready to proceed with adding your electronic signature in the next step.
Step 5: Add Your Signature to the Document
Once you have imported the document into the electronic signature app on your iPhone, it’s time to add your electronic signature. The app provides intuitive tools that allow you to sign the document digitally, ensuring its authenticity and legality. Follow these steps to add your signature to the document:
- Select the document: Open the electronic signature app and navigate to the imported document that you want to sign. Tap on the document to open it within the app.
- Locate the signature field: Look for the designated signature field within the document. This field is typically indicated by a box or highlighted area where the signature should be placed. The app may also display a prompt instructing you to add your signature.
- Add your signature: Depending on the app, you’ll have different options to add your signature to the document. You can typically choose to draw your signature directly on the touchscreen using your finger or a stylus. Some apps also offer the option to use a previously saved signature or type your name in a predefined font that mimics a handwritten signature.
- Review and adjust the signature: After adding your signature, take a moment to review the placement and appearance. Ensure that the signature fits within the designated signature field and aligns correctly with any accompanying text or lines. If necessary, you may be able to resize or reposition the signature using the app’s signature editing tools.
- Save the signature: Once you’re satisfied with the placement and appearance of your signature, save it within the app. The app will update the document with your digital signature, ensuring its authenticity and legal validity.
- Verify the signed document: Before proceeding, take a moment to verify that the signed document reflects your electronic signature accurately. Review the document to ensure that it contains all the necessary information and that your signature appears in the correct location.
With your electronic signature added to the document, you have successfully completed the fifth step of the signing process. Take the time to carefully place and review your signature to ensure its accuracy and legibility. By following these steps, you can confidently sign documents digitally using your iPhone and the electronic signature app.
Step 6: Save and Share the Signed Document
After adding your electronic signature to the document using the electronic signature app on your iPhone, the final step is to save and share the signed document. This allows you to securely store the document and distribute it to the necessary recipients. Follow these steps to save and share the signed document:
- Confirm the signed document: Before saving and sharing, take a moment to review the document to ensure that it accurately reflects your electronic signature and contains all the necessary information.
- Locate the save option: Within the electronic signature app, look for a button or icon that represents saving or exporting the document. This may be labeled as “Save,” “Export,” or as a cloud or download icon.
- Select the save format: The app may provide different options for saving the document, such as PDF, DOCX, or other file formats. Choose the format that best suits your needs and the requirements of the recipients.
- Choose the save location: The app may prompt you to select a location where you want to save the signed document. You can typically choose to save it within the app itself, on your iPhone’s local storage, or directly to a cloud storage service connected to the app.
- Save the document: Once you’ve specified the save format and location, proceed to save the document. The app will generate the saved file, incorporating your electronic signature, and store it in the selected location.
- Share the document: After saving the document, the app may offer various options for sharing it. Look for a button or icon that represents sharing, which can include options like sending it via email, messaging apps, or uploading it to a cloud storage service. Choose the appropriate method for sharing the document with the intended recipients.
- Follow additional steps for secure sharing (if applicable): Depending on the sharing method you choose, you may need to follow additional steps to ensure the security and privacy of the signed document. This can include setting permissions, adding password protection, or encrypting the document.
- Verify successful sharing: After sharing the document, double-check that it has been successfully sent or uploaded to the desired location. Confirm that the recipients have received the signed document.
By saving and sharing the signed document using the electronic signature app, you have completed the final step of the signing process. Take the time to choose the appropriate save format, location, and sharing method to ensure the document reaches the intended recipients securely and efficiently. With the document saved and shared, you can confidently conclude your digital signing workflow using your iPhone.
Tips for Using Electronic Signatures Effectively on iPhone
Using electronic signatures on your iPhone offers a convenient and efficient way to sign and manage documents. To make the most of this digital signing process, consider the following tips for using electronic signatures effectively on your iPhone:
- Choose a reputable electronic signature app: Select an electronic signature app from a trusted provider that offers robust security features, a user-friendly interface, and seamless integration with your iPhone.
- Ensure document compatibility: Before importing a document into the electronic signature app, make sure it’s in a compatible file format like PDF or DOCX. This will ensure smooth processing and preserve the document’s intended format.
- Customize your signature: Take advantage of the signature customization options offered by the app. Personalize your electronic signature by choosing a style, size, and format that reflects your professional identity.
- Practice signature placement: Pay attention to the designated signature field within the document and ensure your signature aligns properly. Practice placement and sizing to achieve a clean and professional appearance.
- Double-check the document: Before signing, carefully review the document to verify its contents, ensuring that it’s complete, accurate, and free of any errors or discrepancies.
- Protect your credentials: Set up additional security measures offered by the app, such as two-factor authentication or biometric verification, to protect access to your electronic signatures and account.
- Keep track of signed documents: Maintain an organized system for storing and managing your signed documents. Use folder structures, tags, or labels within the app to easily locate and reference your signed files.
- Understand legal implications: Familiarize yourself with the legalities surrounding electronic signatures in your jurisdiction. Educate yourself on the specific requirements for digital signing to ensure compliance with applicable laws and regulations.
- Be mindful of deadlines: Set reminders or utilize the app’s notification features to ensure you meet deadlines for signing and sharing documents in a timely manner.
- Regularly update the app: Keep the electronic signature app on your iPhone up to date by installing the latest updates and patches. This ensures you have the latest security features and optimizations provided by the app developer.
By following these tips, you can use electronic signatures effectively on your iPhone, optimizing your digital signing process and maximizing the benefits of this modern approach to document management. Enjoy the convenience, efficiency, and security that electronic signatures bring to your everyday workflow.