
Why Create an Apple ID for a Child?
As technology becomes increasingly integrated into our daily lives, it’s important to provide children with the necessary tools and knowledge to navigate the digital world safely. Creating an Apple ID for your child is a proactive step in this direction. It not only enables them to access age-appropriate apps, games, and educational content, but also allows you to have control and monitor their activities. Here are a few reasons why you should consider creating an Apple ID for your child:
1. Appropriate Content: By having their own Apple ID, you can ensure that your child only has access to age-appropriate apps, games, and media. With stricter content guidelines and parental controls in place, you can rest assured that your child is exploring digital content in a safe and controlled environment.
2. Enhanced Privacy: When your child has their own Apple ID, they have their own personal space within the Apple ecosystem. Their messages, photos, and other personal data are separate from yours. This not only safeguards their privacy but also provides them with a sense of ownership and responsibility towards their digital presence.
3. Educational Opportunities: Apple devices are widely used in educational institutions, and many educational apps and interactive learning materials are available exclusively through the App Store. By creating an Apple ID for your child, you can open up a world of educational opportunities that can supplement their learning and encourage their curiosity.
4. Safe Communication: With their own Apple ID, your child can have their own email address which they can use for communication purposes. This allows them to communicate with teachers, friends, and family members in a controlled and safe manner, helping them develop valuable digital communication skills.
5. Easy Device Management: Creating a separate Apple ID for your child allows for easier device management. You can set up parental controls, monitor their app usage, and even remotely manage their device settings from your own device, ensuring a seamless and secure digital experience for your child.
By creating an Apple ID for your child, you are empowering them with the necessary tools to explore the digital world responsibly. It’s never too early to educate them about safe internet usage and digital citizenship, and an Apple ID provides a platform for you to guide and monitor their digital journey.
Step 1: Check System Requirements
Before you begin the process of creating an Apple ID for your child, it is important to ensure that your devices meet the necessary system requirements. Here are the basic system requirements you need to consider:
1. Apple Devices: You will need an Apple device, such as an iPhone, iPad, or iPod touch, to create and manage your child’s Apple ID. Ensure that your device is running the latest version of iOS or iPadOS.
2. Family Sharing: Family Sharing is a feature that enables you to share purchases, subscriptions, and other content with your family members. To create an Apple ID for your child, you need to set up Family Sharing on your device. Check if your device supports Family Sharing by going to Settings > [Your Name] > Set Up Family Sharing.
3. Age Eligibility: Apple has specific age requirements for creating an Apple ID. The minimum age varies from country to country, so make sure to check the age eligibility criteria in your region. In some cases, you may need to provide consent for your child to create an Apple ID.
4. Internet Connection: You will need a stable internet connection to complete the Apple ID creation process. Ensure that you are connected to a reliable Wi-Fi or cellular network before proceeding.
5. A Valid Payment Method: When setting up a child’s Apple ID, you have the option to add a payment method for App Store purchases. If you choose to enable this feature, make sure you have a valid payment method linked to your Apple ID. Alternatively, you can also set up an Apple ID fund that allows your child to make purchases using preloaded funds.
6. Device Compatibility: It’s important to check if your child’s device is compatible with the latest version of iOS or iPadOS. Older devices may not support newer operating systems, which can affect the functioning of certain apps and features.
By checking these system requirements beforehand, you can ensure a smooth and hassle-free process when creating an Apple ID for your child. Once you have verified that your devices meet the necessary requirements, you can proceed to the next step of setting up Family Sharing and creating your child’s Apple ID.
Step 2: Set Up Family Sharing
Family Sharing is a feature provided by Apple that allows you to connect multiple Apple IDs and share purchases, subscriptions, and other content with your family members. Before creating an Apple ID for your child, you need to set up Family Sharing on your device. Follow the steps below to set up Family Sharing:
1. Open Settings: Open the Settings app on your Apple device.
2. Sign in with your Apple ID: If you are not already signed in, sign in with your Apple ID. This will be the organizer or parent’s Apple ID that will manage the Family Sharing settings.
3. Tap on your name: Scroll down and tap on your name or profile picture at the top of the Settings menu.
4. Set up Family Sharing: Tap on “Set Up Family Sharing” and select “Get Started.” Follow the on-screen instructions to proceed.
5. Add family members: Tap on “Add Family Member” and enter your child’s Apple ID or create one for them. Follow the prompts to send an invitation to join your family. Your child will receive an invitation that they can accept to join the Family Sharing group.
6. Choose sharing options: Once your child has accepted the invitation, you can choose what you want to share with them. This includes purchases from the App Store, Apple Music subscription, iCloud Storage, and more. You can also enable sharing of location information if desired.
7. Manage parental controls: Family Sharing allows you to set up parental controls for your child’s Apple ID. You can control what types of content they can access, impose restrictions on their usage, and manage their screen time. Take some time to review and customize these settings according to your preferences.
8. Confirm payment method: If you have chosen to enable purchase sharing, you may need to confirm your payment method or set up an Apple ID fund for your child’s account. This will allow them to make purchases while keeping them within predefined limits.
By setting up Family Sharing, you are creating a digital ecosystem where you can manage and oversee your child’s Apple ID and content access. It provides a seamless way to share purchases, subscriptions, and other content with your child while maintaining control and ensuring a safe and appropriate digital experience.
Step 3: Create a Child Apple ID
Once you have set up Family Sharing, the next step is to create an Apple ID for your child. Here’s how you can create a child Apple ID:
1. Open Settings: Open the Settings app on your Apple device.
2. Tap on your name: Scroll down and tap on your name or profile picture at the top of the Settings menu.
3. Family Sharing: Tap on “Family Sharing” and then select your child’s name from the list of family members.
4. Tap on “Create an Apple ID for a child”: The option to create an Apple ID for your child will be displayed. Tap on it to begin the process.
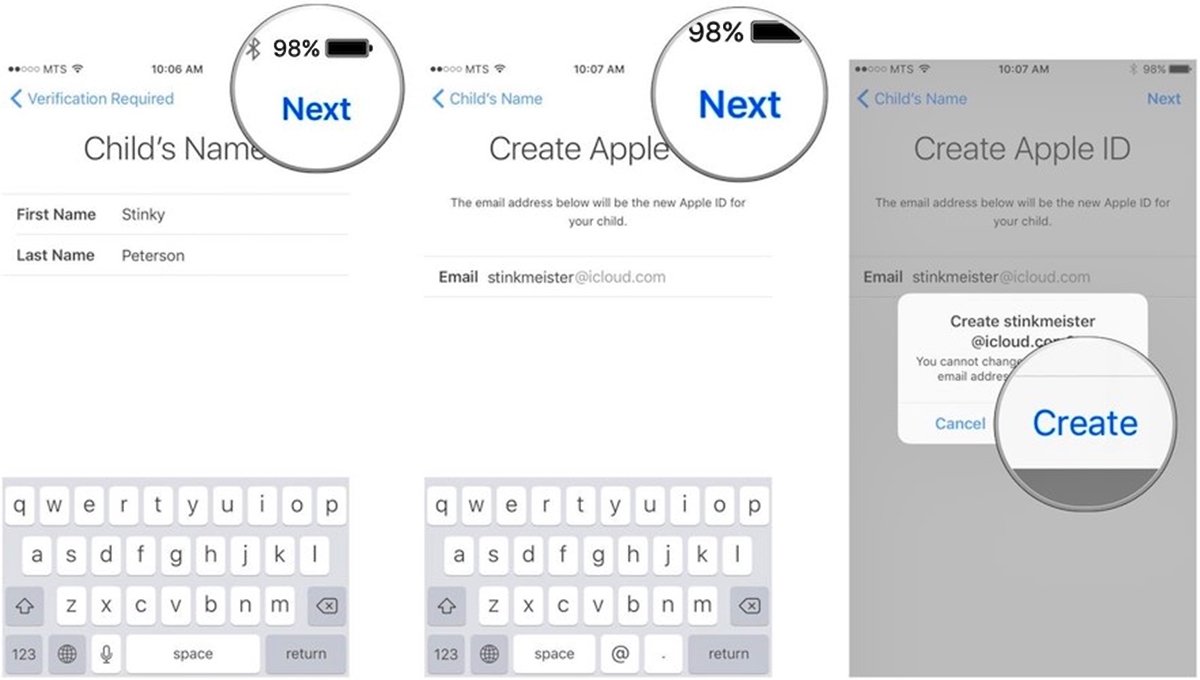
5. Enter child’s information: Enter your child’s first and last name, date of birth, and tap “Next.”
6. Verify parental consent: Depending on your child’s age, you may be required to verify parental consent. Follow the prompts to verify your identity and consent.
7. Create an Apple ID: Enter the desired email address for your child’s Apple ID. If the email address is already associated with another Apple ID, you can choose to create a new one or use the provided address with a different domain. Create a password and security questions for the Apple ID.
8. Set up security and privacy: Review and customize the security and privacy settings for your child’s Apple ID. You can enable or disable features like Share My Location, Screen Time, and more, based on your preferences.
9. Agree to terms and conditions: Read and accept the terms and conditions for using Apple services.
10. Create Apple ID: Tap “Next” to create the Apple ID for your child. The process may take a few moments to complete.
11. Share iCloud Storage: If you have enabled sharing of iCloud Storage through Family Sharing, you will be prompted to share storage with your child. Choose the desired storage plan and follow the prompts to proceed.
12. Complete the setup: You will receive a notification once the setup is complete. Your child can now use their Apple ID to sign into their device and access age-appropriate content.
By creating a child Apple ID, you are providing your child with personalized access to the Apple ecosystem while maintaining the necessary controls and restrictions to ensure their safety and appropriate digital experience.
Step 4: Add Payment Method or Apple ID Funds to Child’s Account
When creating an Apple ID for your child, you have the option to add a payment method or set up an Apple ID fund. This allows your child to make purchases from the App Store within predefined limits. Here’s how you can add a payment method or set up Apple ID funds for your child’s account:
1. Open Settings: Open the Settings app on your device.
2. Tap on your child’s name: Scroll down and tap on your child’s name or profile picture in the Family Sharing section.
3. Tap on “Payment & Shipping”: In the Account Settings menu, tap on “Payment & Shipping.”
4. Add payment method: If you wish to add a payment method, tap on “Add Payment Method” and enter the necessary details such as credit card information. You can also choose to use an existing payment method associated with your Apple ID.
5. Set up Apple ID funds: Alternatively, you can set up an Apple ID fund for your child’s account. This allows you to preload a specific amount of money into their account, which they can use to make purchases without having to link a payment method. To set up Apple ID funds, go back to the Account Settings menu and tap on “Add Funds to Apple ID.”
6. Set the fund amount: Enter the desired amount that you want to add to your child’s Apple ID funds. You can choose a specific amount or select one of the predefined options.
7. Confirm and authorize: Review the fund amount and tap “Next” to confirm. You may be required to enter your Apple ID password or use Touch ID/Face ID to authorize the transaction.
8. Check the funds balance: After completing the payment setup or adding funds, you can verify the balance in your child’s Apple ID funds by going back to the Account Settings and checking the “Card Details” or “Fund Balance” section.
By adding a payment method or setting up Apple ID funds, you provide your child with the ability to make app purchases, subscriptions, and other digital content within predefined limits. This gives you control over their spending while allowing them to enjoy the benefits of having their own digital wallet within the Family Sharing setup.
Step 5: Set Up Parental Controls
Setting up parental controls is an essential step in ensuring your child’s safety and guiding their digital experience. With parental controls, you can manage what your child can access, impose restrictions on their device usage, and protect them from inappropriate content. Here’s how you can set up parental controls for your child:
1. Open Settings: Open the Settings app on your device.
2. Tap on your child’s name: Scroll down and tap on your child’s name or profile picture in the Family Sharing section.
3. Tap on “Screen Time”: In the Account Settings menu, tap on “Screen Time.”
4. Set up Screen Time: On the Screen Time page, tap on “Turn On Screen Time” if it’s not already enabled. Follow the on-screen prompts to set up usage limits, app restrictions, and other desired controls.
5. Customize Content & Privacy Restrictions: In the Screen Time menu, tap on “Content & Privacy Restrictions.” Here, you can enable restrictions for explicit content, websites, downloads, and more. You can also set up privacy settings, password requirements, and control communication features.
6. Set up Downtime: Downtime allows you to schedule specific periods when your child’s device can only be used for essential functions. Tap on “Downtime” in the Screen Time menu and set the desired schedule.
7. Review and customize other options: Explore other options in the Screen Time menu, such as App Limits, Always Allowed apps, and Allowances, to further customize your child’s device usage and content access.
8. Set a passcode: It’s crucial to set a passcode for the parental control settings to restrict unauthorized changes. Pick a passcode that is easy for you to remember but difficult for your child to guess.
9. Test the restrictions: Once you have set up the parental controls, it’s a good idea to test them and ensure they are working as desired. Try accessing restricted content or apps to confirm that the restrictions are in place.
10. Regularly review and update: As your child grows, it’s important to regularly review and update the parental control settings. Adjust the restrictions and limits based on their maturity level and changing digital needs.
By setting up parental controls, you can create a safe and secure digital environment for your child. It allows you to guide their device usage, protect them from inappropriate content, and teach them responsible digital habits.
Step 6: Manage Screen Time and App Restrictions
One of the key aspects of creating a safe and balanced digital experience for your child is managing their screen time and app usage. By setting appropriate limits and restrictions, you can ensure that your child develops healthy digital habits. Here’s how you can manage screen time and app restrictions for your child:
1. Open Settings: Open the Settings app on your device.
2. Tap on your child’s name: Scroll down and tap on your child’s name or profile picture in the Family Sharing section.
3. Tap on “Screen Time”: In the Account Settings menu, tap on “Screen Time.”
4. Set up app limits: Under the App Limits section, tap on “Add Limit” to set time limits for specific categories of apps, such as Social Networking or Games. You can choose the categories, set the time limit for each, and customize the days when the limits apply.
5. Customize downtime: Downtime allows you to schedule specific periods when your child’s device can only be used for essential functions. Tap on “Downtime” in the Screen Time menu and set the desired schedule. During downtime, only apps that you mark as “Always Allowed” will remain accessible.
6. Manage app restrictions: Under the Always Allowed section, you can choose which apps are always accessible, even during downtime or when time limits are reached. You can mark important apps like Messages or Phone as “Always Allowed” to ensure your child can use them when necessary.
7. Review app usage: In the Screen Time menu, you can view detailed reports on your child’s app usage. This provides insights into their digital habits and helps you identify any apps that may require additional attention or restrictions.
8. Adjust content & privacy restrictions: Under the Content & Privacy Restrictions section, you can fine-tune the level of access your child has to certain types of content. Adjust the restrictions for explicit content, web browsing, app downloads, and more based on your child’s age and your family’s values.
9. Communicate and explain: It’s important to have open communication with your child about the screen time limits and app restrictions you have set. Explain the reasons behind these boundaries and involve them in the decision-making process when appropriate.
10. Regularly review and adjust: As your child grows, their digital needs and maturity level may change. Regularly review and adjust the screen time limits, app restrictions, and other settings accordingly to ensure a balanced and appropriate digital experience.
By actively managing screen time and app restrictions, you can help your child develop healthy digital habits, maintain a balanced lifestyle, and make the most of their time spent with technology.
Step 7: Approve App Purchases and Downloads
One of the advantages of setting up a child Apple ID is the ability to have control over app purchases and downloads. With this feature, you can review and approve or reject any app requests made by your child. Here’s how you can manage and approve app purchases and downloads:
1. Open Settings: Open the Settings app on your device.
2. Tap on your child’s name: Scroll down and tap on your child’s name or profile picture in the Family Sharing section.
3. Tap on “Ask to Buy”: In the Account Settings menu, tap on “Ask to Buy.” This feature allows your child to request permission before downloading or purchasing apps.
4. Review app requests: Whenever your child tries to download or purchase an app from the App Store, you will receive a notification or email informing you of the request. You can also see their pending app requests in the Family Sharing settings.
5. Approve or reject the request: To approve or reject the app request, open the notification or go to the Family Sharing settings. Review the app details, consider its appropriateness, and tap on “Approve” or “Reject” accordingly.
6. Communicate with your child: If you reject an app request, it’s important to communicate your reasons to your child and explain why you feel it is not suitable for them at that time. This allows for open discussions and a better understanding of boundaries.
7. Customize notification settings: In the Ask to Buy settings, you can customize how you receive notifications for app requests. You can choose to receive them as notifications on your device, push notifications, or email notifications.
8. Monitor app purchases: To monitor your child’s app purchases, you can go to the Family Sharing settings and view the purchase history. This allows you to stay informed about the apps they are downloading and any associated costs.
9. Adjust permissions as needed: As your child grows older and exhibits responsibility, you may choose to loosen the restrictions and grant them more independence in making app purchases. This can be adjusted in the Ask to Buy settings.
10. Regularly review and discuss: Regularly review the app requests, your child’s app usage, and the appropriateness of downloaded apps. Discuss any concerns or questions you may have with your child to promote responsible app usage.
By actively managing and approving app purchases and downloads, you maintain control over the apps your child can access while also teaching them valuable decision-making skills and promoting responsible app usage.
Step 8: Manage Child’s Apple ID from Parent’s Device
As a parent, it is important to have control and oversight of your child’s Apple ID from your own device. This allows you to make necessary adjustments, manage settings, and monitor their activities. Here’s how you can manage your child’s Apple ID from your parent’s device:
1. Open Settings: Open the Settings app on your device.
2. Tap on your name: Scroll down and tap on your name or profile picture at the top of the Settings menu.
3. Tap on “Family Sharing”: In the iCloud settings, tap on “Family Sharing.”
4. Tap on your child’s name: In the Family Sharing menu, tap on your child’s name or profile picture.
5. Manage purchase sharing: In the Purchases section, you can manage content sharing settings with your child. You can choose to share app and media purchases, as well as subscriptions, with your child or disable sharing if needed.
6. Set screen time limits: In the Screen Time section, you can manage screen time limits, app categories, and customized restrictions for your child. Adjust the settings based on your child’s needs and your family’s digital guidelines.
7. Manage content & privacy restrictions: In the Content & Privacy Restrictions section, customize the content and privacy settings for your child’s Apple ID. Modify the restrictions for explicit content, web browsing, app downloads, and more to ensure a safe and appropriate digital experience.
8. Review and manage location sharing: In the Share My Location section, you can manage the settings for location sharing with your child. Enable or disable location sharing as per your preferences and communicate the reasons behind your decision to your child.
9. Communicate and involve: It is important to communicate openly with your child about the settings and adjustments you make to their Apple ID. Involve them in the decision-making process when appropriate and explain the reasons behind your choices.
10. Regularly check and update: Make it a habit to regularly check and update the settings for your child’s Apple ID. Monitor their activities, review reports, and make necessary adjustments to ensure a safe, balanced, and age-appropriate digital experience.
By managing your child’s Apple ID from your parent’s device, you can ensure that their digital experience aligns with your family’s values and guidelines. It allows you to make informed decisions, monitor their activities, and provide the necessary guidance and support in their digital journey.
Step 9: Keep Track of Child’s Activity with Screen Time Reports
Monitoring your child’s digital activities is crucial for understanding their device usage patterns and ensuring a healthy and balanced digital experience. Apple’s Screen Time feature provides detailed reports that allow you to keep track of your child’s activity. Here’s how you can utilize Screen Time reports to stay informed:
1. Open Settings: Open the Settings app on your device.
2. Tap on your child’s name: Scroll down and tap on your child’s name or profile picture in the Family Sharing section.
3. Tap on “Screen Time”: In the Account Settings menu, tap on “Screen Time.”
4. View Screen Time reports: On the Screen Time page, you can see an overview of your child’s device usage. You can view daily and weekly reports that provide detailed insights into app usage, app categories, notifications, pickups, and more.
5. Understand app usage: Analyze the information provided in the reports to understand which apps your child is spending the most time on. This allows you to assess their screen time habits and identify any apps that may require further attention or restrictions.
6. Track app categories: Screen Time reports also provide data on app categories. This helps you understand how much time your child is spending on different types of apps, such as social networking, productivity, or entertainment. This information can guide your discussions and decision-making regarding app usage balance.
7. Monitor notifications and pickups: The reports also show the number and frequency of notifications received by your child’s device and how many times they pick up their device during the day. This can provide insights into their overall digital engagement and habits.
8. Set goals and limits: Use the data from the Screen Time reports to set goals and limits for your child’s device usage. Discuss these goals together and help your child understand the importance of balancing screen time with other activities.
9. Encourage healthy habits: Based on the report findings, encourage your child to adopt healthy habits such as taking breaks, engaging in physical activities, and pursuing other hobbies. Use the reports as a reference to help them make informed decisions about their digital usage.
10. Use reports as conversation starters: Screen Time reports can be a valuable tool for initiating conversations about responsible digital habits. Discuss the report findings with your child, address any concerns, and reinforce the importance of maintaining a healthy and balanced digital lifestyle.
By leveraging the information provided by Screen Time reports, you can gain valuable insights into your child’s digital activities. This enables you to guide them towards responsible device usage, encourage healthy habits, and ensure a well-rounded digital experience.
Step 10: Help Child Sign into Their Apple ID on Their Device
Once you have created an Apple ID for your child, the next step is to help them sign into their Apple ID on their own device. This allows them to access their personalized content and settings. Here’s how you can assist your child in signing into their Apple ID:
1. Prepare the device: Ensure that the device your child will be using is powered on and connected to a stable internet connection.
2. Open Settings: On the device, open the Settings app.
3. Tap on “Sign in to your iPhone” or “Sign in to your iPad”: If your child is using an iPhone, they may see a message prompting them to sign in to their device. Tap on “Sign in to your iPhone” or a similar prompt that appears. If no prompt is shown, look for the “Sign in” option in the Settings menu.
4. Enter child’s Apple ID credentials: On the sign-in page, your child needs to enter the email address and password associated with their Apple ID that you created for them. If necessary, help them enter the correct details.
5. Follow the prompts: Your child will be guided through a series of prompts to complete the sign-in process. These prompts may include agreeing to terms and conditions, setting up Face ID or Touch ID, and enabling two-factor authentication for added security.
6. Set up iCloud options: Your child will have the option to set up iCloud, which provides cloud storage and synchronization of data across devices. They can choose to enable iCloud Backup, iCloud Drive, and other iCloud features as per their preferences.
7. Customize settings: Once signed in, your child can personalize their device settings. Help them customize settings such as display and brightness, notifications, privacy, and other options based on their preferences.
8. Download apps and content: In the App Store, your child can browse and download apps, games, and other digital content using their Apple ID. Encourage them to explore age-appropriate and educational apps that align with their interests and needs.
9. Synchronize data: If your child had previously been using another device with their Apple ID, make sure to synchronize their data, such as contacts, photos, and calendars, to the new device. This can be done through iCloud settings.
10. Ensure security: Educate your child about the importance of keeping their Apple ID and device secure. Encourage them to set a strong passcode, enable two-factor authentication, and be cautious when downloading apps or accessing websites.
By helping your child sign into their Apple ID on their own device, you empower them to make use of their personalized settings and access age-appropriate content. This promotes a sense of ownership and responsibility over their digital experience while ensuring a seamless transition to their own device.
Step 11: Encourage Safe Internet Use and Digital Citizenship
As a parent, it is essential to instill in your child the importance of safe internet use and responsible digital citizenship. By teaching them about online etiquette, privacy, and security, you empower them to navigate the digital world confidently. Here are some ways you can encourage safe internet use and promote digital citizenship:
1. Establish open communication: Foster an environment where your child feels safe discussing their online experiences with you. Encourage open conversations about the internet, social media, and any concerns they may have.
2. Teach responsible online behavior: Educate your child about the importance of treating others with respect, both online and offline. Emphasize the significance of empathy, kindness, and avoiding cyberbullying.
3. Set age-appropriate guidelines: Establish clear rules and guidelines for internet usage based on your child’s age and maturity level. Discuss topics such as appropriate websites, content sharing, and time limits for screen time.
4. Monitor online activities: Regularly monitor your child’s online activities, including their social media profiles, websites visited, and interactions with others. Use parental controls and privacy settings to protect their digital footprint.
5. Educate about online privacy: Teach your child about the importance of protecting their personal information online. Emphasize the significance of using strong, unique passwords, avoiding sharing personal details with strangers, and being cautious about who they interact with online.
6. Encourage critical thinking: Teach your child to question the credibility of online information and to think critically before sharing content. Help them differentiate between reliable sources and misinformation.
7. Promote a positive digital footprint: Teach your child about the permanent nature of online posts and the importance of maintaining a positive digital footprint. Encourage them to think before they post and to consider how their online presence can impact their future.
8. Teach digital resilience: Help your child develop resilience by discussing how to handle online challenges and negative experiences. Teach them to seek support from trusted adults and to report any cyberbullying or inappropriate behavior they encounter.
9. Emphasize the impact of online actions: Help your child understand that their online actions can have consequences. Teach them about copyright laws, the importance of respecting others’ intellectual property, and the potential legal implications of cyberbullying or harassment.
10. Be a positive role model: Model responsible internet use and digital etiquette. Show your child how to engage in positive online interactions, respect others’ privacy, and use technology as a tool for learning and creativity.
By encouraging safe internet use and promoting digital citizenship, you empower your child to navigate the digital world responsibly, confidently, and ethically. These skills will not only benefit them today but also equip them for a lifetime of positive and responsible online engagement.
Step 12: Troubleshooting Common Issues
While setting up and managing your child’s Apple ID, you may encounter some common issues. It’s important to address these issues promptly to ensure a smooth and enjoyable digital experience for your child. Here are some troubleshooting tips for common issues that may arise:
1. Forgotten Apple ID password: If your child forgets their Apple ID password, you can reset it by going to the Apple ID account page and following the password reset prompts. Make sure your child remembers their security questions or has two-factor authentication enabled for easier account recovery.
2. Error messages during sign-in: If your child encounters an error message during sign-in, such as “Verification Failed” or “Could Not Sign In”, try the following steps: check the internet connection, verify that the Apple ID and password are entered correctly, and ensure that two-factor authentication is set up correctly.
3. App download issues: If your child is experiencing issues downloading apps from the App Store, ensure that their Apple ID has the necessary funds or a valid payment method linked. Also, check if there are any restrictions or limitations set up in the Screen Time or Content & Privacy Restrictions settings that might be preventing downloads.
4. Family Sharing not working: If Family Sharing is not working as expected, make sure all devices are properly set up with the same Apple ID and that all devices have the Family Sharing feature enabled. Check if any changes or updates need to be made in the Family Sharing settings to ensure proper sharing of purchases and content.
5. Screen Time reports not generating: If Screen Time reports are not being generated for your child’s device, check if the Screen Time feature is properly enabled in the device settings. Also, ensure that the device has a stable internet connection as reports are generated and synced to iCloud.
6. Unauthorized app purchases: If you notice any unauthorized app purchases made using your child’s Apple ID, contact Apple Support as soon as possible. They can assist you in resolving the issue and ensuring that appropriate measures are taken to prevent future unauthorized purchases.
7. Syncing data across devices: If your child is having trouble syncing data, such as contacts, photos, or calendars, across their devices using their Apple ID, check that iCloud is properly set up on all devices and that the necessary data sync options are enabled in the iCloud settings.
8. Unable to delete unwanted apps: If your child is unable to delete unwanted apps from their device, check if the app deletion feature is enabled in the restrictions settings. Ensure that the Restrictions passcode is entered correctly if required.
9. Invalid or expired Apple ID: If you receive a notification stating that your child’s Apple ID is invalid or expired, contact Apple Support for assistance. They can help verify the status of the Apple ID and help resolve the issue.
10. Contact Apple Support: If you encounter any other issues or require further assistance, don’t hesitate to reach out to Apple Support. They have dedicated support channels to address a wide range of issues related to Apple IDs and family sharing.
By troubleshooting these common issues, you can ensure that your child’s Apple ID and devices function smoothly, allowing them to make the most of their digital experience.
Step 13: Remove Child from Family Sharing or Transfer Apple ID Ownership
There may come a time when you need to remove your child from Family Sharing or transfer the ownership of their Apple ID to them as they become more independent. Here are the steps to follow when you need to make these changes:
1. Open Settings: Open the Settings app on your device.
2. Tap on your name: Scroll down and tap on your name or profile picture at the top of the Settings menu.
3. Tap on “Family Sharing”: In the iCloud settings, tap on “Family Sharing.”
4. Tap on your child’s name: In the Family Sharing menu, tap on your child’s name or profile picture.
5. Remove child from Family Sharing: To remove your child from Family Sharing, tap on “Remove [Child’s Name] from Family.” Confirm the action when prompted. This will remove their Apple ID from the family group and revoke their access to shared purchases and content.
6. Transfer Apple ID ownership: If you want to transfer the ownership of your child’s Apple ID to them, follow these steps carefully:
- On their device, have them sign into their Apple ID.
- Go to Settings > [Child’s Name] > Family Sharing > [Your Name].
- Tap on “Stop Using [Your Name’s] Apple ID.”
- Follow the prompts to confirm the transfer and enter the necessary credentials.
7. Communicate and guide: Communicate with your child about the changes and explain the reasons behind them. Guide them on managing their own Apple ID and responsibilities that come with it, such as updating payment information, managing subscriptions, and practicing good online habits.
8. Data transfer: If your child needs to transfer their data, such as photos, contacts, or app data, from your device to their new device, ensure that iCloud is properly set up on both devices and that the necessary settings for data synchronization are enabled. They can also use services like iCloud backup or data transfer tools provided by Apple to facilitate this process.
9. Provide ongoing support: Even after transferring the ownership or removing your child from Family Sharing, be ready to provide ongoing support and guidance if they encounter any issues or have questions regarding their Apple ID or device usage. Maintain open communication and encourage responsible technology use.
10. Optional: Establish new Family Sharing: If necessary, you can establish a new Family Sharing group with your child as the organizer, allowing you to continue sharing purchases and content while giving them increased responsibility within the family group.
By following these steps, you can effectively remove your child from Family Sharing or transfer the ownership of their Apple ID. This allows them to take increased ownership over their digital presence and manage their own settings and content while still receiving guidance and support from you as a parent.