
Why Remove a Child from Family Sharing?
Family Sharing is a convenient feature offered by Apple that allows family members to share purchases, subscriptions, and iCloud storage. It can be a great way to manage expenses and facilitate easy access to shared content. However, there may come a time when you need to remove a child from Family Sharing. There are several reasons why you might consider doing this:
- Age and Independence: As children grow older, they may desire more independence and responsibility. Removing them from Family Sharing can give them the freedom to manage their own Apple ID and subscriptions.
- Privacy and Personalization: Family Sharing allows all members to share certain information, such as calendar events and location. Removing a child from Family Sharing can help protect their privacy and allow them to personalize their Apple devices according to their own preferences.
- Control over Purchases: By removing a child from Family Sharing, you regain control over their app and media purchases. This can be helpful in managing expenses and ensuring that they make appropriate choices.
- Parental Control: Family Sharing provides parental controls that restrict content and limit access to certain features. However, there may come a time when a child no longer needs these restrictions, and removing them from Family Sharing allows for greater flexibility in managing their device usage.
- Change in Family Dynamics: Family dynamics can change over time, such as when children move out, get their own devices, or form new family units. Removing a child from Family Sharing can help reflect these changes and ensure that each individual has their own Apple ID and settings.
Regardless of the reason, removing a child from Family Sharing is a relatively straightforward process. It allows the child to have more autonomy and independence while allowing the family to adapt to changing circumstances. The following steps will guide you through the process of removing a child from Family Sharing.
Requirements for Removing a Child from Family Sharing
Before you proceed with removing a child from Family Sharing, there are a few requirements that you need to keep in mind:
- Updated iOS or macOS: Make sure that all devices involved, including the child’s device and the Family Sharing organizer’s device, are running the latest version of iOS or macOS. This ensures compatibility and a smooth removal process.
- Family Sharing Organizer’s Apple ID: You will need to have access to the Apple ID of the Family Sharing organizer, as this is required to make changes to the Family Sharing settings.
- Child’s Consent: It is important to communicate with the child and seek their consent before removing them from Family Sharing. This allows them to understand the implications and make any necessary preparations.
- Back Up Data: Before removing a child from Family Sharing, it is advisable to back up any important data from their device. This ensures that no data is lost during the removal process.
By fulfilling these requirements, you can proceed with confidence and ensure a seamless removal of the child from Family Sharing. Now that you understand the prerequisites, let’s move on to the step-by-step process of removing a child from Family Sharing.
Step 1: Update to the Latest iOS or macOS
Before you begin the process of removing a child from Family Sharing, it is crucial to ensure that all devices involved are running the most recent version of iOS or macOS. Updating to the latest software version provides compatibility and ensures a smooth removal process.
To update iOS on an iPhone or iPad:
- Connect your device to a stable Wi-Fi network.
- Go to “Settings” on your device’s home screen.
- Scroll down and tap “General.”
- Tap “Software Update.”
- If an update is available, tap “Download and Install.”
- Enter your device passcode, if prompted.
- Agree to the Terms and Conditions.
- Wait for the update to download and install. Your device may restart during this process.
To update macOS on a Mac:
- Ensure that your Mac is connected to the internet.
- Click on the Apple menu in the top-left corner of the screen and select “System Preferences.”
- Click on “Software Update.”
- If an update is available, click “Update Now.”
- Follow the on-screen instructions to download and install the update.
- Your Mac may restart during the update process.
Updating your devices to the latest operating system version not only prepares them for removing a child from Family Sharing but also provides access to the latest features and security enhancements offered by Apple.
Step 2: Sign in to iCloud with the Family Sharing Organizer’s Apple ID
In order to remove a child from Family Sharing, you need to sign in to iCloud with the Apple ID of the Family Sharing organizer. This ensures that you have the necessary access and privileges to manage the Family Sharing settings.
Follow these steps to sign in to iCloud with the Family Sharing organizer’s Apple ID:
- Open the Settings app on your iOS device or the System Preferences on your Mac.
- Scroll down and tap on your Apple ID or iCloud, depending on your device.
- If prompted, enter your device passcode or use Touch ID/Face ID to authenticate.
- Look for “Sign In” or “Sign in to your [device]” and tap on it.
- Enter the Apple ID and password of the Family Sharing organizer’s account.
- Tap on “Sign In” or press Enter to proceed.
Once you have successfully signed in to iCloud with the Family Sharing organizer’s Apple ID, you have gained the necessary credentials to manage the Family Sharing settings and proceed with removing the child from the group.
It is important to note that you should obtain proper authorization from the Family Sharing organizer before using their Apple ID to make any changes to the settings. This ensures that you have the consent and permission to carry out the necessary actions.
Step 3: Open the Settings App or System Preferences
Once you have signed in to iCloud with the Family Sharing organizer’s Apple ID, the next step is to open the Settings app on your iOS device or the System Preferences on your Mac. This will allow you to access the necessary settings to remove a child from Family Sharing.
Follow these steps to open the Settings app or System Preferences:
- On an iOS device, locate the Settings app on your home screen and tap on it to open it. The Settings app is represented by a gray gear icon.
- On a Mac, click on the Apple menu located at the top-left corner of the screen and select “System Preferences” from the drop-down menu.
By opening the Settings app on your iOS device or the System Preferences on your Mac, you will be able to access the relevant settings to proceed with removing the child from Family Sharing in the next steps.
It is important to ensure that you have the necessary permissions and access rights to make changes to the settings. If you encounter any issues or restrictions, verify that you are signed in to iCloud with the correct Apple ID and that you have the required authorization to manage the Family Sharing settings.
Step 4: Tap on Your Apple ID or iCloud
After opening the Settings app on your iOS device or the System Preferences on your Mac, the next step is to tap on your Apple ID or iCloud. This will allow you to access the specific settings related to your Apple ID and iCloud account.
Follow these steps to tap on your Apple ID or iCloud:
- In the Settings app on your iOS device, scroll down and tap on your name or the “Apple ID, iCloud, iTunes & App Store” option at the top of the screen.
- In System Preferences on your Mac, locate and click on the “Apple ID” or “iCloud” icon, which will be represented by a blue cloud-shaped logo.
By tapping on your Apple ID or iCloud, you will be directed to a screen that contains various settings and options specific to your account. This includes information such as your name, email address, payment details, and iCloud storage.
It is important to note that you should ensure that you are signed in to the correct Apple ID or iCloud account that is associated with the Family Sharing organizer’s account. This will ensure that you have the necessary permissions and access to manage the Family Sharing settings.
Once you have successfully tapped on your Apple ID or iCloud, you can proceed to the next step to access the specific Family Sharing settings.
Step 5: Scroll down and Tap on Family Sharing or iCloud Settings
After tapping on your Apple ID or iCloud in the Settings app on your iOS device or the System Preferences on your Mac, the next step is to scroll down and find the “Family Sharing” or “iCloud” settings. These settings contain the options and controls for managing Family Sharing or iCloud features.
Follow these steps to scroll down and tap on Family Sharing or iCloud Settings:
- On an iOS device, scroll down and look for the “Family Sharing” option. It should have a blue icon with three people. Tap on it to proceed.
- On a Mac, locate and click on the “iCloud” option within the System Preferences. This will take you to the iCloud settings where you can manage Family Sharing.
By tapping on Family Sharing or iCloud settings, you will be able to access a range of features and options related to the management of your shared content, subscriptions, and other settings associated with Family Sharing.
It is important to note that the exact location of these settings may vary depending on the version of iOS or macOS that you are using. If you are having trouble locating the Family Sharing or iCloud settings, refer to the documentation or support resources provided by Apple for assistance.
Once you have successfully tapped on Family Sharing or iCloud settings, you are ready to proceed to the next step and access the specific settings related to the child you wish to remove from Family Sharing.
Step 6: Tap on the Child’s Name
After accessing the Family Sharing or iCloud settings in the previous step, the next step is to tap on the name of the child you wish to remove from Family Sharing. This will allow you to access the specific settings and options for that child’s account within the Family Sharing settings.
Follow these steps to tap on the child’s name:
- In the Family Sharing or iCloud settings, look for the list of family members or account names associated with your Family Sharing group.
- Locate and tap on the name of the child you want to remove from Family Sharing.
By tapping on the child’s name, you will be directed to a screen that contains various settings and controls specific to that child’s account. This includes options related to their shared purchases, subscriptions, and other Family Sharing settings.
It is important to note that you should ensure you are tapping on the correct child’s name in the Family Sharing settings. Double-check the names and account details to avoid accidentally removing the wrong child from the group.
If the child’s name is not visible or listed under the Family Sharing settings, make sure they are signed in to their Apple ID on their device and that they are part of your Family Sharing group. If they are not, you may need to invite them to join the Family Sharing group before proceeding with the removal.
Once you have successfully tapped on the child’s name, you are ready to proceed to the next step and initiate the removal process.
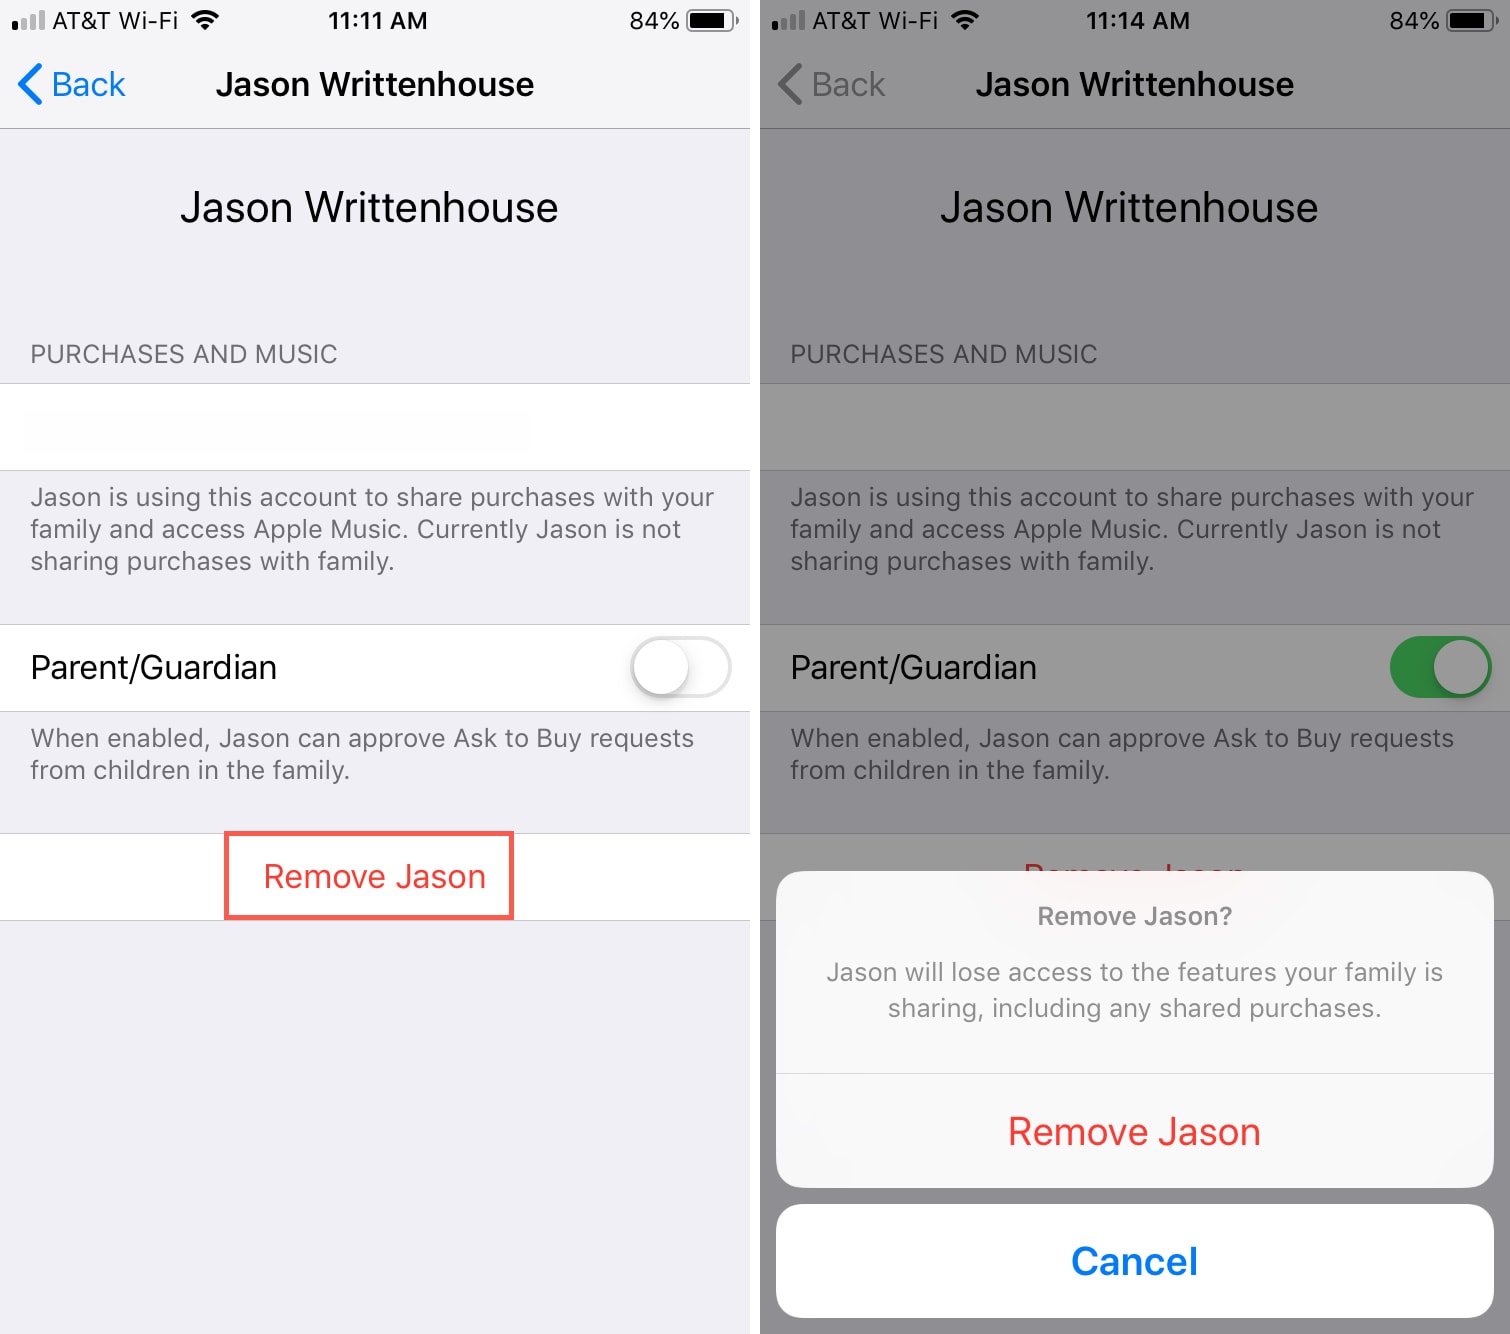
Step 7: Tap on Remove Child
After tapping on the name of the child you wish to remove from Family Sharing in the previous step, the next step is to look for the option to remove the child from the group. This option is typically labeled as “Remove Child” or something similar, depending on the version of iOS or macOS you are using.
Follow these steps to tap on the “Remove Child” option:
- In the child’s settings screen within the Family Sharing settings, scroll down to find the option to remove the child.
- Look for an option labeled “Remove Child” or something similar. This option is usually located towards the bottom of the screen.
- Tap on the “Remove Child” option to initiate the removal process.
By tapping on the “Remove Child” option, you are signaling your intention to remove the selected child from the Family Sharing group. This action will revoke their access to shared purchases, subscriptions, and other Family Sharing benefits.
It is important to note that removing a child from Family Sharing does not delete their Apple ID or any data associated with it. It simply removes them from the group and restores their account to an individual standalone Apple ID.
If you do not see the option to remove the child from Family Sharing, ensure that you have the necessary permissions and access as the Family Sharing organizer. Additionally, confirm that you have followed all the previous steps correctly and that the child is listed as a member of your Family Sharing group.
Once you have successfully tapped on the “Remove Child” option, you are ready to proceed to the confirmation step and finalize the removal of the child from Family Sharing.
Step 8: Confirm the Removal
After tapping on the “Remove Child” option in the previous step, the next step is to confirm the removal of the child from Family Sharing. This confirmation prompt ensures that you are intentionally removing the child from the group and allows you to review the consequences of this action.
Follow these steps to confirm the removal:
- After tapping on “Remove Child,” a confirmation prompt will appear on the screen.
- Review the information in the prompt, which typically includes details about the child’s access to shared purchases, subscriptions, and iCloud content.
- Read the consequences of removing the child from Family Sharing carefully. This may include losing access to shared apps, media, and other benefits.
- Tap on the “Confirm” or “Remove” button to proceed with the removal.
By confirming the removal, you are acknowledging and accepting the consequences associated with removing the child from Family Sharing. Once confirmed, the child will no longer have access to shared purchases, subscriptions, and other Family Sharing benefits.
It is crucial to ensure that you have communicated with the child and obtained their consent before confirming the removal. This allows them to understand the implications and make any necessary preparations for managing their own Apple ID and subscriptions.
If you have second thoughts or realize that you made an error in confirming the removal, you can try to re-add the child to Family Sharing at a later time. However, keep in mind that any shared purchases or subscriptions made under their new individual Apple ID will not be transferable.
Once you have successfully confirmed the removal, the child is officially removed from the Family Sharing group, and you can proceed with any additional steps or adjustments required.
Step 9: Set Up a New Apple ID for the Child if Desired
After removing a child from Family Sharing, you may consider setting up a new Apple ID for them if desired. This step is optional and depends on the circumstances and preferences of the child and their guardians.
Follow these steps to set up a new Apple ID for the child:
- On the child’s device, go to the Settings app or System Preferences.
- Scroll down and tap on “Sign in to your [device]” or “Apple ID, iCloud, iTunes & App Store” option.
- Tap on “Don’t have an Apple ID or forgot it?” or “Create Apple ID” to initiate the account creation process.
- Follow the on-screen prompts to provide the necessary information, including name, date of birth, email address, and password. You may also need to set up security questions or verify the account using a phone number.
- Agree to the Terms and Conditions and any additional prompts.
- When prompted, choose the preferred settings for iCloud services, app purchases, and subscriptions.
- Complete the account setup process by following any remaining on-screen instructions.
Setting up a new Apple ID for the child allows them to have their own individual account, separate from Family Sharing. This grants them more autonomy and control over their Apple device, app purchases, and subscriptions.
When setting up the new Apple ID, it is important to choose a strong password and ensure the security of the account. Additionally, ensure that the child and their guardians are aware of the login details and understand their responsibility to manage the account properly.
Keep in mind that setting up a new Apple ID will not transfer any previous shared purchases or subscriptions from the Family Sharing group. These will remain associated with the original Family Sharing organizer’s account.
If the child already has an existing Apple ID that they would like to use, they can sign in with that account on their device instead of creating a new one.
Once the new Apple ID setup is complete, the child can start using their device with their individual account and manage their own app purchases, subscriptions, and other preferences.
Step 10: Adjust Family Sharing Settings if Necessary
After removing a child from Family Sharing and setting up a new Apple ID (if desired), you may need to adjust the Family Sharing settings if necessary. This step is important to ensure that the remaining family members are correctly configured and that the shared content and subscriptions are managed properly.
Follow these steps to adjust the Family Sharing settings:
- On the Family Sharing organizer’s device, open the Settings app or System Preferences.
- Scroll down and tap on the Family Sharing or iCloud settings.
- Review the list of family members to ensure that all members are displayed correctly. If any changes are needed, tap on the “Add Family Member” or “Remove” options to adjust the list.
- Check the shared content, such as apps, music, and subscriptions, to ensure they are still accessible to the intended family members. Modify or update the shared content list as needed.
- Review the parental control settings, if applicable, to ensure they are appropriate for the remaining family members. Adjust any restrictions or permissions as necessary.
- Verify the shared iCloud storage settings and view the distribution among family members. Make changes to the storage allocation if desired.
- Consider implementing other Family Sharing features, such as location sharing or calendar sharing, based on the preferences and needs of the remaining family members.
Adjusting the Family Sharing settings after removing a child helps to maintain the integrity and efficiency of the shared content and services. It ensures that each family member has the appropriate access and controls based on their individual needs.
It is important to regularly review and update the Family Sharing settings to accommodate any changes in the family dynamics, preferences, or device usage. This will help to optimize the sharing experience and ensure that everyone benefits from the features provided by Family Sharing.
If you encounter any difficulties adjusting the Family Sharing settings or have questions about specific features, refer to the documentation or support resources provided by Apple for further assistance.
Once you have successfully adjusted the Family Sharing settings, you have completed the necessary steps to remove a child from Family Sharing and make the required adjustments for the remaining family members.