
Why Add a Profile to an Amazon Fire Tablet?
If you are using an Amazon Fire Tablet, you might wonder why and how to add a profile to it. Adding a profile can be beneficial for various reasons, such as personalized settings, tailored content, and maintaining privacy. Whether you want to create a separate profile for your child or have a dedicated space for yourself, adding a profile to your Amazon Fire Tablet allows you to have a customized experience without interfering with other users. Let’s explore the advantages of adding a profile and how to do it step by step.
One of the main reasons to add a profile to your Amazon Fire Tablet is to create a separate space for children. With a child profile, you can ensure that the content and apps they access are age-appropriate. In addition, parental controls can be set up to limit screen time and restrict access to certain features or content. This helps to create a safe and controlled environment for children to explore and enjoy their tablet.
On the other hand, creating an adult profile allows you to have a personalized experience tailored to your preferences. You can customize settings, such as language, time zone, wallpaper, and app layout, to suit your needs. Having a separate profile also ensures that your content and browsing history remain private, without any overlap with other users of the device.
Adding profiles to an Amazon Fire Tablet is a straightforward process. You can access the necessary settings by going to the main menu and tapping on “Settings”. From there, navigate to “Profiles & Family Library” and select the option to add a profile. You will then be prompted to enter the necessary information and choose the appropriate profile type: child or adult.
Once the profile is added, you can further customize it by adjusting the settings and preferences. This includes selecting the wallpaper, managing notifications, choosing the app layout, and more. For child profiles, you can also enable parental controls to ensure a safe and appropriate browsing experience.
Switching between profiles is easy and can be done from the lock screen or the main menu. Simply tap on the profile picture at the top side of the screen and select the desired profile. This allows multiple users of the device to have their own personalized experience without any confusion or interference.
If, for any reason, you no longer need a profile on your Amazon Fire Tablet, you can easily delete it. Just go to the settings menu, select “Profiles & Family Library”, and choose the profile you want to remove. Follow the on-screen instructions to delete the profile, and all associated content will be permanently removed from the device.
Now that you understand the benefits of adding a profile to your Amazon Fire Tablet, you can enhance your tablet experience by creating personalized spaces for each user. Whether it’s for your child or yourself, having separate profiles ensures a customized and secure environment tailored to individual preferences. So, go ahead and add a profile to your Amazon Fire Tablet to make the most out of your device!
Step 1: Go to the Settings menu
To add a profile to your Amazon Fire Tablet, you will first need to access the Settings menu. The Settings menu is where you can manage various options and configurations for your device. Here’s how you can get to the Settings menu:
1. Unlock your Amazon Fire Tablet and go to the home screen. If you are not on the home screen, press the home button located at the bottom center of your device to go there.
2. Swipe down from the top of the screen to reveal the notification panel.
3. In the top right corner of the notification panel, you will see a gear icon. Tap on it to open the Settings menu.
4. Alternatively, you can access the Settings menu by tapping on the “Settings” app icon on your home screen. The app icon resembles a gear or a cogwheel.
5. Once you tap on the gear icon or the “Settings” app, the Settings menu will open, displaying various options and configurations for your Amazon Fire Tablet.
It’s important to note that the location and appearance of the Settings menu may vary slightly depending on the model and version of your Amazon Fire Tablet. However, the general steps to access the Settings menu should remain the same.
By going to the Settings menu, you will gain access to a wide range of features and settings that allow you to personalize and manage your Amazon Fire Tablet. From the Settings menu, you can add and manage profiles, customize display options, adjust sound settings, manage storage and network preferences, and much more.
Now that you have successfully accessed the Settings menu, you are ready to move on to the next step and proceed with adding a profile to your Amazon Fire Tablet. Stay tuned for the next section, where we will guide you through the process of adding a profile!
Step 2: Tap on “Profiles & Family Library”
After accessing the Settings menu on your Amazon Fire Tablet, the next step is to navigate to the “Profiles & Family Library” section. This is where you can manage profiles and set up a family library for shared content. Follow the steps below to tap on “Profiles & Family Library”:
1. From the Settings menu, scroll down or swipe up to explore the different options available.
2. Look for the section or category labeled “Profiles & Family Library.” The exact placement of this option may vary depending on the model and version of your Amazon Fire Tablet, but it is usually located under the “Device” or “Personalization” category.
3. Once you locate “Profiles & Family Library,” tap on it to access the profile management settings. A new screen will open, displaying options and configurations related to profiles and family library.
Alternatively, you can often find a shortcut or quick access to the “Profiles & Family Library” section directly from the main Settings menu. Look for icons or labels representing profiles, family library, or users, and tap on them to be redirected to the profile management settings.
Accessing the “Profiles & Family Library” section is a crucial step in adding and managing profiles on your Amazon Fire Tablet. In this section, you can create new profiles, modify existing profiles, set up parental controls for child profiles, and manage shared content within the family library.
Profiles on your Amazon Fire Tablet provide a personalized experience for each user, ensuring that content, settings, and preferences are tailored to their individual needs. With the “Profiles & Family Library” section, you have the flexibility to create separate profiles for family members or allocate specific devices for different purposes.
Once you have successfully tapped on “Profiles & Family Library,” you are now ready to proceed with the next step in the process of adding a profile to your Amazon Fire Tablet. In the following section, we will guide you through the necessary steps to add a child or adult profile to your device. So, let’s move forward and continue with the profile setup!
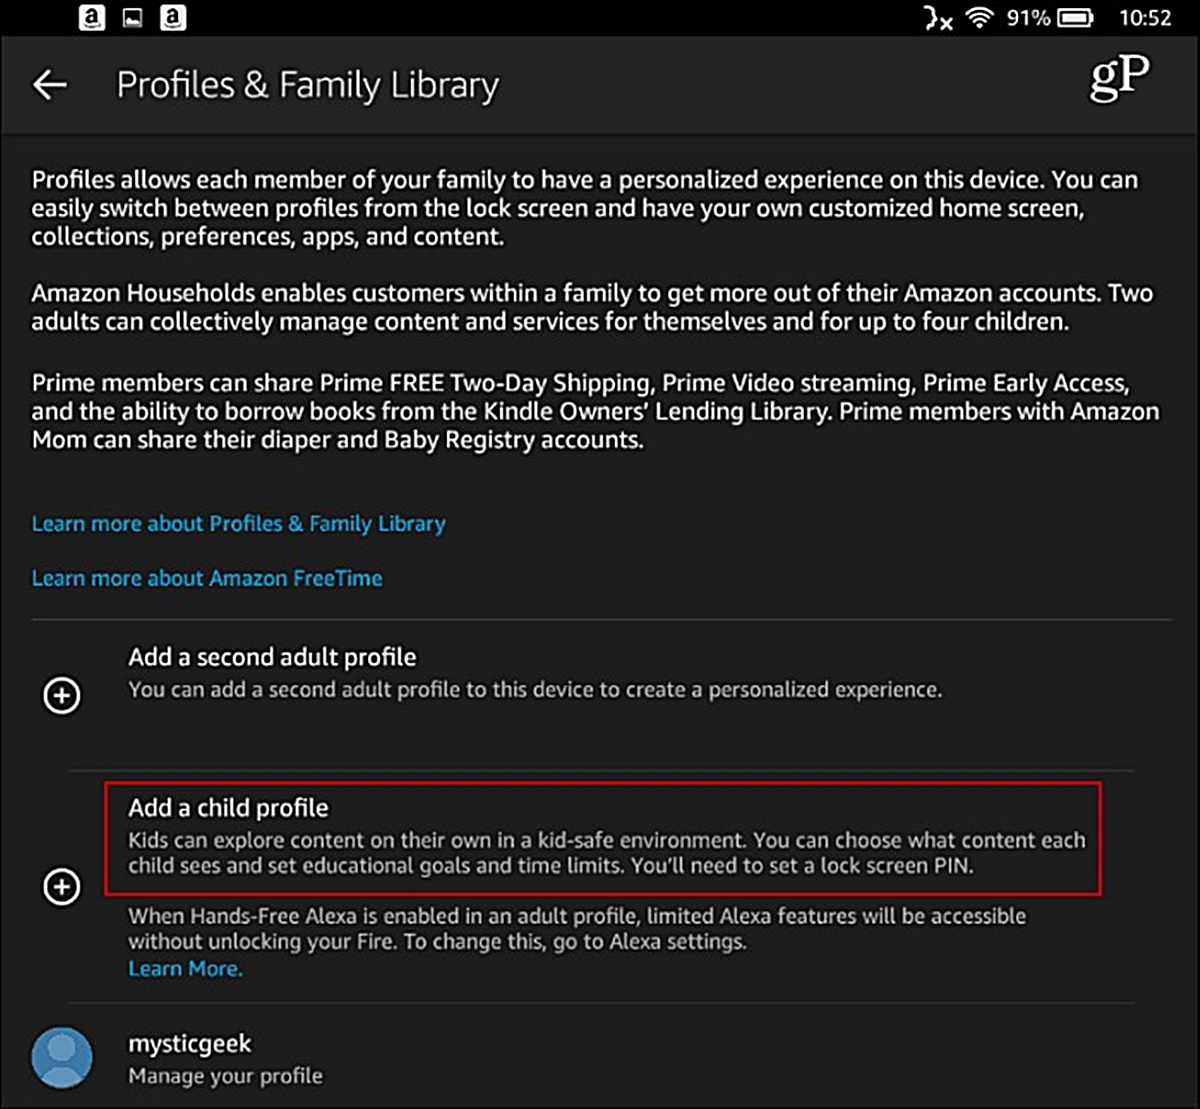
Step 3: Tap on “Add a Child Profile” or “Add an Adult Profile”
After accessing the “Profiles & Family Library” section on your Amazon Fire Tablet, the next step is to tap on either “Add a Child Profile” or “Add an Adult Profile,” depending on the type of profile you want to create. Follow the steps below to proceed:
1. From the “Profiles & Family Library” settings screen, look for the option to add a new profile. Usually, this option is labeled as “Add a Child Profile” or “Add an Adult Profile.” Tap on the relevant option based on the type of profile you want to create.
2. If you select “Add a Child Profile,” you will be prompted to provide parental consent. This is to ensure that you are authorized to create a child profile and set up parental controls. Follow the on-screen instructions to verify your consent and provide any necessary information.
3. If you choose “Add an Adult Profile,” you will be asked to enter the necessary details, such as name, email address, and password. Provide the required information accurately.
4. Once you have filled in the necessary information, tap on the “Next” or “Continue” button to proceed to the next step in the profile creation process.
Creating a child profile allows you to set up parental controls and create a safe browsing environment for your child. With parental controls, you can manage the content your child can access, set time limits for device usage, and control in-app purchases. On the other hand, an adult profile provides a personalized experience without any restrictions, allowing you full access to all features and content on your Amazon Fire Tablet.
By tapping on “Add a Child Profile” or “Add an Adult Profile,” you are one step closer to creating a separate space for yourself or your child on your Amazon Fire Tablet. This ensures that each user has their own tailored experience and personalized settings.
Once you have successfully chosen the type of profile you want to add and entered the necessary information, you can move on to the next steps to set up and customize the profile. In the upcoming sections, we will guide you through the remaining steps to complete the profile creation process. So, let’s continue the journey and proceed with customizing your profile!
Step 4: Choose the appropriate option and provide the necessary information
After selecting the option to add a profile on your Amazon Fire Tablet, the next step is to choose the appropriate profile type and provide the necessary information. Follow the steps below to proceed:
1. If you selected “Add a Child Profile” in the previous step, you will be presented with a series of prompts to provide the required information. This may include the child’s name, birthday, and gender. Fill in the information accurately and follow any additional instructions for parental consent or verification.
2. If you chose “Add an Adult Profile,” you will be asked to enter the necessary details, such as your name, email address, and password. Make sure to provide accurate information that you can easily remember.
3. If prompted, review and agree to the terms and conditions or any other policies related to creating a profile on your Amazon Fire Tablet. This step ensures that you understand and comply with the guidelines set by Amazon for profile creation.
4. Once you have entered all the required information and agreed to the necessary conditions, tap on the “Next” or “Continue” button to proceed to the next step in the profile setup process.
Choosing the appropriate profile type and providing the necessary information is crucial to create a personalized experience on your Amazon Fire Tablet. Whether it’s adding a child profile with parental controls or an adult profile with unrestricted access, you can tailor the settings and preferences to suit your needs.
Make sure to double-check the information you provide during this step to ensure accuracy. It is also important to remember any passwords or login details associated with your profile for future access and management.
Now that you have chosen the appropriate profile type and provided the necessary information, you are one step closer to fully setting up your profile on your Amazon Fire Tablet. In the following sections, we will guide you through the remaining steps to customize your profile settings and add content to enhance your tablet experience. Let’s continue on with the process and move forward to the next steps!
Step 5: Set up parental controls (for child profiles)
If you have created a child profile on your Amazon Fire Tablet, it is important to set up parental controls to ensure a safe and age-appropriate browsing experience. Parental controls allow you to manage the content your child can access, set time limits, and control in-app purchases. Follow the steps below to set up parental controls:
1. From the profile settings menu, locate the “Parental Controls” or “Child Settings” option. This option is usually found under the profile settings specific to the child profile you have created.
2. Tap on “Parental Controls” or “Child Settings” to access the parental control settings.
3. Depending on your Amazon Fire Tablet model and version, you may be prompted to create a parental control password or PIN. This password will be required to make changes to the parental control settings in the future.
4. Once you have set up or entered the parental control password, you can now customize the parental control settings. These settings may include content restrictions, screen time limits, and app usage controls.
5. Review each setting and make adjustments as needed. You can choose from various age groups and content categories to restrict access to certain types of content. Set time limits to manage the amount of time your child spends on the device, and choose which apps can be accessed and used.
6. Additionally, you can enable or disable features such as web browsing, camera usage, and in-app purchases based on your preferences and what you deem suitable for your child.
7. Once you have customized the parental control settings, tap on the “Save” or “Apply” button to save your changes.
Setting up parental controls for your child’s profile on your Amazon Fire Tablet ensures that they have a secure and controlled browsing environment. It allows you to filter content, manage screen time, and create a safe digital space.
It is important to regularly review the parental control settings to ensure that they are appropriate for your child’s age and developmental stage. Adjust the settings as needed and update the restrictions based on your child’s growing needs.
Now that you have successfully set up parental controls for your child’s profile, you can move on to the next step in the process of adding a profile to your Amazon Fire Tablet. In the following sections, we will guide you through customizing the profile settings and adding content to enhance your tablet experience. Let’s continue on with the process and move forward to the next steps!
Step 6: Customize the profile settings and preferences
After creating a profile on your Amazon Fire Tablet, whether it’s a child profile or an adult profile, you have the option to customize the settings and preferences to enhance your tablet experience. Customizing the profile settings allows you to personalize the appearance, language, app layout, and more. Follow the steps below to customize your profile settings and preferences:
1. From the profile settings menu, navigate to the “Settings” or “Preferences” section. This is where you can access various options for customizing your profile.
2. Explore the different settings available to customize your profile. These settings may include language preferences, display options, time zones, wallpaper selection, and app layout preferences.
3. Adjust each setting according to your preferences. For example, you can choose your preferred language to be displayed on your Amazon Fire Tablet. You can also select the time zone that corresponds to your location for accurate time and date information.
4. Personalize your profile even further by selecting a unique wallpaper that reflects your style. Amazon offers a variety of wallpapers to choose from, or you can use your own image as the wallpaper.
5. Customize the app layout on your profile by rearranging and organizing the apps on your home screen. You can move apps around, create folders, and delete or add apps based on your needs and preferences.
6. Review each setting and make adjustments as desired. Take your time to explore the various customization options available and personalize your profile to suit your preferences.
7. Once you have customized your profile settings and preferences, tap on the “Save” or “Apply” button to save the changes.
Customizing the profile settings allows you to create a personalized experience on your Amazon Fire Tablet. It helps ensure that your device reflects your individual style, preferences, and functionality.
Remember, you can always revisit the profile settings menu in the future to modify or update your preferences as needed. This allows you to adapt to changing needs and preferences over time.
Now that you have successfully customized your profile settings and preferences, you can move on to the next step in the process of adding a profile to your Amazon Fire Tablet. In the following sections, we will guide you through the process of adding content to your profile to further enhance your tablet experience. Let’s continue on with the process and move forward to the next steps!
Step 7: Add content to the profile
Once you have created and customized your profile on your Amazon Fire Tablet, it’s time to add content to make your tablet experience even more enjoyable. Whether it’s apps, books, movies, or music, adding content to your profile allows you to access and enjoy your favorite media. Follow the steps below to add content to your profile:
1. Access the device’s home screen or app library by tapping the home button or swiping up from the bottom of the screen.
2. From the home screen or app library, locate and open the “Amazon Appstore” or “Appstore” app. This is where you can find and download a wide range of apps, games, and other content.
3. Search for the specific app or content you want to add to your profile. You can use the search bar at the top of the app store or browse through the different categories and recommendations.
4. Once you have found the desired app or content, tap on it to access its details page. Here, you can read descriptions, check ratings and reviews, and see screenshots or preview videos.
5. To add the app or content to your profile, tap on the “Download” or “Get” button. This initiates the download and installation process.
6. Wait for the app or content to finish downloading and installing on your Amazon Fire Tablet. Depending on the size of the app or content, this may take a few moments.
7. Once the installation is complete, the app or content will be accessible from your profile’s home screen or app library. You can open it directly from there and start enjoying your new addition.
In addition to apps, you can also add other types of content to your profile, such as ebooks, movies, and music. Simply follow the same steps but access the appropriate section of the Amazon Appstore or use other Amazon services, such as Kindle or Amazon Prime Video, to find and download the content you desire.
By adding content to your profile, you can personalize your tablet experience and have easy access to the media and entertainment that you enjoy the most. It’s all about making your Amazon Fire Tablet truly yours.
Now that you know how to add content to your profile, you can continue exploring and adding more apps, media, and entertainment to enhance your tablet experience. In the next step, we will guide you through the process of switching between profiles on your Amazon Fire Tablet. So, let’s move forward and continue with the profile setup!
Step 8: Switch between profiles on your Amazon Fire Tablet
One of the advantageous features of having multiple profiles on your Amazon Fire Tablet is the ability to easily switch between them. Whether you have created separate profiles for yourself and your children or multiple profiles for different purposes, switching between profiles allows you to access a personalized experience with just a few taps. Follow the steps below to switch between profiles on your Amazon Fire Tablet:
1. Unlock your Amazon Fire Tablet if it is currently locked or asleep.
2. From the lock screen or home screen, swipe down from the top of the screen to reveal the quick settings menu.
3. In the top right corner of the quick settings menu, you will see the user profile icon. It resembles a small person or a silhouette. Tap on it to open the profiles menu.
4. A list of available profiles will appear on the screen. Tap on the one you want to switch to.
5. Once you have selected the desired profile, your Amazon Fire Tablet will switch to that profile, and you will have access to the personalized settings and content associated with it.
To switch between profiles, it is important to note that you need to have separate profiles set up on your Amazon Fire Tablet beforehand. Each profile will have its own apps, settings, and content, ensuring a customized experience for each user.
Switching between profiles is especially useful if multiple users are sharing the same device. Each user can have their own personalized space, without their settings and content being mixed up with others.
It’s also worth mentioning that the process of switching between profiles may vary slightly depending on the model and version of your Amazon Fire Tablet. However, the general steps outlined above should apply to most devices.
Now that you know how to switch between profiles on your Amazon Fire Tablet, you can easily access the desired personalized experience with just a few taps. In the next step, we will guide you through the process of deleting a profile if you ever need to do so. So, let’s continue on with the profile setup!
Step 9: Delete a profile if needed
If you no longer need a profile on your Amazon Fire Tablet, whether it’s a child profile or an adult profile, you can easily delete it. Deleting a profile allows you to free up space and ensure that no personal information or preferences associated with the profile remain on the device. Follow the steps below to delete a profile if needed:
1. From the profile settings menu, navigate to the “Settings” or “Profiles & Family Library” section. This is where you can manage and make changes to the profiles on your Amazon Fire Tablet.
2. Locate the profile that you want to delete from the list of available profiles. Tap on the profile to access its settings.
3. Once you are in the profile settings, look for the option to delete the profile. The specific wording may vary depending on your Amazon Fire Tablet model and version, but it generally involves terms such as “Delete Profile” or “Remove Profile”.
4. When prompted, confirm your intent to delete the profile. Keep in mind that deleting a profile will permanently remove all associated content, settings, and preferences. This action cannot be undone.
5. Enter any necessary verification details, such as a password or PIN, to confirm your authority to delete the profile. This step ensures that the profile can only be deleted by someone with the proper authorization.
6. Tap on the “Confirm” or “Delete” button to initiate the profile deletion process. The profile and all associated data will be permanently removed from your Amazon Fire Tablet.
Deleting a profile is a final step, and it is important to make sure that you truly want to remove the profile before proceeding. Once a profile is deleted, all content, settings, and preferences linked to that profile cannot be recovered.
By deleting a profile, you can declutter your device, remove any unnecessary profiles, and maintain a clean and organized user experience.
Now that you know how to delete a profile on your Amazon Fire Tablet, you have the option to manage and remove profiles as needed. In the next section, we will wrap up the profile setup process and summarize the steps you have followed. So, let’s move forward and conclude the profile setup!