
Overview
Connecting a controller to your iPad can significantly enhance your gaming experience and make it more immersive. Whether you’re a casual gamer or a dedicated enthusiast, using a controller can provide better control, comfort, and precision compared to relying solely on the iPad’s touchscreen controls. In this guide, we will explore different ways to connect a controller to your iPad and enjoy gaming on a whole new level.
Gone are the days when gaming was limited to traditional consoles or PCs. With the advancement in technology, mobile gaming has taken off, and the iPad has become a popular platform for gaming on the go. While touch controls work well for many games, there are certain genres, such as racing, action, and platformers, where a physical controller offers a more intuitive and responsive gaming experience.
The good news is that iPads support a wide range of controllers, both wired and wireless, to cater to your individual gaming preferences. Whether you already have a compatible controller or need to purchase one, there are several options available that will allow you to connect and play seamlessly.
Before we dive into the different methods of connecting a controller to your iPad, it’s essential to consider the compatibility between your iPad model and the controller you plan to use. While many controllers are designed to work with various devices, it’s always a good idea to check the compatibility list or consult the manufacturer’s website to ensure compatibility with your specific iPad model.
Once you’ve confirmed compatibility, you can choose between a wired connection or a wireless connection using Bluetooth. While both methods are effective, the decision ultimately comes down to personal preference and the controller you have or plan to purchase. Wired connections are straightforward and eliminate the need for additional accessories, while wireless connections provide more freedom of movement and convenience.
In the following sections, we will guide you through the step-by-step process of connecting your controller to your iPad using both wired and Bluetooth methods. We will also provide troubleshooting tips to help you overcome any challenges you might encounter along the way. Additionally, we will explore some additional accessories that can enhance your gaming setup and take your iPad gaming experience to the next level.
Compatibility
Before connecting a controller to your iPad, it’s crucial to ensure that the controller is compatible with your specific iPad model. While many controllers work with a wide range of devices, it’s always best to check the compatibility list provided by the manufacturer or consult their website for compatibility details.
Most modern iPads running on iOS 13 or later support a variety of controllers, including popular options like Xbox One controllers, PlayStation DualShock controllers, and Nintendo Switch Pro controllers. These controllers are widely available and offer excellent compatibility with many iOS games. However, it’s important to note that older iPad models might have limited compatibility or may require specific accessories for proper connection.
To determine the compatibility of your iPad with a particular controller, you can visit the manufacturer’s website or refer to the product packaging or documentation. Alternatively, you can check Apple’s official list of MFi (Made for iPhone, iPad, and iPod touch) controllers, which are certified to work seamlessly with Apple devices.
If you already own a controller and are unsure of its compatibility, you can try connecting it to your iPad via Bluetooth using the methods outlined in the next section. If the controller is compatible, it should automatically pair with the iPad, and you’ll be able to use it for gaming. However, if the controller doesn’t connect, it’s likely not compatible with your iPad.
Keep in mind that while many popular console controllers are supported, not all games are optimized for controller use on iOS. It’s always a good idea to check the compatibility of the game you want to play with a controller before making a purchase.
In summary, ensure that your controller is compatible with your iPad model before attempting to connect it. Check the manufacturer’s compatibility list or Apple’s official MFi controllers list for guidance. By using a compatible controller, you can enjoy a seamless gaming experience on your iPad without any compatibility issues.
Wired Connection
One of the simplest ways to connect a controller to your iPad is through a wired connection. This method eliminates the need for Bluetooth pairing and provides a reliable and lag-free gaming experience. To connect your controller to your iPad using a wired connection, follow these steps:
- Start by obtaining a compatible wired controller. There are various options available in the market, including controllers specifically designed for iOS devices.
- Next, ensure your iPad has a Lightning port or USB-C port, depending on the model. You will need a compatible cable to connect the controller to your iPad. For devices with a Lightning port, you can use a Lightning to USB adapter, while USB-C devices will require a USB-C to USB adapter.
- Plug one end of the adapter cable into the Lightning or USB-C port of your iPad.
- Connect the other end of the cable to the USB port of the controller. Make sure the cable is securely connected.
- Once the controller is connected, your iPad should recognize it automatically. You may need to wait a few seconds for the connection to establish.
- Now, you can launch your favorite game and start playing using the controller. The controls should work seamlessly, providing a more tactile and responsive gaming experience.
It’s important to note that not all games are compatible with external controllers, especially if they are designed primarily for touch controls. However, many popular games have controller support, so you can enjoy enhanced gameplay with a wired connection.
Additionally, using a wired connection ensures a stable and continuous power supply to the controller, eliminating the need to worry about battery life. This is especially useful for longer gaming sessions, allowing you to focus on the game without interruptions.
In summary, connecting a controller to your iPad through a wired connection is a straightforward and reliable method. By following the steps outlined above, you can enjoy a seamless gaming experience with enhanced control and precision. Remember to check the compatibility of the controller with your iPad model before making a purchase.
Using Bluetooth
Another popular method for connecting a controller to your iPad is through a wireless Bluetooth connection. This method allows for more flexibility and freedom of movement while gaming. To connect your controller to your iPad using Bluetooth, follow these steps:
- Ensure that your controller is in pairing mode. This mode is usually activated by holding down a specific button combination or using a dedicated pairing button on the controller. Refer to the controller’s manual or manufacturer’s website for instructions.
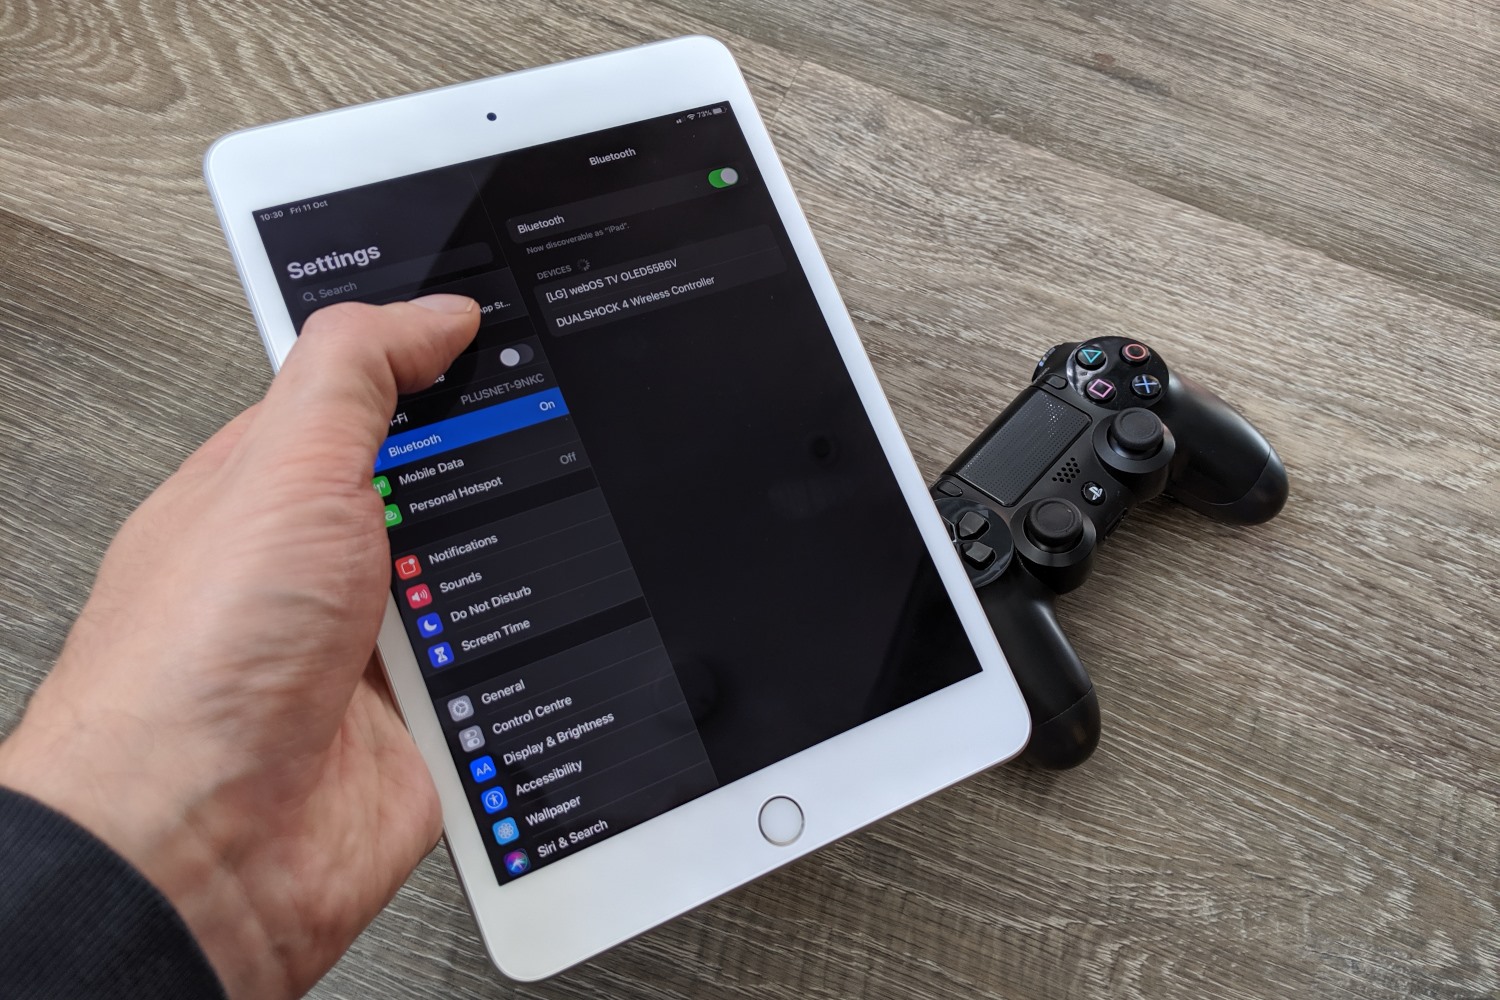
- On your iPad, navigate to the Settings app and tap on “Bluetooth.”
- Make sure Bluetooth is turned on. Your iPad will start scanning for nearby Bluetooth devices.
- Locate your controller in the list of available devices and tap on it to initiate the pairing process.
- If prompted, enter a passcode provided by the controller or simply confirm the pairing request on your iPad.
- Once the pairing is successful, your controller will be connected to your iPad via Bluetooth.
It’s important to note that the specific steps may vary slightly depending on the controller and iPad model. Always refer to the controller’s manual or manufacturer’s website for detailed instructions.
After successfully connecting the controller, you can now launch your favorite game and start playing using the controller’s buttons and joysticks. The iPad will recognize the input from the controller, providing a seamless and responsive gaming experience.
Wireless Bluetooth connections offer the advantage of convenience and freedom of movement. You can sit back, relax, and play your favorite games without worrying about cable restrictions. It’s worth noting that the range of the Bluetooth connection may vary depending on the specific device.
If you face any issues while pairing your controller, ensure that both your controller and iPad have sufficient battery life. Additionally, make sure that the controller is fully charged or connected to a power source if it supports charging during gameplay. You can also try resetting the Bluetooth settings on your iPad or restarting both the iPad and controller to troubleshoot any connection issues.
In summary, connecting a controller to your iPad via Bluetooth provides a wireless and convenient gaming experience. By following the steps outlined above and referring to the controller’s manual, you can enjoy a wide range of games with enhanced controls and freedom of movement.
Pairing the Controller
Once you have connected your controller to your iPad, the next step is to pair them so that they can communicate effectively. Pairing allows the iPad to recognize the controller’s inputs and ensures a smooth gaming experience. The process of pairing may vary slightly depending on the controller and iPad model, but the general steps are as follows:
- Make sure the controller is connected to your iPad either through a wired connection or using Bluetooth, as previously described in the respective sections.
- Once the connection is established, navigate to the Settings app on your iPad.
- Tap on “Bluetooth” to access the Bluetooth settings.
- Locate your connected controller in the list of devices and tap on it.
- You may be prompted to verify the pairing by entering a passcode or confirming the connection on both the iPad and the controller. Follow the on-screen instructions to complete the pairing process.
- Once the pairing is successful, the controller should be ready to use with your iPad for gaming.
It’s important to note that some controllers may have additional features or settings that can be adjusted during the pairing process, such as button mapping or sensitivity adjustments. Refer to the controller’s manual or the manufacturer’s website for more information on these advanced settings.
If you encounter any issues during the pairing process, ensure that the controller has sufficient battery power or is connected to a power source if it supports charging while in use. Restarting both the iPad and the controller can also solve any temporary connectivity issues.
Remember to consult the specific instructions provided by the controller’s manufacturer for accurate pairing guidance. Following the correct steps will ensure a successful connection and a seamless gaming experience with your iPad.
In summary, pairing your controller with your iPad is a straightforward process that allows for effective communication between the devices. By following the general steps outlined above and referring to the controller’s manual, you can easily pair your controller with your iPad and enjoy an enhanced gaming experience with precise controls.
Troubleshooting Tips
While connecting and pairing a controller with your iPad is usually a smooth process, you may encounter some issues along the way. Here are some troubleshooting tips to help you overcome common challenges:
- Ensure compatibility: Before attempting to connect a controller, double-check that it is compatible with your specific iPad model. Refer to the controller’s manual or the manufacturer’s website for compatibility details.
- Check for firmware updates: Controllers often receive firmware updates to improve compatibility and performance. Make sure your controller’s firmware is up to date by visiting the manufacturer’s website and following their instructions.
- Restart your devices: If you’re experiencing connectivity issues, try restarting both your iPad and the controller. This simple step can often resolve temporary glitches and provide a fresh start.
- Charge your controller: If your controller has a built-in battery, ensure that it is adequately charged or connected to a power source. Low battery levels can cause connectivity issues or prevent the controller from functioning properly.
- Reset Bluetooth settings: If your controller is not connecting via Bluetooth, try resetting the Bluetooth settings on your iPad. Navigate to the Settings app, go to “General,” and then tap on “Reset.” Select “Reset Network Settings” and enter your passcode if prompted. Keep in mind that this will reset all your network settings, including saved Wi-Fi networks.
- Re-pair the controller: If the controller is already paired but not functioning correctly, try unpairing it from your iPad and pairing it again. Delete the controller from the Bluetooth devices list in the Settings app, then follow the pairing steps outlined in the previous section.
- Try a different controller: If you have access to another compatible controller, try connecting it to your iPad. This can help determine if the issue lies with the specific controller or the iPad’s connection settings.
- Update iOS: Ensure that your iPad is running the latest version of iOS. Software updates often address compatibility issues and optimize performance. To update, go to the Settings app, tap on “General,” and select “Software Update.”
If you have exhausted all troubleshooting options and are still unable to connect or use the controller with your iPad, it may be worth reaching out to the controller’s manufacturer for further assistance. They can provide specific guidance and support tailored to the product you are using.
By following these troubleshooting tips, you can overcome common issues and enjoy a seamless gaming experience with your controller and iPad.
Additional Accessories
In addition to connecting a controller to your iPad, there are several additional accessories that can further enhance your gaming experience. These accessories provide added comfort, convenience, and functionality, allowing you to fully immerse yourself in your favorite games. Let’s explore some of the popular accessories for iPad gaming:
- Controller Mounts: Controller mounts are designed to securely hold your iPad while you game with a controller. These mounts typically attach to the controller itself, providing a comfortable and ergonomic setup.
- Gaming Headsets: A gaming headset allows for an immersive audio experience while playing games on your iPad. Quality headsets offer clear communication with other players in multiplayer games and can enhance the overall immersion of the gaming experience.
- Gaming Chairs: If you’re a serious gamer, investing in a gaming chair can greatly enhance your comfort and posture during extended gaming sessions. Look for chairs with adjustable features such as lumbar support, reclining capabilities, and ergonomic design.
- Gaming Keyboards: Some games, particularly strategy or simulation games, benefit from the added precision and control of a keyboard. A gaming keyboard designed for iPads can provide the tactile feedback and customization options necessary for optimal gameplay.
- Gaming Controllers with Built-in Batteries: While most controllers rely on disposable or rechargeable batteries, some models feature built-in batteries. These controllers minimize the need for frequent battery replacements and offer longer gameplay sessions on a single charge.
- Screen Protectors: Protecting your iPad’s screen is essential, especially during intense gaming sessions. A quality screen protector can shield your iPad from scratches, smudges, and accidental drops.
When considering which accessories to purchase, it’s important to ensure compatibility with your iPad model and the specific controller you’re using. Check product descriptions, reviews, and compatibility lists provided by the manufacturers to find the accessories that are designed to work seamlessly with your device.
Remember, while accessories can enhance the gaming experience, they are not essential. You can still enjoy gaming on your iPad with just a controller and the built-in features of the device. Consider your gaming preferences and budget before investing in additional accessories.
In summary, additional gaming accessories such as controller mounts, headsets, gaming chairs, keyboards, and screen protectors can take your iPad gaming experience to the next level. Choose accessories that are compatible with your iPad and controller model, and tailor your setup to suit your gaming preferences and comfort.