
What is CMOS?
CMOS, which stands for Complementary Metal-Oxide-Semiconductor, refers to a type of technology used in the design and manufacturing of computer chips. It is commonly used in computers for various purposes, including storing and retaining BIOS (Basic Input/Output System) settings.
The CMOS chip, also known as the CMOS battery or the RTC (Real-Time Clock) battery, is a small battery-powered chip that stores important configuration information about your computer. This includes settings related to hardware components, system preferences, and the date and time. These settings are essential for your computer to function properly.
Unlike volatile memory (RAM), which loses its contents when the computer is turned off, the CMOS chip retains its information even when the power is off. This is because it is powered by a small battery, typically a CR2032 coin-cell battery, ensuring that the stored data remains intact.
CMOS settings can be accessed and modified through the BIOS Setup Utility, which is a firmware interface present in most computers. It allows users to change various system configurations and optimize performance settings. These configurations include boot device priority, CPU and memory settings, drive configurations, and many more.
Overall, the CMOS chip plays a crucial role in ensuring the proper functioning of your computer by preserving important system settings. However, there may be instances where it becomes necessary to clear CMOS and reset the BIOS settings. This could be due to issues such as hardware incompatibility, system instability, or the need to revert to default settings.
Now that you understand the basics of what CMOS is and its importance in your computer, let us explore the reasons why you might need to clear CMOS and the precautions you should take before doing so.
Why you might need to clear CMOS
There are several scenarios where clearing the CMOS and resetting the BIOS settings becomes necessary. Let’s explore some of the most common reasons why you might need to perform this task.
- Hardware and compatibility issues: Sometimes, when you install new hardware components, such as a graphics card or RAM modules, your computer may fail to recognize or properly configure them. Clearing the CMOS can help resolve any conflicts or compatibility issues between the new hardware and existing settings.
- System instability and boot failures: If your computer is experiencing frequent crashes, random freezes, or failing to boot up properly, it could be due to corrupted BIOS settings. Clearing the CMOS can help eliminate any invalid or conflicting configurations, allowing your system to start fresh.
- Forgot BIOS password: In some cases, you might forget the BIOS password that you have set, preventing you from accessing the BIOS Setup Utility. Clearing the CMOS will reset all BIOS settings, including the password, and allow you to regain access to the configuration interface.
- Overclocking issues: Overclocking refers to increasing the clock speed of your CPU or other components beyond their default values to achieve better performance. However, if you push your hardware too far or encounter stability issues, clearing the CMOS can revert the overclocked settings back to default values.
- Software conflicts: Certain software installations, particularly those related to system utilities or drivers, can sometimes interfere with BIOS settings. Clearing the CMOS can help resolve any conflicts arising from incompatible software or incorrect configurations.
It is important to note that clearing the CMOS should be approached with caution. While it can often solve various issues, it also resets all BIOS settings to their default values. This means that any customizations or tweaks you have made to optimize your system’s performance will be lost. Therefore, before proceeding with clearing the CMOS, it is advisable to backup any important data and make note of any custom configurations.
In the following sections, we will explore different methods to clear the CMOS and reset BIOS settings, as well as the precautions you should take before undertaking this task.
Precautions before clearing CMOS
Before proceeding to clear the CMOS and reset the BIOS settings, it is important to take some precautions to ensure a smooth and successful process. These precautions will help you avoid any potential issues or unintended consequences.
- Backup important data: Before clearing the CMOS, it is always a good idea to back up any important files or data on your computer. While clearing the CMOS typically does not affect your data directly, it is better to be safe and have a backup in case of any unexpected issues or errors during the process.
- Note down custom configurations: If you have made any customizations or tweaks to the BIOS settings that you wish to retain, be sure to make a note of them before clearing the CMOS. This includes any overclocking settings, boot priority configurations, or specific hardware configurations. Once the CMOS is cleared, all these custom settings will be erased, and you will need to reconfigure them.
- Find the correct method: There are several methods to clear the CMOS, including using the BIOS Setup Utility, the Clear CMOS jumper, removing the CMOS battery, or using a CMOS reset button (if available). Depending on your computer’s model and manufacturer, the method may vary. It is important to refer to your computer’s manual or manufacturer’s website to find the correct method for your specific model.
- Follow instructions carefully: When performing the CMOS clearing process, it is crucial to follow the instructions provided by your computer’s manufacturer or the documentation that accompanies your motherboard. Each method may have specific steps or considerations that need to be followed accurately to avoid any potential damage to the hardware or system.
- Power off and disconnect: Before attempting to clear the CMOS, it is essential to power off your computer and disconnect it from the power source. This ensures your safety and prevents any electrical damage or short circuits while working with the internal components. Always handle the CMOS battery, jumpers, or any other internal components with care.
By taking these precautions, you can mitigate any risks associated with clearing the CMOS and ensure a smooth process. Once you are prepared and have noted down any necessary information, you can proceed with the method that is appropriate for your computer to clear the CMOS and reset the BIOS settings.
Method 1: Using the BIOS Setup Utility
One of the commonly used methods to clear the CMOS and reset BIOS settings is through the BIOS Setup Utility. This method allows you to access and modify the BIOS settings directly from your computer’s firmware interface. Here’s a step-by-step guide on how to clear the CMOS using the BIOS Setup Utility:
- Power off your computer: Start by powering off your computer completely. Ensure that all applications are closed, and the system is not in hibernation or sleep mode.
- Power on your computer: Press the power button to turn on your computer. As soon as the computer starts, look for a prompt or message indicating which key to press to enter the BIOS Setup Utility. It is usually a function key (e.g., F2, F10, or Del). The exact key may vary depending on your computer’s manufacturer.
- Enter the BIOS Setup Utility: Press the designated key repeatedly (typically every few seconds) until the BIOS Setup Utility screen appears. This screen may vary in appearance depending on your computer’s motherboard and firmware version.
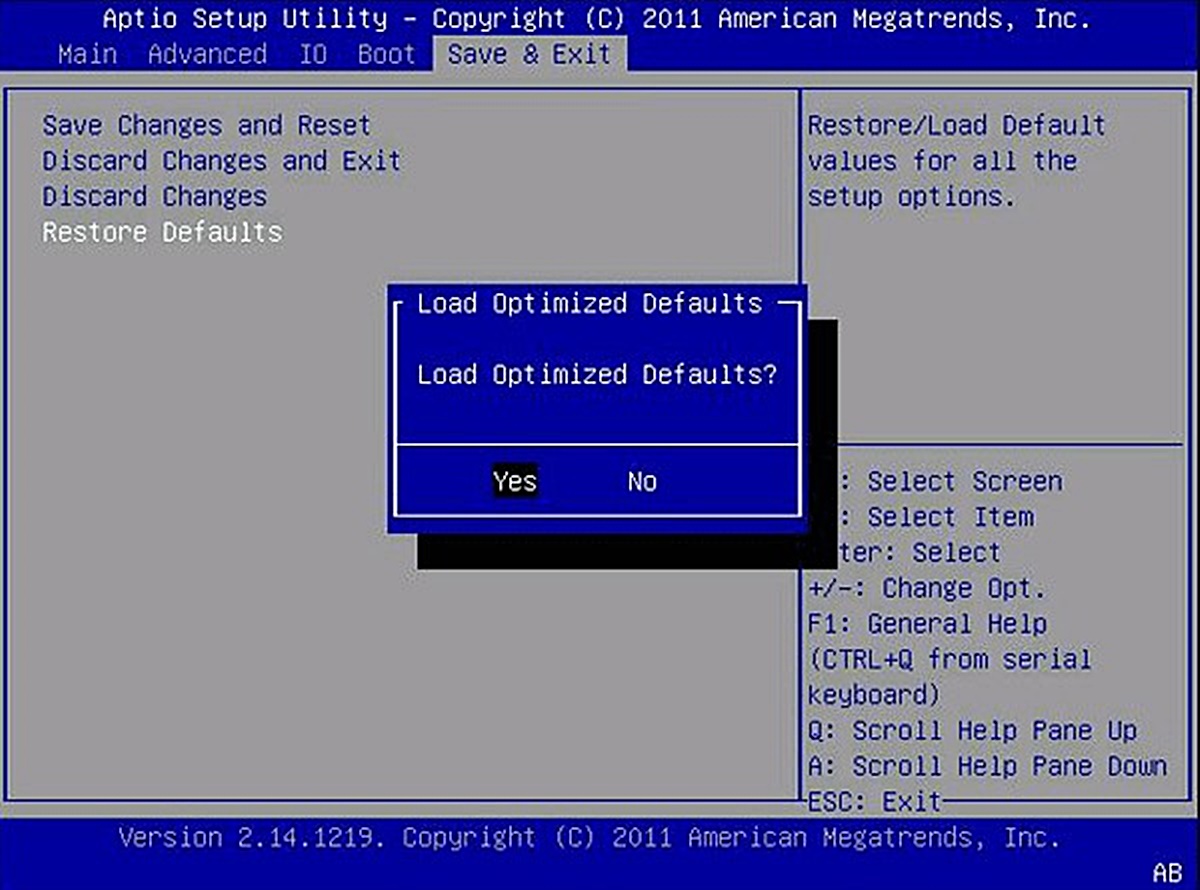
- Locate the “Reset to Default” option: Within the BIOS Setup Utility, navigate through the menus using the arrow keys or specified hotkeys. Look for an option that allows you to reset the BIOS settings to their default values. It may be labeled as “Load Setup Defaults,” “Reset to Default,” or something similar.
- Confirm the reset: Once you have located the appropriate option, select it and confirm your choice. The confirmation process may involve pressing a designated key or following on-screen instructions. Be aware that resetting the BIOS settings will revert all configurations back to their default values.
- Save and exit: After the confirmation, navigate to the “Exit” menu within the BIOS Setup Utility. Look for an option to “Save Changes and Exit” or a similar phrase. Select this option to save the changes made and exit the BIOS Setup Utility.
Once you have successfully cleared the CMOS using the BIOS Setup Utility, your computer will restart with the BIOS settings reset to their default values. You will need to reconfigure any custom settings or preferences that you had previously set.
It is important to note that the specific steps and options within the BIOS Setup Utility may vary depending on your computer’s manufacturer and firmware version. Refer to your computer’s manual or the manufacturer’s website for precise instructions tailored to your system.
Now that you are familiar with the method of clearing the CMOS using the BIOS Setup Utility, let’s explore other methods that can be used to reset the BIOS settings.
Method 2: Using the Clear CMOS Jumper
Another method to clear the CMOS and reset the BIOS settings involves using the Clear CMOS jumper on your computer’s motherboard. This is a small connector that can be found on the motherboard and is used to temporarily disconnect the power from the CMOS chip. Here’s a step-by-step guide on how to clear the CMOS using the Clear CMOS jumper:
- Power off your computer: Start by shutting down your computer completely. Make sure that all applications are closed and the system is not in hibernation or sleep mode. Also, disconnect the power cord from the back of your computer to ensure your safety.
- Locate the Clear CMOS jumper: Open your computer’s case and locate the motherboard. Look for a small jumper labeled “Clear CMOS,” “CLR_CMOS,” or something similar. The jumper is typically located near the CMOS battery, but its exact placement may vary depending on your motherboard model. Refer to your computer’s manual for precise instructions on locating the Clear CMOS jumper.
- Set the jumper: The Clear CMOS jumper has three pins: Pin 1, Pin 2, and Pin 3. Initially, the jumper is placed on Pin 1 and Pin 2. To clear the CMOS, you need to move the jumper to connect Pin 2 and Pin 3 together. Use a small jumper cap or a metal object (e.g., screwdriver or tweezers) to carefully move the jumper.
- Wait and restore: After connecting Pin 2 and Pin 3 together with the jumper, leave it in that position for approximately 5 to 10 seconds. This will allow the CMOS to discharge and reset. After the waiting period, remove the jumper from Pin 2 and Pin 3, and place it back on Pin 1 and Pin 2.
- Close the case and power on: With the Clear CMOS jumper restored to its original position, close your computer’s case and reconnect the power cord. Power on your computer and check if the CMOS has been cleared. The BIOS settings will be reset to their default values, and you will need to reconfigure any custom settings you had previously set.
It is important to note that the Clear CMOS jumper method may vary slightly depending on your motherboard’s manufacturer. Some motherboards may have a dedicated Clear CMOS button instead of a jumper. Always consult your computer’s manual for specific instructions related to your system.
This method is quite effective in clearing the CMOS and reseting the BIOS settings. However, exercise caution when working inside your computer’s case, and be sure to handle the Clear CMOS jumper and other components with care to avoid any damage.
In the next section, we will explore another method to clear the CMOS by removing the CMOS battery.
Method 3: Removing the CMOS Battery
Removing the CMOS battery is another method to clear the CMOS and reset the BIOS settings. The CMOS battery is a small coin-cell battery that powers the CMOS chip and retains the BIOS settings. By removing this battery, the power supply to the CMOS chip is disrupted, resulting in the clearing of the saved configurations. Here’s a step-by-step guide on how to clear the CMOS by removing the CMOS battery:
- Power off your computer: Begin by shutting down your computer completely. Close all applications and ensure that the system is not in sleep or hibernation mode. Additionally, unplug your computer from the power source to avoid any electrical mishaps.
- Open your computer’s case: Locate the screws or latches that secure your computer’s case and carefully remove them. Gently slide off the side panel or lift the top cover, depending on the design of your computer’s case. Be cautious not to damage any components or cables inside.
- Locate the CMOS battery: Look for a small, round battery on the computer’s motherboard. This is the CMOS battery. It is typically a CR2032 coin-cell battery and may be secured by a clip or held in place by a battery holder.
- Remove the CMOS battery: Use your fingers or a small flat-head screwdriver to carefully detach the CMOS battery from its holder. If there is a clip holding the battery in place, gently push the clip away from the battery and lift it out. If the battery is secured by a holder, release any locks or tabs and slide the battery out.
- Wait and reinstall the CMOS battery: After removing the CMOS battery, wait for approximately 5 minutes to ensure any remaining charge is completely dissipated and the CMOS is cleared. Then, carefully reinsert the CMOS battery back into its holder, ensuring proper alignment with the positive and negative terminals.
- Close the case and power on: Once the CMOS battery is securely reinstalled, close your computer’s case and fasten any screws or latches. Plug your computer back into the power source and power it on. The CMOS will be reset, and you will need to reconfigure the BIOS settings according to your requirements.
It is important to note that removing the CMOS battery may also reset other settings, such as the date and time, network settings, and boot order. Therefore, after clearing the CMOS, make sure to review and adjust these settings as needed.
Remember to handle the CMOS battery and other internal components with care to avoid any damage. Additionally, consulting your computer’s manual for specific instructions related to your motherboard model is recommended.
Next, we will explore another method to clear the CMOS, which involves using a CMOS reset button if available on your computer.
Method 4: Using a CMOS Reset Button (if available)
If your computer is equipped with a CMOS reset button, this offers a convenient method to clear the CMOS and reset the BIOS settings. The CMOS reset button is a physical button located on the motherboard that allows you to quickly and easily reset the CMOS without the need to open the computer’s case. Here’s a step-by-step guide on how to clear the CMOS using a CMOS reset button:
- Power off your computer: Start by shutting down your computer completely. Close all applications and ensure that the system is not in sleep or hibernation mode.
- Locate the CMOS reset button: Open your computer’s case and locate the CMOS reset button on the motherboard. The button is usually labeled “CMOS” or “CMOS Reset” and may be near the CMOS battery or in a different location, depending on the motherboard model. Refer to your computer’s manual for precise instructions on locating the CMOS reset button.
- Press and hold the CMOS reset button: With the computer powered off, press and hold the CMOS reset button for about 10-15 seconds. This action will discharge the CMOS and reset the BIOS settings to their default values.
- Release the button and power on your computer: After holding the CMOS reset button for the specified duration, release the button. Close your computer’s case and plug it back into the power source. Power on your computer and check if the CMOS has been successfully cleared. You will need to reconfigure any custom BIOS settings that you had previously set.
Using a CMOS reset button offers a convenient and simple way to clear the CMOS without the need to open the computer’s case and deal with internal components. However, note that the availability of a CMOS reset button varies depending on the motherboard model and manufacturer.
If your computer does not have a CMOS reset button, don’t worry. There are other methods available, such as flashing the BIOS firmware, which we will explore in the next section.
Method 5: Flashing the BIOS Firmware
Flashing the BIOS firmware is another method that can be used to clear the CMOS and reset the BIOS settings. This method involves updating the BIOS firmware to the latest version provided by the motherboard manufacturer. During the firmware update process, the CMOS and BIOS settings are typically reset to their default values. Here’s a step-by-step guide on how to clear the CMOS by flashing the BIOS firmware:
- Gather the necessary information: Before proceeding, visit the website of your motherboard manufacturer and locate the latest BIOS firmware for your specific motherboard model. Also, carefully read and familiarize yourself with the instructions provided by the manufacturer for the BIOS update process.
- Prepare a bootable USB drive: Format a USB drive to create a bootable media. Copy the downloaded BIOS firmware onto the USB drive, following the manufacturer’s instructions. Ensure that the USB drive is properly detected by your computer.
- Power off your computer: Start by shutting down your computer completely. Close all applications and ensure that the system is not in sleep or hibernation mode.
- Boot from the USB drive: Insert the bootable USB drive into one of the USB ports on your computer. Power on your computer and access the boot menu by pressing the designated key (e.g., F12, Esc, or F8) during the startup process. Select the USB drive as the boot device.
- Follow the BIOS update process: Once your computer boots from the USB drive, follow the instructions provided by the motherboard manufacturer to initiate the BIOS update process. This typically involves running a BIOS flashing utility and selecting the firmware file from the USB drive. Carefully read and follow the on-screen instructions to complete the BIOS update.
- Restart your computer: After the BIOS update process is complete, restart your computer. The CMOS and BIOS settings will be reset to their default values. You will need to reconfigure any custom settings that you had previously set.
Flashing the BIOS firmware should be approached with caution, as an incorrect update or an interruption during the process can lead to permanent damage to your motherboard. Follow the manufacturer’s instructions precisely and ensure a stable power source for your computer during the update.
By flashing the BIOS firmware, you can achieve both a BIOS update and a reset of the CMOS settings to their default values, providing a fresh start for your system.
In the following section, we will discuss common issues that may arise during the CMOS clearing process and provide troubleshooting tips to help you resolve them.
Troubleshooting Common Issues
While clearing the CMOS and resetting the BIOS settings can be a straightforward process, there may be instances where you encounter common issues along the way. Here are some troubleshooting tips to help you resolve these issues:
- Computer not powering on: If your computer does not power on after clearing the CMOS, ensure that all power connections are secure. Check the power cord, power supply, and motherboard connections. Additionally, verify that the CMOS battery is properly inserted.
- BIOS settings not reset: If your BIOS settings remain unchanged after clearing the CMOS, confirm that you followed the correct method for your computer. Double-check the documentation and resources specific to your motherboard model. In some cases, you may need to repeat the CMOS clearing process using a different method.
- Date and time reset: After clearing the CMOS, if the date and time settings reset to a default or incorrect value, access the BIOS Setup Utility and manually set the correct date and time. Save the settings and restart your computer to ensure that the changes are applied.
- Inability to access BIOS Setup Utility: If you are unable to access the BIOS Setup Utility after clearing the CMOS, check again for the correct key or combination of keys to press during system startup. Try different combinations or consult your computer’s manual for specific instructions.
- System instability persists: If your system continues to experience crashes, freezes, or other issues after clearing the CMOS, consider updating drivers and firmware for your hardware components. Additionally, ensure compatibility between hardware devices and verify that all components are properly installed and functioning correctly.
If you encounter any other specific issues or error messages during the CMOS clearing process, consult the documentation provided by your motherboard manufacturer or seek assistance from technical support. They will be able to provide guidance tailored to your system’s configuration.
Remember that clearing the CMOS and resetting the BIOS settings should be done with caution, as it can lead to the loss of custom configurations or other settings. Backup any important data and document your customizations before proceeding.
Now that you have troubleshooting tips under your belt, you can effectively resolve any issues that may arise during the CMOS clearing process.