
What is a CMOS Checksum Error?
A CMOS checksum error is a common issue that occurs when the checksum value stored in the Complementary Metal-Oxide-Semiconductor (CMOS) memory is incorrect. The CMOS memory is responsible for storing essential system configuration settings, such as the date and time, boot sequence, and hardware settings. The checksum is a calculated value that ensures the integrity and accuracy of the stored data.
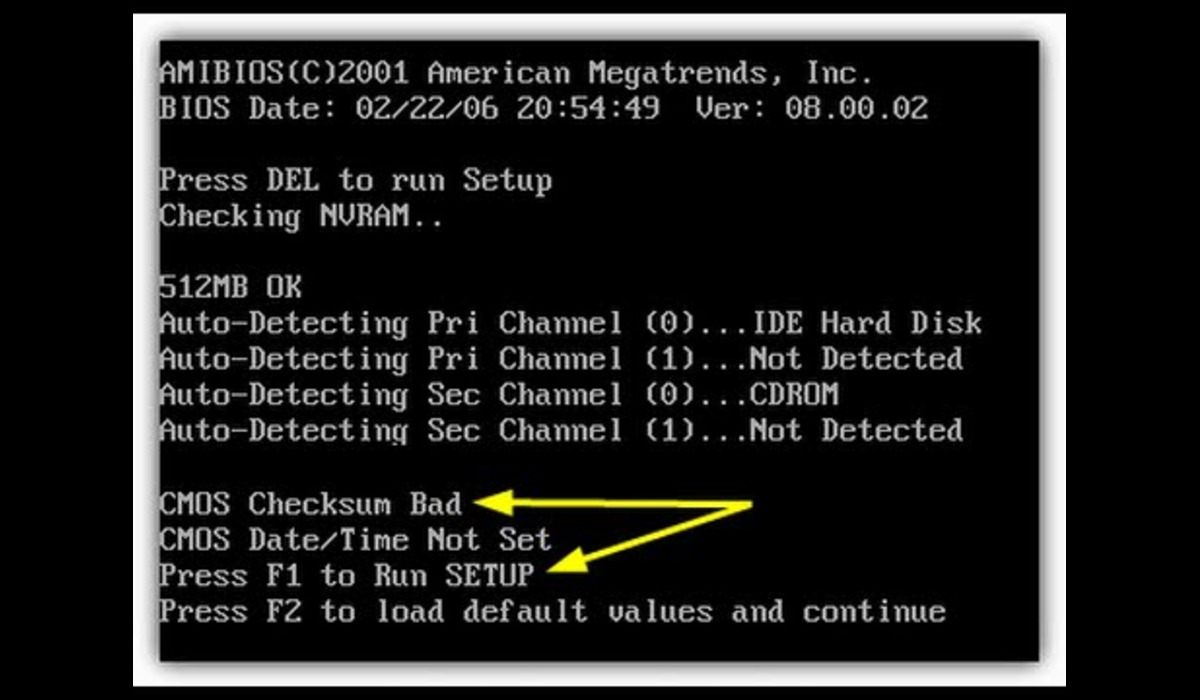
When the CMOS checksum becomes invalid or does not match the expected value, it indicates a potential problem with the CMOS settings or the CMOS battery. The checksum error usually appears when you start your computer or during the boot process.
The CMOS checksum error can occur due to various reasons, such as:
- Power issues: Sudden power outages or improper shutdowns can corrupt the CMOS memory, leading to a checksum error.
- CMOS battery failure: The CMOS battery provides power to maintain the CMOS settings when the computer is powered off. When the battery is dead or weak, it can cause a checksum error.
- Hardware changes: If you recently made hardware changes, such as adding or removing a component, it can trigger a checksum error if the new hardware is not compatible or causing conflicts.
- BIOS updates: Incorrect BIOS updates or incomplete flashing processes can result in a checksum error.
The CMOS checksum error can cause various symptoms, such as an incorrect system date and time, failure to boot into the operating system, or even hardware malfunctions. It is important to address the issue promptly to ensure the proper functioning of your computer.
In the next section, we will discuss the steps you can take to fix a CMOS checksum error and restore the correct settings on your computer.
Causes of CMOS Checksum Error
A CMOS checksum error can be caused by several factors. Understanding these causes will help you diagnose and rectify the issue effectively. Below are some of the common causes of CMOS checksum errors:
- CMOS battery failure: The CMOS battery, also known as the motherboard battery, provides power to maintain the CMOS settings when the computer is powered off. When the CMOS battery fails or becomes weak over time, it can result in a checksum error.
- Power issues: Sudden power outages, incorrect shutdowns, or voltage fluctuations can corrupt the CMOS memory and cause checksum errors. It is essential to use a stable power supply and ensure proper shutdown procedures to minimize the risk of power-related checksum errors.
- Hardware changes: Making hardware changes, such as adding or removing a component, without updating the CMOS settings can lead to the CMOS checksum error. This can occur if the new hardware is not compatible or is causing conflicts with the existing configuration.
- BIOS updates: Incorrect or incomplete BIOS updates can result in a CMOS checksum error. When updating the BIOS, it is crucial to follow the manufacturer’s instructions precisely and ensure that the update process is successfully completed.
- Static electricity: ESD (electrostatic discharge) can damage the CMOS memory and cause checksum errors. It is crucial to take proper ESD precautions when handling computer components to prevent any potential damage.
Identifying the root cause of the CMOS checksum error is vital in resolving the issue. By addressing the underlying cause, you can restore the correct settings and prevent further occurrences of the checksum error.
In the next section, we will discuss the symptoms of a CMOS checksum error, which will help you recognize if your computer is experiencing this issue.
Symptoms of CMOS Checksum Error
A CMOS checksum error can manifest in various ways, indicating that there is an issue with the CMOS settings or the CMOS battery. Being aware of these symptoms will help you identify if your computer is experiencing a checksum error. Here are some common symptoms to look out for:
- Incorrect system date and time: One of the most noticeable signs of a CMOS checksum error is an incorrect system date and time. Your computer may display an outdated date or time, which can cause issues with file creation, system updates, and other time-sensitive processes.
- Failure to boot into the operating system: A CMOS checksum error can prevent your computer from booting into the operating system. You may see error messages or encounter a black screen, preventing you from accessing your files and applications.
- Random hardware malfunctions: If you notice random hardware malfunctions, such as USB ports not working, display issues, or sudden system freezes, it could be a result of a CMOS checksum error. Inaccurate CMOS settings can cause conflicts and instability in the hardware components.
- Boot device issues: When a CMOS checksum error occurs, your computer’s boot sequence configuration may be affected. As a result, you might encounter problems booting from the correct device, such as the hard drive or a USB flash drive.
- CMOS setup errors: Another symptom of a checksum error is the inability to access or modify the CMOS settings. You may experience errors or restrictions when trying to enter the BIOS setup utility to adjust system configurations.
If you notice any of these symptoms, there is a high likelihood that your computer is experiencing a CMOS checksum error. It is important to address the issue promptly to prevent further complications and ensure the proper functioning of your system.
In the next section, we will discuss the steps you can take to fix a CMOS checksum error and restore the correct settings on your computer.
How to Fix a CMOS Checksum Error
Experiencing a CMOS checksum error can be frustrating, but fortunately, there are several steps you can take to resolve the issue. Here are some solutions to fix a CMOS checksum error:
- Clear CMOS: Clearing the CMOS memory can often fix checksum errors. To do this, locate the CMOS jumper on your motherboard and move it to the clear position. Leave it in that position for a few seconds, then move it back to its original position. This process will reset the CMOS memory to default settings.
- Replace CMOS battery: If the CMOS battery is weak or dead, it can cause checksum errors. To fix this, turn off your computer, open the case, and locate the CMOS battery on the motherboard. Carefully remove it and replace it with a new one of the same type. This will provide a fresh power source for the CMOS memory.
- Update or replace BIOS: A corrupt or outdated BIOS can contribute to checksum errors. Check the manufacturer’s website for BIOS updates and install any available updates following the instructions. If updating the BIOS doesn’t resolve the issue, you may need to replace the BIOS chip on your motherboard.
- Check hardware connections: Ensure that all hardware components are properly connected to the motherboard. Loose or faulty connections can cause checksum errors. Remove and reseat all cables, expansion cards, and memory modules to ensure a secure connection.
- Reset BIOS to default settings: In the BIOS setup utility, there is usually an option to reset the settings to default. Enter the BIOS by pressing the appropriate key during startup (usually Del or F2), locate the “Reset to Default” or similar option, and select it. Save the changes and exit the BIOS. This will restore the BIOS settings to their original state.
After trying these solutions, restart your computer and check if the CMOS checksum error persists. In most cases, one of these steps will resolve the issue and allow your computer to boot normally without the checksum error.
If the problem continues to occur even after attempting these solutions, it is recommended to seek assistance from a professional or contact your computer manufacturer for further guidance.
Clear CMOS
Clearing the CMOS is an effective solution to fix a CMOS checksum error. It involves resetting the CMOS memory to its default state, which can resolve any corruption or incorrect settings causing the checksum error. Here’s how you can clear the CMOS:
- Shutdown your computer and make sure it is completely powered off.
- Open the computer case to access the motherboard. Take precautions to avoid static electricity by grounding yourself or using an antistatic strap.
- Locate the CMOS jumper on the motherboard. It is usually near the CMOS battery and labeled as “CLR_CMOS”, “CLRPWD”, or something similar. Refer to your motherboard’s manual if you’re unsure.
- With the computer turned off and unplugged, carefully move the CMOS jumper from its original position (usually covering two pins) to the clear position (covering a different set of pins). The clear position may be labeled or indicated in the manual.
- Leave the jumper in the clear position for about 10-15 seconds to discharge any residual power and reset the CMOS memory. This will clear any incorrect values or settings that caused the checksum error.
- Move the CMOS jumper back to its original position, covering the original set of pins.
- Close the computer case, plug in the power cable, and start your computer.
Upon restarting, the CMOS checksum error should no longer appear, and your computer should boot normally. The CMOS memory will be reset to its default settings, so you may need to enter the BIOS setup utility and adjust any customized settings, such as boot order or overclocking profiles.
Remember to save any changes you make in the BIOS setup utility before exiting. You may also need to set the correct date and time in the system settings as they may be reset to their default values.
Clearing the CMOS is a straightforward process, but it may vary slightly depending on your motherboard. Refer to your motherboard’s manual for specific instructions on clearing the CMOS.
If clearing the CMOS doesn’t resolve the checksum error, you may need to consider other solutions such as replacing the CMOS battery or updating the BIOS.
Replace CMOS Battery
If you are still experiencing a CMOS checksum error after attempting other solutions, it may be necessary to replace the CMOS battery. The CMOS battery provides power to the CMOS memory when the computer is turned off, ensuring that the settings are maintained. Over time, the battery can become weak or completely dead, resulting in checksum errors. Here’s how you can replace the CMOS battery:
- Turn off your computer and unplug it from the power source. Ensure that you are grounded or using an antistatic strap to avoid static discharge.
- Open the computer case and locate the CMOS battery on the motherboard. It is typically a round silver or lithium battery.
- Carefully remove the old CMOS battery by gently pushing on the retention clip or prying it with a small tool. Take note of the battery’s orientation for proper installation.
- Dispose of the old battery properly according to local regulations or recycling guidelines.
- Obtain a new CMOS battery of the same type or model as the original. Common battery types include CR2032 or CR2025.
- Insert the new CMOS battery into the battery holder, ensuring that it is properly aligned.
- Press down gently on the battery until it is securely in place and the retention clip locks it in position.
- Close the computer case, plug in the power cable, and power on your computer.
Once you have replaced the CMOS battery, the incorrect checksum error should be resolved. The new battery will provide the necessary power for the CMOS memory to retain the settings accurately.
Upon restarting your computer, it is advisable to enter the BIOS setup utility to confirm that the correct date, time, and other settings are applied. Adjust any necessary settings and save the changes before exiting the BIOS. Your computer should now boot normally without the CMOS checksum error.
Replacing the CMOS battery is a relatively simple procedure, but it’s important to handle the battery with care and ensure proper compatibility with your motherboard. If you are unsure, consult your motherboard’s manual or seek assistance from a professional.
Update or Replace BIOS
If you have tried clearing the CMOS and replacing the CMOS battery but are still encountering a checksum error, the BIOS (Basic Input/Output System) may need to be updated or replaced. Outdated or corrupted BIOS can contribute to checksum errors. Here’s what you can do:
- Identify the current version of your BIOS: Before proceeding with any updates or replacements, it is essential to know the current version of your BIOS. You can usually find this information by entering the BIOS setup utility during computer startup or checking the manufacturer’s website or documentation.
- Check the manufacturer’s website for BIOS updates: Visit the website of your computer’s manufacturer or the motherboard manufacturer to check if there are any available BIOS updates. Download the appropriate update by following the instructions provided. It is crucial to select and install the correct BIOS version specific to your computer’s make and model.
- Follow the instructions for BIOS update: Carefully read the instructions provided with the BIOS update. Some updates may require specific procedures, such as creating a bootable USB drive or using a specific software tool. Follow the steps precisely to ensure a successful update.
- Backup your data: Before performing any BIOS update, it is recommended to backup your important data. Although rare, there is a small possibility that something may go wrong during the update process and result in data loss.
- Restart your computer and enter BIOS setup utility: After successfully updating the BIOS, restart your computer and enter the BIOS setup utility by pressing the appropriate key (often Del or F2) during startup. Verify that the BIOS version has been updated to the correct version.
- If updating the BIOS does not resolve the checksum error, you may need to consider replacing the BIOS chip itself. This option should be handled by professionals or authorized service centers, as it requires specialized equipment and expertise.
It is important to note that updating or replacing the BIOS carries some degree of risk, and if not done correctly, it can render your computer inoperable. Therefore, it is advisable to follow the manufacturer’s instructions precisely and to exercise caution when performing such procedures.
If you are unsure or uncomfortable with updating or replacing the BIOS, it is recommended to seek assistance from a professional or contact your computer manufacturer for support.
Check Hardware Connections
When encountering a CMOS checksum error, it is essential to check the hardware connections to ensure that they are properly set up. Loose or faulty connections can cause conflicts and result in checksum errors. Here are the steps you can take to check hardware connections:
- Power off your computer and unplug it from the power source.
- Open the computer case and carefully inspect the internal components, including cables, expansion cards, memory modules, and any other hardware connected to the motherboard.
- Make sure that all cables are securely connected to their respective ports. Firmly push them in to ensure a proper connection.
- If you recently added or removed any hardware components, double-check their compatibility with your system. Ensure that the new hardware is properly seated and connected according to the manufacturer’s instructions.
- If you have multiple memory modules, try reseating them one by one. Remove each module, clean the contacts with a soft cloth, and reinsert it firmly into the memory slot. Repeat this process for each module.
- If you have expansion cards, such as a graphics card or network card, ensure that they are securely seated in their respective slots.
- Inspect the CMOS battery and its connections. Ensure that the battery is correctly installed and making proper contact with the battery holder.
- Close the computer case, plug in the power cable, and start your computer to check if the CMOS checksum error persists.
If the hardware connections were the cause of the checksum error, ensuring proper connections should resolve the issue. However, if the problem persists, consider trying other solutions such as clearing the CMOS, replacing the CMOS battery, or updating the BIOS.
It is worth noting that improper handling of hardware components can cause damage. Always exercise caution when working inside your computer case and refer to the manufacturer’s instructions or seek professional assistance if you are unsure about any aspect of checking hardware connections.
By meticulously inspecting and securing the hardware connections, you can eliminate any potential problems relating to loose or incompatible components, minimizing the chances of a CMOS checksum error.
Reset BIOS to Default Settings
If you’re encountering a CMOS checksum error, resetting the BIOS to default settings can help resolve the issue. Resetting the BIOS will restore all settings to their default values, which can fix any incorrect configurations causing the checksum error. Follow these steps to reset the BIOS:
- Start by turning off your computer and unplugging it from the power source.
- Open your computer case to access the motherboard. Be cautious and take necessary precautions to prevent static discharge.
- Locate the CMOS jumper on the motherboard. It’s typically labeled as “CLR_CMOS,” “CLRPWD,” or similar. Refer to your motherboard’s manual if you’re unsure about the exact location.
- With your computer turned off and unplugged, carefully move the CMOS jumper from its default position (usually covering two pins) to the “clear” position (covering a different set of pins). The clear position may be labeled or indicated in the manual.
- Leave the CMOS jumper in the clear position for 10-15 seconds. This will discharge any residual power and reset the BIOS settings.
- Move the CMOS jumper back to its original position, covering the default set of pins.
- Close your computer case, plug in the power cable, and power on your computer.
- Upon restarting your computer, enter the BIOS setup utility by pressing the appropriate key (usually Del or F2) during startup. This key is typically mentioned on the screen during the boot process.
- Once in the BIOS setup utility, navigate to the option that allows you to reset the BIOS to default values. This option is often labeled as “Load Default Settings” or “Reset to Optimal Defaults.”
- Select the option to reset the BIOS to default settings and confirm your choice. Save the changes and exit the BIOS setup utility.
After resetting the BIOS to default settings, the incorrect checksum error should be resolved. Your computer will now boot with the default BIOS configuration, eliminating any incorrect settings that may have caused the issue.
Remember to reconfigure any customized settings in the BIOS, such as boot order or hardware profiles, to match your preferences after the reset. Also, ensure that the system date and time are correctly set.
Resetting the BIOS to default settings is a simple process, but it’s important to handle the CMOS jumper and BIOS settings with care. If you’re unsure or uncomfortable with this procedure, consult your motherboard’s manual or seek assistance from a professional technician.
Final Thoughts
A CMOS checksum error can be a frustrating issue to encounter, as it can prevent your computer from functioning properly. However, by understanding the causes and symptoms of a CMOS checksum error and following the appropriate troubleshooting steps, you can often resolve the issue and restore your computer’s functionality. Here are a few final thoughts to keep in mind:
First, it’s important to diagnose the root cause of the checksum error. Is it a weak CMOS battery? Does the BIOS need to be updated? Are there loose hardware connections? Identifying the underlying issue will help you apply the most appropriate solution.
Next, take precautionary measures when working on your computer’s hardware components. Ensure that you are grounded or using an antistatic strap to prevent static discharge, which can damage sensitive electronic components.
When attempting solutions like clearing the CMOS, replacing the CMOS battery, updating the BIOS, or checking hardware connections, always follow the manufacturer’s instructions carefully. Incorrectly performing these steps can cause further issues or potentially damage your computer.
Remember to back up your data before making any major changes to your computer, such as updating the BIOS. While the risk is low, there is always a small possibility of data loss.
If you are unsure or uncomfortable with the troubleshooting steps, it is always a good idea to consult the manufacturer’s documentation or seek assistance from a professional technician. They can provide further guidance and ensure the proper resolution of the CMOS checksum error.
By following these tips and taking the necessary actions, you can effectively resolve a CMOS checksum error and ensure the smooth operation of your computer. Remember that prevention is also important, so regularly checking and maintaining your computer’s CMOS settings and hardware components can help avoid future checksum errors.