
Why Change Screen Timeout on Mac?
The screen timeout setting on your Mac determines how long it takes for your screen to turn off or go into sleep mode when there is no activity. By default, Macs usually have a screen timeout of a few minutes, which can be convenient for most users. However, there are several reasons why you might want to change the screen timeout settings on your Mac.
Firstly, adjusting the screen timeout can help conserve battery life. If you are using a MacBook and frequently work unplugged, having a longer screen timeout can prevent unnecessary battery drain. By setting a longer timeout, you can ensure that your screen doesn’t turn off too quickly and interrupt your workflow.
Secondly, changing the screen timeout can enhance privacy and security. In certain situations, you may want to step away from your Mac temporarily without it automatically locking or going into sleep mode. By increasing the screen timeout, you can have more time to return to your Mac and resume your work without the need to enter your password or unlock the screen.
Furthermore, modifying the screen timeout can improve convenience and productivity. If you regularly refer to information on your screen, such as recipes, tutorials, or research material, you may find it annoying when the screen dims or turns off after a short period of inactivity. Increasing the screen timeout can give you ample time to read, follow instructions, or take notes without interruption.
Additionally, altering the screen timeout can be beneficial for multimedia purposes. Imagine watching a movie or a presentation and having the screen automatically turn off in the middle of it. By adjusting the screen timeout to a longer duration, you can enjoy uninterrupted viewing experiences without the need to constantly interact with your Mac to prevent the screen from dimming or turning off.
Method 1: Adjusting Screen Saver Settings
One way to change the screen timeout on your Mac is by adjusting the screen saver settings. Here’s how:
- Click on the Apple menu icon in the top-left corner of your screen and select “System Preferences” from the dropdown menu.
- In the System Preferences window, click on “Desktop & Screen Saver.”
- Next, navigate to the “Screen Saver” tab at the top of the window.
- On the left-hand side, you’ll find a list of screen saver options. Choose the one that you prefer.
- Below the screen saver preview, you will see a slider to adjust the “Start after” time. Slide it to the desired duration.
- You can also check the box for “Show with clock” if you want the clock to display while the screen saver is active.
- Close the System Preferences window, and the new screen saver settings will take effect immediately.
By adjusting the screen saver settings, you can effectively change the screen timeout on your Mac. Keep in mind that this method will only affect the screen timeout when the screen saver is active. If you prefer a longer screen timeout for general usage, you may need to explore other methods.
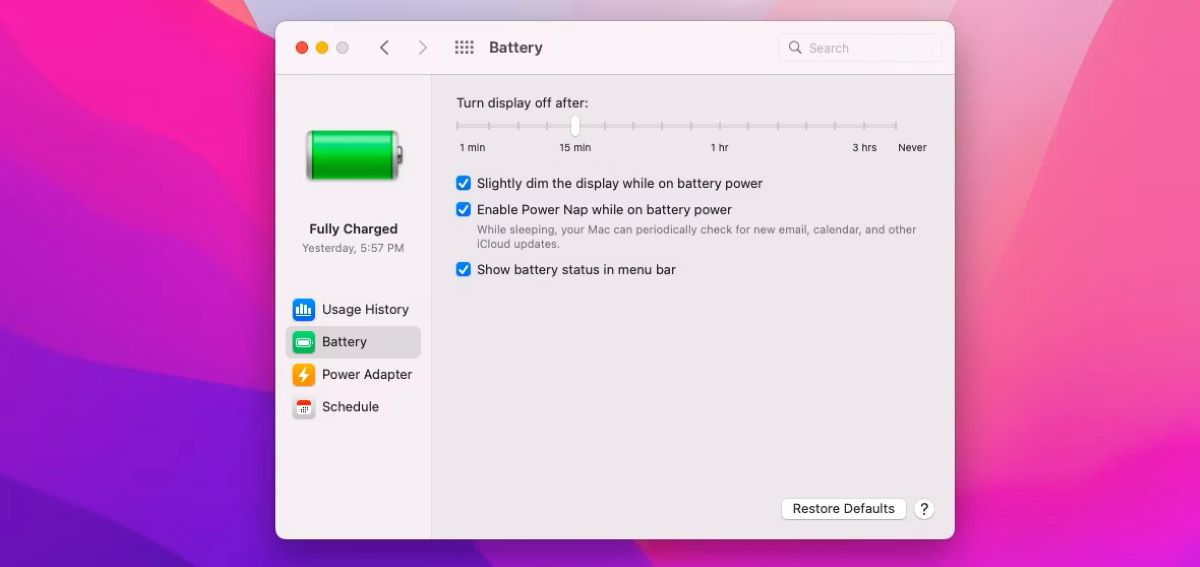
Method 2: Modifying Energy Saver Preferences
Another method to change the screen timeout on your Mac is by modifying the Energy Saver preferences. Follow these steps:
- Click on the Apple menu icon in the top-left corner of your screen and select “System Preferences” from the dropdown menu.
- In the System Preferences window, click on “Energy Saver.”
- Within the Energy Saver tab, you’ll see two options: “Battery” and “Power Adapter.” Click on the relevant option based on your current power source.
- There will be a slider for “Turn display off after” or “Computer sleep.” Adjust the slider to set the desired screen timeout.
- Beneath the slider, you can also customize other energy saving settings, such as when your Mac goes to sleep and how quickly the display turns off when idle.
- Once you have made the necessary adjustments, close the System Preferences window. Your new energy saver settings will be applied immediately.
By modifying the Energy Saver preferences, you can easily change the screen timeout on your Mac based on different power scenarios. Whether you’re using your Mac on battery power or connected to a power adapter, you have the flexibility to customize the screen timeout according to your preferences and needs.
Method 3: Using Terminal Commands
If you prefer a more advanced approach, you can change the screen timeout on your Mac using Terminal commands. Here’s how:
- Open the Terminal application on your Mac. You can find it by going to “Applications” > “Utilities” > “Terminal.”
- Once Terminal is open, type in the following command:
sudo pmset -a displaysleep value, replacingvaluewith the desired number of seconds for the screen timeout. - Press the “Enter” key on your keyboard and enter your administrator password when prompted.
- The screen timeout will be updated immediately based on the value you specified.
With Terminal commands, you have more control over the specific screen timeout duration by specifying the number of seconds. This method allows for more precise customization of the screen timeout on your Mac.
Before making changes using Terminal, please exercise caution and ensure that you enter the commands accurately. Terminal is a powerful tool, and any incorrect commands can potentially cause issues with your Mac. If you’re unsure or uncomfortable with using Terminal, it’s best to explore other methods.
Method 4: Utilizing Third-Party Apps
If you prefer a more user-friendly and intuitive way to change the screen timeout on your Mac, you can utilize third-party apps specifically designed for this purpose. These apps provide additional features and options for customizing the screen timeout to suit your needs. Here are a few popular options:
1. Amphetamine: Amphetamine is a powerful app that allows you to control the screen timeout and prevent your Mac from going to sleep. It offers various customizable settings, including options to keep your Mac awake while specific apps are running or when certain conditions are met.
2. Caffeine: Caffeine is a simple and lightweight app that sits in your menu bar, allowing you to quickly toggle the screen timeout on or off. With a single click, you can prevent your Mac from going to sleep temporarily, perfect for situations where you need to keep your screen active for extended periods.
3. KeepingYouAwake: KeepingYouAwake is another menu bar app that provides a straightforward solution to adjust the screen timeout. It offers different staying awake modes, such as for a specific duration, indefinitely until deactivated, or until the next restart.
4. Lungo: Lungo is a minimalistic app that provides an easy way to control the screen timeout. It lets you toggle the screen timeout on or off and offers additional features like preventing your Mac from dimming or entering sleep mode when specific apps are active.
By utilizing third-party apps, you can enjoy a more streamlined and personalized experience when changing the screen timeout on your Mac. These apps often offer additional features and customization options that go beyond the built-in settings, allowing you to have even more control over your screen timeout preferences.
Before installing any third-party app, make sure to read reviews, check compatibility, and ensure that the app comes from a trusted source to maintain the security and stability of your Mac.