
Why Change Screen Timeout on an iPhone?
The screen timeout is the period of inactivity after which the iPhone’s display turns off. By default, iPhones have a predetermined screen timeout setting to conserve battery life. However, there are various reasons why you might want to adjust the screen timeout on your iPhone.
Firstly, changing the screen timeout can help you customize your device to suit your personal preferences. You may find that the default setting is too short or too long for your needs. For example, if you frequently refer to a recipe while cooking, a longer screen timeout can prevent the screen from turning off while you are in the middle of the process.
Secondly, adjusting the screen timeout can improve the overall user experience. If you use your iPhone for activities that require prolonged periods of inactivity, such as reading or watching movies, a longer screen timeout can provide a seamless experience without the screen constantly turning off.
Moreover, changing the screen timeout can enhance the convenience and efficiency of using your iPhone. For instance, during a video call or when using navigation apps, a shorter screen timeout can help save battery power and prevent unnecessary interruptions while still ensuring that the screen does not stay on for too long when not in use.
Additionally, managing the screen timeout can be essential for privacy and security. If you frequently leave your iPhone unattended, a shorter screen timeout ensures that the device locks sooner, preventing unauthorized access to your personal information and protecting your sensitive data.
Lastly, adjusting the screen timeout can have a positive impact on battery life. If you find that your iPhone’s battery drains quickly, reducing the screen timeout can help conserve energy by turning off the display when not actively in use. This can prolong the battery life and enable you to use your iPhone for a longer duration without needing to recharge.
In summary, changing the screen timeout on your iPhone allows you to personalize your device, improve the user experience, enhance convenience and security, and optimize battery life. With various methods available to adjust the screen timeout, you can easily customize this setting to suit your specific needs and preferences.
Method 1: Changing Screen Timeout in Settings
Changing the screen timeout on your iPhone can be done easily through the device’s settings. Follow the steps below to adjust the screen timeout duration:
- Unlock your iPhone and open the “Settings” app from the home screen.
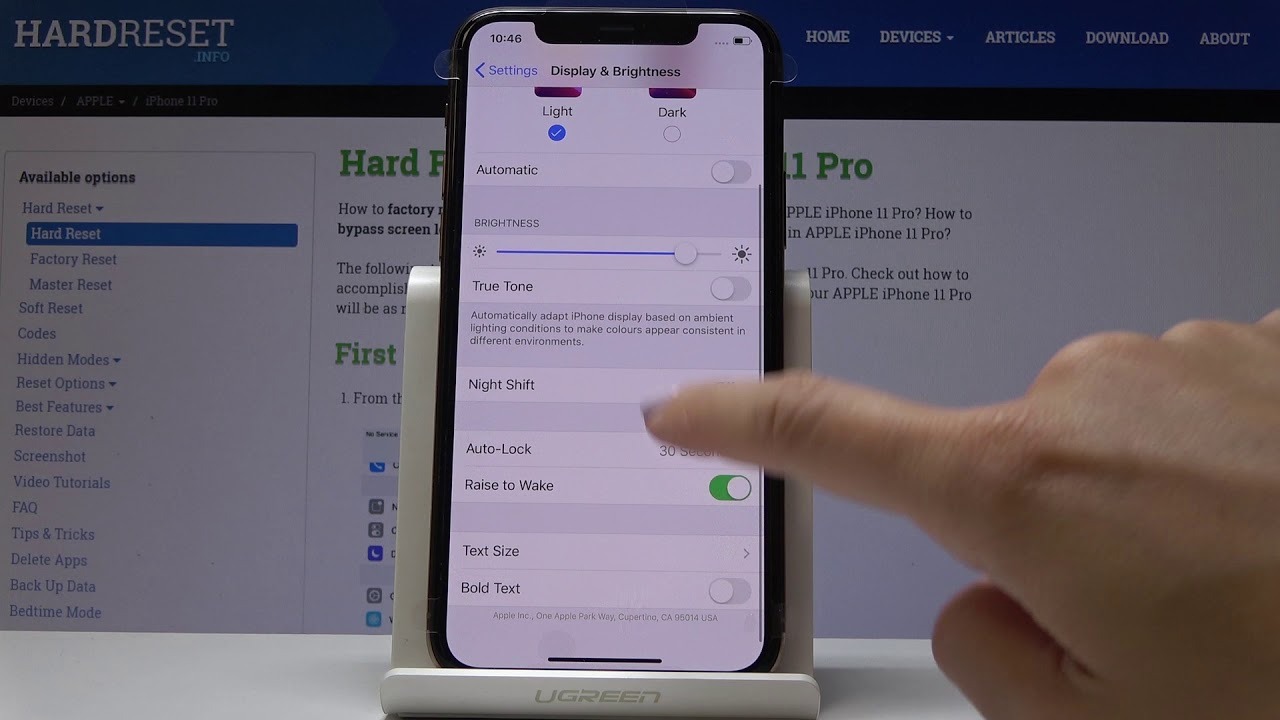
- Scroll down and tap on “Display & Brightness.”
- Under the “Display & Brightness” settings, you will find the “Auto-Lock” option. Tap on it.
- In the “Auto-Lock” menu, you will see a list of available timeout durations ranging from 30 seconds to 5 minutes. Tap on your preferred duration.
- Exit the Settings app, and the screen timeout will now be set to the duration you selected.
By following these simple steps, you can easily change the screen timeout duration to better suit your needs. Remember that a shorter screen timeout will help conserve battery life, while a longer timeout duration provides convenience for activities that require extended periods of inactivity.
It’s worth noting that the screen timeout setting in the “Display & Brightness” section affects the overall timeout duration across all apps and activities on your iPhone. However, some apps may have their own specific timeout settings, which may override the general duration set in the system settings. Therefore, it’s a good idea to check the settings within individual apps if you want to fine-tune the screen timeout for a particular application.
Additionally, keep in mind that regularly reviewing and adjusting your screen timeout settings can help ensure that your iPhone’s battery life is optimized and that the device remains convenient and secure for your use.
Method 2: Changing Screen Timeout through Control Center
Another convenient way to adjust the screen timeout on your iPhone is through the Control Center. The Control Center provides quick access to various settings, including screen brightness and timeout. Here’s how you can change the screen timeout using the Control Center:
- Swipe up from the bottom of your iPhone’s screen to open the Control Center.
- Look for the brightness slider at the top of the Control Center.
- Tap and hold your finger on the brightness slider to expand it.
- Below the brightness slider, you will find the screen timeout options represented by icons. Tap on the icon that corresponds to your preferred timeout duration.
- The selection will be applied immediately, and your screen timeout will be adjusted accordingly.
This method provides a quick and intuitive way to change the screen timeout duration without navigating through multiple settings menus. It is particularly useful when you need to make temporary adjustments to the timeout duration, such as during specific activities or situations.
As with the previous method, it’s important to remember that the screen timeout set in the Control Center will apply across all apps and activities on your iPhone. However, some apps may have their own individual timeout settings that can override the general duration set in the Control Center or system settings. Therefore, if you need to customize the screen timeout for certain apps, it’s recommended to check the settings within those respective applications.
By utilizing the Control Center to change the screen timeout duration, you can easily adapt the timeout settings to match your specific needs and preferences. Whether you require a shorter or longer duration, this method provides a convenient solution to manage the screen timeout on your iPhone.
Method 3: Changing Screen Timeout with Siri
If you prefer a hands-free approach, you can use Siri, Apple’s virtual assistant, to change the screen timeout on your iPhone. Here’s how you can adjust the screen timeout using Siri:
- Activate Siri by pressing and holding the home button or saying “Hey Siri” if it is enabled on your device.
- Once Siri is activated, say a command like “Change screen timeout” or “Set screen timeout to [desired duration].” Siri will then process your request.
- Siri will confirm the changes made to the screen timeout duration, and the new setting will take effect immediately.
Using Siri to change the screen timeout provides a convenient and hands-free option, especially if you are unable to physically interact with your iPhone at the moment. It can be particularly useful in situations where you have your hands full or when you are driving and need to make a quick adjustment.
It’s important to note that Siri is capable of understanding natural language commands, so you can phrase your request in various ways. For example, you can say, “Make the screen timeout shorter” or “Increase the screen timeout duration by 1 minute.” Siri will interpret your instructions accordingly and make the necessary changes.
However, ensure that you have a stable internet connection when using Siri, as it relies on online servers to process commands. Additionally, keep in mind that Siri is only available on compatible iPhone models and requires prior setup and activation.
By using Siri to change the screen timeout, you can easily adjust the setting without the need to navigate through menus or physically interact with your device. It provides a convenient and efficient way to customize the screen timeout duration to your liking.
Method 4: Changing Screen Timeout through Accessibility Settings
For users who require additional accessibility features, the iPhone offers the option to change the screen timeout duration through the Accessibility settings. This method provides an alternative way to modify the screen timeout and cater to specific accessibility needs. Here’s how you can change the screen timeout through the Accessibility settings:
- Unlock your iPhone and open the “Settings” app.
- Scroll down and tap on “Accessibility.”
- In the Accessibility settings, tap on “Display & Text Size.”
- Under the Display & Text Size section, look for the “Auto-Lock” option and tap on it.
- Choose your preferred screen timeout duration from the available options.
- Exit the settings, and your screen timeout will be set according to your selection.
This method is particularly useful for individuals who may require longer periods of time to complete tasks or navigate through content due to accessibility needs. By adjusting the screen timeout duration through Accessibility settings, you can ensure that the device remains responsive and accessible for extended periods without prematurely timing out.
Additionally, the Accessibility settings provide various other options to customize the display and interaction experience on your iPhone. It’s worth exploring these features to take full advantage of the accessibility enhancements available.
Keep in mind that changing the screen timeout through the Accessibility settings will apply to all apps and activities on your iPhone. However, some apps might have their own timeout settings that can override the general duration set in the system or Accessibility settings. Hence, it’s recommended to check individual app settings if you want to configure the screen timeout for specific applications.
By utilizing the Accessibility settings to modify the screen timeout duration, individuals with specific accessibility requirements can tailor their iPhone experience to accommodate their needs, ensuring a more inclusive and user-friendly device.
Method 5: Changing Screen Timeout with Guided Access
The Guided Access feature on the iPhone allows users to lock their device to a specific app and customize various settings, including the screen timeout duration. If you want to have more control over the screen timeout while using a specific app, Guided Access is the ideal method for you. Here’s how you can change the screen timeout with Guided Access:
- Open the app you want to use with Guided Access enabled.
- Triple-click the home button (or the side button on newer models) to activate Guided Access.
- The Guided Access screen will appear. Tap on “Options” at the bottom left corner.
- In the Options menu, locate the “Time Limit” section.
- Tap on “Time Limit” and choose your desired screen timeout duration from the available options.
- Tap on “Done” to confirm the changes and start Guided Access with the adjusted screen timeout.
Guided Access will lock your iPhone to the selected app and keep it active until the specified screen timeout duration is reached. This is especially useful if you need to use a specific app for an extended period without interruptions or distractions.
It’s worth noting that Guided Access also allows you to disable certain areas of the screen and restrict touch input to specific sections. This can be helpful if you want to limit interactions within the app or block certain buttons or controls.
To exit Guided Access mode, triple-click the home button (or the side button on newer models), enter your passcode, and then tap on “End” at the top-left corner of the screen. Alternatively, you can use Touch ID or Face ID to exit Guided Access if they are enabled on your iPhone.
By utilizing the Guided Access feature and adjusting the screen timeout duration within it, you can have greater control over the screen timeout while using specific apps on your iPhone. This method ensures a focused and uninterrupted experience tailored to your needs.
Additional Tips for Managing Screen Timeout on an iPhone
Managing the screen timeout on your iPhone effectively can enhance your user experience and optimize battery life. Here are some additional tips to consider for better control over the screen timeout settings:
- Use the “Low Power Mode”: Enabling the Low Power Mode on your iPhone automatically reduces the screen timeout duration to conserve battery power. This feature can be particularly useful when your battery is running low, and you need to extend its life.
- Take advantage of app-specific settings: Some apps have their own screen timeout settings that override the system default. Explore the settings within individual apps to customize the timeout according to your preferences.
- Utilize the “Do Not Disturb” mode: Enabling the Do Not Disturb mode temporarily disables incoming calls and notifications, preventing them from interrupting your activities. This can be useful for uninterrupted usage during a fixed period, such as watching a movie or attending a meeting.
- Consider third-party apps: There are a variety of third-party apps available in the App Store that offer additional customization options for screen timeout settings. These apps provide more flexibility in controlling screen timeout durations and offer advanced features that go beyond the default settings.
- Regularly review and adjust settings: As your usage patterns and needs change, periodically review and adjust your screen timeout settings to ensure they align with your current requirements. This can help maintain optimal battery life and provide an enhanced user experience.
Remember that the screen timeout settings on your iPhone play a crucial role in balancing battery life and convenience. By making conscious choices and utilizing the available options, you can fine-tune the screen timeout to best suit your preferences and usage patterns.
Experiment with different durations and settings to find the ideal balance between conserving battery power and ensuring a seamless user experience. Implementing these tips will help you effectively manage the screen timeout on your iPhone and make the most out of your device.