
Enable Page Numbers in Google Docs
Page numbers are a crucial element in organizing and referencing your documents in Google Docs. They help readers navigate through the content and provide a professional touch to your work. Luckily, enabling page numbers in Google Docs is a simple process. Follow the steps below to get started:
- Open your Google Docs document
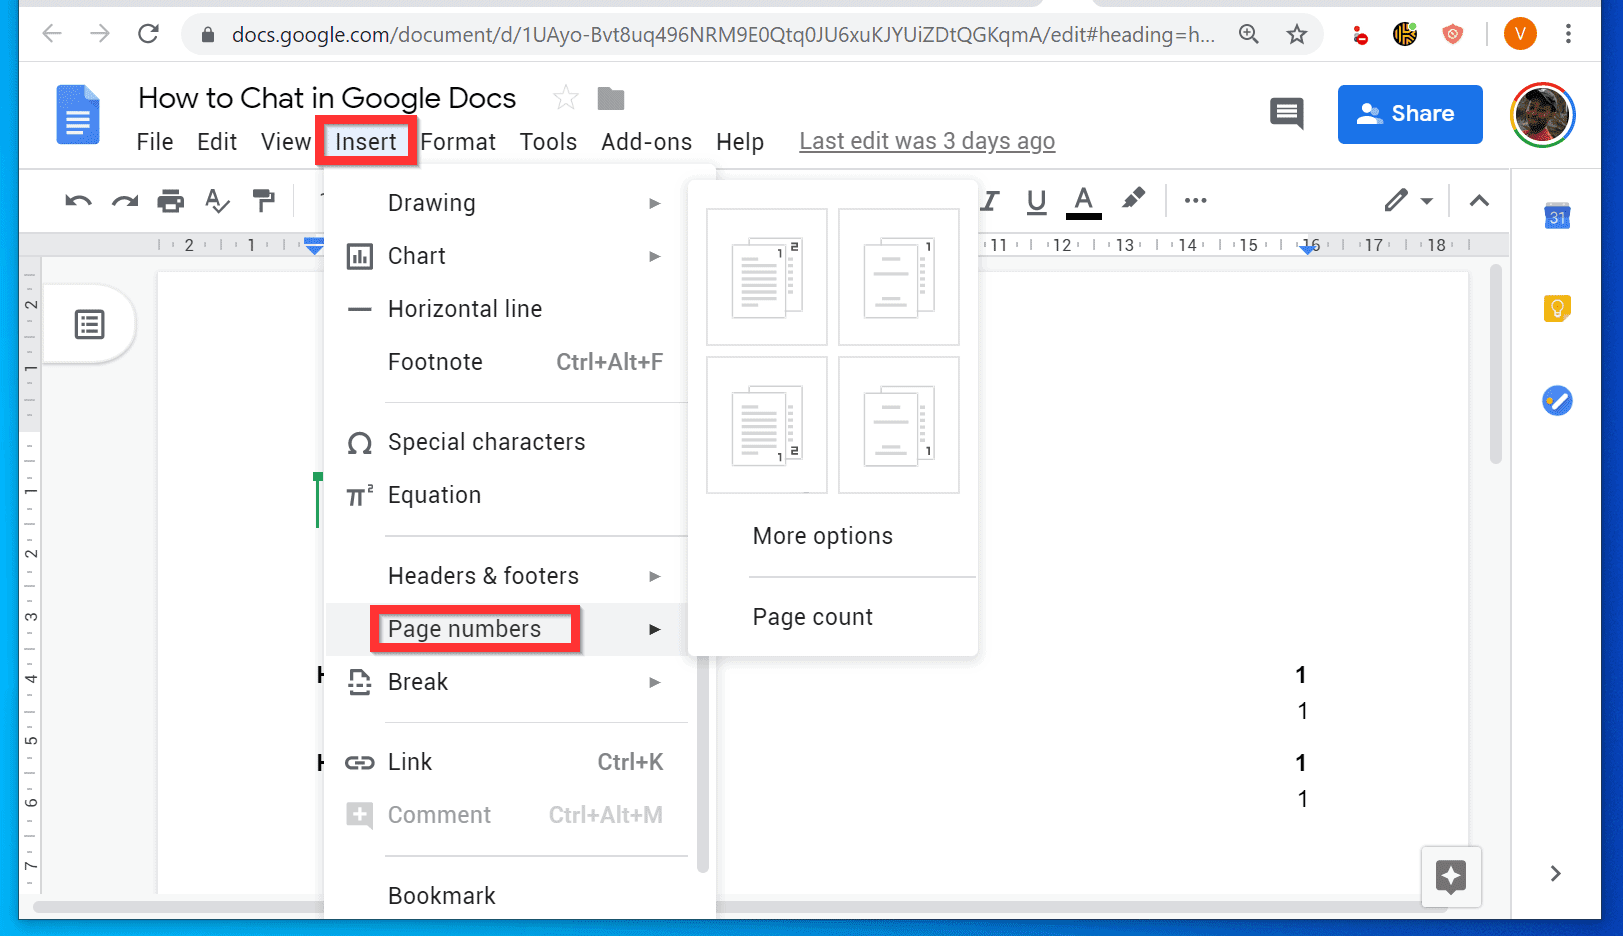
- Click on the “Insert” tab in the menu
- Select “Page numbers” from the drop-down menu
- A pop-up window will appear with various options for you to customize the placement and formatting of the page numbers
- Choose the desired location for your page numbers, such as at the top or bottom of the page
- You can also choose to display the page numbers on the first page of your document or exclude them from the first few pages if needed
- Click on the “Apply” button to insert the page numbers into your document
Once you have enabled page numbers, they will be added to every page in your document. You can easily update the page numbers if you make any changes to the document’s structure, such as adding or removing pages.
This feature is especially useful when working on longer documents, such as reports, theses, or manuscripts. With page numbers, you can refer to specific sections or provide citations accurately.
By enabling page numbers in Google Docs, you enhance the professionalism and organization of your work, ensuring ease of navigation for readers. Now that you have added page numbers to your document, let’s explore how you can customize their format to suit your preferences in the next section.
Insert Page Numbers in Google Docs
Inserting page numbers in Google Docs is a straightforward process that allows you to easily add sequential numbers to your document. Follow the steps below to insert page numbers:
- Open your Google Docs document
- Click on the “Insert” tab in the menu
- Select “Page numbers” from the drop-down menu
- A pop-up window will appear with various options for customizing the placement and formatting of the page numbers
- Choose the desired location for your page numbers, such as top or bottom of the page
- Decide whether you want to display the page numbers on the first page or exclude them from certain pages
- Click “Apply” to insert the page numbers into your document
Once inserted, the page numbers will automatically appear on every page of your document, keeping them organized and easy to reference. If you make any changes to the structure of your document, such as adding or removing pages, the page numbers will adjust accordingly.
Page numbers are particularly useful when working on lengthy documents or collaborating with others. They provide a consistent way to navigate through the content and ensure that readers can easily find specific sections or references.
Now that you’ve learned how to insert page numbers in Google Docs, let’s explore how you can customize the format of the page numbers to suit your needs in the next section.
Customize Page Number Format in Google Docs
Google Docs provides various options to customize the format of page numbers to match your preferences or document requirements. These customization options allow you to change the appearance, style, and position of the page numbers. Follow the steps below to customize the page number format:
- Open your Google Docs document
- Click on the “Insert” tab in the menu
- Select “Page numbers” from the drop-down menu
- In the pop-up window, you’ll find options to personalize the format of the page numbers
- Choose the desired format, such as Arabic numerals (1, 2, 3), Roman numerals (I, II, III), or letters (A, B, C)
- You can also select the starting page number and the numbering style, such as “1, 2, 3” or “01, 02, 03”
- Additionally, you can customize the alignment of the page numbers, such as left, center, or right
- Once you’ve made your selections, click “Apply” to update the page numbers in your document
By customizing the page number format, you can create a professional-looking document tailored to your specific needs or style preferences. For example, if you’re working on a manuscript, you may choose to use Roman numerals for the preliminary pages and switch to Arabic numerals for the main content.
Remember that any changes you make to the page number format will be applied to all pages of your document. If you need to modify the format on specific pages or sections, you can utilize the “Insert and Customize Page Numbers in Headers and Footers” section, which we’ll explore next.
Insert and Customize Page Numbers in Headers and Footers
In addition to inserting page numbers directly into the content of your document, Google Docs allows you to add page numbers in the headers or footers. This gives you more control over the position and appearance of the page numbers. Here’s how you can insert and customize page numbers in headers and footers:
- Open your Google Docs document
- Click on the “Insert” tab in the menu
- Select “Header” or “Footer” from the drop-down menu
- Choose the desired placement for the header or footer, such as top or bottom of the page
- Click on the “Insert” tab that appears within the header or footer area
- Select “Page numbers” from the drop-down menu
- A pop-up window will appear with options to customize the page number format
- Make your selections for the numbering style, starting page number, and alignment
- Click “Apply” to insert and customize the page numbers in the header or footer
Customizing the page numbers in headers or footers allows for greater flexibility in designing your document. You can choose to include additional elements alongside the page numbers, such as document title or author information, making it more personalized and professional.
Remember to consider the readability of the headers and footers in your document’s layout. Make sure the page numbers and any accompanying text are easily visible and do not disrupt the overall readability of the content.
Now that you’ve learned how to insert and customize page numbers in headers and footers, let’s explore how to remove page numbers from specific pages in the next section.
Remove Page Numbers from Specific Pages in Google Docs
Sometimes, you may need to remove page numbers from specific pages in your Google Docs document. This can be useful in scenarios where you want certain pages, such as the cover page or table of contents, to be free of page numbers. Here’s how you can remove page numbers from specific pages:
- Open your Google Docs document
- Navigate to the page from which you want to remove the page number
- Click on the “Insert” tab in the menu
- Select “Page numbers” from the drop-down menu
- In the pop-up window, deselect the checkbox next to “Show on first page”
- If you have multiple pages without page numbers, select “Show on first page” only on the first page where you want to display page numbers
- Click “Apply” to update the page number settings
By removing page numbers from specific pages, you can ensure that they do not interfere with the overall layout or aesthetics of your document. This feature is especially useful when you want to create a professional cover page or introduction section without any distractions.
Remember that removing page numbers from certain pages will not affect the numbering sequence on the other pages. If you decide to reinsert page numbers on subsequent pages, they will continue from where they left off.
Now that you know how to remove page numbers from specific pages, let’s explore how to add page numbers to specific sections in the next section.
Add Page Numbers to Specific Sections in Google Docs
In some cases, you may want to add page numbers to specific sections within your Google Docs document. This can be helpful when you have multiple chapters or sections that require independent numbering. Here’s how you can add page numbers to specific sections:
- Open your Google Docs document
- Select the section where you want to add page numbers
- Click on the “Insert” tab in the menu
- Select “Break” from the drop-down menu
- Choose “Next page” or “Continuous” depending on the desired style of the section break
- Navigate to the section where you want to add page numbers
- Click on the “Insert” tab again
- Select “Page numbers” from the drop-down menu
- In the pop-up window, choose the desired page number format and alignment
- Click “Apply” to insert page numbers for the specific section
By adding page numbers to specific sections, you can create a more organized and structured document. This is particularly beneficial for lengthy reports, theses, or manuscripts where each section may require its own numbering.
Additionally, you have the flexibility to customize the format of the page numbers for each section independently. For instance, you may choose to use Roman numerals for the introduction and Arabic numerals for the main body of the document.
Now that you know how to add page numbers to specific sections, let’s move on to the troubleshooting section, where we’ll address common page number issues and how to resolve them.
Troubleshooting Page Number Issues in Google Docs
While adding page numbers to your Google Docs document is usually a seamless process, you may encounter some common issues. Here are a few troubleshooting tips to help you resolve page number issues:
1. Page numbers not updating: If you have made changes to the structure of your document, such as adding or deleting pages, page numbers may not automatically update. To fix this issue, go to the “Insert” tab, select “Page numbers,” and click “Apply” to refresh the page numbers.
2. Incorrect page numbering sequence: If your page numbers are not following the desired sequence, make sure to check if any section breaks or continuous breaks have been inserted. Adjust or remove these breaks if necessary to ensure proper page numbering.
3. Missing page numbers: If certain pages are missing page numbers or if page numbers are not displayed consistently throughout the document, try inserting page numbers again by going to the “Insert” tab and selecting “Page numbers.” Ensure that the correct settings are applied to all pages.
4. Formatting issues: If the format of the page numbers does not match your preferences, modify the settings by clicking on the “Insert” tab, selecting “Page numbers,” and adjusting the format, alignment, and starting page number options. Click “Apply” to update the page number formatting.
5. Header and footer conflicts: If you encounter conflicts between header/footer content and page numbers, carefully adjust the positioning of these elements to avoid overlapping or obscuring the page numbers. You can adjust the margins of the header/footer or resize the content to ensure it doesn’t interfere with the page numbers.
By addressing these common troubleshooting issues, you can resolve page number problems and ensure your document is properly paginated and formatted.
Now that you have learned how to troubleshoot page number issues, you are well-equipped to manage and customize page numbers in your Google Docs document. Use this knowledge to enhance the professionalism and navigability of your work.