
Changing the Default Font
When working with Google Docs, you may find yourself needing to change the default font to suit your preferences or to adhere to specific formatting requirements. Fortunately, Google Docs offers a simple method to modify the default font settings.
To change the default font in Google Docs:
- Open your Google Docs document.
- Click on the “Format” menu at the top of the screen.
- Select “Paragraph styles” and then click on “Normal text” from the drop-down list.
- In the right panel, click on the font drop-down menu under “Text,” where you will see the currently selected font.
- Choose the desired font from the list of available options.
- As soon as you select a new font, the changes will be applied to the entire document.
This allows you to set a specific font as the default for all future documents, saving you time and effort by eliminating the need to manually change the font every time you begin a new project.
It is important to note that changing the default font will only affect new documents or documents that do not have existing text formatting. If you have already applied formatting to your text, you will need to adjust the font settings within the document itself.
By customizing the default font in Google Docs, you can ensure a consistent and professional appearance across all of your documents. Whether you prefer a sleek and modern font or a more traditional and elegant style, Google Docs allows you to tailor the default font to your personal or professional requirements.
Adjusting the Margins and Indentation
Properly formatting the margins and indentation in your Google Docs document can greatly enhance its readability and visual appeal. Whether you need to meet specific formatting requirements or simply want to improve the overall look of your document, Google Docs provides a straightforward way to adjust these settings.
To adjust the margins and indentation in Google Docs:
- Open your Google Docs document.
- Click on the “File” menu at the top of the screen.
- Select “Page setup” from the dropdown menu.
- In the “Page setup” dialog box, you will see options for adjusting the top, bottom, left, and right margins of your document.
- Enter the desired margin values in the corresponding fields.
- Additionally, you can adjust the indentation of your paragraphs by selecting the “Indents and spacing” tab in the “Page setup” dialog box.
- Under the “Indents” section, you can set the indentation for the first line and subsequent lines of paragraphs.
- Once you have made the desired adjustments, click the “OK” button to apply the changes to your document.
By customizing the margins and indentation, you can create a visually pleasing layout that suits your specific needs. Whether you prefer narrower margins for a concise and professional look or wider margins for a more open and spacious feel, Google Docs allows you to configure the settings to match your preferences.
Remember that adjusting the margins and indentation will affect the entire document. Therefore, it is essential to review the changes and ensure they align with the desired formatting before finalizing your document.
Whether you are working on a professional report, an academic paper, or any other type of document, paying attention to the margins and indentation can make a significant difference in its overall presentation. With the flexibility provided by Google Docs, you can effortlessly adjust these aspects to create visually appealing and well-structured documents.
Modifying Line Spacing
The line spacing in a document plays a crucial role in its readability and organization. Google Docs allows you to easily modify the line spacing to ensure your document looks polished and professional. Whether you need to adjust the line spacing for a specific section or throughout the entire document, Google Docs provides a user-friendly method to meet your requirements.
To modify the line spacing in Google Docs:
- Open your Google Docs document.
- Select the text that you want to modify the line spacing for. To apply the changes to the entire document, press “Ctrl + A” (or “Command + A” on a Mac) to select all the text.
- Click on the “Format” menu at the top of the screen.
- Select “Line spacing” from the dropdown menu.
- A submenu will appear with several options for line spacing, such as single, 1.15, 1.5, and double. You can also choose “Custom spacing” to enter a specific line spacing value.
- Select the desired line spacing option.
- The changes will be immediately applied to the selected text or the entire document.
By adjusting the line spacing, you can create a more visually appealing and readable document. Increasing the line spacing can improve readability, especially for those with visual impairments or when dealing with dense text. On the other hand, reducing the line spacing can help fit more content on a page or create a more compact layout.
Keep in mind that modifying the line spacing will only affect the selected text or the entire document if you have selected all the text. If you want to change the line spacing for specific sections, make sure to select the relevant text before applying the changes.
With Google Docs, you have the freedom to customize the line spacing to match your desired style and formatting preferences. Experiment with different options to find the line spacing that enhances the readability and visual appeal of your document.
Updating the Default Style for Headings
Headings are an essential element of document structure and organization. In Google Docs, you can customize the default style for headings to maintain consistency and ensure a cohesive look throughout your documents. By updating the default style, you can save time and effort by automatically applying the desired formatting to all future headings you create.
To update the default style for headings in Google Docs:
- Open your Google Docs document.
- Select a heading in your document or create a new one by typing the desired heading text.
- Format the heading’s font type, size, color, and any other formatting you want to apply.
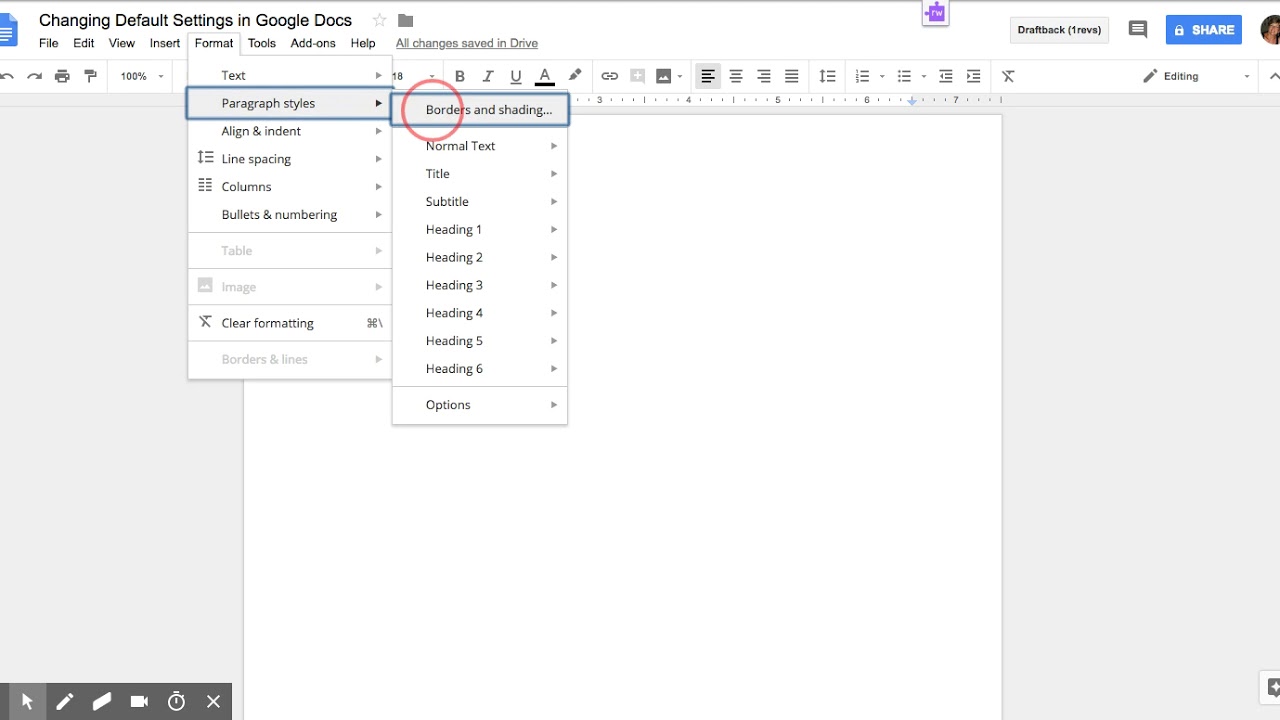
- With the formatted heading selected, click on the “Format” menu at the top of the screen.
- Hover over the “Paragraph styles” option.
- Click on the arrow icon next to “Normal text” to expand the style options.
- Scroll down and select “Update ‘Heading 1’ to match.”
By updating the default style for headings, any new headings you create will automatically inherit the formatting you specified. This feature allows you to maintain a consistent visual hierarchy and style throughout your document.
It is important to note that updating the default style for headings will not affect the formatting of existing headings in your document. To apply the new style to existing headings, you will need to update them manually by selecting the text and applying the appropriate heading style.
Customizing the default style for headings in Google Docs provides a cohesive and professional look to your documents. It helps readers navigate and understand the content more easily and ensures a consistent visual representation of different sections throughout your work.
Setting the Default Alignment and Justification
The alignment and justification of text in a document not only affect its visual appeal but also impact its readability. Google Docs offers various alignment and justification options to help you create a well-organized and professional-looking document. By setting the default alignment and justification, you can ensure consistent formatting throughout your work.
To set the default alignment and justification in Google Docs:
- Open your Google Docs document.
- Click on the “Format” menu at the top of the screen.
- Select “Paragraph styles” and then click on “Normal text” from the drop-down list.
- In the right panel, click on the alignment and justification icons located above the font options.
- Choose the desired alignment and justification options from the available choices, such as left, center, right, or justified.
- As soon as you select the desired options, the changes will be applied to the entire document.
By setting the default alignment and justification, your text will automatically adhere to the specified formatting when you create new paragraphs or sections. This not only saves time but also creates a consistent visual structure throughout your document.
Keep in mind that setting the default alignment and justification will apply to new text you type or paste into your document. If you have existing text with different alignment or justification, you will need to select the text and manually change the formatting options.
The ability to customize the default alignment and justification in Google Docs allows you to enhance the readability and aesthetics of your document. Whether you prefer a left-aligned, centered, or justified layout, setting the default options ensures that all new text you add will adhere to the desired formatting, resulting in a polished and professional document.
Changing the Default Bulleted and Numbered List Formatting
Bulleted and numbered lists are valuable tools for organizing information and presenting it in a clear and structured manner. In Google Docs, you have the flexibility to customize the default formatting of these lists, allowing you to create visually appealing and consistent documents with ease. By changing the default bulleted and numbered list formatting, you can save time and ensure that all future lists adhere to your preferred style.
To change the default bulleted and numbered list formatting in Google Docs:
- Open your Google Docs document.
- On an existing bulleted or numbered list, format it according to your desired style. This may include changes such as altering the bullet or number style, adjusting the indentation, or modifying the font properties.
- With the formatted list selected, click on the “Format” menu at the top of the screen.
- Hover over the “Bullets and numbering” option.
- Click on the arrow icon next to “Bulleted list” or “Numbered list” to expand the list style options.
- Scroll down and select “Reset to default style.”
By changing the default bulleted and numbered list formatting, any new lists you create in your document will inherit the style and formatting you specified. This allows you to maintain consistency and visual harmony throughout your document.
It is important to note that changing the default list formatting will not affect existing lists in your document. To apply the new formatting to existing lists, you will need to manually adjust their styles by selecting the list and utilizing the appropriate list formatting options.
Customizing the default bulleted and numbered list formatting in Google Docs provides you with the flexibility to present information in a visually appealing and organized manner. By tailoring the style and formatting of lists to match your preferences, you can create professional-looking documents that effectively convey information to your audience.
Adjusting the Default Page Size and Orientation
The page size and orientation of a document can significantly impact its layout and overall presentation. Whether you need to create documents with specific dimensions or switch between portrait and landscape orientations, Google Docs offers a convenient way to adjust the default page size and orientation settings.
To adjust the default page size and orientation in Google Docs:
- Open your Google Docs document.
- Click on the “File” menu at the top of the screen.
- Select “Page setup” from the dropdown menu.
- In the “Page setup” dialog box, you will find options to modify the page size and orientation.
- Choose the desired page size from the available options or enter custom dimensions.
- Select the preferred orientation, either portrait or landscape.
- Click the “OK” button to apply the changes to your document.
By adjusting the default page size and orientation, you can ensure that all new documents you create adhere to your preferred settings. Whether you need to create standard letter-sized documents or specific dimensions for brochures or posters, Google Docs allows you to customize the page size to meet your requirements.
Additionally, choosing the right orientation can greatly enhance the readability and layout of your document. Landscape orientation is suitable for documents with wide tables, charts, or images, while portrait orientation is ideal for most standard documents.
Remember that adjusting the default page size and orientation will only affect new documents or documents that you have not already modified. If you need to apply these changes to an existing document, make sure to adjust the settings from within the document itself.
With Google Docs, you have the flexibility to tailor the page size and orientation of your documents, allowing you to create visually pleasing and professionally formatted content for any purpose.
Modifying the Default Header and Footer
The header and footer sections in a document provide valuable space to include important information such as page numbers, document titles, or author names. In Google Docs, you can easily modify the default header and footer settings to personalize and customize your documents.
To modify the default header and footer in Google Docs:
- Open your Google Docs document.
- Click on the “Insert” menu at the top of the screen.
- Select “Header & page number” if you want to modify the header or “Footer & page number” if you want to modify the footer.
- Choose one of the pre-designed header or footer options provided, or click on “Edit header” or “Edit footer” to customize it further.
- Once in the editing mode, you can add text, insert images, adjust font styles and sizes, or include dynamic elements like page numbers or document information.
- Make the desired modifications to the header or footer.
- Click outside the header or footer area to exit the editing mode.
By modifying the default header and footer, you can add a personal touch, include necessary information, or align your document with specific formatting requirements. This customization feature allows you to convey vital details or branding elements consistently throughout your document.
If you want to remove the header or footer entirely, you can do so by accessing the “Header & page number” or “Footer & page number” options under the “Insert” menu and selecting the “None” option.
It is important to note that modifying the default header and footer settings will only apply to new documents or documents without existing header and footer content. If you need to modify the header and footer in an existing document, make sure to do so within the document itself.
With Google Docs, you have full control to modify the default header and footer, allowing you to tailor your documents to suit your specific needs. Whether you want to indicate document properties, add branding elements, or incorporate necessary information, customizing the header and footer enhances the professionalism and utility of your documents.
Changing the Default Text Color and Highlighting
Text color and highlighting can play a significant role in emphasizing important information and improving the visual appeal of your document. With Google Docs, you have the flexibility to customize the default text color and highlighting settings to match your preferences or adhere to specific formatting guidelines.
To change the default text color and highlighting in Google Docs:
- Open your Google Docs document.
- Select a portion of text or create new text with the desired formatting.
- Click on the “Text color” button or the “Text highlight color” button in the toolbar at the top of the screen.
- Select the desired color from the color palette.
- The selected text will now have the new default text color or highlighting.
By changing the default text color and highlighting, you can establish a consistent style throughout your document. Whether you prefer a traditional black font for a formal document or a vibrant color for a creative project, Google Docs allows you to customize the default text color to suit your needs.
It is essential to keep in mind that changing the default text color and highlighting will only apply to new text that you type or paste into your document. If you want to update the color and highlighting of existing text, you will need to select the text and manually apply the desired formatting.
With Google Docs, you have the freedom to personalize the default text color and highlighting, enabling you to create visually engaging and expressive documents that captivate your readers.
Updating the Default Link Formatting
Hyperlinks are essential for connecting different parts of your document or providing references to external sources. Google Docs allows you to customize the default formatting of links, ensuring that they stand out and are easily recognizable to readers. By updating the default link formatting, you can create visually appealing and consistent documents.
To update the default link formatting in Google Docs:
- Open your Google Docs document.
- Select an existing link or create a new one by typing the desired text and adding the appropriate URL.
- Format the link by changing the font color, style, or underlining as desired.
- With the formatted link selected, right-click on it, and choose “Link” from the context menu.
- In the “Link” dialog box, you can further customize the link settings, such as opening the link in a new window or applying a specific title to the link.
- Click the “Apply” button to save the changes and update the default link formatting.
By updating the default link formatting, any new links you create will automatically inherit the style and formatting you specified. This allows for consistent and visually appealing links throughout your document.
It’s important to note that updating the default link formatting only affects new links added to your document. Existing links will not be automatically updated. To apply the new formatting to existing links, you will need to select and modify them manually.
Customizing the default link formatting in Google Docs allows you to highlight and differentiate links within your document. By utilizing different colors, styles, or underlines, you can ensure that your links are visible, easily identifiable, and improve the overall navigation and user experience within your document.