
Tools and Materials Needed
Before embarking on the disassembly of your Motorola Razr M, it's essential to gather the necessary tools and materials to ensure a smooth and efficient process. Here's a comprehensive list of what you'll need:
Tools:
- Precision Screwdriver Set: A set of precision screwdrivers with various head types and sizes is crucial for removing the tiny screws that secure the internal components of the Razr M.
- Plastic Opening Tools: These non-conductive and non-marring tools are essential for prying open the back cover and separating delicate components without causing damage.
- Spudger: A spudger, or a plastic opening tool, is useful for disconnecting ribbon cables and releasing connectors without risking electrical damage.
- Tweezers: Fine-pointed tweezers are indispensable for handling small screws and components with precision.
- Suction Cup: A suction cup can aid in lifting the display assembly without damaging the screen or the surrounding frame.
- Heat Gun or Hair Dryer: In some cases, applying heat to the adhesive securing the display assembly can facilitate its removal without causing damage.
Materials:
- Replacement Parts: If you're disassembling the Razr M for repair or maintenance, it's advisable to have replacement parts on hand, such as a new battery, camera module, or charging port, depending on the specific purpose of the disassembly.
- Adhesive Strips: If you intend to reassemble the device after the disassembly, having adhesive strips or adhesive glue specially designed for smartphones can help secure components back in place.
- Cleaning Cloth and Isopropyl Alcohol: Keeping a clean work environment is essential, and having a microfiber cleaning cloth and isopropyl alcohol can help remove any dust, fingerprints, or adhesive residue from the internal components and the device's exterior.
By ensuring that you have all the necessary tools and materials at your disposal, you can proceed with confidence, knowing that you're well-equipped to handle the disassembly process effectively and safely.
Removing the Back Cover
Removing the back cover of the Motorola Razr M is the initial step in gaining access to its internal components. This process requires precision and care to avoid damaging the delicate components housed beneath the cover. Here's a detailed guide on how to safely remove the back cover:
-
Power Off the Device: Before starting the disassembly process, ensure that the Razr M is powered off to prevent any potential electrical hazards.
-
Locate the Notch: The back cover of the Razr M is secured by clips along the edges. Begin by locating the small notch or groove along the seam between the back cover and the main body of the device.
-
Use a Plastic Opening Tool: Insert a plastic opening tool or a spudger into the notch to gently pry the back cover away from the device. Apply even pressure along the edges to gradually release the clips securing the cover in place.
-
Work Around the Edges: Once the initial clip is released, continue to work the plastic opening tool around the edges of the device, gradually separating the back cover from the main body. Take care not to force the cover off, as this could lead to damage.
-
Lift Off the Cover: After releasing all the clips, carefully lift the back cover away from the Razr M. Be mindful of any ribbon cables or connectors that may still be attached to the cover and the device.
-
Set Aside the Cover: Place the back cover in a safe and clean location to prevent any scratches or damage. It's essential to keep the cover in a secure place, as it will need to be reattached during the reassembly process.
By following these steps, you can successfully remove the back cover of the Motorola Razr M, gaining access to the internal components for further inspection, repair, or maintenance. Remember to handle the cover with care and keep track of any screws or components that may be attached to it for later reassembly.
This process sets the stage for accessing the internal components of the Razr M, allowing for further disassembly and maintenance as needed.
Removing the Battery
Removing the battery from the Motorola Razr M is a crucial step in the disassembly process, especially if the battery needs replacement or if access to other internal components is required. It's important to approach this task with caution and precision to ensure the safety of both the device and the individual performing the disassembly. Here's a detailed guide on how to safely remove the battery from the Razr M:
-
Power Off the Device: Before initiating the battery removal process, it's essential to power off the Razr M completely. This precautionary step helps prevent any potential electrical hazards during the disassembly.
-
Locate the Battery Connector: The battery of the Razr M is typically located near the center of the device, beneath the rear cover. Once the back cover is removed, the battery and its connector should be visible.
-
Disconnect the Battery Connector: Using a plastic opening tool or a spudger, carefully disconnect the battery connector from the motherboard. It's crucial to exercise gentleness and precision to avoid damaging the connector or the motherboard.
-
Release Adhesive Strips: In some smartphone models, the battery may be secured in place with adhesive strips. If this is the case with the Razr M, gently release the adhesive strips from the battery, taking care not to puncture or damage the battery in the process.
-
Lift Out the Battery: Once the battery connector and any adhesive strips are detached, carefully lift the battery out of its housing. It's important to handle the battery with care, avoiding any bending or puncturing, as lithium-ion batteries can be sensitive to physical damage.
-
Place the Battery in a Safe Location: After removing the battery, place it in a secure and clean location, away from any metallic objects or sources of heat. Properly storing the battery ensures its safety and minimizes the risk of accidental damage.
By following these steps, you can safely remove the battery from the Motorola Razr M, allowing for further inspection, replacement, or access to other internal components. It's crucial to handle the battery with care and adhere to proper disposal practices if a replacement is necessary. This process sets the stage for accessing and servicing other vital components of the Razr M, contributing to the overall maintenance and longevity of the device.
Removing the SIM Card and MicroSD Card
Removing the SIM card and MicroSD card from the Motorola Razr M is a straightforward yet essential step in the disassembly process. Whether you're replacing the cards or gaining access to other internal components, it's crucial to perform this task with care and precision to avoid any damage to the cards or the device itself.
Here's a detailed guide on how to safely remove the SIM card and MicroSD card from the Razr M:
-
Power Off the Device: Before proceeding with the removal of the SIM card and MicroSD card, ensure that the Razr M is powered off. This precautionary step prevents any potential electrical mishaps during the disassembly process.
-
Locate the Card Tray: The SIM card and MicroSD card are typically housed in a shared tray, located on the side of the device. Use a SIM card ejection tool or a paperclip to gently press into the small pinhole adjacent to the card tray, releasing the tray from its slot.
-
Remove the Card Tray: Once the tray is ejected, carefully pull it out of the device using your fingers. The tray should accommodate both the SIM card and the MicroSD card, each in its designated slot.
-
Take Out the SIM Card: If present, gently slide the SIM card out of its slot in the tray. Handle the SIM card with care, avoiding any bending or contact with metallic objects.
-
Extract the MicroSD Card: Similarly, if a MicroSD card is inserted in the tray, carefully remove it from its slot. Exercise caution to prevent any damage to the card or the delicate contacts on its surface.
-
Secure the Cards: Once the SIM card and MicroSD card are removed, place them in a safe and clean location. It's advisable to store the cards in protective cases or sleeves to prevent any physical damage or exposure to dust and debris.
By following these steps, you can safely remove the SIM card and MicroSD card from the Motorola Razr M, facilitating access to other internal components or allowing for the replacement of the cards as needed. Handling the cards with care and storing them properly ensures their integrity and functionality for future use.
This process sets the stage for further disassembly and maintenance of the Razr M, contributing to the overall care and upkeep of the device.
Removing the Rear Camera
Removing the rear camera of the Motorola Razr M is a delicate yet essential step in the disassembly process, particularly if the camera module requires replacement or if access to other internal components is necessary. Careful attention to detail and precision is crucial to ensure the integrity of the camera and the overall functionality of the device. Here's a comprehensive guide on how to safely remove the rear camera from the Razr M:
-
Power Off the Device: Before initiating the rear camera removal process, it's imperative to power off the Razr M completely. This precautionary step helps prevent any potential electrical hazards during the disassembly.
-
Locate the Rear Camera Module: The rear camera module is typically positioned near the top of the device's internal structure, beneath the back cover. Once the back cover is removed, the rear camera and its connector should be visible.
-
Disconnect the Camera Connector: Using a plastic opening tool or a spudger, carefully disconnect the camera connector from the motherboard. It's essential to exercise gentleness and precision to avoid damaging the connector or the motherboard.
-
Release the Camera Mounting: In some smartphone models, the rear camera may be secured in place with adhesive or a mounting bracket. If this is the case with the Razr M, gently release the adhesive or unscrew the mounting bracket to free the camera module.
-
Remove the Camera Module: Once the camera connector and any mounting elements are detached, carefully lift the rear camera module out of its housing. It's crucial to handle the camera with care, avoiding any impact or stress on its delicate components.
-
Secure the Camera Module: After removing the rear camera, place it in a safe and clean location, away from any metallic objects or sources of heat. Properly storing the camera module ensures its safety and minimizes the risk of accidental damage.
By following these steps, you can safely remove the rear camera from the Motorola Razr M, allowing for further inspection, replacement, or access to other internal components. It's crucial to handle the camera module with care and store it properly to maintain its integrity and functionality for future use. This process sets the stage for accessing and servicing other vital components of the Razr M, contributing to the overall maintenance and longevity of the device.
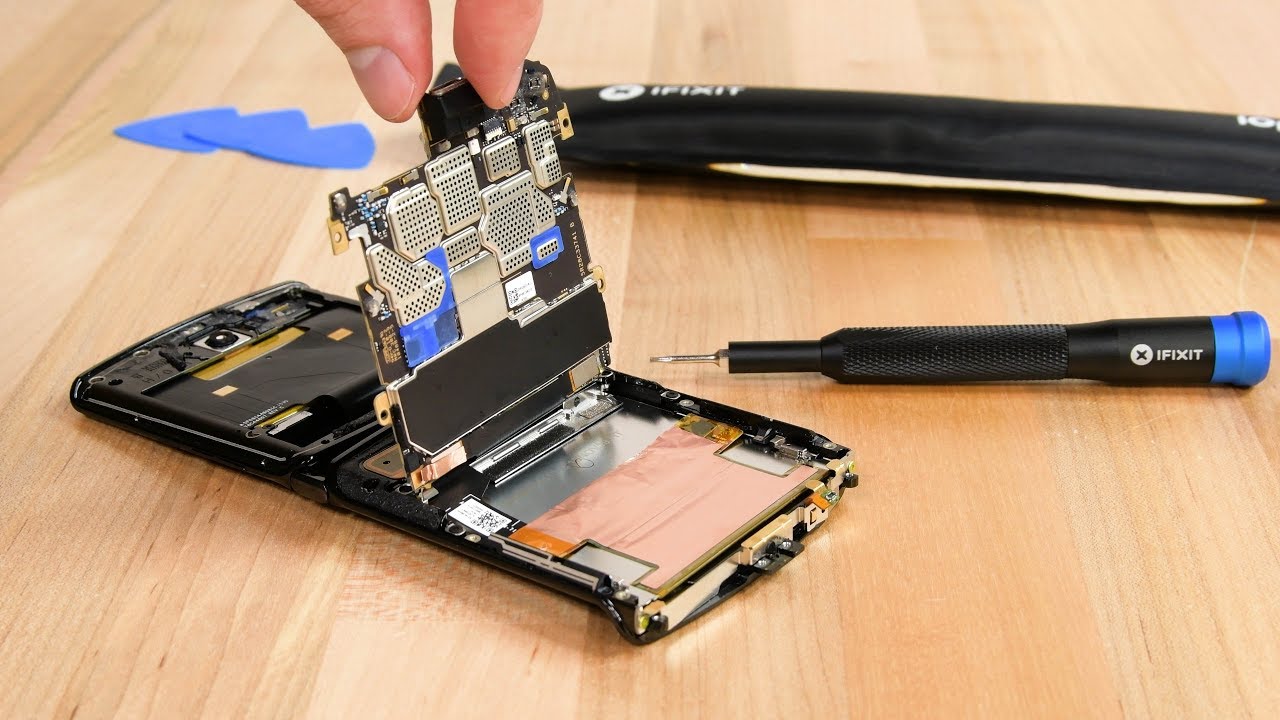
Removing the Motherboard
Removing the motherboard of the Motorola Razr M is a pivotal step in the disassembly process, as it grants access to the device's core components and facilitates thorough inspection, repair, or replacement. The motherboard, serving as the central hub for the device's functionality, houses critical elements such as the processor, memory modules, and various integrated circuits. Careful handling and attention to detail are paramount to ensure the integrity of the motherboard and the overall functionality of the device.
Here's a comprehensive guide on how to safely remove the motherboard from the Razr M:
-
Power Off the Device: Before commencing the motherboard removal process, it is imperative to power off the Razr M completely. This precautionary step mitigates the risk of electrical mishaps during the disassembly.
-
Disconnect Internal Components: Begin by carefully disconnecting all relevant cables, connectors, and ribbon cables attached to the motherboard. These may include the display assembly cable, front-facing camera connector, and any other components interfacing with the motherboard.
-
Remove Mounting Screws: The motherboard is typically secured to the device's frame by several small screws. Utilize a precision screwdriver to carefully remove these screws, ensuring they are safely set aside for reassembly.
-
Release Adhesive and Clasps: In some instances, the motherboard may be held in place by adhesive or clasps. Gently release any adhesive securing the motherboard to the frame, taking care not to damage any surrounding components.
-
Lift Out the Motherboard: Once all screws and securing elements are detached, carefully lift the motherboard out of its housing. Exercise caution to avoid any bending or stress on the motherboard, as well as the delicate components and circuits it houses.
-
Secure the Motherboard: After removing the motherboard, place it in a safe and clean location, away from any metallic objects or sources of static electricity. Properly storing the motherboard ensures its safety and minimizes the risk of accidental damage.
By following these steps, you can safely remove the motherboard from the Motorola Razr M, enabling comprehensive access to its internal components for inspection, repair, or replacement. Handling the motherboard with care and precision is crucial to maintaining its integrity and safeguarding the functionality of the device. This process sets the stage for thorough maintenance and servicing of the Razr M, contributing to its overall longevity and performance.
Removing the Front-Facing Camera
Removing the front-facing camera of the Motorola Razr M is a critical step in the disassembly process, particularly if the camera module requires replacement or if access to other internal components is necessary. The front-facing camera, essential for capturing selfies and facilitating video calls, is a delicate component that demands careful attention to detail and precision to ensure the integrity of the camera and the overall functionality of the device.
Here's a comprehensive guide on how to safely remove the front-facing camera from the Razr M:
-
Power Off the Device: Before initiating the front-facing camera removal process, it's imperative to power off the Razr M completely. This precautionary step mitigates the risk of electrical mishaps during the disassembly.
-
Access the Front-Facing Camera Module: The front-facing camera module is typically located near the top of the device's internal structure, often adjacent to the display assembly. Once access to the internal components is gained, the front-facing camera and its connector should be visible.
-
Disconnect the Camera Connector: Using a plastic opening tool or a spudger, carefully disconnect the camera connector from the motherboard. It's essential to exercise gentleness and precision to avoid damaging the connector or the motherboard.
-
Release the Camera Mounting: In some smartphone models, the front-facing camera may be secured in place with adhesive or a mounting bracket. If this is the case with the Razr M, gently release the adhesive or unscrew the mounting bracket to free the camera module.
-
Remove the Camera Module: Once the camera connector and any mounting elements are detached, carefully lift the front-facing camera module out of its housing. It's crucial to handle the camera with care, avoiding any impact or stress on its delicate components.
-
Secure the Camera Module: After removing the front-facing camera, place it in a safe and clean location, away from any metallic objects or sources of heat. Properly storing the camera module ensures its safety and minimizes the risk of accidental damage.
By following these steps, you can safely remove the front-facing camera from the Motorola Razr M, allowing for further inspection, replacement, or access to other internal components. Handling the camera module with care and storing it properly ensures its integrity and functionality for future use. This process sets the stage for accessing and servicing other vital components of the Razr M, contributing to the overall maintenance and longevity of the device.
Removing the Display Assembly
Removing the display assembly of the Motorola Razr M is a pivotal step in the disassembly process, as it provides access to the device's screen, digitizer, and other essential components. The display assembly, comprising the LCD screen and the touch-sensitive digitizer, is a critical element that requires careful handling and precision to ensure the integrity of the display and the overall functionality of the device.
Here's a comprehensive guide on how to safely remove the display assembly from the Razr M:
-
Power Off the Device: Before initiating the display assembly removal process, it's imperative to power off the Razr M completely. This precautionary step mitigates the risk of electrical mishaps during the disassembly.
-
Remove the Back Cover: As the display assembly is located beneath the back cover, it's essential to follow the previously outlined steps to safely remove the back cover of the Razr M.
-
Disconnect the Display Cable: Upon gaining access to the internal components, locate the display cable connecting the display assembly to the motherboard. Using a plastic opening tool or a spudger, carefully disconnect the display cable, ensuring gentle and precise handling to avoid damaging the connector or the motherboard.
-
Release Adhesive or Mounting Brackets: In some smartphone models, the display assembly may be secured to the device's frame with adhesive or mounting brackets. Gently release any adhesive or unscrew the mounting brackets to free the display assembly from its housing.
-
Lift Out the Display Assembly: Once the display cable and any securing elements are detached, carefully lift the display assembly out of its housing. Exercise caution to avoid any bending or stress on the display, the digitizer, or the delicate components within the assembly.
-
Secure the Display Assembly: After removing the display assembly, place it in a safe and clean location, away from any metallic objects or sources of heat. Properly storing the display assembly ensures its safety and minimizes the risk of accidental damage.
By following these steps, you can safely remove the display assembly from the Motorola Razr M, enabling comprehensive access to its internal components for inspection, repair, or replacement. Handling the display assembly with care and precision is crucial to maintaining its integrity and safeguarding the functionality of the device. This process sets the stage for thorough maintenance and servicing of the Razr M, contributing to its overall longevity and performance.
Removing the Speaker and Vibrator
Removing the speaker and vibrator from the Motorola Razr M is a crucial step in the disassembly process, as it allows access to these integral components for inspection, maintenance, or replacement. Both the speaker and vibrator play essential roles in the device's functionality, contributing to audio output and haptic feedback, respectively. Careful handling and attention to detail are paramount to ensure the integrity of these components and the overall performance of the device.
Here's a comprehensive guide on how to safely remove the speaker and vibrator from the Razr M:
-
Power Off the Device: Before initiating the removal process, it's imperative to power off the Razr M completely. This precautionary step mitigates the risk of electrical mishaps during the disassembly.
-
Access the Speaker and Vibrator Modules: The speaker and vibrator modules are typically located within the internal structure of the device, often near the lower or upper edges. Gaining access to these components may require the removal of additional elements, such as the motherboard or other internal brackets.
-
Disconnect the Speaker and Vibrator Connectors: Using a plastic opening tool or a spudger, carefully disconnect the connectors of the speaker and vibrator from the motherboard or the respective control circuit. It's essential to exercise gentleness and precision to avoid damaging the connectors or the surrounding components.
-
Release Mounting Elements: In some instances, the speaker and vibrator modules may be secured in place with adhesive, screws, or mounting brackets. Gently release any adhesive or unscrew the mounting elements to free the speaker and vibrator from their housing.
-
Lift Out the Speaker and Vibrator Modules: Once the connectors and any securing elements are detached, carefully lift the speaker and vibrator modules out of their housing. Exercise caution to avoid any stress on the delicate components and connections.
-
Secure the Speaker and Vibrator Modules: After removing the speaker and vibrator modules, place them in a safe and clean location, away from any metallic objects or sources of heat. Properly storing the modules ensures their safety and minimizes the risk of accidental damage.
By following these steps, you can safely remove the speaker and vibrator from the Motorola Razr M, enabling comprehensive access to these internal components for inspection, repair, or replacement. Handling the modules with care and precision is crucial to maintaining their integrity and safeguarding the functionality of the device. This process sets the stage for thorough maintenance and servicing of the Razr M, contributing to its overall longevity and performance.
Removing the Charging Port and Headphone Jack
Removing the charging port and headphone jack from the Motorola Razr M is a critical aspect of the disassembly process, as it allows for inspection, repair, or replacement of these essential connectivity components. Both the charging port and headphone jack play integral roles in the device's functionality, facilitating power input and audio output, respectively. Careful attention to detail and precision is paramount to ensure the integrity of these components and the overall performance of the device.
Here's a comprehensive guide on how to safely remove the charging port and headphone jack from the Razr M:
-
Power Off the Device: Before initiating the removal process, it's imperative to power off the Razr M completely. This precautionary step mitigates the risk of electrical mishaps during the disassembly.
-
Access the Charging Port and Headphone Jack: The charging port and headphone jack are typically located at the bottom of the device's internal structure, often integrated into a single component. Gaining access to these components may require the removal of additional elements, such as the back cover and internal brackets.
-
Disconnect the Port and Jack Connectors: Using a plastic opening tool or a spudger, carefully disconnect the connectors of the charging port and headphone jack from the motherboard or the respective control circuit. It's essential to exercise gentleness and precision to avoid damaging the connectors or the surrounding components.
-
Release Mounting Elements: In some instances, the charging port and headphone jack may be secured in place with adhesive, screws, or mounting brackets. Gently release any adhesive or unscrew the mounting elements to free the components from their housing.
-
Lift Out the Charging Port and Headphone Jack: Once the connectors and any securing elements are detached, carefully lift the charging port and headphone jack out of their housing. Exercise caution to avoid any stress on the delicate components and connections.
-
Secure the Components: After removing the charging port and headphone jack, place them in a safe and clean location, away from any metallic objects or sources of heat. Properly storing the components ensures their safety and minimizes the risk of accidental damage.
By following these steps, you can safely remove the charging port and headphone jack from the Motorola Razr M, enabling comprehensive access to these internal components for inspection, repair, or replacement. Handling the components with care and precision is crucial to maintaining their integrity and safeguarding the functionality of the device. This process sets the stage for thorough maintenance and servicing of the Razr M, contributing to its overall longevity and performance.
Reassembling the Motorola Razr M
After successfully disassembling the Motorola Razr M for maintenance, repair, or component replacement, the reassembly process is a critical phase that demands attention to detail and precision. Ensuring that each component is correctly positioned and securely fastened is essential to guarantee the device's optimal functionality and structural integrity. Here's a comprehensive guide on how to reassemble the Motorola Razr M:
-
Positioning the Internal Components: Begin by carefully placing the internal components, such as the motherboard, display assembly, speaker, vibrator, and other modules, back into their respective positions within the device's frame. Ensure that each component aligns correctly with its designated mounting points and connectors.
-
Securing the Components: Once the internal components are in place, proceed to secure them using the appropriate mounting brackets, screws, or adhesive. Exercise caution to avoid overtightening screws, which could potentially damage delicate components or the device's frame.
-
Reconnecting Cables and Connectors: With the internal components secured, reconnect the various cables, ribbon connectors, and flex cables to their respective ports on the motherboard and other control circuits. Ensure that each connection is secure and properly seated to facilitate seamless functionality.
-
Installing the Battery: Carefully place the battery back into its housing, ensuring that the connector is correctly aligned and securely attached to the motherboard. If the battery was held in place with adhesive strips, reapply new adhesive strips to secure it within the device.
-
Reattaching the Back Cover: Position the back cover over the device's frame, aligning it with the edges and ensuring that any clips or latches securely engage. Apply gentle pressure along the edges to ensure a snug fit without causing any damage to the cover or the internal components.
-
Testing the Device: Once the reassembly is complete, power on the device to verify its functionality. Check the display, audio output, connectivity ports, and other essential features to ensure that the reassembly process was successful.
By following these steps and exercising care and precision throughout the reassembly process, you can effectively restore the Motorola Razr M to its fully functional state. Proper reassembly is crucial to maintaining the device's performance and longevity, ensuring that it continues to meet your needs and expectations.