What is a Tilt-Shift Effect?
Have you ever seen a photograph that makes a real-life scene look like a miniature model? That’s the magic of a tilt-shift effect. It’s a popular technique in photography that can transform large, expansive landscapes or cityscapes into charming, toy-like scenes.
The tilt-shift effect creates the illusion of shallow depth of field, making objects in the image appear small and miniature. It’s a technique that mimics the characteristics of a tilt-shift lens, which is a specialized lens used in photography to control focus and perspective.
The tilt-shift effect can be achieved using post-processing software like GIMP, a powerful and free image editing tool. With GIMP’s advanced features and tools, you can easily apply the tilt-shift effect to your photos and give them a whimsical, dreamy look.
By using selective blurring and adjusting the gradient, you can create a sharp focus on a specific area of the image while blurring the rest, simulating the shallow depth of field found in macro or close-up photography.
The tilt-shift effect is widely used in various genres of photography, including architectural photography, landscape photography, and even portrait photography, to create unique and captivating images that stand out.
Now that you have a better understanding of what a tilt-shift effect is, let’s explore how you can recreate this fascinating effect using GIMP.
Understanding Tilt-Shift Photography
Tilt-shift photography is a technique used to manipulate perspective and depth of field in order to create images that give the impression of miniature models. It involves the use of a tilt-shift lens or post-processing software to adjust the focus and blur of specific areas in an image.
The tilt-shift lens allows the photographer to control the plane of focus, giving them the ability to selectively blur different parts of the image. This technique can be used to create a shallow depth of field, making certain objects or areas in the photograph appear in sharp focus while the remainder of the scene appears blurred.
The term “tilt-shift” refers to the movements of the lens. By tilting the lens, the photographer can change the angle at which the light enters the camera, resulting in a different plane of focus that is not parallel to the camera sensor. This tilt can give the illusion of a miniature scene, as it simulates the limited depth of focus that is often associated with a close-up view of small objects.
In addition to tilting the lens, the photographer can also shift it, which changes the position of the lens relative to the sensor. This movement is commonly used to correct perspective distortion, especially in architectural photography. By shifting the lens, the photographer can keep the lines of the building parallel and eliminate converging lines that would occur if the lens was not adjusted.
Tilt-shift photography has gained popularity because of its ability to create unique and visually appealing images. It offers a way to capture real-world scenes in a way that challenges the viewer’s perception, inviting them to see the world from a different perspective. Whether used to transform bustling cityscapes into picturesque miniatures or to highlight specific elements in a landscape, the tilt-shift effect can add a touch of magic and whimsy to your photographs.
Now that you have a better understanding of tilt-shift photography, it’s time to explore how you can achieve this effect using GIMP.
What is GIMP?
GIMP, which stands for GNU Image Manipulation Program, is a powerful open-source software that allows you to edit and manipulate digital images. It is a popular alternative to commercial photo editing software like Adobe Photoshop.
GIMP offers a wide range of features and tools that make it suitable for both basic and advanced image editing tasks. With GIMP, you can adjust colors, enhance the sharpness of an image, remove flaws or imperfections, apply filters and effects, and much more.
One of the greatest advantages of GIMP is its flexibility and extensibility. The software supports a variety of file formats, including popular ones like JPEG, PNG, GIF, and TIFF. It also supports plugins and scripts, allowing users to add additional functionality or automate complex tasks.
Whether you are a professional photographer, a graphic designer, or just someone who enjoys editing photos as a hobby, GIMP provides a reliable and user-friendly platform to unleash your creativity.
In addition to its image editing capabilities, GIMP also supports advanced features like layers and masks, which allow for non-destructive editing. This means that you can make changes to your image without permanently altering the original file. Layers and masks help you achieve more precise and professional-looking edits by giving you greater control over different elements of your image.
Another noteworthy aspect of GIMP is its active and dedicated community. The software is free and open-source, which encourages collaboration and the sharing of knowledge. There are numerous online forums, tutorials, and resources available where users can seek assistance, learn new techniques, and share their work.
Whether you’re a beginner or an experienced photo editor, GIMP is a versatile tool that provides you with the means to bring your creative vision to life. So, if you’re ready to explore the world of image editing and create stunning visual content, GIMP is the perfect software to get started with.
Getting Started with GIMP
Now that you’re familiar with what GIMP is, it’s time to dive into the basics and get started with this powerful image editing software. Here are some steps to help you get up and running with GIMP:
1. Download and Install: The first step is to download GIMP from the official website (https://www.gimp.org/). GIMP is available for Windows, Mac, and Linux operating systems. Once downloaded, follow the installation instructions to set up the software on your computer.
2. Explore the Interface: After installation, launch GIMP. You will be greeted by the main interface, which consists of menus, toolbars, and various windows. Take some time to familiarize yourself with the layout and organization of the interface. You can customize the interface according to your preferences by rearranging or docking windows.
3. Open an Image: To start editing an image, go to “File” > “Open” and browse for the image file on your computer. GIMP supports a wide range of file formats, so you can open virtually any image file.
4. Familiarize Yourself with Tools: GIMP offers a vast array of tools for editing and manipulating images. Some commonly used tools include the selection tools, paintbrush, eraser, clone tool, and text tool. Spend some time exploring these tools and experimenting with their functionalities. You can access the tools from the toolbox on the left side of the interface.
5. Learn Basic Editing Techniques: GIMP provides numerous options for basic editing tasks like cropping, resizing, adjusting brightness and contrast, and applying filters. These features can be accessed through the “Image” and “Layer” menus. Take some time to experiment with these editing techniques to become comfortable with their functionalities.
6. Save Your Work: When you’re satisfied with your edits, it’s important to save your work. GIMP allows you to save projects in its native .xcf format, which preserves all the layers and editing data. You can also export your images in various file formats like JPEG or PNG, depending on your intended use.
Remember, the key to mastering GIMP is practice and experimentation. Don’t be afraid to explore different features, tools, and techniques to unleash your creativity and achieve the desired results. Additionally, there are numerous online tutorials and resources available that can help you learn more about specific editing techniques and advanced features.
Now that you’re equipped with the basic knowledge of getting started with GIMP, it’s time to import and select an image to work with.
Importing and Selecting an Image
Now that you are familiar with the basic functions of GIMP, let’s explore how to import and select an image to begin the editing process.
1. Importing an Image: To import an image into GIMP, go to the “File” menu and select “Open”. Browse for the image file on your computer and click “Open”. The image will then be displayed in a new window within the GIMP interface.
2. Navigating the Image: GIMP provides various tools to navigate and zoom in or out of your image. You can use the navigation options on the toolbar or use keyboard shortcuts such as using the scroll wheel to zoom in or out and holding the spacebar to move around the image.
3. Selecting Tools: GIMP offers a range of selection tools to isolate specific areas of your image for editing. Some commonly used selection tools include the rectangular selection tool, the lasso tool, and the magic wand tool. You can find these tools in the toolbox on the left side of the interface.
4. Making a Selection: To make a selection, choose the appropriate selection tool and click and drag over the area you want to select. You can refine your selection by holding down the Shift key to add to the existing selection or the Ctrl key (Command key on Mac) to subtract from the selection. Once you release the mouse button, the selected area will be outlined by a marching ants pattern.
5. Modifying the Selection: Once you have made a selection, you can further modify it using various options. Use the “Selection” menu to invert the selection, feather the edges, or refine the selection based on color or contrast. This allows for more precise editing on specific parts of your image.
6. Saving and Duplicating Layers: Before making any edits to your image, it is recommended to save a duplicate copy of the original image layer. To do this, go to the “Layers” menu and select “Duplicate Layer”. By working on a duplicate layer, you can always go back to the original if needed.
By importing an image into GIMP and selecting specific areas for editing, you are now ready to apply various tools and effects to transform your image. In the next section, we will discuss how to create a duplicate layer to work on and apply the Gaussian Blur filter to achieve the tilt-shift effect.
Creating a Duplicate Layer
Before applying the tilt-shift effect to your image in GIMP, it is important to create a duplicate layer. This will allow you to make edits and adjustments while preserving the original image layer as a backup.
Here’s how you can create a duplicate layer in GIMP:
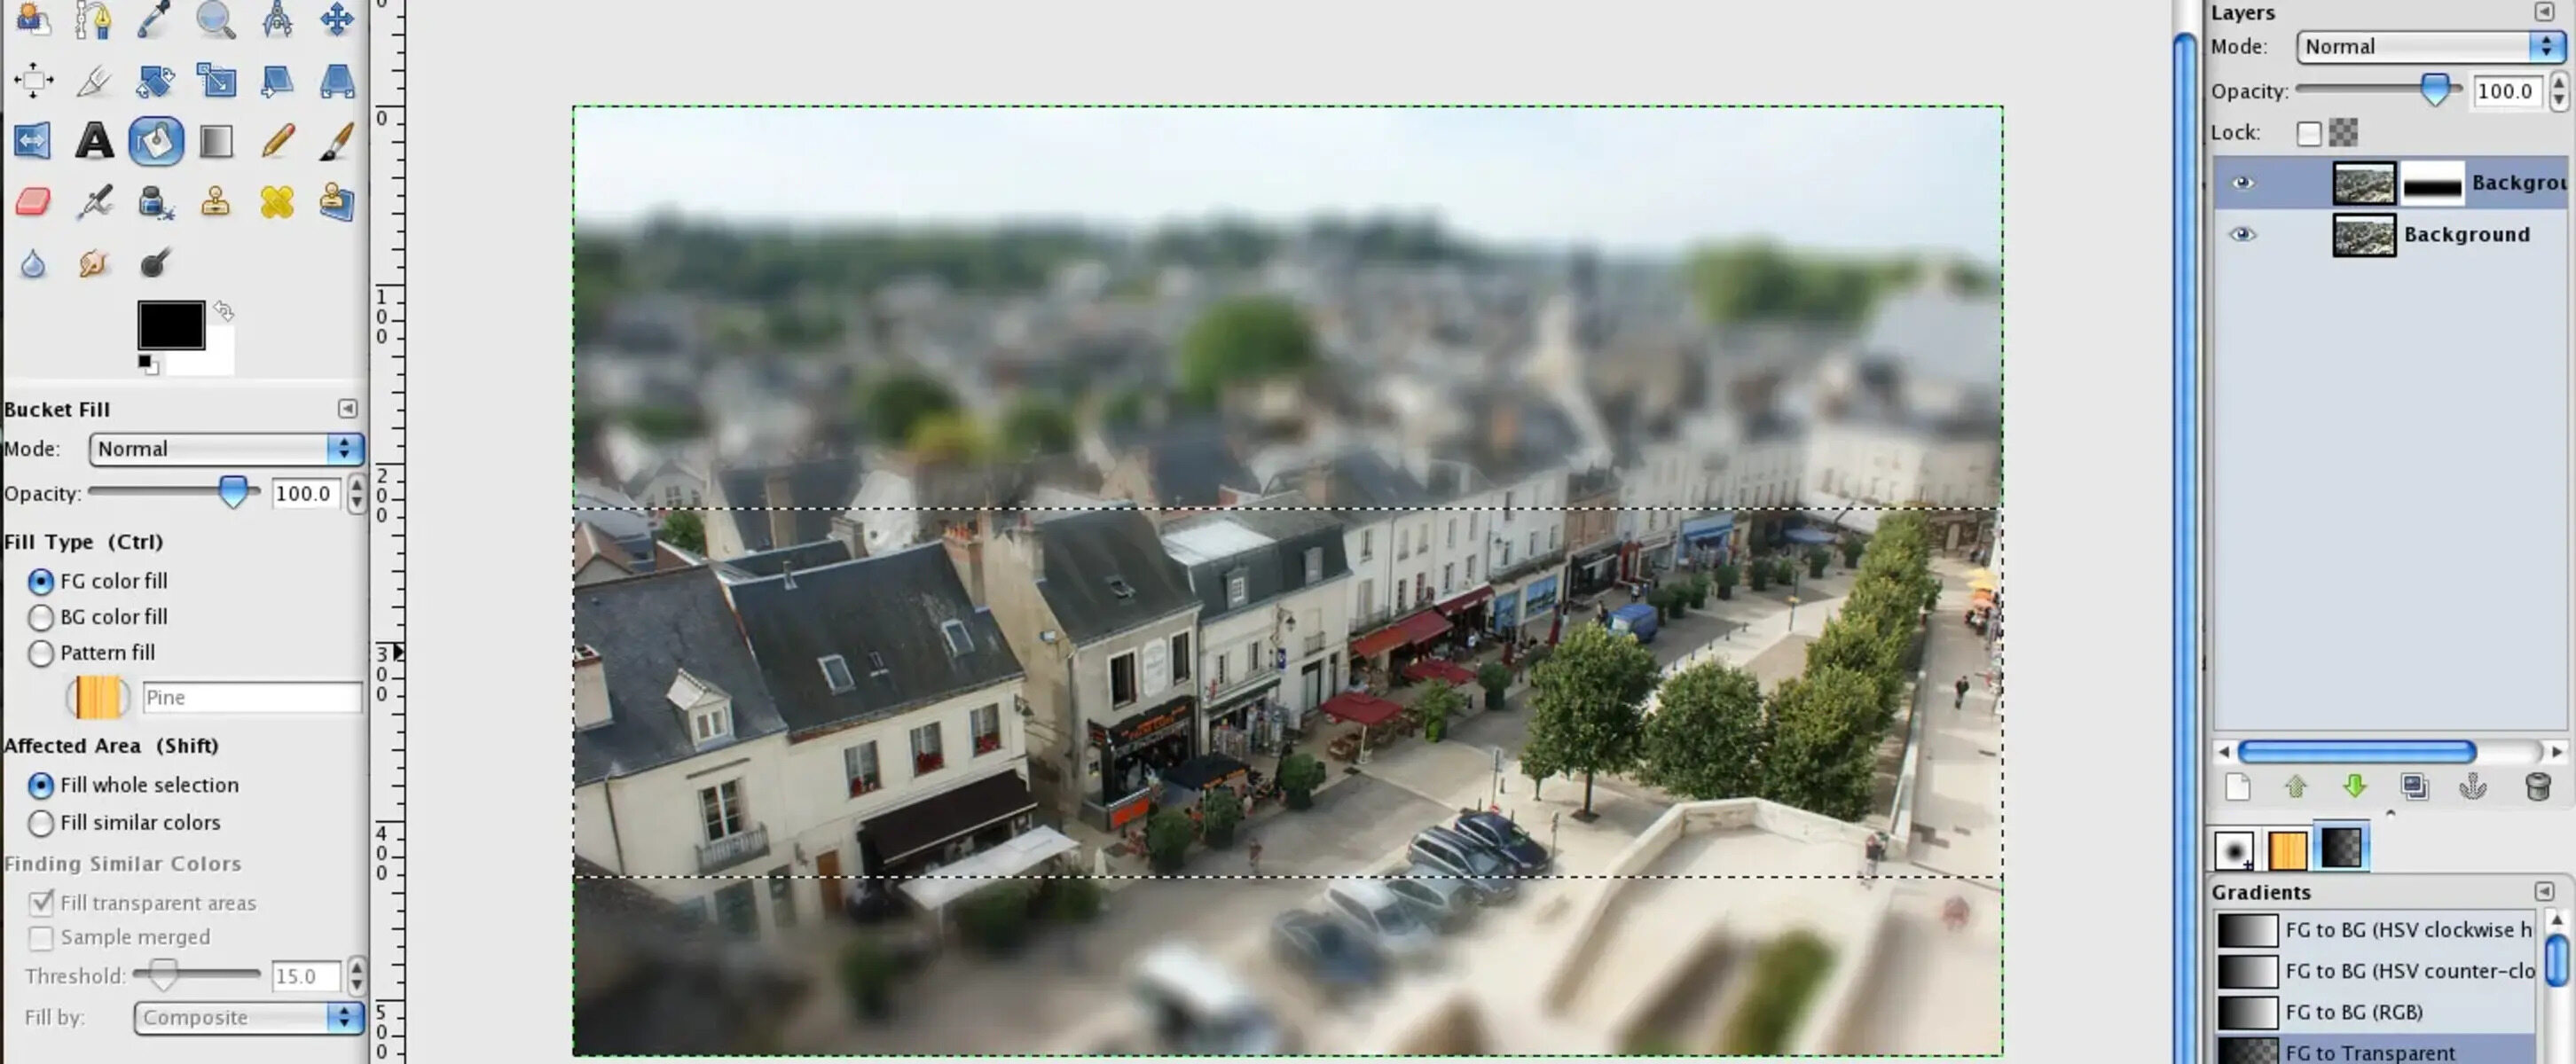
1. Select the Layer: In the Layers panel, located on the right side of the GIMP interface, select the layer containing your image. By default, this layer is named “Background” when you import an image.
2. Duplicate the Layer: With the layer selected, go to the “Layers” menu at the top of the interface and choose “Duplicate Layer”. Alternatively, you can right-click on the layer and select “Duplicate Layer” from the context menu. This will create a copy of the layer.
3. Rename the Duplicate Layer: To avoid confusion, it is recommended to give the duplicate layer a more descriptive name. Right-click on the duplicate layer in the Layers panel and choose “Edit Layer Attributes”. In the Name field, enter a meaningful name for the layer and click “OK”.
4. Arrange the Layers: By default, the duplicate layer will be placed above the original layer. You can change the layer order by clicking and holding the duplicate layer in the Layers panel, then dragging it below the original layer or repositioning it as desired. This will determine the order in which the layers are displayed in the final image.
Creating a duplicate layer ensures that you have a backup of the original image that can be reverted to if needed. It also allows you to make non-destructive edits on the duplicate layer, preserving the integrity of the original image.
By following these steps, you are now ready to apply the Gaussian Blur filter to the duplicate layer, which is the next essential step in creating the tilt-shift effect in GIMP.
Applying the Gaussian Blur Filter
To achieve the tilt-shift effect in GIMP, the next step is to apply the Gaussian Blur filter to the duplicate layer. This filter will create the desired blur effect, simulating the shallow depth of field typically seen in tilt-shift photography.
Here’s how you can apply the Gaussian Blur filter in GIMP:
1. Select the Duplicate Layer: Make sure the duplicate layer is selected in the Layers panel. This is the layer on which you will apply the Gaussian Blur filter.
2. Open the Filters Menu: Go to the “Filters” menu at the top of the GIMP interface and choose “Blur” and then “Gaussian Blur”.
3. Adjust the Blur Radius: A dialog box will appear, allowing you to adjust the blur radius. The radius determines the intensity of the blur effect. Drag the slider or enter a value in the box to find the desired level of blur. You can preview the effect on your image as you make adjustments.
4. Apply the Filter: Once you’re satisfied with the blur radius, click the “OK” button to apply the Gaussian Blur filter to the duplicate layer. The layer will now appear blurred, mimicking the shallow depth of field effect.
5. Fine-Tune the Gaussian Blur: If you feel that the blur effect is too strong or not strong enough, you can adjust it further by going to the “Filters” menu, selecting “Blur” and then “Gaussian Blur” again. This allows you to make additional changes to the blur radius and fine-tune the effect until you achieve the desired result.
Applying the Gaussian Blur filter is a crucial step in creating the tilt-shift effect, as it helps to create the illusion of selective focus and depth of field. With the blur effect in place, you’re now ready to proceed with adjusting the gradient tool to further enhance the tilt-shift effect in your image.
Creating the Tilt-Shift Effect
Now that you have applied the Gaussian Blur filter to the duplicate layer, it’s time to create the tilt-shift effect in GIMP. This effect is achieved by selectively adjusting the focus using the gradient tool.
Follow these steps to create the tilt-shift effect:
1. Select the Duplicate Layer: Make sure the duplicate layer is selected in the Layers panel. This is the layer on which you will create the tilt-shift effect.
2. Select the Gradient Tool: From the toolbox on the left side of the interface, select the Gradient Tool. This tool is represented by an icon that resembles a color gradient.
3. Adjust the Gradient Type: In the tool options at the top of the interface, select the desired gradient type. You can choose from linear, radial, bi-linear, or other gradient types to achieve different effects.
4. Set the Gradient Colors: Click on the gradient preview to open the Gradient Editor dialog box. Here, you can customize the colors and transparency of the gradient. To create a realistic tilt-shift effect, it’s common to use a gradual transition from sharp to blurred focus.
5. Apply the Gradient: With the Gradient Tool selected and the desired settings in place, click and drag vertically or horizontally on the duplicate layer to create the gradient. The gradient represents the transition between the sharp and blurred areas in the image.
6. Adjust the Length and Position of the Gradient: If needed, you can further refine the tilt-shift effect by adjusting the length and position of the gradient. Simply click and drag the ends or middle of the gradient to change its size, orientation, or position on the image.
By creating the tilt-shift effect using the gradient tool, you can simulate the appearance of selective focus, with a specific area or subject in sharp focus while the surrounding areas gradually blur out. This effect gives your image a unique and captivating visual impact.
Now that you have created the tilt-shift effect, it’s time to fine-tune and adjust the gradient tool to achieve the desired look for your image. We will explore these adjustments in the next section.
Adjusting the Gradient Tool
After creating the tilt-shift effect with the gradient tool in GIMP, you may want to make further adjustments to achieve the perfect look for your image. Fine-tuning the gradient tool allows you to refine the transition between the focused and blurred areas, creating a more realistic and impactful tilt-shift effect.
Here are some techniques for adjusting the gradient tool in GIMP:
1. Gradient Length: By modifying the length of the gradient, you can control the area of focus and the extent of the blur. To adjust the length, click and drag the endpoints of the gradient to make it wider or narrower. Experiment with different lengths to find the optimal balance for your image.
2. Gradient Position: The position of the gradient can also influence the tilt-shift effect. You can move the gradient up, down, left, or right to shift the focal point and determine which part of the image remains in sharp focus. Click and drag the center point of the gradient to reposition it accordingly.
3. Gradient Opacity: Adjusting the opacity of the gradient allows you to control the intensity of the transition between the focused and blurred areas. Lower opacity creates a more gradual blend, resulting in a smoother and more natural effect. Use the “Opacity” slider in the gradient editor to make these adjustments.
4. Experiment with Different Gradient Types: GIMP offers various gradient types, such as linear, radial, bi-linear, and more. Try switching between different gradient types to see how they impact the focus and blur areas of your image. Each gradient type can produce unique and visually appealing results, so don’t be afraid to experiment.
5. Use Multiple Gradients: You can enhance the tilt-shift effect by combining multiple gradients on different layers. By duplicating the duplicate layer and applying additional gradients to each layer, you can create complex and multi-dimensional focal points. This technique enables you to have precise control over the areas of focus in your image.
Remember, adjusting the gradient tool is all about experimenting and fine-tuning to achieve the desired tilt-shift effect. Play with different settings, opacity levels, and positions until you are satisfied with the final result.
Once you feel you have perfected the tilt-shift effect, it’s time to move on to adding the miniature effect to further enhance the illusion of a scaled-down scene in your image. We will explore this step in the next section.
Fine-Tuning the Tilt-Shift Effect
After applying the gradient tool to create the tilt-shift effect in GIMP, you may want to fine-tune and refine the effect to achieve the desired look for your image. Fine-tuning allows you to enhance the illusion of a miniature scene, creating a more realistic and visually appealing result.
Here are some techniques for fine-tuning the tilt-shift effect in GIMP:
1. Adjusting the Gradient Length: Depending on the desired focus area and depth of field, you can modify the length of the gradient to make it wider or narrower. A wider gradient creates a larger area of focus, resembling a shallower depth of field. Experiment with different lengths to find the perfect balance for your image.
2. Refining the Gradient Position: Moving the position of the gradient can significantly impact the tilt-shift effect. By shifting the gradient up or down, left or right, you can control where the focal point is located. This adjustment allows you to highlight specific elements in the image, enhancing the miniature effect. Carefully consider the composition and subject matter when making these adjustments.
3. Adjusting Opacity and Feather: Fine-tune the transition between the focused and blurred areas by adjusting the opacity and feathering of the gradient. Lowering the opacity creates a smoother blend, while increasing the feathering softens the transition. Experiment with various settings to find the right balance for your image.
4. Using Layer Masks: Layer masks in GIMP provide additional control over the tilt-shift effect. By applying a layer mask to the duplicate layer, you can selectively hide or reveal parts of the image, further enhancing the illusion of a miniature scene. Use a brush tool with a soft edge to paint over areas you want to hide or reveal, allowing for more precision in adjusting the effect.
5. Experiment with Blur Filters: While the Gaussian Blur filter is commonly used for the tilt-shift effect, don’t hesitate to experiment with other blur filters available in GIMP. Depending on the desired effect, you might find that different blur filters provide unique and interesting results. Feel free to explore and test different filters to achieve your desired outcome.
Remember, fine-tuning the tilt-shift effect is a process of trial and error. Don’t be afraid to experiment with different settings, adjustments, and techniques until you achieve the desired look for your image. Take your time to evaluate the impact of each change and consider how it contributes to the overall composition and storytelling of your photograph.
Once you are satisfied with the fine-tuned tilt-shift effect, it’s time to move on to adding the miniature effect to further enhance the illusion of a scaled-down scene in your image.
Adding the Miniature Effect
After fine-tuning the tilt-shift effect in GIMP, you can further enhance the illusion of a miniature scene by adding additional effects and adjustments. These enhancements will give your image a distinctive and captivating look, reminiscent of a scaled-down model.
Here are some techniques for adding the miniature effect in GIMP:
1. Selective Saturation: One effective way to enhance the miniature effect is to apply selective saturation. By reducing the saturation of the areas that are out of focus, the in-focus areas will stand out more prominently, emphasizing the illusion of depth and the miniature scale. To do this, create a new layer above the duplicate layer and use the “Desaturate” tool or adjust the saturation levels using the “Hue-Saturation” tool under the “Colors” menu.
2. Vignetting: Vignetting is another technique that can help enhance the miniature effect. By darkening the edges or corners of the image, you can draw the viewer’s attention toward the central area, simulating the effect of a shallow depth of field. Use the “Vignette” filter in GIMP under the “Filters” menu to achieve this effect. Adjust the settings, such as shape, size, and opacity, to suit your image.
3. Color Grading: Applying a specific color grading or tone to your image can also enhance the miniature effect. By using color adjustments or filters, you can create a specific mood or atmosphere that complements the miniature aesthetic. Experiment with different color combinations and tones to find the one that best suits your image. Use the “Color Balance”, “Curves”, or “Color Lookup” tool under the “Colors” menu in GIMP to achieve the desired color grading.
4. Detail Enhancement: To further enhance the miniature effect, selectively increasing the sharpness, contrast, or details in the in-focus areas can help bring out the miniature-like appearance. Use the “Unsharp Mask” filter or the “Sharpen” tool in GIMP to selectively enhance the details in the areas of focus. Be careful not to overdo it, as excessive sharpening can create an unnatural look.
5. Experiment with Filters and Effects: GIMP offers a wide array of filters and effects that you can experiment with to add unique touches to your image. Some filters, such as “G’MIC” or “Cartoon”, can give your image a stylized look resembling a miniature model. Explore different filters and effects in GIMP to discover the ones that complement your vision for the miniature effect.
By adding the miniature effect to your tilt-shift image, you can further elevate its visual impact and create a captivating, dream-like quality. Play around with various adjustments, filters, and techniques to achieve the desired result. Remember that the aim is to create an image that elicits a sense of wonder and fascination, as if the viewer is peering into a tiny world.
With the miniature effect applied, your image is nearly complete. All that’s left is to finalize the edits and prepare your image for export. We will cover these final steps in the next section.
Finalizing and Exporting the Image
After applying the tilt-shift and miniature effects to your image in GIMP, it’s time to finalize the edits and prepare your image for export. This involves making any necessary adjustments, ensuring the image is optimized for different platforms, and saving it in the desired format.
Here are the final steps to finalize and export your image in GIMP:
1. Review and Make Adjustments: Take a moment to review your image and make any final adjustments. Pay attention to details like exposure, colors, and composition. Use the various tools and adjustments available in GIMP to fine-tune your image until you are satisfied with the overall result.
2. Flatten the Layers: If you have been working with multiple layers, it’s recommended to flatten them before exporting the image. Flattening merges all the layers into a single layer, ensuring that your image retains its edited appearance without any layer-specific information. To flatten the layers, go to the “Image” menu, select “Flatten Image”, and confirm the action when prompted.
3. Resize and Crop: Depending on your intended use, you may need to resize or crop the image. Consider the specific requirements of the platform or medium where you plan to showcase your image. Use the “Image Size” or “Crop Tool” in GIMP to adjust the dimensions and composition of your image accordingly.
4. Save or Export: Choose whether you want to save your image as a GIMP project file (.xcf) or export it to a standard image format like JPEG, PNG, or TIFF. If you want to preserve the layers and editing information, save the project file to retain the flexibility for future edits. Otherwise, export the image in the desired format for sharing or printing.
5. Set Export Options: When exporting your image, consider the specific requirements of the platform or medium where you plan to use it. Adjust the export options accordingly, such as the resolution, compression level, color space, and file format. GIMP provides various settings to customize the export process and ensure optimal quality and compatibility.
6. Quality Check: Finally, preview the exported image to ensure that it looks as intended. Open it in an image viewer or upload it to the desired platform to confirm that the visual quality is maintained. Make any necessary adjustments and re-export if needed.
By following these final steps, you can ensure that your tilt-shift image is finalized, optimized for its intended purpose, and ready to be shared with the world. The combination of the tilt-shift and miniature effects, along with the various adjustments and additions, will create a visually captivating image that amazes and engages viewers.
Now that your image is finalized and exported, you can proudly showcase your artistic creation and enjoy the admiration it receives. Happy editing!
Tips and Tricks for Better Results
When applying the tilt-shift and miniature effects in GIMP, there are several tips and tricks you can utilize to achieve better results and enhance the overall impact of your image. These techniques will help you create stunning and visually captivating photographs that truly stand out. Here are some tips to consider:
1. Plan Your Composition: Before capturing or selecting an image for the tilt-shift effect, carefully consider the composition. Think about how different elements will be affected by the blur and how they will contribute to the overall storytelling of the image. Pay attention to leading lines, diagonals, and points of interest that can make your composition more dynamic.
2. Experiment with Different Blur Intensity: Adjust the intensity of the Gaussian Blur filter to achieve the desired level of blur for your image. Subtle adjustments can make a big difference in the resulting effect, so take the time to experiment with different settings until you find the right balance.
3. Mind the Transition Zone: Pay attention to the transition zone between the focused and blurred areas. Aim for a gradual and smooth transition to create a more realistic tilt-shift effect. Avoid abrupt or harsh transitions that may look unnatural.
4. Refine the Depth of Field: Use the gradient tool to precisely control the depth of field in your image. Consider how the depth of field should be distributed, whether you want the foreground, middle ground, or background to be in focus. Experiment with different gradient lengths and positions to achieve the desired effect.
5. Utilize Layer Masks: Layer masks offer additional control over the tilt-shift effect. Use them to selectively hide or reveal parts of the image, ensuring that only the intended areas remain in focus. Layer masks allow for more precise adjustments and can help create a more convincing miniature effect.
6. Pay Attention to Lighting: Lighting plays a crucial role in creating realistic and captivating images. Consider the direction, intensity, and color of light in your image. Ensure that the lighting matches the overall mood and enhances the miniature effect.
7. Add Depth with Shadows: Consider adding subtle shadows to your image to create depth and dimensionality. Shadows can make the miniature effect appear more convincing and help distinguish between different layers and elements in your composition.
8. Experiment with Color Grading: Color grading can greatly influence the mood and atmosphere of your tilt-shift image. Play with different color palettes and tonal adjustments to enhance the overall impact of your photograph. Consider using warm or cool tones that complement the subject matter and evoke a specific emotion.
9. Keep it Subtle: Balance is essential when applying the tilt-shift and miniature effects. Avoid overdoing the blur or other enhancements, as it can make the image appear unrealistic or artificial. Remember, the aim is to create a visually appealing image that draws viewers into a miniature world, not to create an obvious and exaggerated effect.
10. Practice and Experiment: As with any artistic endeavor, practice and experimentation are key to improving your skills. Continuously explore new techniques, settings, and approaches to push the boundaries and develop your unique style. The more you experiment, the more proficient you will become in achieving the desired tilt-shift and miniature effects.
By keeping these tips and tricks in mind, you can elevate your tilt-shift images to a new level. Remember, it’s all about attention to detail, experimentation, and refining your vision to create compelling and visually striking photographs.
Now armed with these valuable tips, go forth and create captivating tilt-shift images that amaze and inspire!