
Understanding the Vignette Effect
The vignette effect is a popular technique used in photography and graphic design to draw attention to the subject of an image by darkening or fading the edges. This technique creates a subtle yet impactful visual effect that adds depth and focus to the center of the composition. The vignette effect can be used to enhance the mood, create a vintage look, or add drama to an image.
Essentially, the vignette effect mimics the natural behavior of older cameras and lenses, where the edges of the image were slightly darker due to lens limitations. This effect can be both additive and subtractive, depending on the desired outcome. An additive vignette effect darkens the edges of the image, while a subtractive vignette effect lightens the edges.
The vignette effect can be applied in various ways, with different software applications offering different methods and levels of control. Adobe Photoshop, Adobe Lightroom, and GIMP are among the most popular applications for creating the vignette effect.
By understanding the process and techniques behind the vignette effect, you can effectively use it to enhance your photographs and creative projects. In the following sections, we will explore how to create the vignette effect using Adobe Photoshop, Adobe Lightroom, and GIMP, as well as provide step-by-step guides, shortcuts, tips, and tricks to help you achieve the desired results.
Creating a Vignette Effect in Adobe Photoshop
Adobe Photoshop is a powerful and versatile software that allows photographers and designers to manipulate images in various ways, including creating the vignette effect. There are multiple methods to achieve this effect in Adobe Photoshop, each providing different levels of control and customization.
Step-by-Step Guide: Vignette Effect in Adobe Photoshop
- Open your image in Adobe Photoshop.
- Create a new layer above the image layer by clicking on the “New Layer” icon in the Layers panel.
- With the new layer selected, choose the “Elliptical Marquee Tool” from the toolbar.
- Click and drag on the image to create an elliptical selection that covers the area where you want the vignette effect. Ensure that the center of the selection corresponds to the subject of the image.
- Invert the selection by going to “Select” > “Inverse” or using the keyboard shortcut Ctrl+Shift+I (Command+Shift+I on Mac).
- With the inverted selection still active, choose the “Gradient Tool” from the toolbar.
- In the options bar, select the desired gradient type. For a classic vignette effect, choose the “Foreground to Transparent” option.
- Set the foreground color to black by pressing the “D” key (it will reset the colors to default, where black is the foreground color).
- Starting from outside the selection, click and drag towards the center to create the vignette effect. The gradient will darken the edges, gradually fading to transparency towards the subject.
- Deselect the selection by going to “Select” > “Deselect” or using the keyboard shortcut Ctrl+D (Command+D on Mac).
- Adjust the opacity and blending mode of the vignette layer to fine-tune the intensity and overall look of the effect.
- Make any additional adjustments or enhancements as needed, such as adjusting contrast, exposure, or adding filters to further enhance the image.
- Save your work in the desired format.
Shortcut Method: Vignette Effect in Adobe Photoshop
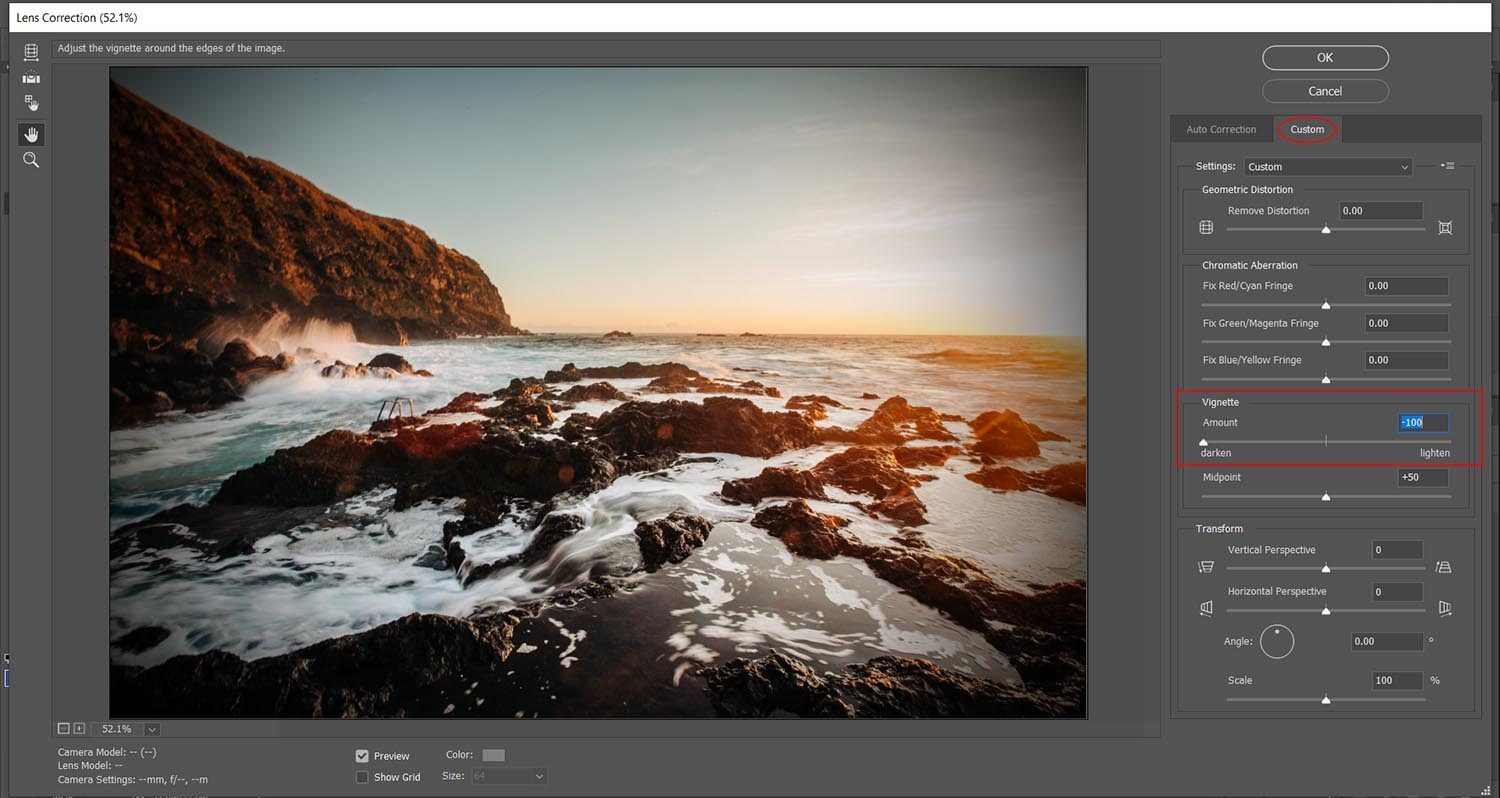
If you prefer a quicker and more automated approach, you can use the “Lens Correction” filter in Adobe Photoshop to create a vignette effect. Follow these steps:
- Open your image in Adobe Photoshop.
- Go to “Filter” > “Lens Correction”.
- In the “Custom” tab of the Lens Correction dialog box, locate the “Vignette” section.
- Adjust the “Amount” slider to control the strength of the vignette effect.
- Use the “Midpoint” slider to adjust the size of the vignette, determining how much of the image is affected.
- Click “OK” to apply the vignette effect.
- Make any further adjustments or enhancements as desired.
- Save your work in the desired format.
Tips and Tricks: Vignette Effect in Adobe Photoshop
- Experiment with different shapes and sizes for the vignette by using custom selection tools, such as the “Rectangular Marquee Tool” or the “Lasso Tool”. This allows you to create unique vignette effects based on the composition of your image.
- Adjust the opacity and blending mode of the vignette layer to fine-tune the intensity and blend it seamlessly with the rest of the image.
- Consider using adjustment layers, such as “Curves” or “Levels”, to further enhance the vignette effect and make it seamlessly integrate with the overall tonality and color of the image.
- Save your work as a layered PSD file to preserve the flexibility of making further adjustments in the future.
Step-by-Step Guide: Vignette Effect in Adobe Photoshop
Creating a vignette effect in Adobe Photoshop is a straightforward process that can greatly enhance the visual impact of your photographs. Follow these step-by-step instructions to achieve a beautiful vignette effect:
- Open your image in Adobe Photoshop: Launch Adobe Photoshop on your computer and open the image you want to apply the vignette effect to.
- Create a new layer above the image layer: In the Layers panel, click on the “New Layer” icon to add a new layer above the image layer. This will allow you to apply the vignette effect without altering the original image.
- Select the Elliptical Marquee Tool: Choose the “Elliptical Marquee Tool” from the toolbar on the left-hand side of the screen. It looks like an oval-shaped selection tool.
- Create an elliptical selection: Click and drag on the image to create an elliptical selection that covers the area where you want the vignette effect. Ensure that the center of the selection corresponds to the subject of the image.
- Invert the selection: Go to the “Select” menu at the top of the screen and choose “Inverse,” or use the keyboard shortcut Ctrl+Shift+I (Command+Shift+I on Mac). This will invert the selection so that the outer edges are selected instead of the center.
- Choose the Gradient Tool: Select the “Gradient Tool” from the toolbar. It looks like a rectangle filled with a gradient.
- Select the gradient type: In the options bar at the top of the screen, choose the desired gradient type. For a classic vignette effect, select the “Foreground to Transparent” option.
- Set the foreground color to black: Press the “D” key on your keyboard to reset the colors to default, where black is the foreground color. This ensures that the vignette effect will be created with a black-to-transparent gradient.
- Apply the vignette effect: Starting from outside the selection, click and drag towards the center of the image using the Gradient Tool. This will create the vignette effect, with the outer edges gradually fading to transparency.
- Deselect the selection: Go to the “Select” menu and choose “Deselect,” or use the keyboard shortcut Ctrl+D (Command+D on Mac), to remove the selection.
- Adjust opacity and blending mode: Fine-tune the intensity and overall look of the vignette effect by adjusting the opacity and blending mode of the vignette layer in the Layers panel.
- Make additional adjustments if needed: If necessary, make any additional adjustments or enhancements to the image, such as adjusting contrast, exposure, or adding filters to further enhance the overall effect.
- Save your work: Once you are satisfied with the vignette effect, save your work in the desired format to preserve the changes.
By following this step-by-step guide, you can easily create a stunning vignette effect in Adobe Photoshop and elevate the impact of your images.
Shortcut Method: Vignette Effect in Adobe Photoshop
If you prefer a quicker and more automated approach to create a vignette effect in Adobe Photoshop, you can use the “Lens Correction” filter. This method allows you to achieve the desired vignette effect with just a few simple steps:
- Open your image in Adobe Photoshop: Launch Adobe Photoshop and open the image you want to apply the vignette effect to.
- Go to the “Filter” menu: In the top navigation bar, click on “Filter” to access the Filter menu.
- Select “Lens Correction”: From the Filter menu, choose “Lens Correction” to open the Lens Correction dialog box.
- Switch to the “Custom” tab: In the Lens Correction dialog box, switch to the “Custom” tab to reveal various correction options.
- Locate the “Vignette” section: Scroll down the Custom tab until you find the “Vignette” section.
- Adjust the “Amount” slider: Use the “Amount” slider to control the strength of the vignette effect. Increase the value to darken the image edges or decrease it to lighten them.
- Modify the “Midpoint” slider: The “Midpoint” slider determines the size of the vignette. Adjust it to increase or decrease the area affected by the effect.
- Preview the effect: Continuously monitor the preview window in the Lens Correction dialog box to visualize the changes in real-time.
- Apply the vignette effect: Once you are satisfied with the adjustments, click on the “OK” button to apply the vignette effect to the image.
- Make further adjustments if needed: If necessary, you can make additional adjustments to the image, such as contrast, brightness, or color corrections, to enhance the overall appearance.
- Save your work: Finally, save your image in the desired format to preserve the vignette effect.
Using the shortcut method of the Lens Correction filter in Adobe Photoshop, you can quickly achieve a vignette effect with minimal effort. This method is particularly useful when you need to apply the effect to multiple images or want a more automated approach to creating the vignette effect.
Tips and Tricks: Vignette Effect in Adobe Photoshop
Creating a vignette effect in Adobe Photoshop offers numerous possibilities for customization and fine-tuning. Here are some helpful tips and tricks to enhance your vignette effect and make it even more impactful:
- Experiment with different shapes and sizes: While the traditional vignette effect is often circular or oval, don’t be afraid to try different shapes and sizes. Use custom selection tools such as the “Rectangular Marquee Tool” or the “Lasso Tool” to create unique vignette effects based on the composition of your image.
- Adjust opacity and blending mode: Fine-tune the vignette effect by adjusting the opacity and blending mode of the vignette layer. Lowering opacity can make the effect subtler, while blending modes like “Multiply” or “Soft Light” can create different visual effects.
- Consider using adjustment layers: To seamlessly integrate the vignette effect with the tonality and color of your image, try using adjustment layers. The “Curves” or “Levels” adjustment layers, for example, can further enhance the vignette effect and allow for precise control over the image’s overall appearance.
- Utilize layer masks: Layer masks allow you to selectively apply the vignette effect to specific areas of the image. For instance, you can use layer masks to protect important elements from the vignette or to control its intensity in specific regions.
- Save your work as a layered PSD: Save your work as a layered Photoshop file (PSD) to preserve the flexibility of making further adjustments in the future. This way, you can revisit and modify the vignette effect or any other edits without damaging the original image.
- Consider other creative options: The vignette effect doesn’t have to be limited to darkening the edges. Experiment with different variations such as color vignettes, where you apply a subtle color cast to the edges, or artistic vignettes that incorporate textures or overlays to add interest to your image.
- Explore Photoshop plugins and actions: Expand your options by exploring Photoshop plugins and actions specifically designed for creating vignettes. These plugins and actions can offer additional features, presets, and shortcuts to speed up your workflow and provide more creative possibilities.
- Combine with other post-processing techniques: The vignette effect can work in synergy with other post-processing techniques. Experiment with combining it with techniques such as dodging and burning, selective color adjustments, or adding gradients to create unique effects and enhance specific areas of your composition.
By applying these tips and tricks, you can elevate your vignette effect in Adobe Photoshop and create stunning and visually captivating images.
Creating a Vignette Effect in Adobe Lightroom
Adobe Lightroom is a powerful software widely used by photographers for organizing, editing, and enhancing their images. With its intuitive interface and comprehensive editing capabilities, Lightroom offers a straightforward way to create a vignette effect. Let’s explore how to achieve this effect in Adobe Lightroom:
Step-by-Step Guide: Vignette Effect in Adobe Lightroom
- Open your image in Adobe Lightroom: Launch Adobe Lightroom and import the image you want to apply the vignette effect to.
- Access the Develop module: Switch to the Develop module by clicking on the “Develop” button in the top-right corner of the interface or pressing the “D” key on your keyboard.
- Go to the Effects panel: Locate the Effects panel on the right-hand side of the Develop module.
- Adjust the Amount slider: In the Effects panel, you will find the “Post-Crop Vignetting” section. Adjust the “Amount” slider to control the strength of the vignette effect. Increase the value to darken the edges or decrease it to lighten them.
- Modify other vignette settings: Lightroom offers additional options to refine the vignette effect. You can experiment with sliders such as “Midpoint,” “Roundness,” and “Feather” to customize the shape, transition, and intensity of the vignette.
- Preview the effect: Continuously monitor the image preview in the main window to visualize the changes and fine-tune the vignette effect as desired.
- Make further adjustments if needed: If necessary, make additional adjustments to the image using other editing tools in Lightroom, such as exposure, contrast, clarity, or color adjustments, to enhance the overall appearance and ensure a cohesive look.
- Save your work: Once you are satisfied with the vignette effect and any other edits, save your image in the desired format to preserve the changes.
Shortcut Method: Vignette Effect in Adobe Lightroom
If you prefer a quick and automated way to apply a vignette effect in Adobe Lightroom, you can use pre-made presets. These presets are pre-configured settings that can be applied to your images with a single click. There are numerous vignette presets available, and you can even create your own custom presets for consistent application across multiple images.
Tips and Tricks: Vignette Effect in Adobe Lightroom
- Experiment with different vignette styles: Lightroom offers various vignette styles, such as Highlight Priority, Color Priority, Paint Overlay, and more. Experiment with different styles to achieve the desired look for your image.
- Consider the subject and composition: When applying the vignette effect, carefully consider the subject and overall composition of the image. Adjust the vignette settings accordingly to ensure the effect enhances the focal point and doesn’t overpower or distract from the subject.
- Use local adjustments: If you want to apply the vignette effect selectively to specific areas of the image, consider using the local adjustment tools in Lightroom, such as the adjustment brush or radial filter. This allows you to have more control over where the vignette effect is applied.
- Combine vignette with other adjustments: Experiment with combining the vignette effect with other adjustments in Lightroom, such as graduated filters or color grading, to create a more comprehensive and harmonious edit.
- Preserve original image: Always work with a non-destructive workflow in Lightroom by preserving the original image and utilizing virtual copies or snapshots. This way, you can go back to the unedited version or try different vignette settings without permanently altering your image.
By following these instructions and utilizing tips and tricks in Adobe Lightroom, you can easily create a visually appealing vignette effect and enhance the impact of your images.
Step-by-Step Guide: Vignette Effect in Adobe Lightroom
Adobe Lightroom provides photographers with a user-friendly interface and powerful editing tools for enhancing their images. Here is a step-by-step guide on how to create a vignette effect in Adobe Lightroom:
- Open your image in Adobe Lightroom: Launch Adobe Lightroom and import the image you want to apply the vignette effect to.
- Access the Develop module: In the top-right corner of the Lightroom interface, click on the “Develop” button or press the “D” key on your keyboard to switch to the Develop module.
- Navigate to the Effects panel: On the right side of the interface, locate the Effects panel.
- Adjust the Amount slider: Within the Effects panel, find the “Post-Crop Vignetting” section. Use the “Amount” slider to control the strength of the vignette effect. Increasing the value darkens the edges, while decreasing it lightens them.
- Modify other vignette settings: Lightroom offers additional options to fine-tune the vignette effect. Adjust sliders such as “Midpoint,” “Roundness,” and “Feather” to customize the shape, transition, and intensity of the vignette.
- Preview the effect: Observe the main image window to visualize the changes and make any necessary adjustments to achieve the desired vignette effect.
- Make further adjustments if needed: If additional edits are required, use other editing tools in Lightroom, such as exposure, contrast, clarity, or color adjustments, to enhance the overall appearance and maintain a cohesive look.
- Save your work: Once you are satisfied with the vignette effect and any other edits, save your image in the desired format to preserve the changes.
Shortcut Method: Vignette Effect in Adobe Lightroom
For a quick and automated approach to applying a vignette effect in Adobe Lightroom, you can utilize pre-made presets. These pre-configured settings can be applied to your images with a single click. There are numerous vignette presets available, and you can even create custom presets for consistent application across multiple images.
Tips and Tricks: Vignette Effect in Adobe Lightroom
- Experiment with different vignette styles: Lightroom offers various vignette styles, such as Highlight Priority, Color Priority, Paint Overlay, and more. Experiment with different styles to achieve the desired look for your image.
- Consider the subject and composition: When applying the vignette effect, consider the subject and overall composition of the image. Adjust the vignette settings accordingly to ensure the effect enhances the focal point and doesn’t overpower or distract from the subject.
- Utilize local adjustments: To selectively apply the vignette effect to specific areas of the image, employ Lightroom’s local adjustment tools such as the adjustment brush or radial filter. This allows for more precise control over where the vignette effect is applied.
- Combine vignette with other adjustments: Experiment with combining the vignette effect with other adjustments in Lightroom, such as graduated filters or color grading, to create a more comprehensive and harmonious edit.
- Preserve the original image: Ensure a non-destructive workflow in Lightroom by preserving the original image and utilizing virtual copies or snapshots. This enables you to revert to the unedited version or explore different vignette settings without permanently altering your image.
By following these step-by-step instructions and utilizing tips and tricks in Adobe Lightroom, you can easily create a visually appealing vignette effect and enhance the impact of your images.
Shortcut Method: Vignette Effect in Adobe Lightroom
If you’re looking for a quick and efficient way to apply a vignette effect in Adobe Lightroom, you can take advantage of pre-made presets. These presets can be applied to your images with just a few clicks, offering a shortcut to achieving a stunning vignette effect. Here’s how you can use the shortcut method for creating a vignette effect in Adobe Lightroom:
- Launch Adobe Lightroom and open your image: Start by opening Adobe Lightroom and selecting the image you want to apply the vignette effect to.
- Navigate to the Develop module: Switch to the Develop module by clicking on the “Develop” button in the top-right corner of the interface or pressing the “D” key on your keyboard.
- Access the Presets panel: On the left-hand side of the Develop module, locate the Presets panel.
- Browse available vignette presets: Explore the available presets by expanding the “Vignette” section within the Presets panel. Lightroom provides a variety of pre-made vignette presets to choose from.
- Preview the vignette presets: Hover over each preset to see a live preview of the effect applied to your image. This allows you to assess which vignette style suits your image best.
- Select a vignette preset: Click on the desired preset to apply it to your image. Lightroom will instantly apply the chosen vignette effect, saving you time and effort.
- Adjust the preset settings (if needed): After applying the vignette preset, you can further fine-tune the effect by adjusting the preset settings in the Develop module. Tweak parameters like “Amount,” “Midpoint,” or “Feather” to achieve the desired result.
- Make additional adjustments if desired: If necessary, make additional adjustments to your image using other editing tools in Lightroom, such as exposure, contrast, or color adjustments, to complement the vignette effect.
- Save your work: Once you are satisfied with the vignette effect and any other edits, save your image in the desired format to preserve the changes.
By utilizing pre-made vignette presets in Adobe Lightroom, you can quickly apply a professional-looking vignette effect to your images without going through the manual adjustments. It’s a convenient and efficient way to enhance the overall visual impact of your photographs.
Tips and Tricks: Vignette Effect in Adobe Lightroom
Adobe Lightroom offers versatile tools to create and customize vignette effects. Here are some tips and tricks to help you enhance your vignette effect and make the most out of Adobe Lightroom’s capabilities:
- Experiment with different vignette styles: Lightroom provides various vignette styles, including Highlight Priority, Color Priority, and Paint Overlay. Try different styles to achieve the desired look and feel for your image.
- Consider the subject and composition: When applying the vignette effect, keep the subject and overall composition of your image in mind. Adjust the vignette settings accordingly to ensure that the effect enhances the focal point and doesn’t overpower or distract from the subject.
- Utilize local adjustments: Take advantage of Lightroom’s local adjustment tools, such as the adjustment brush or radial filter, to selectively apply the vignette effect to specific areas of the image. This level of control allows for more precise adjustments and helps you achieve a more tailored vignette effect.
- Combine the vignette effect with other adjustments: Experiment with combining the vignette effect with other editing tools and adjustments in Lightroom. Graduated filters, color grading, or tonal adjustments can be combined with the vignette effect to create a more comprehensive and harmonious edit.
- Use the “Feather” slider: Adjusting the “Feather” slider within the vignette settings can soften the transition between the vignette effect and the rest of the image, creating a more natural and seamless blend.
- Save custom user presets: If you frequently use specific vignette settings, consider saving them as custom user presets in Lightroom. This allows you to quickly apply your preferred vignette settings to other images, saving time and maintaining a consistent visual style.
- Experiment with different shapes: While the vignette effect is often associated with circular or oval shapes, you can experiment with different shapes using the “Post-Crop Vignetting” settings. Adjust the “Roundness” slider to create non-traditional and creative vignette effects.
- Use vignette sparingly: The vignette effect can be a powerful tool, but it’s important to use it sparingly and in a way that enhances your image. Avoid overusing or applying excessively strong vignettes, as they can distract from the overall composition.
- Preserve the original image: Work with a non-destructive workflow by preserving the original image and utilizing virtual copies or snapshots. This enables you to revisit or experiment with different vignette settings without permanently altering your original image.
By applying these tips and tricks, you can take your vignette effects in Adobe Lightroom to the next level and create visually captivating images that stand out.
Creating a Vignette Effect in GIMP
GIMP (GNU Image Manipulation Program) is a powerful and free open-source software that offers a wide range of editing tools, including the ability to create a vignette effect. With GIMP, you can easily add a vignette effect to enhance your images and draw focus to the subject. Here’s how to create a vignette effect in GIMP:
Step-by-Step Guide: Vignette Effect in GIMP
- Open your image in GIMP: Launch GIMP and open the image you want to apply the vignette effect to using the “Open” option in the “File” menu.
- Create a new transparent layer: In the Layers panel, click on the “New Layer” button to create a new transparent layer above your image. This layer will be used to apply the vignette effect.
- Select the Ellipse Select Tool: From the Toolbox, choose the “Ellipse Select Tool” (it resembles an oval-shaped icon).
- Create a circular selection: With the Ellipse Select Tool, click and drag on your image to create a circular selection. The center of the selection should be where you want to place the focal point of your image.
- Invert the selection: In the “Select” menu, go to “Invert” or use the keyboard shortcut Ctrl+I to invert the selection so that the outer edges are now selected.
- Apply a feather to the selection: Still in the “Select” menu, go to “Feather” and choose an appropriate feather radius for your image. This determines the softness of the transition between the vignette and the rest of the image.
- Create the vignette effect: In the Toolbox, select the “Blend Tool” (it resembles a gradient) and make sure the foreground and background colors are set to black and white, respectively. Click and drag from the center of the selection towards the edges to create a gradient effect. This will apply the vignette effect, with the center being unaffected and the edges darkening or fading.
- Remove the selection: In the “Select” menu, choose “None” or use the keyboard shortcut Ctrl+Shift+A to remove the selection and view the final vignette effect.
Shortcut Method: Vignette Effect in GIMP
If you prefer a quicker approach to create a vignette effect in GIMP, you can utilize the “Vignette” filter. Here’s how:
- Open your image in GIMP: Launch GIMP and open the image you want to apply the vignette effect to.
- Go to the “Filters” menu: In the top navigation bar, click on “Filters” to access the Filters menu.
- Navigate to “Light and Shadow”: From the Filters menu, go to “Light and Shadow” and choose “Vignette.”
- Adjust the vignette settings: In the Vignette dialog box, you can adjust parameters such as “Radius,” “Strength,” and “Gamma” to customize the vignette effect according to your preference.
- Preview the effect: Continuously monitor the preview window in the Vignette dialog box to visualize the changes in real-time.
- Apply the vignette effect: Once you are satisfied with the adjustments, click “OK” to apply the vignette effect to your image.
Tips and Tricks: Vignette Effect in GIMP
- Experiment with different shapes and sizes: While circular vignettes are common, don’t be afraid to explore different shapes and sizes using the Ellipse Select Tool. This allows for unique and creative vignette effects.
- Adjust opacity and blending mode: Fine-tune the intensity and blend of the vignette effect by adjusting the opacity and blending mode of the vignette layer in the Layers panel.
- Utilize layer masks: Use layer masks in GIMP to selectively apply the vignette effect to specific areas of the image, providing more control over the focal point and intensity of the vignette.
- Combine with other editing tools: Experiment with combining the vignette effect with other editing tools and techniques in GIMP, such as adjusting contrast, saturation, or adding filters, to create a more comprehensive and polished final image.
- Save your work: Once you are satisfied with the vignette effect and any additional edits, save your image in the desired format to preserve the changes.
By following these instructions and utilizing tips and tricks in GIMP, you can easily create a vignette effect and enhance the visual impact of your images.
Step-by-Step Guide: Vignette Effect in GIMP
Creating a vignette effect in GIMP allows you to add depth and focus to your images. Here’s a step-by-step guide on how to achieve a vignette effect in GIMP:
- Launch GIMP and open your image: Start by launching GIMP and opening the image you want to apply the vignette effect to using the “Open” option in the “File” menu.
- Create a new layer: In the Layers panel, click on the “New Layer” button to create a new layer above your image. This layer will be used for applying the vignette effect.
- Select the Ellipse Select Tool: From the Toolbox, choose the “Ellipse Select Tool” (it resembles an oval-shaped icon).
- Create a circular selection: Use the Ellipse Select Tool to click and drag on your image, creating a circular selection. Position the selection where you want the focal point of your image to be.
- Invert the selection: In the “Select” menu, click on “Invert” or use the keyboard shortcut Ctrl+I to invert the selection. This way, the outer edges will be selected for applying the vignette effect.
- Apply feather to the selection: In the “Select” menu, go to “Feather” and choose a suitable feather radius. This softens the transition between the vignette and the rest of the image.
- Create the vignette effect: Select the “Blend Tool” from the Toolbox, making sure the foreground color is set to black and the background color is set to white. Click and drag from the center of the selection towards the edges to create a gradient effect, applying the vignette effect with a darkening or fading effect at the edges.
- Remove the selection: In the “Select” menu, click on “None” or use the keyboard shortcut Ctrl+Shift+A to remove the selection. This allows you to view the final vignette effect on your image.
Shortcut Method: Vignette Effect in GIMP
If you prefer a quicker way to create a vignette effect in GIMP, you can utilize the “Vignette” filter. Follow these steps:
- Open your image in GIMP: Launch GIMP and open the image you want to apply the vignette effect to.
- Access the “Filters” menu: Click on “Filters” in the top navigation bar to access the Filters menu.
- Find the “Light and Shadow” filters: From the Filters menu, navigate to the “Light and Shadow” category and choose “Vignette.”
- Adjust vignette settings: In the “Vignette” dialog box, adjust the parameters such as “Radius,” “Strength,” and “Gamma” to customize the vignette effect according to your preference.
- Preview the effect: Observe the preview window in the “Vignette” dialog box to see a real-time preview of the effect on your image.
- Apply the vignette effect: Once you are satisfied with the adjustments, click “OK” to apply the vignette effect to your image.
By following these step-by-step instructions, you can easily create a vignette effect in GIMP and add a professional touch to your images.
Shortcut Method: Vignette Effect in GIMP
GIMP provides a shortcut method to quickly create a vignette effect using the “Vignette” filter. By utilizing this filter, you can achieve a stunning vignette effect in just a few simple steps. Here’s how:
- Launch GIMP and open your image: Start by launching GIMP and opening the image you want to apply the vignette effect to.
- Access the “Filters” menu: Click on “Filters” in the top navigation bar to access the Filters menu.
- Navigate to the “Light and Shadow” filters: From the Filters menu, locate the “Light and Shadow” category and choose “Vignette.”
- Adjust the vignette settings: In the “Vignette” dialog box, you will find various parameters to customize the vignette effect. Adjust values such as “Radius,” “Strength,” and “Gamma” to achieve the desired vignette effect on your image.
- Preview the effect: Take advantage of the preview window provided in the “Vignette” dialog box. This allows you to see a real-time preview of the vignette effect applied to your image, assisting you in making further adjustments if necessary.
- Apply the vignette effect: Once you are satisfied with the settings, click the “OK” button to apply the vignette effect to your image.
By using the “Vignette” filter in GIMP, you can conveniently and effectively create an eye-catching vignette effect on your images with minimal effort.
Tips and Tricks: Vignette Effect in GIMP
- Experiment with different blending modes: After applying the vignette effect using the “Vignette” filter, try experimenting with different blending modes in the Layers panel. This can further enhance the impact of the vignette and create unique visual effects.
- Adjust the opacity of the vignette layer: To fine-tune the vignette effect, adjust the opacity of the vignette layer in the Layers panel. Lowering the opacity can make the effect subtler, while increasing it can intensify the vignette effect.
- Use layer masks for selective vignetting: If you want to apply the vignette effect selectively to specific areas of the image, consider using layer masks. Layer masks allow you to control where the effect is visible, giving you more precise control over the vignetting process.
- Combine the vignette effect with other adjustments: Experiment with combining the vignette effect with other editing tools and techniques in GIMP. Adjusting contrast, saturation, or using other filters can enhance the overall appearance and create a more balanced and impactful image.
- Save your work: Once you are satisfied with the vignette effect and any additional edits, save your image in the desired format to preserve the changes.
By utilizing these tips and using the shortcut method in GIMP, you can effectively create captivating vignette effects and elevate the visual impact of your images.
Tips and Tricks: Vignette Effect in GIMP
GIMP offers numerous ways to enhance the vignette effect and make it more impactful. Here are some tips and tricks to help you get the most out of the vignette effect in GIMP:
- Experiment with different shapes and sizes: While circular or oval vignettes are common, don’t be afraid to explore different shapes using the selection tools in GIMP. Adjustable shapes can help you achieve unique and creative vignette effects.
- Adjust opacity and blending modes: Fine-tune the vignette effect by adjusting the opacity and blending modes of the vignette layer in the Layers panel. Lower the opacity for a softer effect or experiment with blending modes to create different visual styles.
- Utilize layer masks: Take advantage of layer masks in GIMP to selectively apply the vignette effect to specific areas of the image. Layer masks enable precise control over where the effect is visible, giving you more flexibility in customization.
- Combine with other editing tools: Experiment with combining the vignette effect with other editing tools and techniques in GIMP. Adjusting contrast, saturation, or utilizing filters can further enhance the overall impact and create a more dynamic image.
- Try different feathering settings: When creating the vignette effect, experiment with different feathering settings to control the softness of the transition between the vignette and the rest of the image. This can greatly impact the overall mood and aesthetic of the image.
- Use layer opacity and masks for gradual vignettes: If you prefer a subtle or gradual vignette effect, consider using layer opacity and masks together. Adjusting the opacity gradually or utilizing gradient masks can create a more nuanced and natural-looking vignette.
- Add color to the vignette: Instead of using a traditional black-to-transparent vignette, consider adding subtle colors to the vignette effect. Experiment with blending modes and color overlays to create unique and artistic vignette effects.
- Save your work as a project file: To preserve your work and maintain flexibility for future editing, save your image as a layered GIMP project file (e.g., .xcf) that includes all the layers and adjustments. This way, you can easily make changes and adjustments later without losing any information.
- Experiment and have fun: The vignette effect is a creative tool, so don’t be afraid to experiment and find different approaches that suit your unique style and the specific image you are working with. Have fun exploring different options and discovering your own creative enhancements.
By applying these tips and tricks, you can take your vignette effects in GIMP to the next level and create visually captivating images that stand out.
Comparing the Vignette Effects in Different Applications
When it comes to creating a vignette effect, various image editing applications offer different methods and capabilities. Let’s compare the vignette effects in Adobe Photoshop, Adobe Lightroom, and GIMP:
Adobe Photoshop:
Adobe Photoshop provides multiple methods to create a vignette effect. It offers precise control over the shape, size, and intensity of the vignette. Photoshop provides both manual methods using selection tools and gradient overlays, as well as a shortcut method using the “Lens Correction” filter. The software additionally enables the combination of the vignette effect with other adjustments and customization options, allowing for extensive creative possibilities.
Adobe Lightroom:
Adobe Lightroom offers an integrated approach to editing and organizing photographs, including the option to create a vignette effect. Lightroom provides a user-friendly interface with dedicated sliders to adjust the vignette effect’s strength, size, and shape. Additionally, presets in Lightroom streamline the process, providing quick and consistent application of vignettes. Although Lightroom’s vignette customization options may be more limited compared to Photoshop, it offers a simplified and efficient method for photographers who want to apply the effect as part of their regular photo editing workflow.
GIMP:
GIMP, being a free and open-source software, offers users a powerful editing toolset, including the ability to create a vignette effect. GIMP provides manual control over the placement, size, and intensity of the vignette effect through selection tools, gradients, and layer masks. The software also includes a shortcut using the “Vignette” filter. While GIMP does not have the same level of integration and specialized features as Adobe software, it allows users to achieve professional-looking vignette effects with its extensive toolset and customizable options.
When comparing the vignette effects in these applications, it is important to consider factors such as ease of use, flexibility, and compatibility with your workflow. Adobe Photoshop offers advanced control and extensive editing capabilities, making it suitable for users who require precise adjustment options. Adobe Lightroom offers a streamlined and efficient workflow for photographers, with a focus on simplicity and quick application of the vignette effect. GIMP, being a free and open-source solution, provides a powerful editing platform with extensive customization options but requires a deeper understanding of the software’s functionalities and interface.
Ultimately, the choice of application depends on your specific needs, level of expertise, and personal preference. By familiarizing yourself with the features and capabilities of each application, you can select the one that best suits your editing style and enhances your creative vision.