
What is HDR Photography?
HDR (High Dynamic Range) photography is a technique that allows photographers to capture a wider range of light and detail in their images. Typically, when you take a photograph, the camera sensor can only capture a limited range of light, resulting in either overexposed highlights or underexposed shadows. HDR photography overcomes this limitation by capturing multiple exposures of the same scene, each with a different exposure setting.
By combining these multiple exposures in post-processing, HDR photography reveals intricate details in both the highlights and shadows of the image. The result is a photograph that more accurately represents the full range of light and brings out the depth and texture in the subject.
HDR photography is particularly useful in situations where there is a high contrast between light and shadow, such as landscapes with a bright sky and dark foreground, or interior shots with windows that let in bright sunlight. It allows photographers to capture the scene in a way that closely matches what the human eye sees, with all the nuances and details preserved.
One of the key benefits of HDR photography is the ability to create stunning, vibrant, and dynamic images. The technique can bring out the colors and details that might otherwise be lost in a single exposure. Additionally, HDR photography provides photographers with the flexibility to fine-tune the image’s overall tonal range and create a more visually appealing result.
While HDR photography was traditionally done using specialized cameras or software, it is now possible to achieve HDR effects with a variety of editing programs, including the popular open-source software GIMP.
In the following sections, we will explore how to create a captivating HDR photo using GIMP, from capturing multiple exposures to post-processing techniques that enhance the final image.
What is GIMP?
GIMP, which stands for GNU Image Manipulation Program, is a powerful and versatile open-source image editing software. It offers a wide range of tools and features that rival many commercial editing programs, making it an excellent choice for photographers, graphic designers, and digital artists.
GIMP provides a comprehensive set of image editing tools, including cropping, resizing, adjusting colors, and retouching imperfections. It also supports layers, allowing users to combine multiple elements and manipulate them independently for more complex editing tasks.
One of the standout features of GIMP is its support for HDR editing. It allows users to create HDR images by combining multiple exposures, just like specialized HDR software. GIMP provides the necessary tools and functionality to merge the different exposures, adjust the tonal range, and enhance the overall image quality.
With GIMP, users have full control over the HDR editing process. They can fine-tune the exposure, adjust the tone mapping, and apply various enhancement techniques to achieve the desired look and feel of the final image. The software also supports non-destructive editing, which means users can make adjustments without permanently altering the original image data.
In addition to its extensive editing capabilities, GIMP supports a wide range of file formats, including popular formats such as JPEG, PNG, and TIFF. This allows users to work with images from various sources and export their final creations in the desired format.
Another noteworthy aspect of GIMP is its thriving community. As an open-source software, GIMP benefits from contributions and feedback from a dedicated community of users and developers. This means that the software is constantly being improved and updated, with new features and bug fixes being regularly released.
Whether you are a seasoned professional or a novice photographer, GIMP provides a powerful and accessible platform for editing and enhancing your images. Its versatility, extensive toolset, and HDR editing capabilities make it a valuable tool in any photographer’s workflow.
In the following sections, we will delve into the steps and techniques involved in creating an HDR photo using GIMP, transforming your ordinary images into stunning, high-impact visuals.
How to Take Multiple Exposures for HDR
Creating an HDR photo requires capturing multiple exposures of the same scene with different exposure settings. This ensures that you have a range of images that cover both the highlights and shadows, providing the necessary data for the HDR merging process. Here are the steps to take multiple exposures for HDR:
- Choose a Stable Setup: To ensure that the images align perfectly during the merging process, use a tripod or steady surface to keep your camera steady. This helps prevent any movement that could introduce alignment issues.
- Set the Camera to Manual Mode: Switch your camera to manual mode to have full control over the exposure settings. This allows you to keep the aperture and ISO consistent across all the exposures.
- Bracket Your Exposures: Take a series of exposures, varying the shutter speed to capture a range of brightness levels. Typically, three to five exposures are sufficient, but you can experiment with more or fewer depending on the scene’s contrast.
- Determine the Exposure Range: Start by setting your camera’s exposure for the highlights and take a shot. Gradually decrease the exposure by adjusting the shutter speed and take additional shots. Finally, increase the exposure to capture details in the shadows. Ensure that each exposure is distinct, capturing different parts of the dynamic range.
- Use Exposure Lock or Manual Focus: To maintain consistency between exposures, consider using exposure lock or manual focus. This prevents the camera from adjusting the exposure or focusing between shots, providing consistent results.
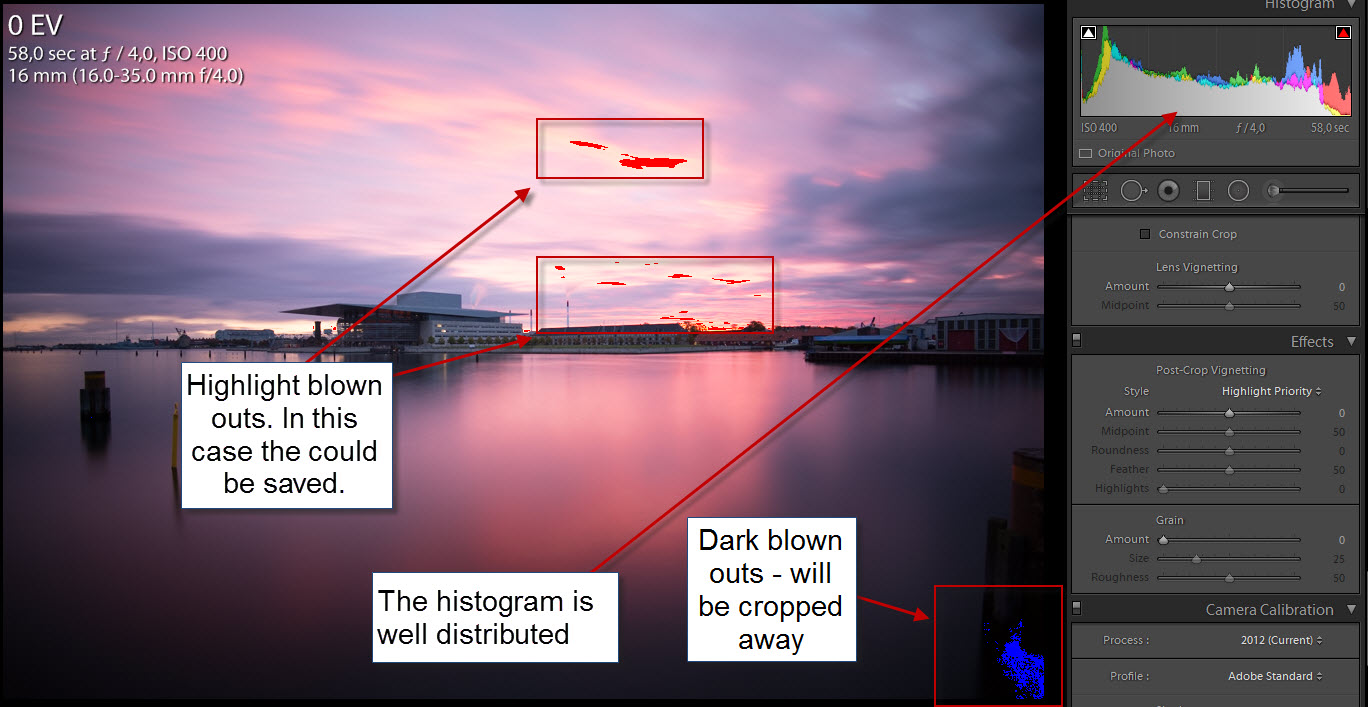
- Review Histograms: Check the histograms of each exposure to ensure that the highlights are not overblown or the shadows are not too dark. This will help you make adjustments if needed during the post-processing stage.
By capturing multiple exposures with different brightness levels, you will have a robust set of images to work with in creating your HDR photo. In the next section, we will explore how to prepare your photos in GIMP before merging them into a single HDR image.
Preparing Your Photos in GIMP
Once you have captured multiple exposures for your HDR photo, it’s time to prepare them in GIMP for the merging process. Here are the steps to follow:
- Importing Your Photos: Launch GIMP and navigate to File > Open. Select the multiple exposures you captured and import them into GIMP as separate layers. Make sure they are arranged in the correct order, with the brightest exposure on top and the darkest exposure at the bottom.
- Aligning the Layers: In some cases, slight movements during capture may affect the alignment of the layers. To correct this, select the layers and go to Layer > Auto > Align Layers. GIMP will automatically align the layers based on their content, ensuring a seamless merge.
- Masking the Layers: To selectively blend the exposures, add layer masks to each layer. This allows you to reveal or hide specific areas of each exposure. Select the top layer, then click on the “Add Layer Mask” button at the bottom of the Layers panel. Repeat this process for each layer.
- Adjusting Layer Opacity: To finesse the blending effect, you can adjust the opacity of each layer to control the amount of visibility. Lower the opacity of the brighter layers to let the details from the darker exposures come through. Experiment with different opacity levels until you achieve the desired balance.
- Refining the Masks: Use the brush tool and the black or white color to refine the masks. Painting with black hides the content of the layer, while painting with white reveals it. This allows you to selectively adjust the blend in specific areas to ensure a smooth and seamless transition.
- Correcting Exposure and Colors: Use adjustment layers in GIMP, such as Levels, Curves, and Saturation, to fine-tune the exposure and colors of your merged image. This step helps to achieve a balanced overall look and correct any inconsistencies or color shifts among the different exposures.
By following these steps, you will effectively prepare your photos in GIMP for the HDR merging process. In the next section, we will explore how to create the HDR image by blending the exposures together.
Creating the HDR Image in GIMP
Now that your photos are prepared in GIMP, it’s time to merge them into a single HDR image. Here’s how you can create the HDR image:
- Merge the Layers: Select all the layers in the Layers panel and right-click on them. Choose “Merge Layers” to combine them into a single layer. This merged layer will serve as the base for your HDR image.
- Create a New Layer: Duplicate the merged layer by right-clicking on it and selecting “Duplicate Layer”. This layer will be used for blending the exposures in the HDR image.
- Apply the Difference Blending Mode: With the duplicated layer selected, change its blending mode to “Difference”. This mode highlights the differences between the layers and helps to enhance the details and dynamic range in your HDR image.
- Invert the Layer: Invert the duplicated layer by going to Colors > Invert. This further enhances the differences between the layers and prepares it for the next step.
- Apply Gaussian Blur: Add a Gaussian Blur effect to the inverted layer. Go to Filters > Blur > Gaussian Blur and adjust the radius until you achieve a pleasing effect. The blur helps to smooth out the differences and create a more natural and cohesive HDR image.
- Change Blending Mode and Opacity: Change the blending mode of the inverted and blurred layer to “Addition”. Then, adjust the opacity of this layer to control the strength of the blending effect. Experiment with different opacity levels to achieve the desired HDR look.
- Refine the Image: Use adjustment layers and further editing techniques to refine your HDR image in GIMP. This may include adjustments to brightness, contrast, saturation, and color balance. Use your creative judgment to achieve the desired aesthetic and make any fine-tuning adjustments as needed.
By following these steps, you will successfully create an HDR image in GIMP that combines the exposures and enhances the overall dynamic range. In the next section, we will explore how to use exposure blending techniques to enhance your HDR photo even further.
Using Exposure Blend to Enhance Your HDR Photo
Exposure blending is a powerful technique that can further enhance your HDR photo, bringing out the best qualities of each exposure. It involves selectively blending specific areas or elements from different exposures to create a more balanced and visually appealing image. Here’s how you can use exposure blending to enhance your HDR photo in GIMP:
- Identify Areas to Blend: Assess your HDR image and identify areas that could be improved through exposure blending. This might include overly bright or dark regions, areas with blown-out highlights or loss of detail in shadows.
- Create Layer Masks: Duplicate the HDR image layer and create layer masks for the duplicates. Use the layer masks to reveal or hide specific areas of the image, allowing you to selectively blend the exposures.
- Blend in Brighter Exposures: For areas that are too dark or lacking detail, use a layer mask to reveal the corresponding regions from brighter exposures. This helps to bring out the details and restore the balance in those areas.
- Blend in Darker Exposures: Similarly, for areas that are overexposed or have blown-out highlights, use a layer mask to reveal the corresponding regions from darker exposures. This helps to recover lost details and create a more balanced exposure.
- Refine the Blending: Use the brush tool with a soft edge and varying opacity to refine the layer masks and blend the exposures more seamlessly. This allows for precise control over the blending effect and ensures a smooth transition between different exposure values.
- Adjust the Overall Tone: Once the exposure blending is complete, make overall adjustments to the tone and contrast of the image. This can be done using adjustments such as Levels, Curves, or Brightness/Contrast to fine-tune the overall appearance and create the desired mood.
- Review and Make Final Adjustments: Take a step back and review your blended HDR photo. Make any final adjustments to colors, saturation, or sharpness to enhance the image’s impact and achieve your desired artistic vision.
By utilizing exposure blending techniques, you can take your HDR photo to the next level, achieving a more balanced and visually striking result. In the next section, we will explore how to adjust the tone mapping of your HDR photo to achieve greater realism and natural-looking results.
Adjusting Tone Mapping for Greater Realism
Tone mapping is a crucial step in creating a realistic and visually pleasing HDR photo. It allows you to control the distribution of tones and colors in your image, ensuring a balanced and natural-looking result. Here are the steps to adjust the tone mapping of your HDR photo in GIMP:
- Assess the Image: Begin by assessing the overall tone and contrast of your HDR photo. Look for areas that may appear too bright, too dark, or lacking in detail.
- Use Levels or Curves: Adjust the tone mapping by using the Levels or Curves adjustment tool in GIMP. These tools provide control over the distribution of tones and help you fine-tune the contrast and brightness of your image.
- Preserve Natural Tones: While it can be tempting to push the extremes in an HDR photo, aim for a result that maintains a natural look. Avoid overly saturated colors or excessive contrast that may make the image appear unrealistic.
- Avoid Overprocessing: Be mindful not to over-process your HDR photo. Strive for a balance where the details are enhanced, but the image retains a sense of realism. Avoid excessive sharpening or noise reduction that could lead to artifacts or an unnatural appearance.
- Pay Attention to Highlights and Shadows: Adjust the tone mapping to ensure that the highlights and shadows maintain detail and do not appear overly clipped or washed out. This will contribute to a more balanced and realistic final image.
- Use Localized Adjustments: Apply localized adjustments to specific areas if needed. This can be done with adjustment layers or brushes to target specific regions of the image that require fine-tuning.
- Experiment and Iterate: Don’t be afraid to experiment and iterate with different tone mapping settings. Adjusting the tone mapping is often an iterative process, and it may take some trial and error to achieve the desired results.
By carefully adjusting the tone mapping of your HDR photo, you can create a result that appears more realistic and natural. In the next section, we will explore how to fine-tune your HDR photo in GIMP to add the finishing touches.
Fine-Tuning Your HDR Photo
Once you have adjusted the tone mapping of your HDR photo, it’s time to fine-tune and add the finishing touches to create a polished and visually impactful image. Here are some steps to help you fine-tune your HDR photo in GIMP:
- Check for Imperfections: Carefully examine your HDR photo for any imperfections, such as dust spots, lens distortions, or sensor artifacts. Use the healing tool or clone stamp tool in GIMP to remove or repair these imperfections.
- Enhance Details: Consider using sharpening techniques to enhance the details in your HDR photo. Apply a sharpening filter or use the Unsharp Mask tool in GIMP to bring out the finer elements and textures of your image.
- Adjust Color Balance: Fine-tune the color balance if necessary to achieve the desired look. Use the color balance adjustment layer or the levels and curves tools to make subtle adjustments to the color tones and achieve a harmonious color palette.
- Refine Composition: Evaluate the composition of your HDR photo and make any necessary adjustments. Crop the image or use the transform tools to recompose the scene for better balance and visual impact.
- Add Depth and Dimension: Apply techniques such as dodging and burning to create depth and dimension in your HDR photo. Use a soft brush with reduced opacity to selectively darken or lighten areas, enhancing the three-dimensional quality of your image.
- Experiment with Filters and Effects: Get creative and experiment with different filters and effects to add a unique touch to your HDR photo. Try applying vignettes, gradients, or other artistic effects to enhance the mood or draw attention to specific areas.
- Consider Black & White Conversion: Convert your HDR photo to black and white to create a different aesthetic. Experiment with different conversion methods and adjust the tonal range to achieve a timeless and dramatic monochrome image.
By fine-tuning your HDR photo in GIMP, you can refine the details, colors, and composition to create a visually stunning and compelling image. In the next section, we will explore how to add creative effects to further enhance your HDR photo.
Adding Creative Effects to Your HDR Photo
Adding creative effects to your HDR photo can further enhance its visual appeal and give it a unique and artistic touch. Here are some ways you can add creative effects to your HDR photo in GIMP:
- Texture Overlay: Apply a texture overlay to give your HDR photo a vintage or textured look. Use blending modes and layer masks to blend the texture seamlessly with the image, creating an interesting and artistic effect.
- Gradient Map: Use a gradient map adjustment to change the colors of your HDR photo. Experiment with different gradients to create a dramatic or stylized effect, emphasizing certain tones or creating a specific mood.
- Selective Coloring: Convert your HDR photo to black and white and selectively add colors to specific areas. This can be done by creating layer masks and painting with a colored brush or using the brush tool with the “Color” blending mode.
- Radial Blur or Motion Blur: Add a sense of movement or dynamic energy to your HDR photo with radial blur or motion blur effects. This can be particularly effective when applied to elements such as water, clouds, or moving subjects.
- Surreal or Dreamy Effects: Experiment with filters and adjustment layers to create surreal or dreamy effects. This can include playing with saturation, contrast, and other parameters to evoke a specific mood or atmosphere.
- Vignetting: Add a vignette effect to draw attention to the center of your HDR photo. Use the elliptical selection tool to create a circular or oval selection around the focal point, then apply a darkening effect to the surrounding area.
- Light Leak or Lens Flare: Simulate light leaks or lens flares to add a vintage or atmospheric look to your HDR photo. Use brushes or overlay images to create these effects, carefully blending them with the image to make them appear natural and realistic.
- Split Toning: Apply split toning to add a unique color cast to highlights and shadows separately. This can create a distinctive look and enhance the mood of your HDR photo.
- Double Exposure: Create a double exposure effect by blending two different images together. Overlay one image on top of the other and use layer masks to selectively reveal elements from each image, resulting in a visually striking and artistic effect.
Adding creative effects to your HDR photo allows you to bring out your artistic vision and make your photo truly unique. Have fun exploring different techniques and effects in GIMP to create a captivating and visually stunning HDR image.