
Why Should You Straighten Your Photos?
Photography allows us to capture unforgettable moments and create cherished memories. However, sometimes those perfect shots can be marred by a slightly tilted horizon or crooked composition. That’s where straightening your photos can make a world of difference.
A straight photograph not only looks more professional and visually pleasing, but it also helps to create a sense of balance and harmony. It allows viewers to focus on the subject of the photo without being distracted by slanted or uneven elements.
Straightening your photos can also improve the overall composition. By aligning the horizon or key elements in your image, you can guide the viewer’s eye and create a more visually engaging experience. Whether you’re capturing a beautiful landscape, a group of people, or a product for an online store, ensuring that the photo is straight will enhance its impact.
Additionlly, straightening photos can be particularly useful for architectural or interior shots. It helps to maintain the integrity of the building’s structure and showcases the design elements in a more accurate way. For real estate agents or interior designers, presenting straight photos can make a significant difference in attracting potential buyers or clients.
Moreover, straightening your photos digitally saves you from the hassle and expense of physically straightening prints. In the past, photographers had to rely on additional tools like tripods and bubble levels to ensure a straight shot. With the advancement of technology and photo editing software like GIMP, straightening your photos has become much easier and more accessible.
So, whether you’re a professional photographer looking to perfect your shots or an amateur capturing treasured moments, straightening your photos is a valuable skill to learn. It allows you to enhance the quality and impact of your images, ensuring that they are visually appealing and captivating to the viewer’s eye.
What Is GIMP?
GIMP, short for GNU Image Manipulation Program, is a powerful and free open-source software used for editing and manipulating digital images. It provides users with a wide range of tools and features, making it a popular choice for photographers, graphic designers, and digital artists.
GIMP offers a comprehensive set of tools that rival those found in paid photo editing software. It supports various file formats, including JPEG, PNG, GIF, and TIFF, making it compatible with most image types. Additionally, GIMP is available for multiple operating systems, including Windows, Mac OS, and Linux, making it accessible to a wide range of users.
One of GIMP’s standout features is its ability to perform advanced image editing tasks, such as retouching, color correction, and photo manipulation. It provides users with tools for adjusting brightness, contrast, saturation, and levels to enhance the overall look and feel of the image.
Besides these basic editing features, GIMP also offers more advanced tools like layers, masks, and filters. Layers allow users to work on different elements of an image separately, giving them full control over the editing process. Masks allow for precise selections and non-destructive editing, while filters offer creative effects to add unique touches to your photos.
In addition to its editing capabilities, GIMP is also known for its extensive plugin support. This means that users can further enhance the software’s functionality by installing additional plugins that provide specialized tools and effects.
While GIMP may have a steep learning curve for beginners, its vast array of features and customization options make it a favorite among experienced users. It offers a high level of flexibility, allowing users to tailor the program to their specific needs and workflows.
Whether you’re an amateur photographer looking to edit your vacation photos or a professional designer working on a complex project, GIMP provides the tools necessary to achieve your desired results. Its versatility, power, and affordability make it a go-to choice for anyone seeking robust image editing capabilities without breaking the bank.
Getting Started With GIMP
If you’re new to GIMP and excited to start editing your photos, here’s a step-by-step guide to help you get started:
- Download and Install GIMP: Visit the official GIMP website and download the software compatible with your operating system. Follow the installation prompts to complete the setup process.
- Launch GIMP: Once installed, open GIMP on your computer. You’ll be greeted with a clean and user-friendly interface.
- Open Your Photo: To begin editing, click on “File” in the top menu and select “Open.” Locate the photo you want to edit and click “Open” to load it into GIMP’s workspace.
- Familiarize Yourself With the Tools: Take some time to explore the various tools available in GIMP. From the toolbox on the left side of the screen, you’ll find tools for selection, painting, cropping, image manipulation, and more. Hover over each tool for a tooltip description.
- Make Basic Edits: Use tools like the Crop tool to remove unwanted parts of the image, the Rotate tool to straighten the photo if needed, and the Scale tool to resize it. Experiment with different adjustments to enhance the lighting, color balance, and overall appearance of your photo.
- Use Layers: Layers are a powerful feature in GIMP that allow you to work on different elements of your image separately. Create a new layer by clicking on “Layer” in the top menu and selecting “New Layer.” This allows you to make non-destructive edits without affecting the original image.
- Apply Filters and Effects: GIMP offers a wide range of filters and effects to add creative touches to your photos. Experiment with options like blur, sharpen, noise reduction, and artistic filters to achieve the desired look.
- Save Your Work: Once you’re happy with your edits, click on “File” in the top menu and select “Save” to save your project as a GIMP (.xcf) file. This preserves all the layers and allows you to continue editing later. If you’re done with your edits and want to save the final image, select “Export” and choose the desired file format (e.g., JPEG or PNG).
Remember, practice makes perfect. Take the time to experiment with different tools and techniques in GIMP to familiarize yourself with its features. The more you use it, the more proficient you’ll become in editing your photos to perfection.
Opening Your Photo in GIMP
In order to start editing your photos in GIMP, you need to open them within the software. Here’s a quick guide on how to open your photo in GIMP:
- Launch GIMP: Open GIMP on your computer by double-clicking the program icon. It may take a few moments to load.
- Access the “Open” dialog: Click on the “File” menu at the top of the screen. In the drop-down menu, select “Open.” Alternatively, you can use the shortcut Ctrl + O (or Command + O on a Mac).
- Select your photo: Navigate to the folder where your photo is stored. Browse through your files to find the specific image you want to edit. Click on the photo to select it.
- Open the photo: Once you have selected your photo, click the “Open” button on the bottom right corner of the dialog box. This will load the image into GIMP’s workspace.
After successfully opening your photo in GIMP, you will see it displayed in the main editing area. You can now begin applying various edits and enhancements to your image.
If you want to work on multiple photos simultaneously, you can open each image using separate instances of GIMP or use the “File” menu to open additional images within the same GIMP window. This allows you to switch between photos easily and work on them independently.
GIMP supports a wide range of file formats, including JPEG, PNG, GIF, and TIFF, among others. This means that you can open and edit photos in the format you have saved them in without the need for conversion or additional software.
It’s important to note that GIMP’s default file format is the native XCF format, which preserves layers and other editing features. If you want to save your edited photo in a more widely used format (such as JPEG or PNG), you’ll need to use the “Export” function instead of “Save.” This ensures that the final image retains the changes you’ve made while being compatible with other software and devices.
Now that you know how to open your photo in GIMP, you’re ready to start exploring the software’s powerful editing tools and unleash your creativity on your images.
Understanding the Rotate Tool
The Rotate tool in GIMP is a handy feature that allows you to straighten or adjust the angle of your photos. Whether you need to fix a slightly tilted horizon or correct a crooked composition, the Rotate tool provides an easy and effective solution.
Here’s a breakdown of how to use the Rotate tool in GIMP:
- Select the Rotate tool: Click on the Rotate tool icon in the toolbox on the left side of the screen. The icon looks like a curved arrow.
- Choose the rotation mode: In the Tool Options dialog, you’ll see two rotation mode options: “Free” and “Fixed.”
- In “Free” mode, you can rotate the image freely without any constraints.
- In “Fixed” mode, you can specify a specific angle of rotation using the “Angle” input field.
- Position the rotation center: By default, the rotation center is set to the center of the image. If you want to change the rotation center, simply click on the spot in the image where you want the center to be.
- Rotate the image: To rotate the image, click and drag your mouse within the image area. As you drag, the image will rotate accordingly.
- In “Free” mode, the image will rotate freely in any direction as you drag.
- In “Fixed” mode, the image will rotate based on the angle you specified in the Tool Options dialog.
- Fine-tune the rotation: If needed, you can use the “Angle” field in the Tool Options dialog to further adjust the rotation angle numerically.
- Apply the rotation: Once you’re satisfied with the rotation, click the “Rotate” button in the Tool Options dialog to apply the changes to the image.
The Rotate tool also provides additional options to enhance your workflow. You can choose whether to rotate the current layer or the entire image, as well as the option to straighten the image automatically based on the horizon or a specific reference line.
It’s important to note that rotating an image can sometimes result in empty areas created by the rotation. To fill these empty areas, GIMP provides the “Crop to Result” option, which allows you to automatically crop the image to remove any excess space created during the rotation.
By mastering the Rotate tool in GIMP, you can easily straighten your photos and ensure precise alignment, creating visually appealing images that captivate viewers.
Straightening Your Photo Using the Rotate Tool
The Rotate tool in GIMP is a powerful tool that can help you straighten your photos and correct any tilted or crooked compositions. Here’s a step-by-step guide on how to use the Rotate tool to straighten your photo:
- Select the Rotate tool: Click on the Rotate tool icon in the toolbox on the left side of the screen. It looks like a curved arrow.
- Identify the horizon or reference line: Look for a horizontal line in your photo that should be straight, such as the horizon in a landscape photo or a straight edge in an architectural shot. This line will serve as your reference for straightening the photo.
- Set the rotation mode: In the Tool Options dialog at the top of the screen, choose the “Fixed” rotation mode. This will allow you to specify the angle of rotation.
- Position the rotation center: To set the rotation center, click on the spot in the image where you want the center to be. It’s often best to choose a point along the reference line.
- Rotate the image: Click and drag your mouse in the image area to rotate it. As you drag, the image will rotate around the center point you set. Align the reference line with the horizontal guide provided in the GIMP interface or adjust it visually for accuracy.
- Fine-tune the rotation: If needed, you can adjust the rotation angle precisely by entering the desired angle in the “Angle” input field in the Tool Options dialog.
- Apply the rotation: Once you are satisfied with the adjustment, click the “Rotate” button in the Tool Options dialog to apply the rotation to your photo.
After straightening your photo using the Rotate tool, you’ll notice that the image looks more balanced and visually pleasing. Any tilted or skewed elements will be corrected, resulting in a more professional-looking composition.
Keep in mind that it’s best to use the Rotate tool in moderation and only for smaller adjustments. If your photo requires a significant rotation, it’s recommended to use the Crop tool in combination with the Rotate tool to achieve the desired result.
By utilizing the power of the Rotate tool in GIMP, you can easily straighten your photos and ensure that they look polished and professional.
Using the Crop Tool to Straighten Your Photo
The Crop tool in GIMP is a versatile feature that not only allows you to adjust the composition of your photo but also enables you to straighten it. Here’s how you can use the Crop tool to straighten your photo:
- Select the Crop tool: Click on the Crop tool icon in the toolbox on the left side of the screen. It resembles a square with arrows pointing out from the corners.
- Find the straightening reference: Look for a straight edge or line in your photo that should be level. This can be a horizontal or vertical reference, depending on the composition of your image.
- Draw the cropping rectangle: Click and drag your mouse to draw a rectangle around the area you want to keep in your photo. Align the sides of the rectangle with the straight edge or line you identified as your reference.
- Make further adjustments, if necessary: You can fine-tune the position and size of the cropping rectangle by dragging the handles at the corners or sides. Ensure the straight reference line is perfectly aligned with either the top or bottom edge of the cropping rectangle.
- Apply the crop: Once you are satisfied with the positioning of the cropping rectangle, press the Enter key or click the “Crop” button in the tool options bar to apply the crop and straighten your photo.
After using the Crop tool to straighten your photo, you will notice that the horizon or vertical lines in your image appear perfectly level. The adjustment helps to create a sense of balance and symmetry, enhancing the overall composition.
While the Crop tool is effective for basic straightening, it’s important to note that excessive cropping can result in some loss of content. It’s recommended to ensure that the photo still maintains its intended subject and composition after the straightening process.
If you find that additional adjustments are needed, you can utilize additional tools in GIMP, such as the Rotate tool, to fine-tune the alignment. By combining the Crop and Rotate tools, you have the flexibility to straighten your photo and achieve the desired result effectively.
By utilizing the Crop tool in GIMP, you can not only adjust the composition of your photo but also straighten it, resulting in visually pleasing and well-aligned images.
Additional Tips for Straightening Photos in GIMP
Straightening photos in GIMP can be a simple yet effective way to enhance the overall composition and visual appeal of your images. Here are some additional tips to help you achieve the best results when straightening photos in GIMP:
- Use guidelines or grids: GIMP provides tools like guidelines and grids that can help you align and straighten your photos more precisely. You can enable these tools by going to the “View” menu and selecting “Show Grid” and “Show Guides.” Align the edges or lines in your photo with the grid or guidelines for accurate straightening.
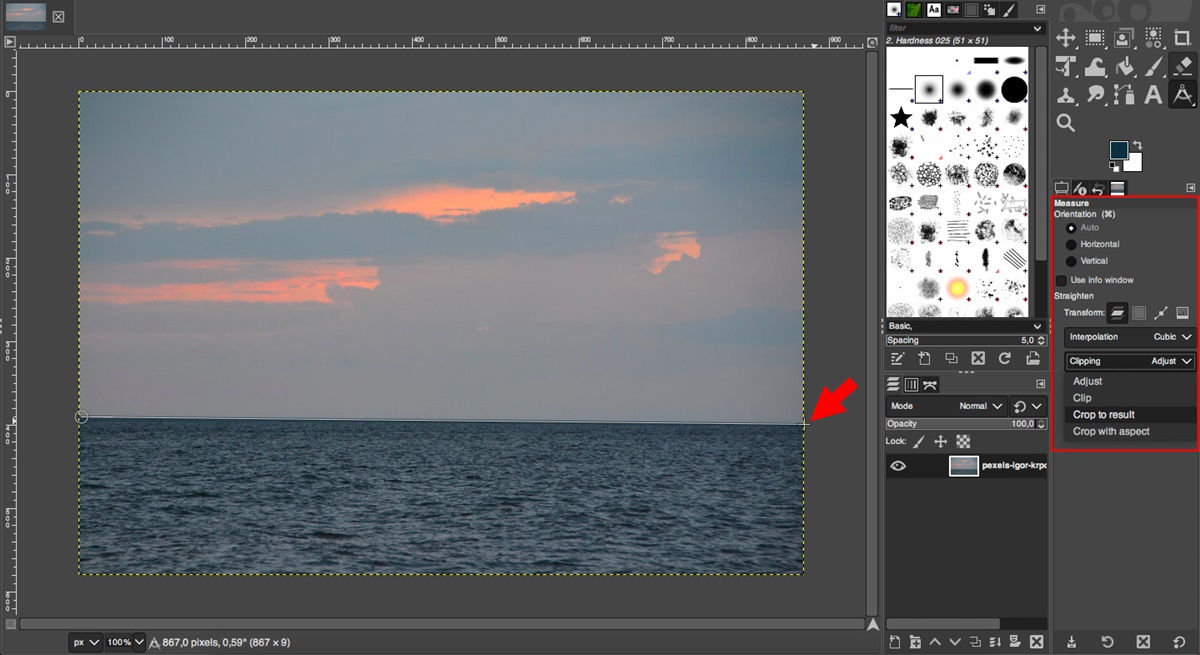
- Utilize the “Measure” tool: The Measure tool in GIMP allows you to draw a line along a reference edge or horizon to determine the exact angle of rotation needed. You can access this tool by clicking on the Measure tool icon in the toolbox. After measuring the angle, use the Rotate tool to straighten your photo according to the measurement.
- Correct perspective distortion: If your photo has perspective distortion, where parallel lines converge or diverge, GIMP provides a Perspective tool that can help correct it. This tool allows you to adjust the vertical or horizontal perspective, ensuring that straight lines appear parallel or perpendicular as intended.
- Experiment with the “Straighten” autopilot: GIMP offers a helpful feature called “Straighten” autopilot that automatically detects and straightens the horizon in landscape photos. To use this feature, go to the “Image” menu, select “Transform,” and click on “Straighten.” This can be a quick and convenient option for straightening photos with a tilted horizon.
- Combine the Crop and Rotate tools: For photos that require both straightening and cropping, you can use the Crop tool to straighten the image first and then make any necessary composition adjustments. This allows you to achieve a perfectly aligned and well-composed final result.
- Practice non-destructive editing: To preserve your original photo and have the flexibility to make further adjustments later, consider working with layers and keeping the original image on a separate layer. This way, you can apply edits and straighten your photo without permanently altering the original content.
- Experiment and trust your eye: While guidelines and tools can be helpful, ultimately, your artistic intuition and visual judgment play a crucial role. Trust your eye and make adjustments that create a balanced and visually appealing result, even if it means deviating slightly from strict alignment.
By applying these additional tips while straightening your photos in GIMP, you can fine-tune the alignment, correct perspective distortion, and achieve professional-looking results that bring out the best in your images.
Saving and Exporting Your Straightened Photo
Once you’ve straightened your photo to your satisfaction in GIMP, it’s time to save and export your finalized image. Here’s how you can save and export your straightened photo:
- Save as XCF file: If you want to preserve all the layers, adjustments, and editing capabilities, you can choose to save your straightened photo as a GIMP XCF file. To do this, go to the “File” menu and select “Save” or use the shortcut Ctrl + S (or Command + S on a Mac). Give your file a name and choose a location on your computer to save it.
- Export as a different file format: If you’re finished editing your photo and don’t need to preserve the layers, you can export it as a different file format such as JPEG, PNG, or TIFF. To export your photo, go to the “File” menu and select “Export As” or use the shortcut Shift + Ctrl + E (or Shift + Command + E on a Mac). Choose the desired file format from the options and customize any additional settings.
- Adjust export options: When exporting your photo, you may have the option to adjust settings such as image quality (for JPEG), transparency (for PNG), or compression level (for TIFF). Make any necessary adjustments based on your intended use and desired file size.
- Choose file location and name: After adjusting the export settings, specify the location on your computer where you want to save the file. Give your exported photo a descriptive name to easily identify it in the future.
- Click “Export”: Once you’ve chosen the file location and name, click the “Export” button to save your straightened photo as the selected file format. GIMP will process and export the image based on the specified settings.
After saving or exporting your straightened photo, you can now use the finalized image for various purposes including sharing it online, printing it, or using it in any other creative projects.
Remember to keep a backup of the original photo or the GIMP XCF file in case you need to make further adjustments or modifications in the future.
By following these simple steps to save and export your straightened photo in GIMP, you can ensure that your final image is ready for use in any medium while preserving the edits and alignment you’ve achieved.