
Understanding the Rotate Tool in GIMP
The Rotate Tool is one of the essential features in GIMP that allows you to adjust the orientation of an image or a specific layer. Whether you want to fix a tilted photo or create an interesting visual effect, the Rotate Tool enables you to achieve the desired results with ease.
When you select the Rotate Tool from the toolbox, a set of options becomes available to you. These options include the ability to rotate a single layer, rotate a selection, or even rotate multiple layers simultaneously.
One of the primary functions of the Rotate Tool is to adjust the angle of an image or a layer. By dragging the mouse cursor on the canvas, you can rotate the selected element in any direction. The rotation is visualized in real-time, making it easy to achieve the perfect angle.
If you want more precise control over the rotation, you can input specific numeric values in the tool options dialog. This way, you can accurately rotate an image by a certain degree, ensuring the desired outcome.
Additionally, the Rotate Tool also allows you to flip an image horizontally or vertically. This feature comes in handy when you want to create mirror images or invert the orientation of a layer.
One important aspect to keep in mind when using the Rotate Tool is its impact on the image or layer quality. Repeated rotations, especially at extreme angles, can result in degradation of image quality. Therefore, it’s essential to use the tool judiciously and consider creating a backup copy of the original image before applying any transformations.
Basic Rotation Techniques
When using the Rotate Tool in GIMP, there are several basic rotation techniques that you can employ to achieve the desired results. These techniques will help you rotate your images with precision and ease:
1. Drag and Rotate: The most straightforward way to rotate an image or layer is by selecting the Rotate Tool from the toolbox and then clicking and dragging your mouse on the canvas. As you drag, the image or layer will rotate dynamically, allowing you to find the perfect angle.
2. Numeric Input: To achieve more precise rotations, you can utilize the numeric input option in the Rotate Tool’s options dialog. Simply enter the desired angle in degrees, and GIMP will rotate the image or layer accordingly. This method is particularly useful when you need to rotate an object by a specific angle.
3. Center of Rotation: By default, GIMP uses the center of the canvas as the pivot point for rotations. However, you can change the rotation center by holding down the CTRL key while clicking anywhere on the canvas. This can be helpful when you want to rotate an object around a specific point or axis.
4. Rotate and Resample: When rotating an image or layer, GIMP provides an option called “Interpolation” that allows you to choose how the pixels will be resampled. This option is essential for minimizing pixelation and preserving image quality. Experiment with different resampling methods (such as cubic, linear, or none) to determine the best outcome for your specific project.
By understanding and utilizing these basic rotation techniques, you can confidently manipulate the orientation of your images or layers in GIMP. Remember to practice and experiment to achieve the desired results, and don’t be afraid to undo or redo rotations as needed. With GIMP’s powerful Rotate Tool, you have full control over transforming and enhancing your digital creations.
Using the Rotate Tool on a Single Layer
The Rotate Tool in GIMP allows you to easily manipulate the orientation of a single layer within your image. This feature comes in handy when you want to correct a tilted photo or adjust the angle of a specific element in your composition. Here’s how you can use the Rotate Tool on a single layer:
1. Open your image in GIMP and ensure that the layer you want to rotate is selected in the Layers panel.
2. Select the Rotate Tool from the toolbox, which is represented by an icon of a square with a curved arrow inside.
3. Click on the canvas to set the rotation center. By default, the center of the canvas is used as the pivot point, but you can change it by pressing and holding the CTRL key while clicking on a different location.
4. Click and drag on the canvas to rotate the selected layer. As you drag, the layer will rotate dynamically, allowing you to see the changes in real-time. You can release the mouse button once you achieve the desired angle.
5. If needed, you can fine-tune the rotation angle by entering a specific value in the “Angle” field located in the tool options dialog. The layer will instantly adjust to the new angle based on your input.
6. To apply the rotation permanently, click the “Rotate” button in the tool options dialog, or press the Enter/Return key on your keyboard. The layer will be transformed with the applied rotation, and you can continue working on your image.
Remember, when using the Rotate Tool on a single layer, only that layer will be affected, leaving the other layers in your composition intact. This allows you to have precise control over the rotation of individual elements without disturbing the overall composition of your image.
Practice using the Rotate Tool on a single layer to familiarize yourself with its capabilities. Experiment with different angles and settings to create the desired visual impact in your digital artwork or photo edits.
Rotating a Selection
GIMP provides the flexibility to rotate specific selections within your image, allowing you to fine-tune the orientation of specific areas or objects. This feature is particularly useful when you want to adjust the angle of a specific element without affecting the rest of the image. Here’s how you can rotate a selection in GIMP:
1. Open your image in GIMP and use the selection tools (such as the Rectangular Selection or Free Select) to create the desired selection around the area or object you want to rotate.
2. Once you have the selection created, go to the “Layer” menu and choose “Transform” > “Rotate” to open the Rotate dialog box.
3. In the Rotate dialog box, you can adjust the rotation angle by dragging the slider or entering a specific value in the “Angle” field. Preview the changes in real-time to determine the desired angle.
4. By default, GIMP uses the selection’s center as the pivot point for rotation. However, you can change the rotation center by clicking on the canvas while holding down the CTRL key.
5. Preview the rotation by clicking the “Rotate” button in the dialog box. The selection will rotate around the specified pivot point, allowing you to see the changes instantly.
6. Once you are satisfied with the rotation, click “Rotate” to apply the changes to the selection. The selection will be transformed with the applied rotation, and you can continue working on your image.
It’s worth noting that rotating a selection in GIMP does not affect the rest of the image outside the selection. This gives you the flexibility to adjust specific elements without disturbing the overall composition. You can also combine this technique with other editing tools and filters to achieve more complex transformations.
Experiment with rotating selections to explore different creative possibilities and enhance your images with precise adjustments. With GIMP’s selection and rotation capabilities, you have the power to refine your compositions and make them visually compelling.
Rotating Multiple Layers Simultaneously
Manipulating the orientation of multiple layers simultaneously in GIMP can save you time and effort when working on complex compositions or designs. By rotating multiple layers together, you can maintain the relative positions and alignments of different elements within your composition. Here’s how you can rotate multiple layers at once in GIMP:
1. Open your image in GIMP and ensure that the layers you want to rotate are visible in the Layers panel. You can select multiple layers by holding down the CTRL key (or CMD key on Mac) and clicking on each layer you want to include in the rotation.
2. With the layers selected, go to the “Layer” menu and choose “Transform” > “Transform” to open the Transform dialog box.
3. In the Transform dialog box, you can adjust the rotation angle by dragging the slider or entering a specific value in the “Rotate” field. Preview the changes in real-time to determine the desired angle.
4. By default, GIMP uses the center of the canvas as the pivot point for rotation. However, you can change the rotation center by clicking on the canvas while holding down the CTRL key.
5. Preview the rotation by clicking the “Transform” button in the dialog box. All the selected layers will rotate around the specified pivot point, allowing you to see the changes instantly.
6. Once you are satisfied with the rotation, click “Transform” to apply the changes to the selected layers. The layers will be transformed with the applied rotation, and you can continue working on your image.
Rotating multiple layers simultaneously in GIMP allows you to maintain the relationships and alignments between different elements in your composition. This is particularly useful for designs, collages, or illustrations where maintaining the relative positions is crucial.
Remember that when rotating multiple layers, any layer styles or applied masks will be taken into account. This ensures that the rotations are applied consistently across all the selected layers.
Experiment with rotating multiple layers to explore different design possibilities and create visually interesting compositions. With GIMP’s flexible layer manipulation capabilities, you have the freedom to transform and arrange your layers with ease.
Applying Numeric Values to Rotate an Image
GIMP allows you to rotate an image with precision by applying specific numeric values to the rotation angle. This method is particularly useful when you want to achieve an exact rotation or reproduce a specific angle. Here’s how you can apply numeric values to rotate an image in GIMP:
1. Open your image in GIMP and select the layer you want to rotate, if you have multiple layers.
2. Choose the Rotate Tool from the toolbox, which is represented by an icon of a square with a curved arrow inside.
3. In the tool options dialog, you will find the “Angle” field. This is where you can enter the precise number of degrees by which you want to rotate the image.
4. Input the desired rotation angle into the “Angle” field. You can use positive values for clockwise rotations and negative values for counterclockwise rotations.
5. After entering the numeric value, GIMP will automatically rotate the image according to the specified angle. You can see the changes in real-time as you adjust the angle.
6. Once you are satisfied with the rotation, click the “Rotate” button in the tool options dialog or press the Enter/Return key on your keyboard to apply the rotation permanently.
By applying numeric values, you have complete control over the precise rotation of your image. This method is beneficial when you need to match a specific angle or maintain consistency across multiple images.
Remember, when applying numeric values to rotate an image, it is essential to consider the orientation and alignment you want to achieve. Keep in mind that repetitive rotations, especially at extreme angles, may result in a loss of image quality. It’s always a good practice to make a backup copy of the original image before applying any transformations.
Experiment with different numeric values to achieve the desired rotation and explore the creative possibilities offered by GIMP’s precise image rotation capabilities.
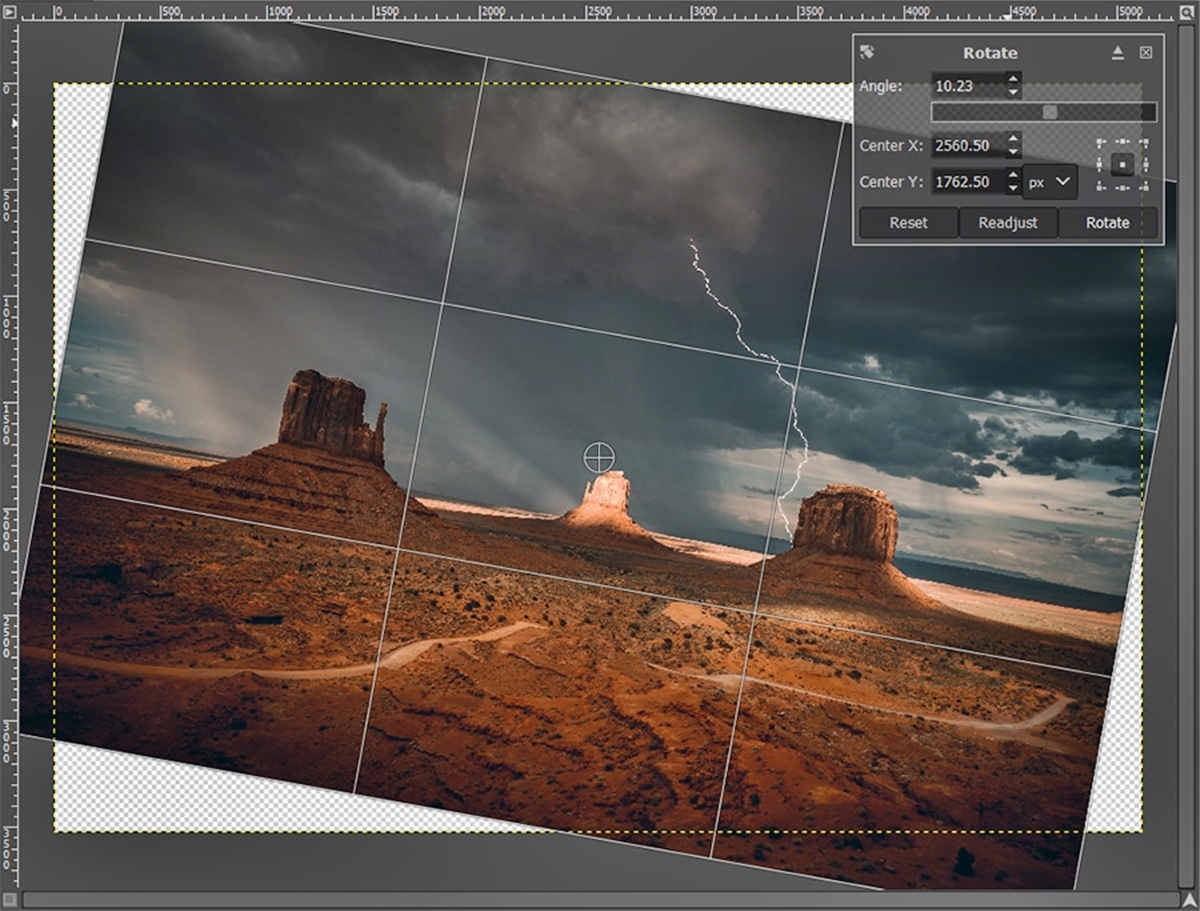
Understanding the Options in the Rotate Tool Dialog
When using the Rotate Tool in GIMP, it is important to understand the various options available to you in the tool’s dialog box. These options provide additional control and customization for your rotations. Here’s a breakdown of the options in the Rotate Tool dialog:
1. Angle: This field allows you to enter the rotation angle in degrees. You can input specific numeric values to achieve precise rotations or use the slider to adjust the angle visually. Positive values rotate the image clockwise, while negative values rotate it counterclockwise.
2. Pivot Point: The pivot point determines the center around which the rotation occurs. By default, GIMP uses the center of the canvas as the pivot point. However, you can change the pivot point by clicking on the canvas while holding down the CTRL key. This allows you to rotate around a specific point or axis.
3. Interpolation: This option determines how GIMP resamples the image’s pixels during rotation. It affects the smoothness and sharpness of the rotated image. You can choose from various interpolation methods such as “None,” “Linear,” “Cubic,” or “NoHalo,” each offering a different trade-off between speed and quality.
4. Transform: The transform option allows you to apply the rotation to the current layer or selection. You can rotate only the active layer or the active selection if one is made. If no selection is made, the entire layer will be rotated.
5. Crop: Enabling this option ensures that the rotated image fits within the canvas boundaries by cropping any parts that extend beyond it. If disabled, the rotated image may extend beyond the canvas, and no cropping will occur.
By understanding and utilizing the options in the Rotate Tool dialog, you can have more control and precision in your rotations. Experiment with different settings to achieve the desired results and tailor the rotation process to your specific needs.
Keep in mind that depending on the image size and complexity, rotations can sometimes result in a loss of image quality or jagged edges. It’s always a good practice to work with a copy of the original image and experiment with the options to find the best balance between desired rotation and image quality.
Using the “Transform” Option for More Accurate Rotations
GIMP’s Rotate Tool offers a “Transform” option that allows for more accurate and precise rotations. When using this option, you have more control over the rotation angle and can apply transformations to specific layers or selections more effectively. Here’s how you can leverage the “Transform” option for more accurate rotations:
1. Open your image in GIMP and select the layer or make a selection that you want to rotate.
2. Choose the Rotate Tool from the toolbox, represented by an icon of a square with a curved arrow inside.
3. In the tool options dialog, locate the “Transform” checkbox and enable it by clicking on it.
4. Now, click and drag on the canvas to rotate the selected layer or selection. As you drag, the rotation will occur around the pivot point that you set.
5. One of the advantages of using the “Transform” option is that you can make precise adjustments using the transformation handles. These handles, visible on the corners and edges of the selection or layer, allow you to fine-tune the rotation angle and alignment.
6. Additionally, you can input specific numeric values for the rotation angle in the “Angle” field in the tool options dialog for even more accuracy. The image or selection will update in real-time as you enter the value.
7. Once you are satisfied with the rotation, press the Enter/Return key on your keyboard or click the “Rotate” button in the tool options dialog to apply the transformation.
Using the “Transform” option provides more control and precision for your rotations in GIMP. This feature is particularly useful when you need to align objects, adjust perspectives, or make intricate adjustments to your images.
Experiment with the “Transform” option to explore its capabilities and become comfortable with the methods of rotating layers or selections more accurately. With practice, you’ll be able to achieve precise rotations in GIMP and enhance your digital artwork and photo edits.
Rotating an Image with a Specific Angle
GIMP allows you to rotate an image with precision by specifying a specific angle. This feature is particularly useful when you want to rotate an image to match a particular orientation or achieve a specific visual effect. Here’s how you can rotate an image with a specific angle in GIMP:
1. Open your image in GIMP and make sure the layer you want to rotate is selected, if you have multiple layers.
2. Select the Rotate Tool from the toolbox by clicking on its icon, which resembles a square with a curved arrow inside.
3. In the tool options dialog, locate the “Angle” field. Enter the specific angle by which you want to rotate the image.
4. Positive values for the angle will rotate the image clockwise, while negative values will rotate it counterclockwise. Preview the rotation angle as you enter the value to ensure it matches your desired result.
5. Once you have entered the specific angle, click and drag on the canvas to rotate the image accordingly. The rotation will occur around the image’s center by default, but you can change the pivot point by pressing the CTRL key and clicking on a different location on the canvas if desired.
6. If needed, you can further refine the rotation by adjusting the coordinates and alignment using the transformation handles. These handles will appear around the image, allowing you to fine-tune the rotation angle and positioning.
7. Once you are satisfied with the rotation, press the Enter/Return key on your keyboard or click the “Rotate” button in the tool options dialog to apply the rotation permanently.
By specifying a specific angle, you have complete control over the rotational transformation of your image in GIMP. This method allows you to precisely achieve the desired orientation or create compelling visual effects.
Experiment with different angles and explore the creative possibilities offered by GIMP’s ability to rotate an image with precision. With practice, you’ll be able to manipulate your images to perfection, whether it’s for basic adjustments or artistic transformations.
Flipping an Image Horizontally or Vertically
GIMP provides the capability to easily flip an image horizontally or vertically, allowing you to create mirror images or change the orientation of your artwork. This feature is useful for correcting inverted or reverse images or adding dynamic visual effects. Here’s how you can flip an image in GIMP:
1. Open your image in GIMP and select the layer you want to flip, if you have multiple layers.
2. Choose the Flip Tool from the toolbox. The Flip Tool icon resembles two square shapes reflecting each other, representing horizontal and vertical flipping.
3. In the tool options dialog, you will find the options for flipping the image. Click on the desired flip direction: “Horizontal” to flip the image left to right, or “Vertical” to flip it top to bottom.
4. Position the cursor on the canvas and click and drag to apply the flip. As you drag, you can see the real-time preview of the flipped image.
5. Once you are satisfied with the flip, release the mouse button to apply it permanently to the selected layer.
Alternatively, you can use keyboard shortcuts to apply the flips: press “Ctrl + H” to flip horizontally and “Ctrl + V” to flip vertically.
Flipping an image horizontally or vertically in GIMP opens up many creative possibilities. You can create symmetrical compositions, generate unique mirrored effects, or correct orientation issues in your artwork.
Remember, flipping an image is a non-destructive process, and you can always undo or redo the flip if needed. Additionally, you can create a duplicate layer of your original image before flipping to preserve the original orientation for future reference.
Experiment with flipping images horizontally and vertically to explore different visual effects and add an exciting dynamic element to your digital artwork in GIMP. With this feature, you have the power to transform your images and enhance their visual impact.
Undoing or Redoing Rotations in GIMP
GIMP provides a convenient way to undo or redo rotations, allowing you to easily revert back to previous states or reapply rotations that you have undone. This flexibility is essential when experimenting with different angles or when you make a mistake during the rotation process. Here’s how you can undo or redo rotations in GIMP:
To undo a rotation:
1. Open your image in GIMP and make sure the layer with the rotation is selected.
2. Go to the “Edit” menu and choose “Undo” or use the keyboard shortcut “Ctrl + Z” (or “Command + Z” on Mac). This will revert the rotation and restore the previous state of the image before the rotation was applied.
Alternatively, you can click the “Undo” button in the toolbar, which resembles a curved arrow pointing to the left.
To redo a rotation:
1. If you want to reapply a rotation that you have undone, go to the “Edit” menu and choose “Redo” or use the keyboard shortcut “Ctrl + Y” (or “Command + Y” on Mac). This will reapply the previously undone rotation, restoring the image to its state after the rotation was applied.
You can also click the “Redo” button in the toolbar, which resembles a curved arrow pointing to the right.
By utilizing the undo and redo functionality in GIMP, you have the freedom to experiment with different rotation angles and easily correct any mistakes or unwanted changes in the image. This feature is especially valuable when working on complex projects or when trying to achieve the desired visual effect.
Remember to save your work regularly to preserve different stages of your image after rotations. This way, you can always revert back to a specific point in your editing process if needed.
Take advantage of the undo and redo capabilities in GIMP to fine-tune your rotations and explore different creative possibilities without the fear of making irreversible changes.
Troubleshooting Rotation Issues in GIMP
While using the Rotate Tool in GIMP, you may encounter occasional issues or challenges when performing rotations. These issues can range from unexpected results to difficulties in aligning elements accurately. Here are some troubleshooting tips to overcome common rotation issues in GIMP:
1. Loss of Image Quality: Rotating an image repeatedly or at extreme angles can result in a loss of image quality. To mitigate this, consider making a backup copy of your original image before applying any rotations. Additionally, experiment with different interpolation methods, such as Cubic or NoHalo, in the Rotate Tool’s options dialog to minimize pixelation and preserve image quality.
2. Alignment Problems: If you are experiencing difficulty in aligning elements accurately during rotation, try using guides or grids in GIMP. Enable the rulers (View -> Show Rulers) and create guides by clicking and dragging from the rulers onto the canvas. These guides can help you align specific elements or achieve precise rotations.
3. Unintended Distortion: In some cases, rotating an image can introduce unintentional distortion, especially when there are complex shapes or patterns involved. To minimize distortion, consider rotating the image using the “Transform” option in the Rotate Tool’s options dialog. This allows for more precise adjustments and maintains the original aspect ratio of the image.
4. Multiple Layer Misalignment: When rotating multiple layers simultaneously, it’s important to ensure that they are aligned correctly. To avoid misalignment, select all the layers you want to rotate and use the “Transform” option in the Layer menu instead. This way, all selected layers will rotate around a common pivot point, maintaining their relative positions.
5. Unexpected Results with Flipped Images: Flipping an image horizontally or vertically can sometimes produce unintended results, such as inverted colors or reversed content. To resolve this, ensure that you are selecting the correct layer or image before applying the flip. If the issue persists, try duplicating the layer and flipping the duplicate instead to avoid altering the original layer.
If you encounter any other rotation issues in GIMP, don’t hesitate to refer to the official GIMP documentation or seek help from the GIMP community forums and resources. Troubleshooting rotation problems may involve experimenting with different techniques, settings, and approaches, so don’t be afraid to explore and learn from the experience.
By troubleshooting rotation issues in GIMP, you can overcome challenges, improve your workflow, and achieve the desired rotation results for your digital artwork or photo edits.