
Creating the Initial Images
When it comes to producing an animated GIF with GIMP, the first step is to create the individual images that will comprise the animation. These images will form the basis of the animation and will be displayed sequentially to create the illusion of motion.
Start by brainstorming the concept and visual elements you want to include in your animated GIF. It could be a simple design, a series of illustrations, or even a collection of photographs. Whatever the subject may be, the key is to ensure that each image in the sequence is distinct and contributes to the overall story or concept.
Next, open GIMP and create a new canvas for each image in the animation. Set the dimensions of the canvas to match the desired size of your animated GIF. Remember to consider the final platform where the GIF will be displayed to ensure it fits appropriately.
Once you have set up the canvas, you can start creating your initial images using GIMP’s versatile tools. You can either draw directly on the canvas using the brush tool, create shapes using the shape tool, or import existing images and modify them to suit your needs.
Experiment with different techniques and styles to bring your vision to life. Whether it’s using layers to add depth and texture or applying filters to achieve unique effects, GIMP offers a wide array of features that can help you unleash your creativity.
Remember to save each image as a separate file, using a consistent naming convention that reflects the sequence of the animation. This will make it easier to organize and import the images into GIMP later.
Lastly, ensure that your initial images flow seamlessly from one to the next. Consider the composition, colors, and transitions between images to ensure a smooth transition when the final animation is played back.
By investing time and effort into creating visually captivating initial images, you set a strong foundation for your animated GIF. With GIMP’s powerful tools and your creative ideas, the possibilities are endless.
Importing the Images into GIMP
After you have created the initial images for your animated GIF, the next step is to import them into GIMP, the versatile image editing software. This will allow you to organize and manipulate the images to create a seamless animation.
To begin, launch GIMP and open a new project. Go to the “File” menu and select “Open as Layers.” This will enable you to import multiple images into GIMP simultaneously, saving you time and effort.
Navigate to the location where you saved your initial images and select them all. Once you have chosen the images, click “Open” to import them into GIMP as individual layers.
You will notice that each image is now represented as a layer in the Layers panel, located on the right side of the GIMP interface. The layers are ordered based on the sequence in which you imported them, so make sure they are in the correct order for your intended animation.
If necessary, you can rearrange the layers by clicking and dragging them up or down in the Layers panel. This allows you to adjust the stacking order of the images, which can impact the visual flow of the animation.
Additionally, you can use the layer visibility toggle (the eye icon next to each layer) to hide or show individual images. This feature is useful for previewing the animation and making adjustments as needed.
Once you have imported and organized the images, take the time to review the overall sequence and transitions. Check for any inconsistencies or gaps and make any necessary adjustments to ensure a smooth and cohesive animation.
GIMP’s intuitive interface and powerful layer management make it easy to import and organize your images for the creation of an animated GIF. With the images in place, you’re now ready to move on to the next crucial steps in the animation process.
Organizing Layers in the Layers Panel
When working on an animated GIF project in GIMP, one of the key aspects is organizing the layers in the Layers panel. This allows you to manage and manipulate each layer efficiently, ensuring a smooth and cohesive animation.
After importing your initial images as layers, take a moment to review the Layers panel, located on the right side of the GIMP interface. This panel displays a list of all the layers in your project, stacked in the order they will appear in the animation.
To organize the layers effectively, it’s helpful to assign meaningful names to each layer. This makes it easier to identify and manage specific images throughout the animation process. To rename a layer, simply double-click on its current name in the Layers panel and enter a new descriptive name.
In addition to naming the layers, you can also reposition them by dragging and dropping them in the Layers panel. This allows you to adjust the order of the images and control the timing and flow of the animation.
Furthermore, GIMP offers tools to manipulate individual layers, such as resizing, rotating, or altering their transparency. By utilizing these features, you can add dynamic effects and transitions to your animated GIF.
For more complex animations, GIMP provides the option to group layers. Grouping layers allows you to treat multiple layers as a single unit. This is particularly useful when applying filters, transformations, or adjustments to a group of layers as a whole.
By organizing your layers effectively, you can easily manage and manipulate each image in your animated GIF. This ensures that your animation seamlessly flows from one frame to the next, creating a visually engaging and captivating experience.
Take the time to experiment with different layer configurations and effects to achieve the desired outcome. With GIMP’s flexible layer management system, you have complete control over the organization and presentation of your animated GIF.
Applying Filters and Effects to the Images
One of the exciting features of working with GIMP when creating an animated GIF is the ability to apply various filters and effects to enhance the visual appeal of your images. These filters and effects can transform ordinary images into captivating animations.
To begin, select the layer that you want to apply a filter or effect to in the Layers panel. Then, go to the “Filters” menu and explore the wide range of options available. From artistic effects to color adjustments, GIMP offers a plethora of filters to choose from.
Experiment with different filters and effects to see how they enhance your image. For example, applying the Blur filter can create a sense of motion, while the Cartoon filter can give your image a unique and stylized appearance.
GIMP also allows you to adjust the settings of each filter and effect to fine-tune the desired outcome. These settings may include parameters such as intensity, radius, or threshold. Play around with these settings to achieve the desired visual effect.
Layer masks can also be utilized to apply filters and effects selectively. By applying a layer mask to a specific layer, you can control where the filter or effect is visible, creating a focused and targeted impact on the animation.
In addition to filters and effects, GIMP provides a range of transformation tools that allow you to resize, rotate, or distort layers. These tools can be particularly useful for creating dynamic animations with moving objects or changing perspectives.
Remember, while applying filters and effects can enhance the visual appeal of your animated GIF, it’s important to apply them judiciously. Overuse of filters can result in a cluttered and distracting animation. Aim for a balanced and harmonious combination of effects that align with the overall concept and aesthetics of your animation.
By experimenting with filters, effects, and transformation tools in GIMP, you can elevate your animated GIF to a new level of visual impact. Let your creativity run wild as you explore the possibilities and create animations that truly stand out.
Adjusting Colors and Saturation
When creating an animated GIF with GIMP, having control over the colors and saturation of your images can significantly impact the overall look and feel of your animation. GIMP provides numerous tools and options to help you achieve the desired color palette and saturation levels.
Start by selecting the layer you want to adjust in the Layers panel. Then, navigate to the “Colors” menu in GIMP, where you’ll find a variety of color adjustment options. For instance, you can use the “Levels” tool to adjust the brightness, contrast, and gamma of an image, giving you more control over how the colors appear.
If you’re looking to tweak specific colors within your image, consider using the “Hue-Saturation” tool. This tool enables you to modify individual hues and saturation levels, allowing you to create vibrant, eye-catching animations with precisely controlled color schemes.
GIMP also provides a versatile “Color Balance” tool, which allows you to adjust the intensity of primary and secondary colors. This can be particularly useful for creating a specific atmosphere or mood in your animation.
When editing the colors and saturation, it’s essential to keep the overall concept and aesthetic of your animation in mind. Pay attention to the desired emotional impact and align the color adjustments accordingly. For instance, warm, vibrant colors may convey energy, while cooler tones can evoke tranquility.
Remember to make adjustments while considering the visual flow of the animation. Ensure that the color changes between frames are smooth and balanced to provide a seamless viewing experience.
In addition to adjusting colors and saturation on individual layers, GIMP also offers the option to apply color correction to the entire project. This can be done using the “Colors” menu and selecting options like “Auto,” “Normalize,” or “Colorize.” These adjustments can help maintain consistency and harmony throughout your animated GIF.
By skillfully adjusting colors and saturation in GIMP, you can breathe life into your images and create stunning visual animations. Take the time to experiment with different settings and effects to find the perfect balance that showcases your creativity and vision.
Adding Text and Graphics
Adding text and graphics to your animated GIF can enhance its message, emphasize key points, or simply add a touch of creativity. With GIMP’s robust set of tools and features, you have the power to incorporate text and graphic elements seamlessly into your animation.
To begin, ensure that the layer you want to add text or graphics to is selected in the Layers panel. Then, choose the “Text” tool from the toolbox on the left side of the GIMP interface. Click on the canvas where you want to insert the text and begin typing. GIMP allows you to customize the font, size, color, and alignment of the text to suit your needs.
Furthermore, GIMP provides options for transforming and animating the text. You can apply effects such as shadows, outlines, or gradients to make the text stand out. Experiment with different text effects and animations to bring your message to life.
Besides text, you can also incorporate graphics and images into your animation. Import your desired graphic or image as a separate layer using the “File” menu or by dragging and dropping the file into GIMP. Once imported, you can resize, rotate, and position the graphic to fit seamlessly within your animation.
GIMP also allows you to apply various filters and effects to the graphic layer, providing further opportunities for creative visual enhancements. Experiment with filters like “Drop Shadow,” “Glow,” or “Motion Blur” to make your graphic element appear more dynamic and visually appealing.
Combining text and graphics can help convey your message more effectively. For instance, you can use text overlays to explain the animation or highlight specific elements. You can also use graphics to create visual cues or transitions between frames, adding depth and interest to your animated GIF.
It’s important to find a balance between text, graphics, and the overall animation. Avoid overcrowding the frames with too much text or overpowering the visual elements with excessive graphics. Strive for a harmonious blend that supports and enhances the overall concept of your animation.
With GIMP’s versatile text and graphic tools, you have the creative freedom to add your personal touch to your animated GIF. Utilize these tools to elevate your animation, communicate effectively, and captivate your audience.
Creating Transitions between Images
Creating smooth and seamless transitions between images is crucial for a visually appealing and cohesive animated GIF. With GIMP’s powerful features and tools, you can easily achieve dynamic and eye-catching transitions to enhance the flow of your animation.
To begin, select the layer that represents the starting image of the transition in the Layers panel. Then, choose the “Opacity” tool from the toolbox on the left side of the GIMP interface. Adjust the opacity of the layer to create a fade effect, gradually blending it into the next image.
For more complex transitions, you can utilize the layer masks feature in GIMP. By adding a layer mask to a specific layer, you can control the visibility of certain areas, allowing for smoother and more controlled transitions. Paint on the layer mask to reveal or hide parts of the image, creating unique transition effects.
Another technique to create transitions is to use GIMP’s animation capabilities. By duplicating the transition frames and making incremental changes to each duplicate, you can achieve a gradual transition effect. Adjust elements such as position, size, or opacity between frames to smoothly progress from one image to another.
In addition to fades and gradual transitions, GIMP offers a variety of filters and effects that can be applied specifically to the transition frames. Experiment with effects like blur, zoom, or rotation to add a sense of movement and continuity between images.
When creating transitions, ensure that they align with the overall theme and style of your animation. Consider the tempo and mood you want to convey and choose transitions that complement your desired outcome. Smooth and well-executed transitions can elevate your animated GIF, creating a seamless and engaging viewer experience.
Don’t be afraid to experiment and iterate with different transition techniques. Play with timing, layer opacity, and effects to find the perfect balance that suits your animation. Through practice and exploration, you’ll discover the transitions that best convey your intended message and captivate your audience.
Adjusting Timing and Looping
Timing and looping are crucial elements when creating an animated GIF as they determine the pace and repetition of your animation. With GIMP’s intuitive interface, you have the flexibility to fine-tune the timing and looping settings to achieve the desired effect.
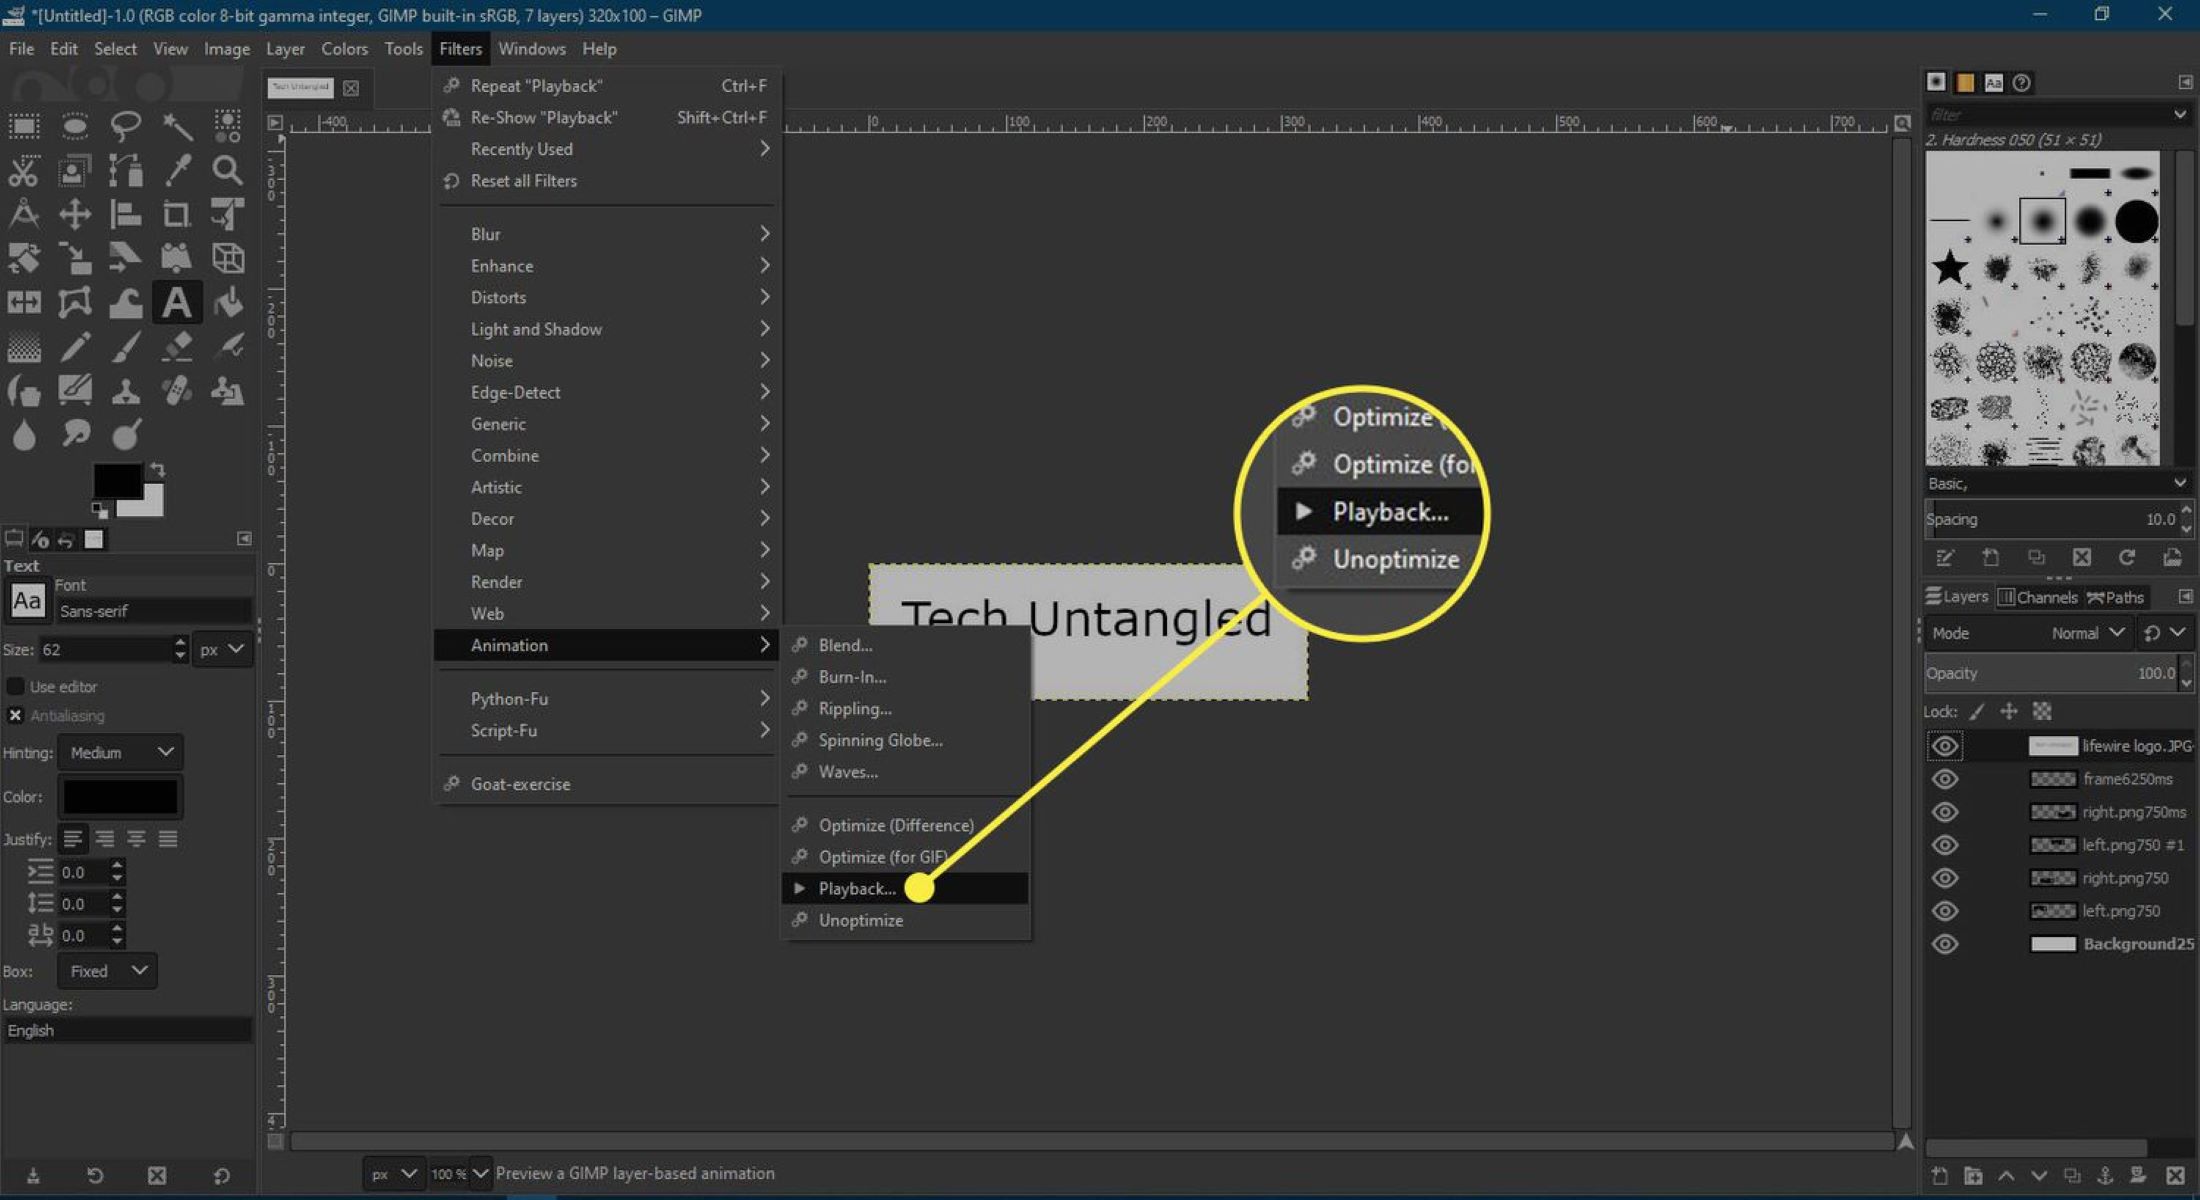
To adjust the timing of your animation, navigate to the “Filters” menu in GIMP and select “Animation” followed by “Playback.” This will open the Playback dialog box, where you can specify the duration of each frame in your animation.
Consider the speed and rhythm you want to convey in your GIF. Shorter durations between frames create a faster-paced animation, while longer durations slow down the motion. Experiment with different durations for each frame to find the timing that best suits the desired effect.
In addition to adjusting the timing of individual frames, GIMP allows you to set the total duration of the entire animation. This determines how long the GIF will play before it loops back to the beginning. Access the Playback dialog box and adjust the “Loop Forever” option to control the looping behavior. You can also set a specific number of loops if you prefer a finite repetition.
Consider the platform or medium where you intend to display the GIF. Longer looping durations may be appropriate for social media feeds, while shorter looping sequences work well in website banners or email signatures.
When adjusting timing and looping, it’s important to preview your animation to ensure it flows smoothly. Use the “Play” button in the Animation Playback dialog box to preview your GIF and make any necessary adjustments to achieve a seamless and visually pleasing animation.
Remember, timing and looping should align with the overall concept and purpose of your animation. Consider the message or story you want to convey and the intended impact on the viewer. A well-timed and appropriately looped animation can leave a lasting impression.
By utilizing GIMP’s timing and looping features, you have the power to control the rhythm and repetition of your animated GIF. Take the time to fine-tune and perfect these settings to create an animation that engages and captivates your audience.
Exporting the Animated GIF
Once you have completed your animated GIF in GIMP, the next step is to export it so that it can be shared and displayed on various platforms. GIMP provides easy-to-use export options that allow you to optimize the GIF’s file size and quality.
To export your animated GIF, go to the “File” menu and select “Export As”. In the dialog box, choose a location on your computer to save the file and give it a descriptive name. Make sure to include the “.gif” file extension to indicate that it is a GIF file.
Before exporting, take a moment to explore the options available in the export dialog box. GIMP provides settings for adjusting the transparency, interlacing, and color options of the GIF.
If your animation contains transparency, choose the appropriate transparency option to preserve its visual effect. Interlacing, on the other hand, can improve the initial loading of the GIF by displaying a low-resolution version first, followed by the progressively higher resolution frames.
Color options include the ability to reduce the number of colors in the GIF to minimize the file size without sacrificing too much image quality. Experiment with different color options to find the right balance of file size and visual fidelity.
When exporting, consider the platform or medium where the GIF will be shared. Different platforms may have specific requirements or recommendations for maximum file size or color limitations. Be mindful of these guidelines to ensure optimal display and sharing of your animated GIF.
Once you have set the desired export options, click “Export” to generate the animated GIF file. GIMP will present an additional dialog box where you can fine-tune compression settings further if required. Adjust these settings based on your preferences and click “Export” once again to finalize the process.
It’s recommended to test the exported GIF in a web browser or image viewer to ensure it appears as intended. This is also an opportunity to evaluate the file size and image quality, making any necessary adjustments to balance these aspects.
With GIMP’s straightforward export process, you can save your animated GIF for sharing online, embedding in web pages, or using in other digital projects. Take advantage of the export options to customize the file size, quality, and transparency settings for optimal presentation.
Testing and Optimizing the Animated GIF
Before finalizing your animated GIF created in GIMP, it’s essential to test and optimize it to ensure optimal performance and visual quality. Testing helps identify any issues or areas that may require improvement, while optimization helps reduce the file size without compromising the overall experience.
After exporting your animated GIF, open it in a web browser or an image viewer to view it as it will appear to your audience. Pay attention to the timing, transitions, and overall flow of the animation. Look for any glitches, inconsistencies, or unintended visual effects that may need adjustment.
Testing also provides an opportunity to evaluate the file size of your animated GIF. Large file sizes can cause slow loading times, especially on websites or when shared online. Aim to strike a balance between quality and file size to ensure a smooth and enjoyable viewing experience.
To optimize the file size of your animated GIF, consider the following techniques:
- Reduce the number of frames: If the animation doesn’t require extremely smooth motion, removing unnecessary frames can significantly reduce the file size.
- Minimize colors: Use GIMP’s color reduction options to reduce the number of colors used in your animation. This can result in a smaller file size while maintaining visual quality.
- Adjust dithering: Dithering can help improve the appearance of images with limited color palettes. Experiment with different dithering options to find the optimal balance between quality and file size.
- Optimize settings: Consider adjusting compression settings during export to further reduce the file size. Strike a balance between file size and image quality by testing and comparing different settings.
After optimizing the file size, conduct another round of testing to ensure that the animation remains fluid and retains its intended visual impact. It’s also a good idea to test the optimized GIF on different platforms and devices to ensure compatibility and optimal performance.
Remember, the goal of testing and optimization is to create an animated GIF that is visually appealing, performs well, and is easily shareable. By refining your animation through testing and optimizing the file size, you can confidently present your work to your audience, ensuring an enjoyable and seamless viewing experience.