
Checking Compatibility
Before you proceed with changing the SIM card on your iPhone, it's crucial to ensure that the new SIM card is compatible with your device. Here's how to do it:
-
Check the iPhone Model: Different iPhone models require different SIM card sizes. For instance, the iPhone 4 and 4s use a Micro-SIM, while newer models like the iPhone 5 and later use a Nano-SIM. Verify the SIM card size supported by your specific iPhone model.
-
Check the Carrier Compatibility: Ensure that the new SIM card is from a carrier that is compatible with your iPhone. Some iPhones are locked to specific carriers, so using a SIM card from a different carrier may not work unless the phone is unlocked.
-
Check for Activation Lock: If you are using a second-hand iPhone, ensure that it isn't locked to the previous user's iCloud account. You can do this by navigating to "Settings" > "[Your Name]" > "Find My" and checking if Find My iPhone is turned off. If it's on, you need the previous owner's Apple ID and password to disable it.
-
Contact Your Carrier: If you have any doubts about compatibility, reach out to your carrier's customer service. They can confirm whether the new SIM card is compatible with your iPhone and provide any necessary assistance.
By ensuring compatibility, you can avoid potential issues and smoothly proceed with changing the SIM card on your iPhone.
Backing Up Data
Before undertaking any significant changes to your iPhone, it is essential to safeguard your data. Here’s how to back up your data before changing the SIM card:
-
iCloud Backup: Utilize iCloud to back up your iPhone’s data. Ensure that iCloud Backup is enabled by going to "Settings" > "[Your Name]" > "iCloud" > "iCloud Backup." Tap on "Back Up Now" to initiate an immediate backup or enable the "iCloud Backup" option to automatically back up your data when your iPhone is connected to Wi-Fi, locked, and charging.
-
iTunes Backup: Connect your iPhone to a computer and open iTunes. Select your device, and under the "Backups" section, choose "This Computer" and click on "Back Up Now." This creates a complete backup of your iPhone’s data on your computer.
-
Transfer Purchases: If you have purchased items from the iTunes Store, App Store, or iBooks Store using multiple Apple IDs, ensure that you are signed in with the correct Apple ID to retain access to your previous purchases after changing the SIM card.
By backing up your data, you can safeguard your valuable information and seamlessly transfer it to the new SIM card without the risk of data loss.
Powering Off the iPhone
Before you proceed with changing the SIM card on your iPhone, it’s essential to power off the device. Here’s a stepwise guide to power off your iPhone:
-
Press and Hold Side Button: On iPhone X or later models, press and hold the side button along with either volume button until the “slide to power off” slider appears on the screen.
-
Slide to Power Off: Once the “slide to power off” slider is displayed, swipe the slider from left to right using your finger. This action will power off the iPhone.
-
Wait for Shutdown: Allow the iPhone to completely power off before proceeding to the next steps. This ensures that the device is in a safe state for the SIM card change.
By following these steps, you can safely power off your iPhone in preparation for the SIM card replacement process. This precautionary measure helps prevent any potential damage to the device during the SIM card change.
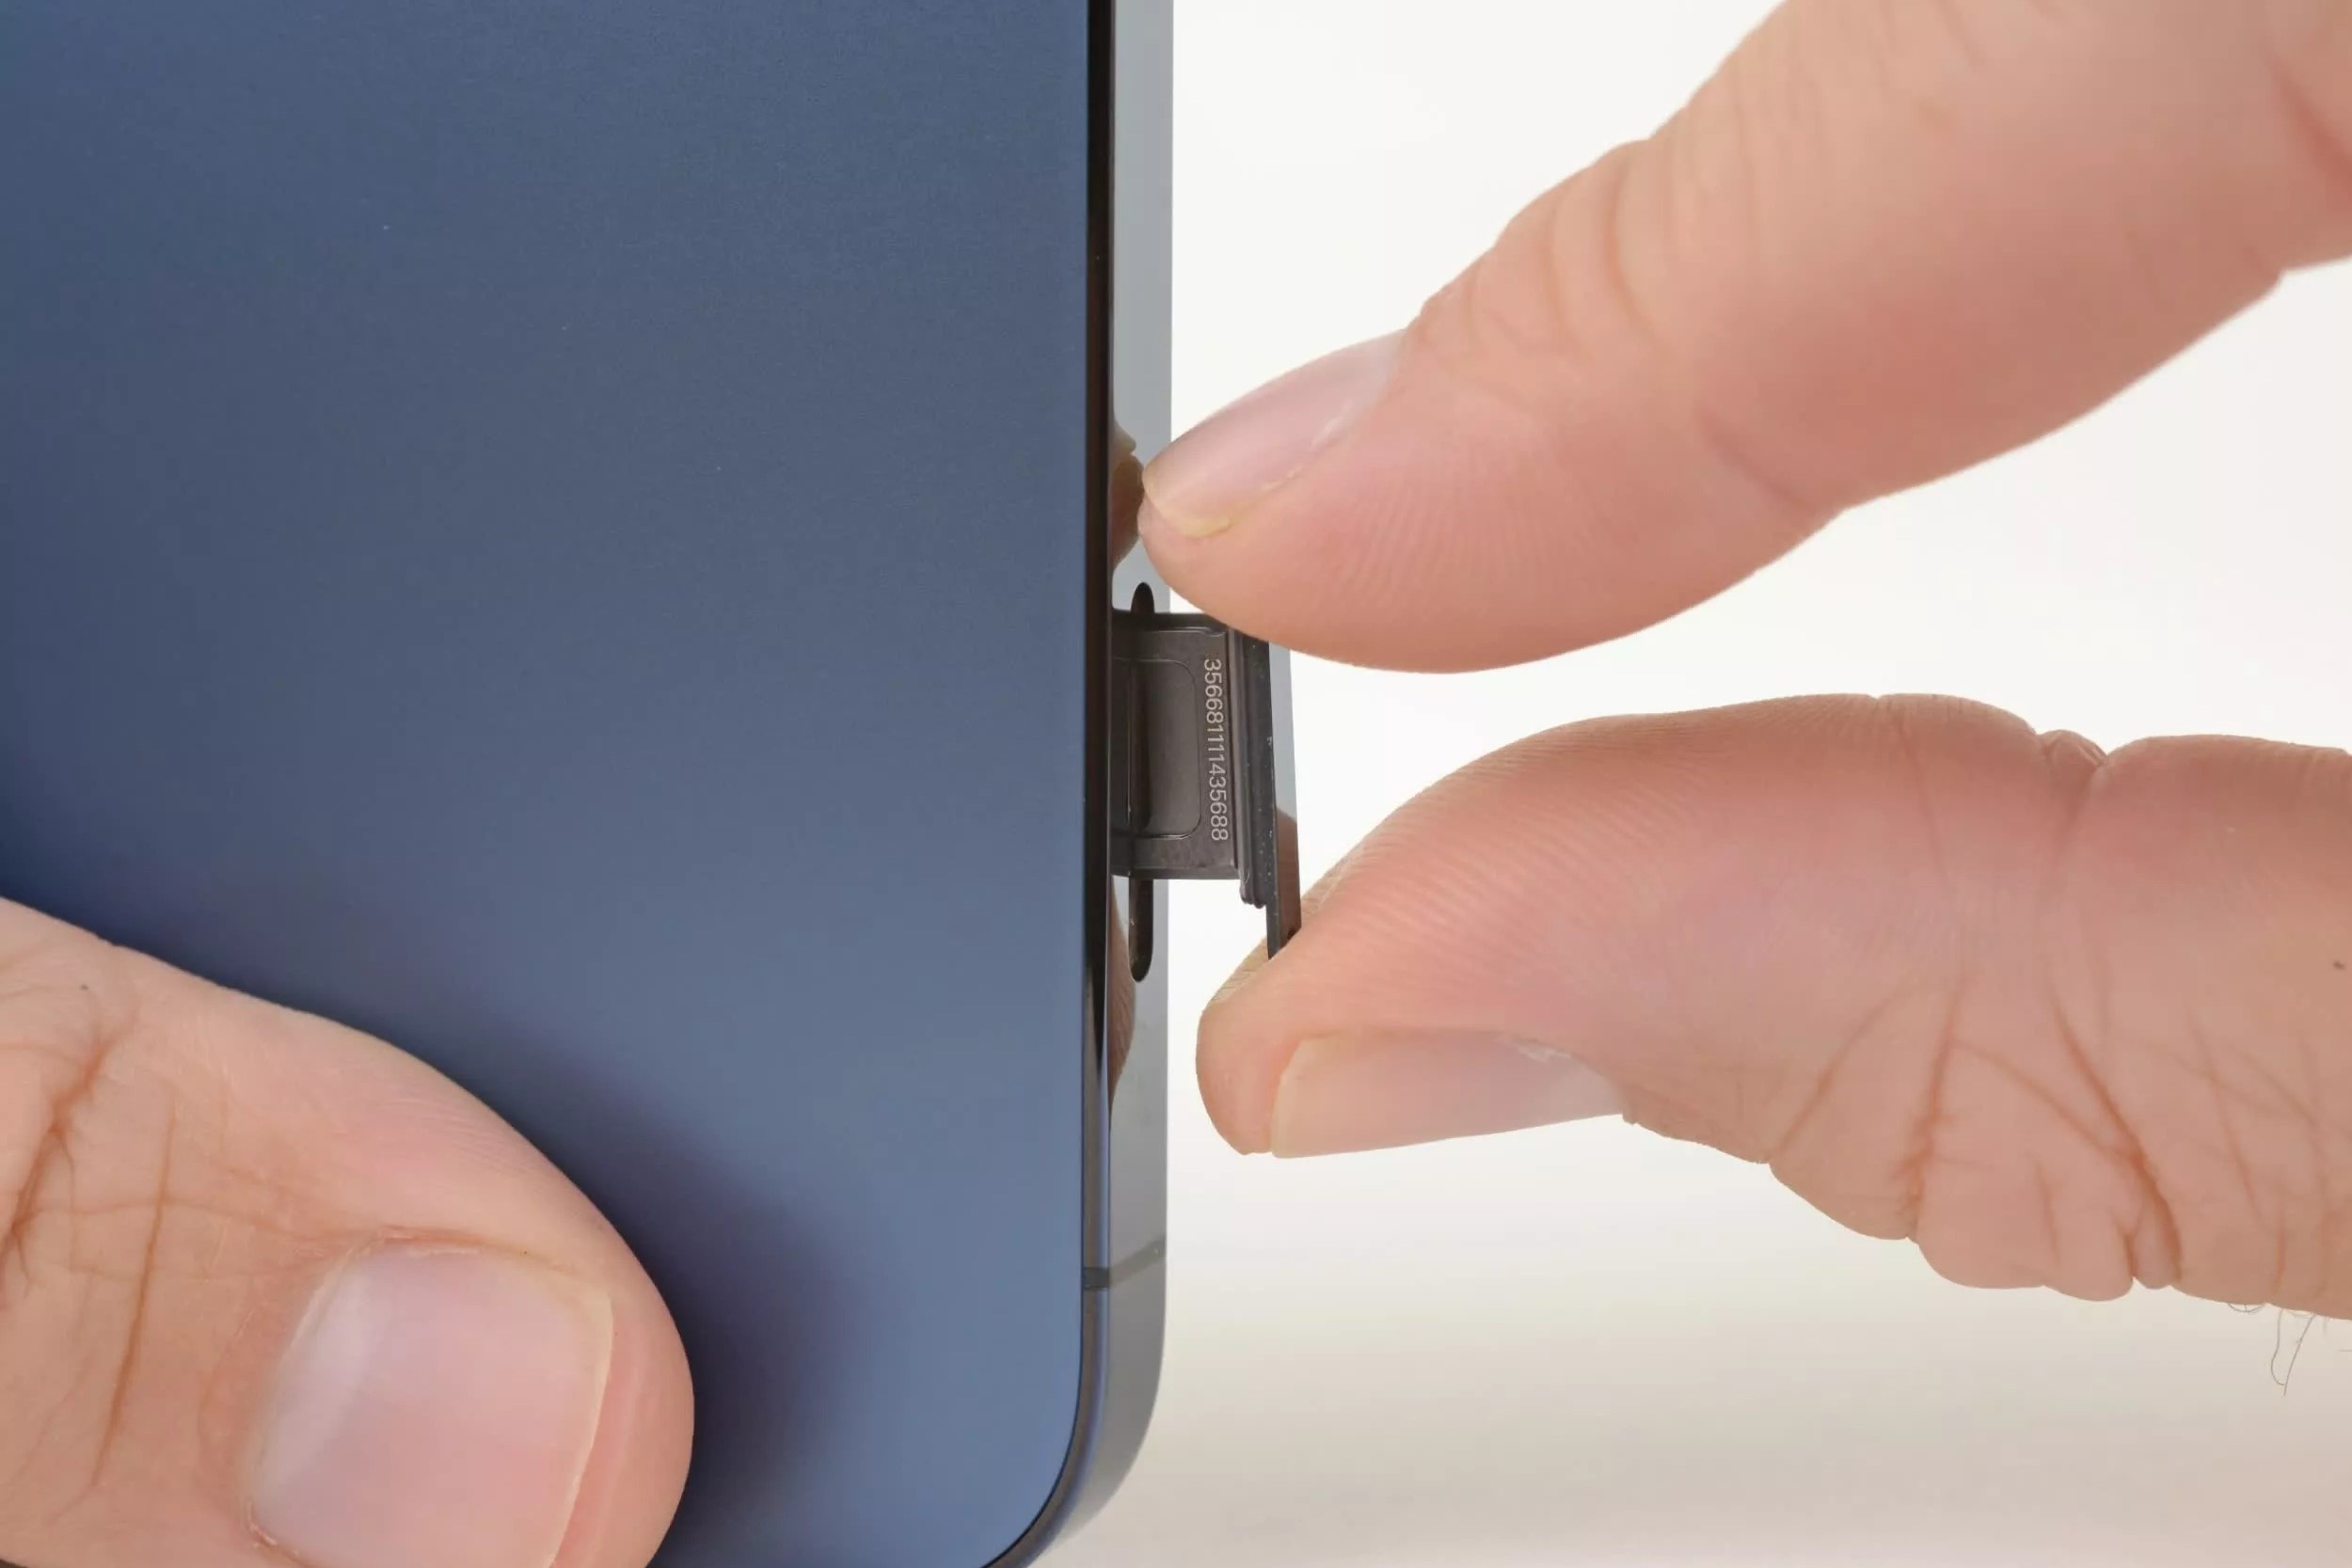
Ejecting the SIM Card Tray
Before proceeding with the SIM card replacement, you need to eject the SIM card tray from your iPhone. Here’s how to do it:
-
Locate the SIM Card Tray Slot: Depending on your iPhone model, the SIM card tray slot is typically located on the side of the device. It may be on the right side (iPhone 6 and later) or the top edge (iPhone 4 and 4s).
-
Insert the Ejection Tool: Use the SIM card ejection tool that came with your iPhone or a small paperclip. Insert the tool into the small pinhole next to the SIM card tray slot. Apply gentle pressure until the tray pops out slightly.
-
Remove the SIM Card Tray: Once the SIM card tray is partially ejected, carefully pull it out of the iPhone using your fingers. Ensure that you handle it with care to avoid any damage to the tray or the device.
By following these steps, you can safely eject the SIM card tray from your iPhone, preparing it for the subsequent SIM card replacement process.
Removing the Old SIM Card
Once the SIM card tray is ejected from your iPhone, the next step is to remove the old SIM card. Follow these steps to safely remove the old SIM card:
-
Inspect the SIM Card and Tray: Take a moment to examine the SIM card and the tray to familiarize yourself with the orientation and positioning of the card within the tray.
-
Handle the SIM Card Carefully: Gently remove the old SIM card from the tray, ensuring that you handle it with care to avoid any damage to the card or the delicate metal contacts on its surface.
-
Place the Old SIM Card in a Safe Location: As a precaution, keep the old SIM card in a secure location, such as its original packaging, in case you need to use it again in the future.
By following these steps, you can safely remove the old SIM card from the tray, setting the stage for inserting the new SIM card into your iPhone.
Inserting the New SIM Card
Now that the old SIM card has been removed, it’s time to insert the new SIM card into your iPhone. Follow these steps to ensure a smooth and secure insertion:
-
Align the New SIM Card: Place the new SIM card into the SIM card tray, ensuring that it is positioned in the correct orientation. The notched corner of the SIM card should align with the notched corner of the SIM card tray.
-
Place the SIM Card Tray Back: Carefully insert the SIM card tray back into the iPhone, ensuring that it fits snugly and smoothly into the slot. Avoid using excessive force to prevent any damage to the tray or the device.
-
Ensure Proper Alignment: Verify that the SIM card tray is flush with the side of the iPhone, indicating that the new SIM card is securely in place within the device.
By following these steps, you can effectively insert the new SIM card into your iPhone, setting the stage for powering on the device and activating the new SIM card.
Replacing the SIM Card Tray
After successfully inserting the new SIM card into your iPhone, the next step is to securely replace the SIM card tray. Follow these steps to ensure a proper and secure placement:
-
Align the SIM Card Tray: Position the SIM card tray in line with the slot on the side of your iPhone. Ensure that it is oriented correctly to fit smoothly into the device.
-
Gently Insert the Tray: Carefully slide the SIM card tray back into the iPhone, applying gentle pressure to ensure that it slots into place without resistance. Avoid forcing the tray, as it should slide in smoothly.
-
Verify Secure Fit: Once the tray is back in place, ensure that it sits flush with the side of the iPhone, indicating that it is securely positioned within the device.
By following these steps, you can securely replace the SIM card tray in your iPhone, ensuring that the new SIM card is properly installed and ready for activation.
Powering On the iPhone
With the new SIM card securely in place, it’s time to power on your iPhone. Follow these steps to ensure a smooth and successful startup:
-
Press and Hold the Side Button: On iPhone X or later models, press and hold the side button until the Apple logo appears on the screen. For earlier models, press and hold the top or side button until the Apple logo is displayed.
-
Release the Button: Once the Apple logo appears, release the side or top button and allow the iPhone to complete its startup process. This may take a few moments.
-
Enter Passcode (if required): If your iPhone is secured with a passcode or Touch ID, you will be prompted to enter your passcode or use Touch ID to unlock the device.
By following these steps, you can successfully power on your iPhone with the new SIM card, allowing the device to initialize and establish connectivity with the new carrier network.
Activating the New SIM Card
Upon powering on your iPhone with the new SIM card, the final step is to activate the new SIM card. Follow these essential guidelines to ensure a seamless activation process:
-
Connect to Wi-Fi or Cellular Network: Ensure that your iPhone is connected to a Wi-Fi network or has a cellular signal to enable the activation process. This connectivity is essential for the device to communicate with the carrier’s network.
-
Follow On-Screen Prompts: In most cases, your iPhone will display on-screen prompts to guide you through the activation process. Follow the instructions provided, which may include entering your new SIM card’s activation code or confirming your carrier details.
-
Restart Your iPhone: After completing the activation process, restart your iPhone to ensure that the new SIM card is fully recognized and operational on your device.
By following these steps, you can successfully activate the new SIM card, allowing your iPhone to establish connectivity with the new carrier and enabling you to make calls, send messages, and access mobile data with the updated SIM card.