
How to Automatically Cc/Bcc Emails in Outlook
Outlook provides a convenient way to automatically copy or blind copy (Cc/Bcc) certain recipients on your emails. This feature can be particularly useful when you regularly need to send copies of important emails to specific individuals or keep others in the loop without manual intervention. In this guide, we’ll walk you through the steps to automatically Cc/Bcc emails in Outlook.
1. Open Outlook: Launch the Outlook application on your computer.
2. Click on “File”: In the top left corner of the Outlook window, click on the “File” tab.
3. Click on “Options”: From the drop-down menu, select “Options.”
4. Select “Mail”: In the Outlook Options menu, click on the “Mail” tab in the left-hand panel.
5. Click on “Advanced”: Scroll down to find the “Advanced” section in the Mail Settings.
6. Scroll down to “Send”: Within the Advanced options, locate the “Send” section.
7. Click on “Automatically CC” or “Automatically BCC”: Choose whether you want to automatically Cc or Bcc recipients.
8. Enter the email address to Cc/Bcc: Click on “Automatically CC” or “Automatically BCC” and type in the email address(es) of the recipient(s) you want to copy or blind copy on each new email.
9. Click on “OK”: Once you have entered the desired email address(es), click on the “OK” button to save the changes.
10. Send your email as usual: Start composing your email and send it as you normally would.
11. Verify that the email was automatically CC/BCC’d: Double-check the recipient list in the sent email to ensure that the specified email address(es) were automatically copied or blind copied.
That’s it! Now, you can save time and effort by automatically Cc/Bcc-ing specific recipients in Outlook. This feature is particularly useful for those who regularly need to keep certain individuals in the loop or want to maintain a record of important email communications. Experiment with this feature to streamline your email workflow and improve your productivity.
What is Cc and Bcc?
When it comes to email communication, you may have come across the terms “Cc” and “Bcc” before. Cc stands for “carbon copy,” while Bcc stands for “blind carbon copy.” Understanding the purpose and distinction between these two features can greatly enhance your email efficiency and effectiveness.
Cc: When you Cc someone on an email, it means that you are sending them a copy of the email for informational purposes. All recipients, including the primary recipient, can see the email addresses of everyone who was Cc’d. This allows multiple people to be aware of the conversation and stay informed.
Bcc: On the other hand, Bcc allows you to send a copy of the email without revealing the recipient’s email address to others. This is particularly useful in preserving privacy or keeping recipients hidden from each other. With Bcc, the recipients won’t know who else received the email. The primary recipient and those Cc’d will only see their own email address on the email.
Both Cc and Bcc can serve different purposes depending on your specific needs. Cc is commonly used when there is a need to inform others or keep them in the loop without actively involving them in the conversation. It can be useful for collaborative projects, team updates, or communication with multiple stakeholders. On the other hand, Bcc is often used when you want to send a copy of the email discreetly, such as when forwarding an email or sending a mass email without revealing the recipients’ email addresses to each other.
Using Cc and Bcc effectively can help you streamline your email communication and maintain better organization. It allows you to involve the necessary parties or share information while avoiding cluttering inboxes or revealing personal information to others. By understanding the differences between these two features, you can make more informed decisions about whom to include in your email conversations and ensure the appropriate level of privacy and transparency.
Why Automatically Cc/Bcc Emails?
Automatically Cc/Bcc-ing emails in Outlook offers several advantages that can improve your email workflow and overall communication efficiency. Let’s explore some of the key reasons why you might want to consider utilizing this feature.
1. Information Sharing: By automatically Cc-ing or Bcc-ing specific recipients, you can ensure that relevant parties are kept informed about important communications. This eliminates the need for manually forwarding or copying individuals on emails and helps avoid miscommunication or missed updates.
2. Transparency and Collaboration: Automatically Cc-ing recipients provides transparency and promotes collaboration. It allows stakeholders to be aware of ongoing conversations, project updates, or important decisions. This enhances teamwork and keeps everyone on the same page, contributing to better overall outcomes.
3. Efficiency and Time-saving: The automatic Cc/Bcc feature eliminates the need to manually include recipients on every email. It saves time and effort, especially when you frequently need to keep certain individuals in the loop. This feature is particularly beneficial for recurring emails or when communicating with multiple parties consistently.
4. Privacy and Confidentiality: Utilizing the automatic Bcc feature ensures the privacy and confidentiality of recipient email addresses. It prevents accidental disclosure of email addresses by keeping them hidden from other recipients. This is vital, especially when sending mass emails or communicating with a large number of contacts who may not know each other.
5. Organizational Efficiency: Automatically Cc/Bcc-ing allows for more structured organization of incoming emails. By designating specific individuals or groups to be copied or blind copied, you can easily filter and categorize emails. This promotes better email management and helps you stay organized and focused on essential tasks.
Incorporating the automatic Cc/Bcc feature into your Outlook email workflow can significantly enhance your communication process. It promotes information sharing, collaboration, efficiency, privacy, and organizational effectiveness. By leveraging this feature, you can streamline your email management, reduce manual efforts, and improve overall productivity.
Step 1: Open Outlook
To start the process of automatically Cc/Bcc-ing emails in Outlook, you must first open the Outlook application on your computer. Outlook is a widely used email client with a user-friendly interface and a range of powerful features for managing your emails and communications.
Here are the steps to open Outlook:
- Click on the Start button or press the Windows key on your keyboard to open the Start menu.
- In the search bar, type “Outlook.”
- From the search results, click on the Outlook application icon to launch it.
Alternatively, if you have a shortcut icon for Outlook on your desktop or taskbar, you can simply double-click on it to open the application.
Once Outlook is open, you will be greeted with your email inbox and all your folders and features within the application. Upon completing this step, you are now ready to proceed with the next steps to automatically Cc/Bcc recipients in your emails.
It is worth noting that Outlook may look slightly different depending on the version you are using. However, the basic steps to open the application remain the same for all versions. If you are using Outlook within an organization or on a work computer, make sure you have the necessary permissions and access rights to open and use the application.
Now that you have successfully opened Outlook, let’s move on to the next step to configure the automatic Cc/Bcc feature and streamline your email communication.
Step 2: Click on “File”
In order to configure the automatic Cc/Bcc feature in Outlook, you need to access the settings and options menu. This can be done by clicking on the “File” tab, which is located in the top left corner of the Outlook window. The “File” tab provides access to various settings and customization options for your Outlook account.
Here are the steps to click on “File” in Outlook:
- Open the Outlook application on your computer by following the steps outlined in Step 1.
- Once the application is open, look towards the top left corner of the window.
- Locate the “File” tab in the top left corner and click on it.
By clicking on the “File” tab, you will see a drop-down menu that provides options to access different settings and features within Outlook. This menu serves as the starting point for various configurations and customizations that can enhance your email management experience.
It is important to note that depending on the version of Outlook you are using, the location of the “File” tab may vary slightly. However, most versions of Outlook have the “File” tab in a prominent position at the top of the window for easy access.
Now that you have successfully clicked on “File” in Outlook, you are one step closer to enabling the automatic Cc/Bcc feature. In the next step, we will delve into accessing the Outlook Options menu to further configure and enable the desired settings.
Step 3: Click on “Options”
Once you have clicked on the “File” tab in Outlook, the next step is to access the “Options” menu. This menu allows you to customize and configure various settings related to your Outlook account, including email preferences, appearance, and more.
Here are the steps to click on “Options” in Outlook:
- Open the Outlook application on your computer and ensure that you have clicked on the “File” tab as explained in Step 2.
- Look for the “Options” tab in the left-hand column of the drop-down menu that appears after clicking on “File”.
- Click on the “Options” tab to access the Outlook Options menu.
By clicking on the “Options” tab, a new window will open that contains a wide range of customizable settings for your Outlook account. This allows you to tailor the application according to your preferences and optimize your email management experience.
It is important to note that the location of the “Options” tab may vary slightly depending on the version of Outlook you are using. However, it is typically found in the left-hand column of the drop-down menu after clicking on “File.” Look for the options icon or the word “Options” to access the Outlook Options menu.
Now that you have successfully clicked on “Options,” you are ready to proceed with the next steps to configure the automatic Cc/Bcc feature and streamline your email communication in Outlook. In the upcoming step, we will dive into the Mail settings to further customize the desired options.
Step 4: Select “Mail”
After clicking on the “Options” tab in Outlook, the next step is to select the “Mail” option. This will allow you to access and modify the settings specifically related to your email account, including the automatic Cc/Bcc feature.
Follow these steps to select “Mail” in Outlook:
- Ensure that the Outlook Options menu is open, as explained in Step 3.
- In the left-hand column of the Outlook Options menu, locate and click on the “Mail” option.
By selecting “Mail,” you will be able to customize various settings related to your mail account, such as message format, signatures, and email organization. This section allows you to fine-tune your email management experience according to your specific requirements.
Note that the location of the “Mail” option may vary slightly depending on the version of Outlook you are using. However, it is typically found in the left-hand column of the Outlook Options menu, grouped with other relevant options.
Now that you have successfully selected “Mail,” you are ready to move on to the next steps in order to enable and configure the automatic Cc/Bcc feature. In the following step, we will explore the “Advanced” options to further customize the desired settings.
Step 5: Click on “Advanced”
Once you have selected the “Mail” option in the Outlook Options menu, the next step is to click on “Advanced.” This will give you access to more advanced settings and configurations for your email account, including the option to enable and configure the automatic Cc/Bcc feature.
Follow these steps to click on “Advanced” in Outlook:
- Make sure you are in the “Mail” section of the Outlook Options menu, as explained in Step 4.
- Look for the “Advanced” option in the list of settings and configurations.
- Click on “Advanced” to proceed.
By clicking on “Advanced,” you will be presented with a range of advanced settings that allow you to further customize your email experience. This section provides options to control various aspects of your email communication, such as message handling, folder management, and more.
Please note that the location of the “Advanced” option may vary slightly depending on the version of Outlook you are using. However, it is typically found within the “Mail” section of the Outlook Options menu and indicated as “Advanced” or “Advanced Options.”
Now that you have successfully clicked on “Advanced,” you are ready to proceed to the next steps to enable and configure the automatic Cc/Bcc feature in Outlook. In the upcoming step, we will focus specifically on the “Send” section to further customize the desired options.
Step 6: Scroll down to “Send”
After clicking on “Advanced” in the Outlook Options menu, the next step is to scroll down to the “Send” section. This section contains settings related to sending and receiving emails, including the option to enable and configure the automatic Cc/Bcc feature.
Here is how you can scroll down to “Send” in Outlook:
- Ensure that you are in the “Advanced” section of the Outlook Options menu, as explained in Step 5.
- Scroll down using the scrollbar on the right side of the window or by using the scroll wheel on your mouse.
- Continue scrolling until you reach the “Send” section.
By scrolling down to “Send,” you will be able to access specific settings related to sending emails, such as email composition, delivery options, and automatic Cc/Bcc.
It is important to note that the length and content of the “Send” section may vary depending on the version of Outlook you are using. However, the options related to automatic Cc/Bcc should be located within this section.
Now that you have successfully scrolled down to the “Send” section, you are ready to proceed to the next steps to enable and configure the automatic Cc/Bcc feature in Outlook. In the upcoming step, we will focus on the options to automatically Cc or Bcc recipients as per your preference.
Step 7: Click on “Automatically CC” or “Automatically BCC”
After scrolling down to the “Send” section in the Outlook Options menu, the next step is to click on either “Automatically CC” or “Automatically BCC,” depending on your desired preference. These options allow you to enable the automatic Cc/Bcc feature in Outlook and specify the recipients you want to automatically include in your emails.
Here is how you can click on “Automatically CC” or “Automatically BCC” in Outlook:
- Make sure you are in the “Send” section of the Outlook Options menu, as explained in Step 6.
- Look for the options labeled “Automatically CC” and “Automatically BCC.”
- Click on either “Automatically CC” or “Automatically BCC” based on your preference and needs.
By clicking on “Automatically CC” or “Automatically BCC,” you will activate the corresponding feature and be able to specify the recipients who should be automatically copied or blind copied on each new email you send.
It is important to note that selecting “Automatically CC” will include the email addresses of the specified recipients in the visible Cc field of the email. On the other hand, selecting “Automatically BCC” will add the recipients to the blind carbon copy (Bcc) field, keeping their email addresses hidden from other recipients.
Now that you have successfully clicked on “Automatically CC” or “Automatically BCC,” you are one step closer to configuring the automatic Cc/Bcc feature in Outlook. In the next step, we will explore how to enter the email address(es) of the recipients you want to include in the Cc/Bcc field.
Step 8: Enter the email address to CC/BCC
After selecting either “Automatically CC” or “Automatically BCC” in the Outlook Options menu, the next step is to enter the email address(es) of the recipient(s) you want to include in the Cc/Bcc field automatically. This allows you to specify who should be copied or blind copied on each new email you send.
Here is how you can enter the email address(es) to CC/BCC in Outlook:
- Make sure you have clicked on either “Automatically CC” or “Automatically BCC,” as explained in Step 7.
- In the same section, locate the text box or field labeled “Email Address” or similar.
- Enter the email address(es) of the recipient(s) you want to automatically include in the Cc/Bcc field.
- If you have multiple email addresses to include, separate them with commas.
By entering the email address(es) of the recipient(s), you are specifying who should be automatically copied or blind copied on every new email you send. This ensures that the specified individuals receive a copy of the email without the need for manual intervention.
It is important to enter the email address(es) accurately to avoid any delivery issues or unintended recipient visibility. Double-check the addresses for correctness and make sure you have the necessary permission to include individuals in the Cc/Bcc field.
Now that you have successfully entered the email address(es) to CC/BCC in Outlook, you are one step closer to enabling the automatic Cc/Bcc feature. In the next step, we will learn how to save the changes and proceed with sending emails as usual.
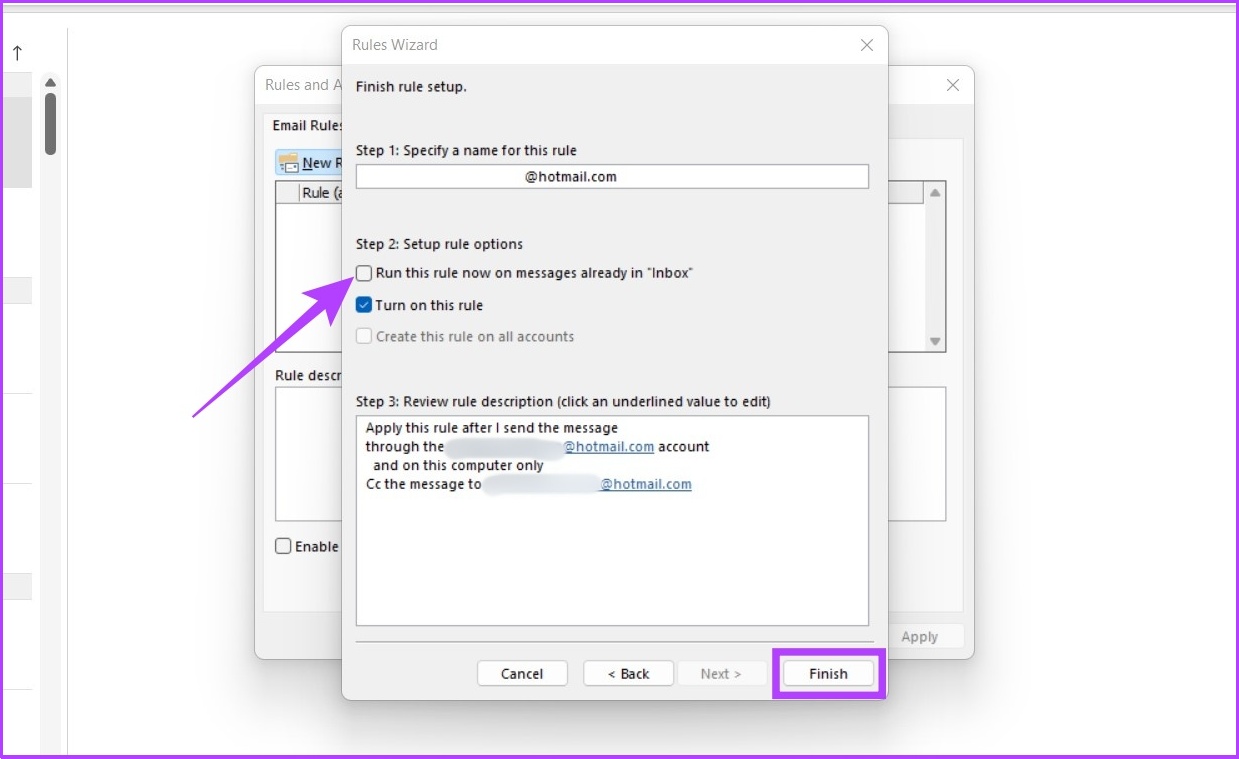
Step 9: Click on “OK”
After entering the email address(es) to CC/BCC in the Outlook Options menu, the next step is to click on “OK” to save the changes. This will enable the automatic Cc/Bcc feature in Outlook and ensure that the specified recipients are included in the Cc/Bcc field of each new email you send.
Here is how you can click on “OK” in Outlook:
- Ensure that you have entered the desired email address(es) to CC/BCC, as explained in Step 8.
- Look for the “OK” button or similar in the Outlook Options menu.
- Click on “OK” to save the changes and close the menu.
By clicking on “OK,” you are confirming your preference to automatically include the specified recipients in the Cc/Bcc field of your emails. This ensures that they will receive a copy of the email without the need for manual intervention every time you send a new email.
It is essential to click on “OK” to save the changes and activate the automatic Cc/Bcc feature. Without saving the changes, the feature will not be enabled, and the specified recipients will not be included in the Cc/Bcc field of your emails.
Now that you have successfully clicked on “OK,” the automatic Cc/Bcc feature is enabled in Outlook. In the next step, we will explore how to send your email as usual, with the designated recipients automatically included in the Cc/Bcc field.
Step 10: Send your email as usual
Now that you have enabled the automatic Cc/Bcc feature in Outlook and specified the recipients to include in the Cc/Bcc field, you can proceed to send your email as usual. This step involves composing your email, adding the desired recipients in the “To” field, and clicking the send button.
Here is how you can send your email as usual in Outlook:
- Open a new email by clicking on the “New Email” button or using the keyboard shortcut (Ctrl+N).
- Compose your email, including the subject, body, and any attachments.
- Add the primary recipient(s) in the “To” field, just like you would in any regular email.
- As you send the email, the recipients you specified in the automatic Cc/Bcc settings will be automatically included in the Cc/Bcc field.
By sending your email as usual, you ensure that the primary recipient(s) receive the email as intended. Along with that, the recipients specified in the Cc/Bcc settings will also receive a copy of the email automatically, without any manual intervention required on your part.
It is important to double-check the recipient(s) in the “To” field to ensure that the right individuals receive the email. Additionally, be mindful of the content and attachments before sending the email to avoid any unintended disclosure or issues.
Now that you have successfully sent your email, Outlook will automatically include the designated recipients in the Cc/Bcc field, making it easier for you to keep them in the loop. In the next step, we will verify that the email was automatically Cc/Bcc’d to ensure the desired recipients received a copy of the email.
Step 11: Verify that the email was automatically CC/BCC’d
After sending an email with the automatic Cc/Bcc feature enabled in Outlook, it’s essential to verify that the designated recipients were automatically included in the Cc/Bcc field. This step allows you to confirm that the recipients received a copy of the email without any manual intervention required on your part.
Here is how you can verify that the email was automatically CC/BCC’d in Outlook:
- Once you have sent the email, go to the “Sent Items” folder in Outlook.
- Locate the sent email you want to verify.
- Open the email and check the recipients in the Cc/Bcc fields.
- Verify that the recipients you specified in the automatic Cc/Bcc settings are included in the Cc/Bcc field.
By reviewing the sent email, you can ensure that all the intended recipients were automatically included in the Cc or Bcc field, depending on your settings. This step provides confirmation that your email reached the designated individuals in the manner you intended, keeping them informed or maintaining their privacy, as required.
If you notice any issues or discrepancies in the Cc/Bcc fields, you may need to revisit the automatic Cc/Bcc settings and verify that the email addresses were entered correctly. Make any necessary adjustments to ensure the desired recipients are included in future emails with the automatic Cc/Bcc feature.
Verifying that the email was automatically CC/BCC’d helps maintain effective communication and ensures that important recipients receive copies of your emails without manual effort. It provides peace of mind and helps to securely deliver information or keep individuals informed, enhancing collaboration and productivity in your email workflow.
Potential Pitfalls
While the automatic Cc/Bcc feature in Outlook can greatly enhance your email productivity, there are a few potential pitfalls to be aware of. By understanding these challenges, you can effectively navigate them and make the most out of this feature.
1. Accidental Cc/Bcc: One common pitfall is accidentally enabling the automatic Cc/Bcc feature without realizing it. Always double-check your Outlook settings and ensure that you have enabled and configured this feature intentionally. Accidentally including recipients in a Cc/Bcc field can lead to privacy concerns or unintended disclosure of email addresses.
2. Inappropriate Recipients: Care should be taken when specifying the recipients to include in the Cc/Bcc field. Make sure that the individuals you add have a legitimate reason to receive a copy of the email. Including unnecessary recipients can clutter inboxes and dilute the purpose of the Cc/Bcc feature. Only include recipients who truly need to receive a copy of the email.
3. Consent and Privacy: When using the automatic Cc/Bcc feature, it is essential to respect the privacy and consent of the recipients. Ensure that you have the necessary permission or consent to include individuals in the Cc/Bcc field. Always comply with data protection regulations and respect the confidentiality of email addresses.
4. Overuse and Spam: Be cautious not to overuse the automatic Cc/Bcc feature, as it can lead to recipients feeling overwhelmed with unnecessary emails. Use this feature judiciously and consider whether a direct email or other means of communication might be more appropriate for certain situations. Avoid spamming recipients with excessive copies of every email you send.
5. Unintended Disclosure: When using the Cc/Bcc feature, take care to avoid unintended disclosure of sensitive information. Be mindful of the content of your emails and ensure that you do not accidentally include confidential or sensitive material in the Cc/Bcc field. Always verify the recipients and content before sending an email to avoid any unintended disclosures.
Being aware of these potential pitfalls can help you use the automatic Cc/Bcc feature effectively and avoid common mistakes. By adopting best practices and being mindful of privacy, consent, and appropriate use, you can maximize the benefits of this feature while maintaining professionalism and data security in your email communication.
Final Thoughts
The automatic Cc/Bcc feature in Outlook is a valuable tool that can streamline your email communication and enhance your productivity. By automatically including specific recipients in the Cc/Bcc field, you can keep individuals informed, collaborate effectively, and maintain privacy when necessary.
It’s important to remember that this feature should be used judiciously and with respect for privacy and consent. Be mindful of who you include in the Cc/Bcc field and consider whether it is necessary for them to receive a copy of the email. Overuse or accidental inclusion of recipients can lead to inbox clutter and potential privacy concerns.
Take the time to configure the automatic Cc/Bcc feature correctly, ensuring that the desired recipients are included and that their email addresses are entered accurately. Double-check your settings to avoid any unintended disclosure of sensitive information or email addresses.
Additionally, regularly review and update your automatic Cc/Bcc settings as your email communication needs evolve. What may be necessary today may not be applicable in the future. By staying mindful of your communication practices and adjusting your settings accordingly, you can ensure the effectiveness and relevance of this feature in the long run.
Overall, the automatic Cc/Bcc feature in Outlook is a powerful tool that can save time, improve collaboration, and enhance your email management. By using it responsibly and in line with best practices, you can optimize your email communication, streamline your workflow, and make the most out of your Outlook experience.