
Common Mistakes when Separating Email Recipients in Outlook
When sending emails in Outlook, it’s important to properly separate the recipients to ensure your message reaches the intended individuals. However, there are some common mistakes that people often make when it comes to separating email recipients. These mistakes can lead to confusion, privacy issues, or even delivery failures. To help you avoid these pitfalls, let’s explore some of the most common mistakes when separating email recipients in Outlook.
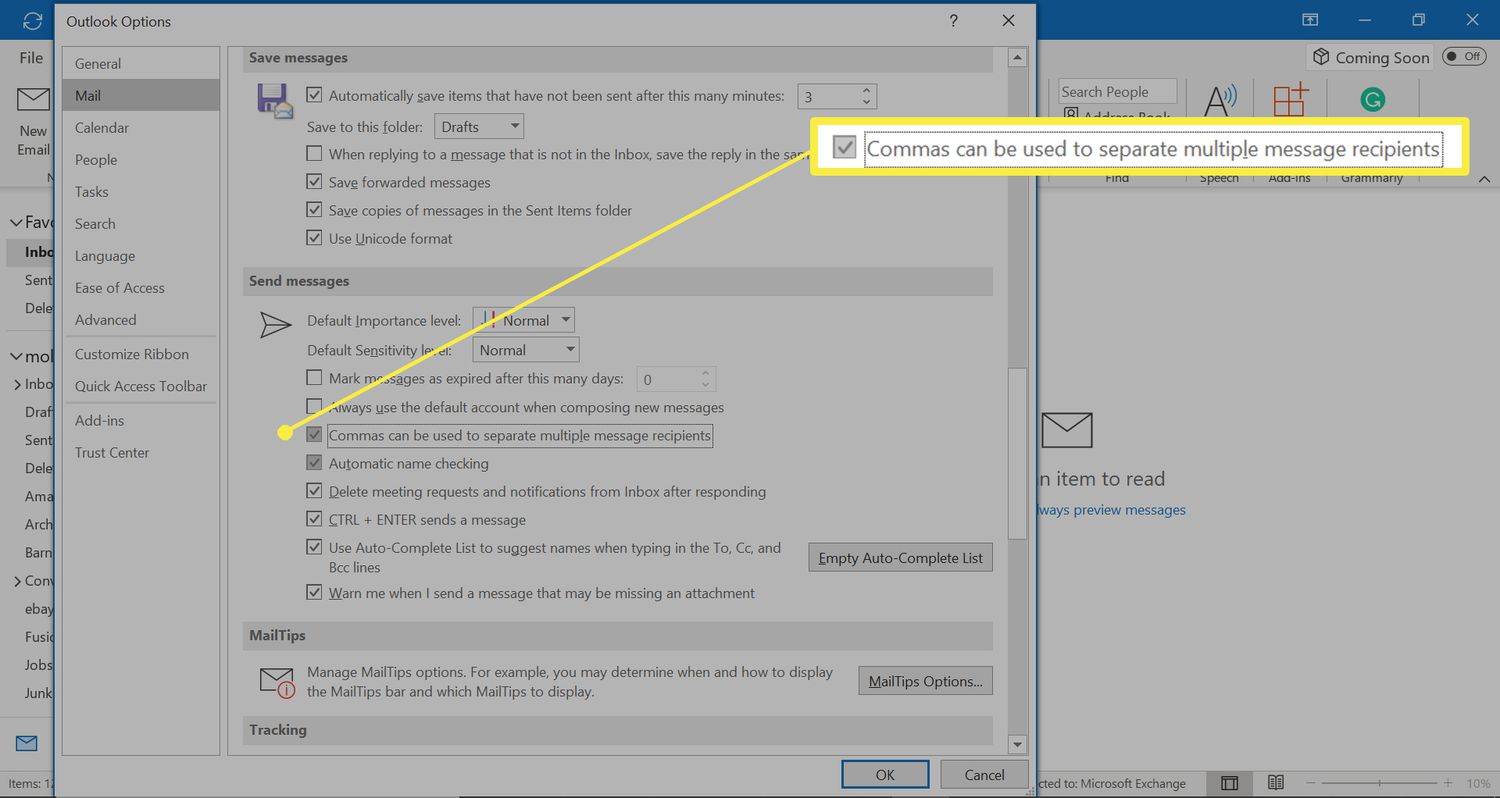
One of the most common mistakes is not using the proper separator between email addresses. Many people mistakenly separate email addresses using spaces, semicolons, or even line breaks. However, in Outlook, the correct separator to use is a comma. Using the wrong separator can cause delivery issues or result in the email addresses not being properly recognized as separate recipients.
Another mistake is forgetting to remove any unnecessary spaces or extra commas when separating email addresses. These extraneous characters can cause errors, resulting in failed delivery or the email being sent to the wrong recipients. It’s important to ensure that you have a clear and concise separation between each email address.
Additionally, some individuals make the mistake of including invalid email addresses in the recipient list. Outlook requires valid email addresses to properly send messages. Including invalid email addresses can result in delivery failures or bounce-back notifications, indicating that the email was not successfully sent to all recipients.
One common mistake is accidentally including email addresses in the CC (carbon copy) or BCC (blind carbon copy) fields instead of the TO field. This can happen when individuals are not paying attention or when they mistakenly assume that everyone should be included in the CC or BCC field. Double-checking the recipient fields before sending the email can help prevent this mistake.
Lastly, one important mistake to avoid is sending sensitive or confidential information to the wrong individuals. Before sending an email, double-check the email addresses to ensure that you are sending the message to the intended recipients. Accidentally including the wrong recipients can lead to privacy breaches or unintended sharing of confidential information.
By being aware of these common mistakes and taking the necessary precautions, you can ensure that your email recipients are properly separated in Outlook. This will help improve communication efficiency and reduce the risk of delivery failures or privacy breaches.
Using Commas to Separate Multiple Email Recipients
When it comes to separating multiple email recipients in Outlook, commas are the key. By correctly using commas, you can ensure that each recipient is properly identified and that your email is delivered to the intended individuals. Let’s delve into the details of using commas to separate multiple email recipients in Outlook.
First and foremost, make sure to enter each recipient’s email address followed by a comma. For example, if you’re sending an email to JohnDoe@example.com and JaneSmith@example.com, you would enter their addresses as follows: “JohnDoe@example.com, JaneSmith@example.com”. This clear separation ensures that Outlook recognizes each email address as a separate recipient.
It’s important to note that you don’t need to add a comma after the last email address in the recipient list. For instance, if you’re sending an email to JohnDoe@example.com, JaneSmith@example.com, and MikeWilson@example.com, you would enter their addresses as: “JohnDoe@example.com, JaneSmith@example.com, MikeWilson@example.com”. The last comma is optional and won’t affect the delivery of your email.
When using the Cc (carbon copy) and Bcc (blind carbon copy) fields, the same principle applies. Each email address should be separated with commas. If you want to send a copy of your email to JohnDoe@example.com and a blind copy to JaneSmith@example.com, you would enter their addresses as: “JohnDoe@example.com” in the To field and “JaneSmith@example.com” in the Bcc field. Both email addresses should be separated with commas in their respective fields.
In addition to individual recipients, you can also use commas to separate email addresses when creating distribution lists in Outlook. Distribution lists allow you to send emails to multiple recipients at once, saving you time and effort. Simply enter each email address followed by a comma when creating a distribution list.
Formatting Email Recipients with Commas in Outlook
Formatting email recipients properly is essential to ensure efficient and error-free communication. When using commas to separate email recipients in Outlook, it’s important to follow certain formatting guidelines. These guidelines help maintain clarity and accuracy in your recipient list. Let’s explore the best practices for formatting email recipients with commas in Outlook.
Firstly, it’s crucial to enter each email address correctly. Ensure that each email address is in the correct format, with no spaces or typos. For example, the correct format for an email address is “username@example.com”. Incorrect formatting, such as missing the “@” symbol or including spaces, can result in delivery failures or undeliverable emails.
Next, each email address should be separated by a comma. This helps Outlook recognize each address as an individual recipient. For example, if you’re sending an email to JohnDoe@example.com and JaneSmith@example.com, you would enter their addresses as “JohnDoe@example.com, JaneSmith@example.com”. The comma serves as a clear indication that each email address is a separate recipient.
When entering multiple email addresses in the Cc (carbon copy) and Bcc (blind carbon copy) fields, the same formatting rules apply. Separate each address using a comma. For example, if you want to carbon copy JohnDoe@example.com and blind carbon copy JaneSmith@example.com, you would enter their addresses as “JohnDoe@example.com” in the Cc field and “JaneSmith@example.com” in the Bcc field. Both addresses should be separated by commas in their respective fields.
It’s also important to validate the email addresses in your recipient list. Make sure that every email address is valid and active. Outlook requires valid addresses to send emails successfully. If an email address is incorrect or no longer in use, the email may bounce back, resulting in a failed delivery.
Another formatting tip is to avoid using unnecessary spaces or extra commas when separating email addresses. Ensure there are no trailing or leading spaces, and that there is a clear separation between each email address using a single comma. Extraneous characters and incorrect formatting can lead to errors and delivery issues.
By following these guidelines and formatting email recipients correctly with commas in Outlook, you can ensure that your emails are delivered to the intended recipients smoothly and effectively. Consistent formatting practices will not only enhance communication but also minimize errors and increase the professional appearance of your emails.
Adding Email Recipients in the To Field with Commas
The “To” field in Outlook is where you typically enter the primary recipients of your email. To properly add multiple email recipients in the “To” field, you can use commas to separate them. This ensures that each recipient receives the email directly and is aware of other recipients. Let’s explore the process of adding email recipients in the “To” field with commas in Outlook.
To begin, open a new email in Outlook. In the “To” field, start by typing the email address of the first recipient. For example, if you’re sending an email to JohnDoe@example.com, you would type “JohnDoe@example.com” in the “To” field. After entering the first recipient’s email address, you can use a comma to separate it from the next recipient.
After typing the first email address, add a comma followed by a space. This indicates the separation between recipients and helps Outlook recognize each email address as a distinct recipient. For instance, if you want to send the email to both JohnDoe@example.com and JaneSmith@example.com, you would type “JohnDoe@example.com, JaneSmith@example.com” in the “To” field.
It’s important to note that you shouldn’t add a comma after the last email address in the “To” field. For example, if you’re sending an email to JohnDoe@example.com, JaneSmith@example.com, and MikeWilson@example.com, you would enter their addresses as “JohnDoe@example.com, JaneSmith@example.com, MikeWilson@example.com” without a comma after “MikeWilson@example.com”. The last email address doesn’t require a comma as it serves as the end of the “To” field.
As you add multiple email recipients in the “To” field, ensure that each email address is entered correctly with no spaces, misspellings, or incorrect formatting. Mistakes in email addresses can result in delivery failures or emails being sent to the wrong recipients.
By using commas to separate email addresses in the “To” field, you can efficiently send emails to multiple recipients in Outlook. This method ensures that each recipient is directly addressed in the email and promotes clear communication among all participants.
Separating Email Recipients in the Cc and Bcc Fields with Commas
When it comes to sending emails in Outlook, the Cc (carbon copy) and Bcc (blind carbon copy) fields are commonly used to include additional recipients. Properly separating email recipients in these fields is important to ensure that each recipient receives the appropriate copy of the email. By using commas, you can effectively separate multiple email recipients in the Cc and Bcc fields in Outlook. Let’s explore how to do this.
When adding email recipients in the Cc field, start by typing the email address of the first recipient. After entering the first email address, use a comma followed by a space to separate it from the next recipient. For example, if you want to carbon copy JohnDoe@example.com and JaneSmith@example.com, you would type “JohnDoe@example.com, JaneSmith@example.com” in the Cc field.
In the Bcc field, the process is the same. Enter the email address of the first recipient, followed by a comma and a space. This indicates the separation between recipients. For instance, if you want to blind carbon copy JohnDoe@example.com and JaneSmith@example.com, you would type “JohnDoe@example.com, JaneSmith@example.com” in the Bcc field.
Just like in the “To” field, it’s important to ensure that each email address is entered correctly in the Cc and Bcc fields. Watch out for any spaces, misspellings, or incorrect formatting that may cause delivery issues or send the email to unintended recipients.
Remember that in both the Cc and Bcc fields, you can include multiple email recipients by separating their addresses with commas. Each recipient will receive a copy of the email, with those in the Cc field being visible to other recipients, while those in the Bcc field will be hidden from other recipients.
When using commas to separate email recipients in the Cc and Bcc fields, be mindful of any email etiquette or privacy considerations. Make sure you have permission to include individuals in the Cc or Bcc fields, and be cautious when disclosing sensitive information to multiple recipients.
By correctly separating email recipients with commas in the Cc and Bcc fields of Outlook, you can effectively communicate with multiple recipients while maintaining the appropriate levels of visibility and privacy.
Using Commas to Separate Email Recipients in Distribution Lists
In Outlook, distribution lists are a convenient way to send emails to multiple recipients simultaneously. They allow you to create a group of contacts and send emails to the entire group with just a single email address. When adding email recipients to distribution lists, it’s important to use commas to separate each email address and ensure accurate delivery. Let’s explore how to use commas to separate email recipients in distribution lists in Outlook.
To create a distribution list in Outlook, start by navigating to the “Contacts” or “People” tab. From there, select “New Contact Group” or a similar option depending on your version of Outlook. Name the group and click on “Add Members” to add the email recipients. Here’s where you’ll use commas to separate the email addresses.
For each email recipient you want to include in the distribution list, type their email address followed by a comma. For example, if you want to add JohnDoe@example.com, JaneSmith@example.com, and MikeWilson@example.com to the distribution list, you would enter it as follows: “JohnDoe@example.com, JaneSmith@example.com, MikeWilson@example.com”. This clear separation helps Outlook identify each email address as a separate recipient.
Ensure that you don’t include any spaces immediately before or after the commas. Spaces can cause errors when Outlook tries to recognize the email addresses, resulting in failed delivery or undeliverable emails.
It’s important to double-check the email addresses you enter in the distribution list. Make sure there are no typos, misspellings, or incorrect formatting. Invalid or non-existent email addresses can lead to delivery failures or bounce-back notifications.
When sending an email to a distribution list, you can simply enter the name of the list in the “To” field. Outlook will automatically expand the distribution list and send the email to all the email addresses included in the list.
Using commas to separate email recipients in distribution lists not only simplifies the process of sending emails to multiple recipients, but it also ensures that each recipient is included in the group. This streamlined approach saves time and effort, allowing you to effectively communicate with a predefined group of contacts.
Adding Multiple Email Recipients with Commas in a Contact Group
In Outlook, contact groups are a useful feature that allows you to create a group of contacts and easily send emails to all members of the group. When adding multiple email recipients to a contact group, it’s important to use commas to separate each email address. This ensures that all recipients are included and receive the email as intended. Let’s explore how to add multiple email recipients with commas in a contact group in Outlook.
To create a contact group in Outlook, navigate to the “Contacts” or “People” tab and select “New Contact Group” or a similar option based on the version of Outlook you are using. Give the group a name and click on “Add Members” to start adding email recipients.
In the “Add Members” section, you can enter the email addresses of the individuals you want to include in the contact group. As you enter each email address, make sure to separate them with commas. For example, if you want to add JohnDoe@example.com, JaneSmith@example.com, and MikeWilson@example.com to the contact group, you would enter it as follows: “JohnDoe@example.com, JaneSmith@example.com, MikeWilson@example.com”. Each email address should be followed by a comma to clearly separate them.
Double-check the email addresses as you add them to the contact group. Ensure there are no typos, misspellings, or incorrect formatting. An incorrect email address may result in a failed delivery or the email not reaching the intended recipient.
If you want to add contacts from your existing Outlook contacts list to the group, you can simply select them from the list and click “Members” to add them. Outlook will automatically add their email addresses to the contact group, separated by commas.
Remember that you can also add new email recipients directly when creating the contact group by entering their email addresses and separating them with commas.
Once you have added all the desired email recipients to the contact group, save the group, and it will be ready for use. You can now easily send emails to everyone in the contact group by simply entering the name of the group in the “To” field of your email.
By using commas to separate multiple email recipients in a contact group, you can efficiently organize and send group emails in Outlook. This feature saves time and makes it easier to communicate with a predefined group of contacts, streamlining your email management process.
Best Practices for Separating Email Recipients with Commas in Outlook
When it comes to separating email recipients with commas in Outlook, following best practices ensures effective communication and minimizes the risk of errors or delivery issues. By keeping these practices in mind, you can optimize your email communication and streamline the process of sending emails to multiple recipients. Let’s explore some of the best practices for separating email recipients with commas in Outlook.
1. Use the Correct Separator: In Outlook, the proper separator to use between email addresses is a comma (,). Avoid using other separators such as spaces, semicolons, or line breaks. Using the correct separator ensures that Outlook recognizes each email address as a separate recipient.
2. Avoid Additional Spaces: Make sure not to include unnecessary spaces before or after the commas separating email addresses. Extra spaces can cause Outlook to treat email addresses as invalid and result in delivery failures.
3. Double-Check Email Addresses: Take the time to double-check each email address before adding them to the recipient list. Look for any typos, misspellings, or incorrect formatting. Invalid or incorrect email addresses can lead to undeliverable emails or bounce-back notifications.
4. Separate Recipients Clearly: Use a clear separation between each email address by using a single comma and a space. This ensures that each recipient is properly identified and avoids any confusion or potential delivery errors.
5. Be Mindful of Privacy and Confidentiality: When including multiple recipients in the “To,” Cc, or Bcc fields, be mindful of privacy and confidentiality. Review the recipient list to ensure that everyone you intend to include in the email should be visible to all recipients. Use the Bcc field if you want to send a blind carbon copy to certain recipients.
6. Test Before Sending: It’s always a good practice to send a test email to yourself or a small group of recipients before sending a mass email to multiple recipients. This allows you to check the formatting, ensure correct recipient separation, and verify that all email addresses are functioning properly.
Remember, the goal is to achieve clear and accurate communication while maintaining the professional appearance of your emails. By following these best practices, you can ensure that your email recipients are properly separated with commas in Outlook, enhancing communication efficiency and reducing the risk of errors or delivery failures.