
Exporting your Outlook address book
Exporting your Outlook address book is the first step in emailing every contact efficiently. By converting your contacts into a file, you can easily import them into a new email message and reach out to all of your connections at once. Follow these steps to export your Outlook address book:
- Open Microsoft Outlook on your computer.
- Click on the “File” tab located at the top left corner of the screen.
- Select “Open & Export” and then click on “Import/Export”.
- Choose “Export to a file” and click on “Next”.
- Select “Comma Separated Values” and click on “Next”.
- Choose the folder containing your contacts (usually named “Contacts” or “Address Book”) and click on “Next”.
- Browse to the location where you want to save the exported file and give it a name.
- Click on “Finish” to complete the exporting process.
Once you’ve successfully exported your Outlook address book, you’ll have a CSV file that contains all of your contacts’ information. This file can now be used to easily import your contacts into a new email in Outlook.
Exporting your Outlook address book is a crucial first step in preparing to send a mass email to your contacts. By following these instructions, you can ensure that you have all the necessary contact information readily available to send out your message effectively.
Creating a new email in Outlook
After exporting your Outlook address book, the next step is to create a new email in Outlook. This will serve as the template for your mass email to all of your contacts. Follow these steps to create a new email in Outlook:
- Open Microsoft Outlook on your computer.
- Click on the “Home” tab located at the top left corner of the screen.
- Click on the “New Email” button to open a new email message.
- In the new email message window, fill in the “To” field with your own email address. This ensures that the email will be sent to you as well.
- Enter a subject line for your email. This should be concise and attention-grabbing, as it will be the first thing your contacts see when they receive the email.
- Compose the body of your email. This is where you can personalize your message and convey the purpose of your email to your contacts.
- Add any attachments or links that are relevant to your email content.
Creating a new email in Outlook is a straightforward process. By following these steps, you can set up the foundation for your mass email and begin customizing it with the necessary details and personalization.
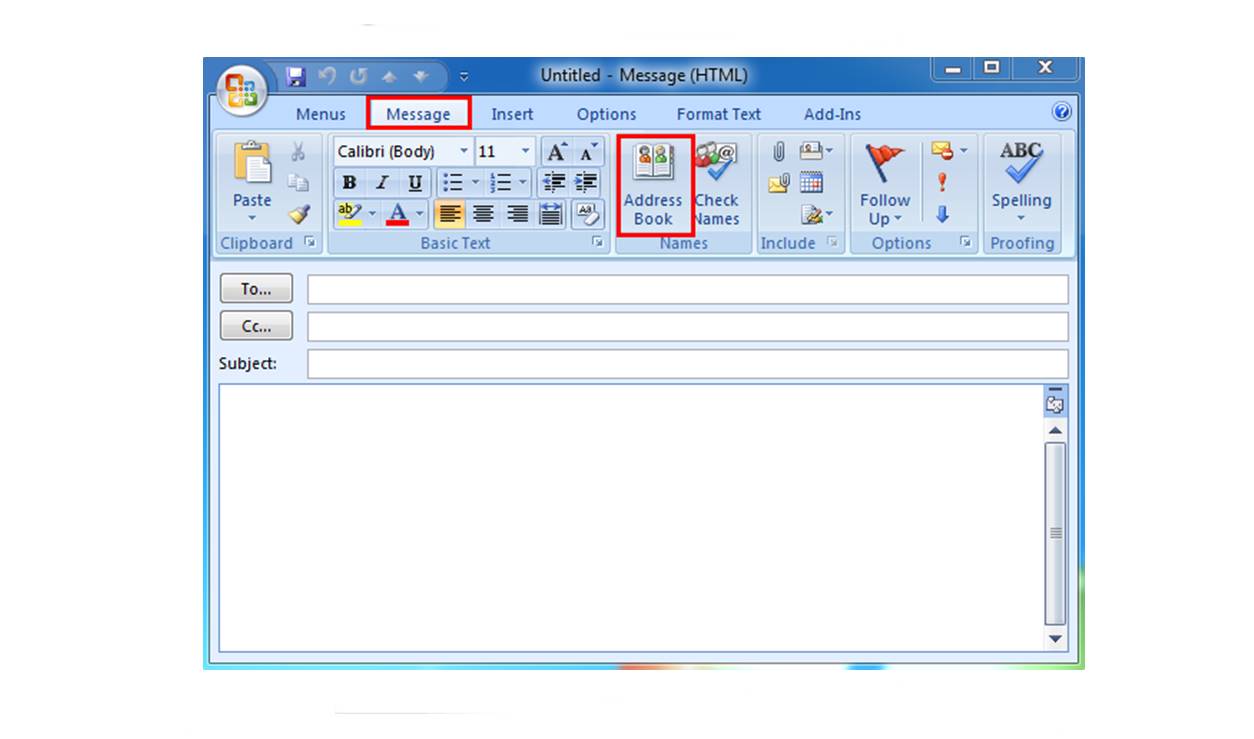
Adding your contacts to the email
Now that you have created a new email in Outlook, it’s time to add your contacts to the email. This step ensures that your mass email reaches all of your intended recipients. Follow these steps to add your contacts to the email:
- In the new email message window, click on the “To” button. This will open the Outlook Address Book.
- Select the address book or contact list where you exported your contacts in the previous step.
- Click on the first contact in the list, then hold down the “Shift” key and click on the last contact to select multiple contacts at once.
- Click on the “To ->” button to add the selected contacts to the “To” field of the email.
- If you want to add any additional contacts individually, you can scroll through the list and select them one by one.
Once you have added your contacts to the email, you will see their email addresses populated in the “To” field. This ensures that the email will be sent to all the selected contacts.
Adding your contacts to the email is a crucial step to ensure that every contact in your Outlook address book receives your mass email. By following these steps, you can easily include all of your contacts in a few simple clicks.
Personalizing your email with merge fields
To make your mass email feel more personalized and tailored to each recipient, you can utilize merge fields in Outlook. Merge fields allow you to dynamically insert specific information from your contact list into the email, such as the recipient’s name or company. Follow these steps to personalize your email with merge fields:
- In the new email message window, click on the “Mailings” tab located at the top of the screen.
- Click on the “Insert Merge Field” button, and a dropdown menu will appear.
- Select the merge field that you want to insert into the email. Common merge fields include “First Name,” “Last Name,” “Company,” and “Email Address”.
- Repeat the above step to insert additional merge fields as needed.
- As you insert merge fields, you will see the corresponding merge fields in the body of your email. For example, if you inserted the “First Name” merge field, it will display as “<<First Name>>” in your email.
- Continue composing your email and incorporating merge fields as desired.
Using merge fields adds a personal touch to your mass email, making it feel more customized for each recipient. When you send the email, Outlook will replace the merge fields with the actual information from each contact in your address book.
By following these steps and utilizing merge fields, you can effectively personalize your mass email, increasing its impact and engagement with your recipients.
Customizing the subject and body of the email
Customizing the subject and body of your email is essential to ensure that your message is engaging and effective. By crafting compelling and well-targeted content, you can increase the chances of your email being opened and read by your contacts. Follow these steps to customize the subject and body of your email:
- Start by brainstorming a powerful subject line that grabs attention and accurately reflects the purpose of your email.
- Avoid using generic subject lines and instead opt for something specific and intriguing to pique the interest of your contacts.
- In the body of your email, begin with a warm and personalized greeting, such as “Dear [First Name].” Utilizing the merge fields discussed earlier can help with this personalization.
- Clearly and concisely state the purpose of your email in the opening paragraph. Be direct and avoid excessive jargon or unnecessary details.
- Elaborate on the main points or benefits of your message in the subsequent paragraphs. Use bullet points or numbered lists to enhance readability and highlight key information.
- Include any relevant call-to-action (CTA) buttons or links that will guide your contacts to take the desired action, whether it’s signing up for an event, downloading a resource, or visiting a website.
- Craft a closing paragraph that reinforces the importance of your message and expresses gratitude for their time.
- Finally, create a signature that includes your name, title, contact information, and any relevant social media links or website URLs.
By customizing the subject and body of your email, you can ensure that your message grabs attention, resonates with your contacts, and guides them towards the desired action.
Reviewing and finalizing your email
Before sending your mass email to your Outlook address book contacts, it’s vital to review and finalize your email to ensure it is error-free and effectively communicates your message. Follow these steps to review and finalize your email:
- Read through your email carefully, checking for any spelling or grammatical errors. Use the built-in spell checker in Outlook to assist you in this process.
- Ensure that all merge fields appear correctly and are populated with the right information from your contact list.
- Verify that the subject line accurately represents the content of your email and is compelling enough to encourage recipients to open it.
- Review the body of your email for clarity and coherence. Make sure your message flows logically and is easy to understand.
- Double-check any attachments or links in your email to confirm they are working correctly and are relevant to your message.
- Consider sending a test email to yourself or a small group of trusted recipients to preview how your email will appear in the inbox and identify any formatting issues.
- Take one final look at the overall design and formatting of your email. Ensure that it is visually appealing, with appropriate font styles, colors, and spacing.
- Once you are confident in the quality and effectiveness of your email, click on the “Send” button to distribute it to all the contacts in your Outlook address book.
By carefully reviewing and finalizing your email, you can ensure that it reflects your desired message and portrays a professional image to your contacts. This extra step can significantly enhance the impact and success of your mass email campaign.
Sending the email to your Outlook address book contacts
After reviewing and finalizing your email, you are now ready to send it to your Outlook address book contacts. By following these steps, you can efficiently distribute your email to all of your intended recipients:
- In the email window, click on the “Send” button located at the top left corner of the screen.
- Outlook will start sending the email to each contact in your address book, one by one. You can monitor the progress in the Outlook “Outbox” folder.
- Depending on the size of your address book and the number of recipients, sending the email may take some time. Be patient and allow Outlook to complete the sending process.
- Once all contacts have received the email, you will see it move to the “Sent” folder in Outlook.
- It’s important to note that sending a mass email to a large number of contacts may result in your email being flagged as spam by some recipients’ email providers. To minimize the chances of this happening, ensure that your email content is relevant, personalized, and complies with email marketing best practices.
By sending the email to your Outlook address book contacts, you can reach out to multiple recipients simultaneously, saving time and effort. Remember to keep track of any responses or follow-up actions that may result from your mass email campaign.
With your email now sent, your communication efforts are underway. Be prepared to engage with any responses or inquiries from your contacts, and continue building strong relationships with your audience.