
Why Export Your Gmail Contacts?
Having a backup of your Gmail contacts is essential for several reasons. It helps safeguard your contacts in case of accidental deletion, software glitches, or account access issues. Exporting your Gmail contacts also allows you to transfer them to another email service or sync them with other devices seamlessly. Furthermore, exporting contacts provides an additional layer of accessibility, enabling you to view, manage, and edit your contacts offline.
By exporting your Gmail contacts, you have a reliable copy of all your important contacts, ensuring you never lose touch with colleagues, friends, or family. Additionally, it allows you to maintain a unified address book across multiple platforms and devices. Whether you switch to a different email provider or need to manage your contacts outside of Gmail, having an exported file ensures that you stay connected and organized.
Furthermore, exporting your Gmail contacts offers flexibility and convenience when it comes to sharing or collaborating with others. You can easily share your contact list with colleagues, clients, or collaborators without needing to grant them direct access to your Gmail account. This allows for smoother collaboration, improved communication, and efficient networking opportunities.
Overall, exporting your Gmail contacts is a proactive step to protect your valuable contact information, ensure accessibility across platforms, and facilitate seamless collaboration. It offers peace of mind, convenience, and flexibility in managing your contacts while preserving the relationships that are crucial for both personal and professional endeavors.
Step 1: Access Google Contacts
To export your Gmail contacts, you first need to access the Google Contacts platform. Here’s how you can do it:
- Open your web browser and go to https://contacts.google.com.
- Sign in to your Gmail account if you haven’t already.
- Click on the Apps icon (nine dots in a grid pattern) at the top right corner of the page.
- In the dropdown menu that appears, click on “Contacts.” This will open the Google Contacts interface.
Once you’ve accessed Google Contacts, you’re ready to proceed to the next step of exporting your contacts.
Note: It’s essential to make sure you’re signed in with the correct Gmail account that contains the contacts you want to export. If you have multiple accounts, double-check that you’re using the right one to avoid any confusion or exporting the wrong set of contacts.
The Google Contacts platform provides a user-friendly interface where you can easily manage and organize your contacts. From this platform, you can import and export contacts, edit contact details, create contact groups, and even merge duplicate contacts. It’s a powerful tool that allows you to have complete control over your Gmail contacts.
Step 2: Select Contacts to Export
After accessing Google Contacts, you need to choose which contacts you want to export. Here’s how you can select the contacts you wish to include in the export:
- In Google Contacts, you will see a list of all your contacts.
- Scroll through the contacts list and manually select the ones you want to export by checking the box next to each contact’s name. Alternatively, if you want to export all your contacts, skip this step.
- If you have a large number of contacts and need to filter them based on certain criteria, you can use the search bar at the top to find specific contacts by name, email address, or any other information associated with them.
- If you want to select all the contacts on the current page, click the checkbox in the top left corner of the contacts list.
- To select all your contacts, click the checkbox in the top left corner of the contacts list and then click on “Select all [number] contacts” when prompted.
By manually selecting contacts or using the search and select-all options, you can customize your exported contact list to include only the contacts you need. This allows for a more efficient export process and ensures that you have control over the information you share or transfer.
It’s worth noting that Google Contacts provides additional features such as contact labeling and grouping. These features allow you to organize your contacts into categories, making it easier to select specific groups for export. This can be particularly useful if you want to export contacts associated with a specific project, team, or event.
Once you have selected the desired contacts for export, you’re ready to proceed to the next step and export them in a compatible format.
Step 3: Export Your Contacts
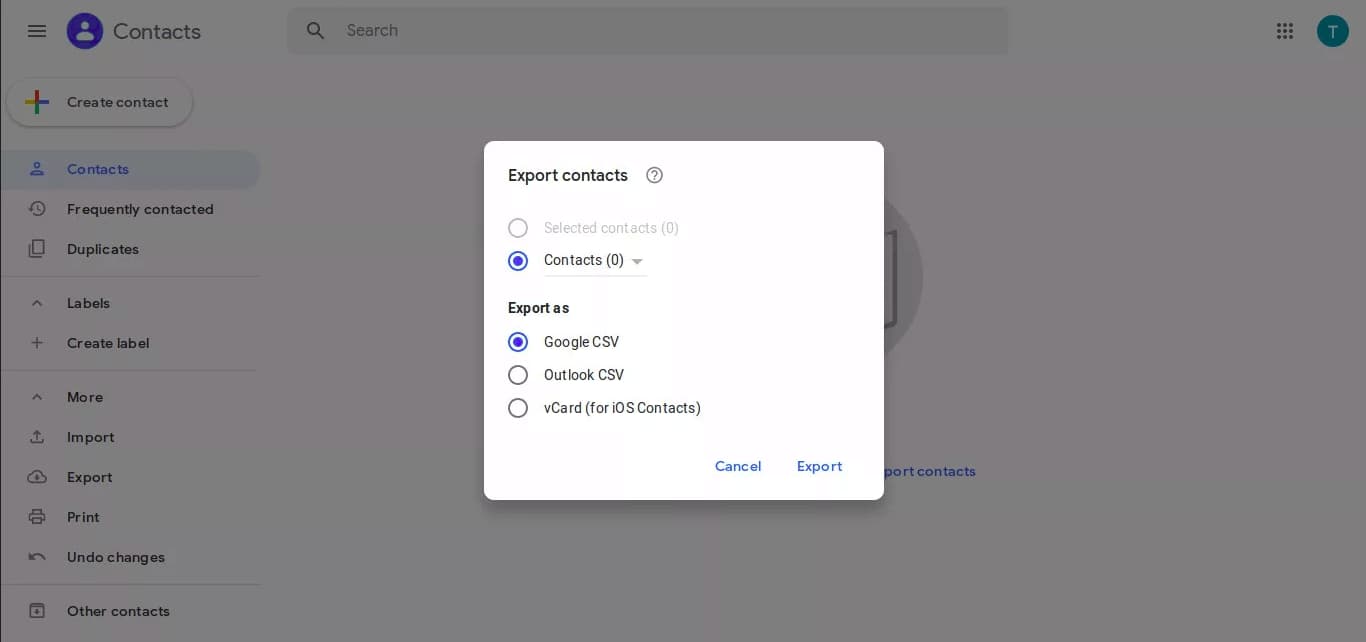
After selecting the contacts you want to export, it’s time to choose the export format. Google Contacts provides multiple options to ensure compatibility with various email clients and platforms. Here are the different export formats available:
- Option 1: Export to Google CSV format: This format is suitable if you plan to import your contacts into another Google account or service. It preserves all contact details, including labels and group assignments.
- Option 2: Export to Outlook CSV format: Choose this format if you intend to import your contacts into an Outlook application or another email client that supports CSV (Comma Separated Values) files.
- Option 3: Export to vCard format: vCard is a widely supported format that allows you to export your contacts and import them into various email clients, address book applications, and mobile devices.
To export your contacts in any of these formats, follow these steps:
- Click on the “More” button located above the contacts list.
- In the dropdown menu, select “Export…”.
- A window will appear with the available export options. Choose the desired format based on your requirements.
- Click on the “Export” button, and your contacts will be saved as a downloadable file on your device.
By providing multiple export options, Google Contacts ensures that you can seamlessly transfer your contacts to different platforms and email clients. It allows for easy migration between services and enhances the flexibility and accessibility of your contact information.
Next, we’ll discuss the steps to save the exported file and prepare it for import to another account or email service.
Option 1: Export to Google CSV format
If you plan to import your contacts into another Google account or service, exporting them in Google CSV format is the ideal choice. This format preserves all contact details, including labels and group assignments. Here’s how you can export your contacts to Google CSV format:
- Follow the steps mentioned in the previous section to access Google Contacts and select the contacts you want to export.
- Click on the “More” button located above the contacts list.
- In the dropdown menu, select “Export…”.
- In the export options window, choose “Google CSV format” as the export format.
- Click on the “Export” button, and the contacts will be saved as a Google CSV file on your device.
The Google CSV file can be imported into another Google account or uploaded to services like Google Sheets or Google Drive. It provides a seamless transfer of your contacts, ensuring that all the information associated with each contact is maintained.
When importing the Google CSV file to another Google account, you can follow the import instructions provided by Google Contacts. It typically involves accessing the Contacts platform in the target account, selecting the import option, and choosing the Google CSV file from your device to import the contacts.
This option allows you to migrate your contacts within the Google ecosystem effortlessly. It’s particularly useful if you’ve created custom labels, groups, or other contact-related settings that you want to preserve.
Now that you know how to export your contacts in Google CSV format, let’s explore the other export options available.
Option 2: Export to Outlook CSV format
If you want to import your contacts into Outlook or any other email client that supports CSV (Comma Separated Values) files, exporting your contacts in Outlook CSV format is the way to go. This format allows for a smooth transition of your contacts between different email clients. Here’s how you can export your contacts to Outlook CSV format:
- Access Google Contacts and select the contacts you wish to export, following the steps mentioned earlier.
- Click on the “More” button located above the contacts list.
- In the dropdown menu, select “Export…”.
- In the export options window, choose “Outlook CSV format” as the export format.
- Click on the “Export” button, and the contacts will be saved as an Outlook CSV file on your device.
Once you have the Outlook CSV file, you can import it into your Outlook application or any other email client that supports the CSV format. The importing process may vary depending on the email client you’re using, but usually, it involves accessing the appropriate import settings or using the import function provided by the application.
By exporting your contacts in Outlook CSV format, you ensure compatibility with various email clients, enabling you to seamlessly transfer your contacts regardless of the platform or software you’re using. This option provides flexibility and convenience, allowing you to manage your contacts in your preferred email client without any hassle.
Now that you’re familiar with exporting to Outlook CSV format, let’s explore another export option available: exporting to vCard format.
Option 3: Export to vCard format
If you want to export your Gmail contacts to a format that is widely supported across various email clients, address book applications, and mobile devices, exporting to vCard format is the best choice. vCard, also known as VCF (Virtual Contact File), allows for easy transfer and import of contact information. Here’s how you can export your contacts to vCard format:
- Access Google Contacts and select the contacts you want to export, following the steps outlined earlier.
- Click on the “More” button located above the contacts list.
- In the dropdown menu, select “Export…”.
- In the export options window, choose “vCard format” as the export format.
- Click on the “Export” button, and the contacts will be saved as a vCard file on your device.
The vCard file can then be easily imported into various email clients, address book applications, and mobile devices that support the vCard format. Simply use the importing function or settings provided by the target application or device to import the vCard file and transfer your contacts.
By exporting your contacts to vCard format, you ensure compatibility across different platforms and devices, making it convenient to manage your contacts regardless of the email client or device you’re using. It’s a versatile format that allows you to seamlessly import and sync your contacts to any application or device that supports vCard.
Now that you know how to export your contacts to vCard format, you have multiple options to choose from based on your specific needs and preferences. Next, we’ll discuss the steps to save your exported file and explore how you can import the contacts to another account or email service.
Step 4: Save Your Exported File
After you have successfully exported your contacts in your desired format, it’s crucial to save the exported file in a secure and accessible location. Saving the file ensures that you can easily import it into another account or email service when needed. Here are the steps to save your exported file:
- Once the export process is complete, your web browser will typically prompt you to save the file. In some cases, the file may automatically download to your default downloads folder.
- Choose the desired location on your device where you want to save the exported file. It’s recommended to select a location that is easy to remember and access.
- Give the file a descriptive name that reflects its content or purpose. For example, you can include the date or a brief description to help you identify the file later if needed.
- Verify that the file is saved with the correct file extension based on the export format you selected. For example, a Google CSV file would have the .csv extension, while a vCard file would have the .vcf extension.
By saving your exported file in a secure and easily accessible location, you ensure that you have a backup copy of your contacts. This allows for a seamless transition to another account or email service and provides peace of mind knowing that your valuable contact information is safely stored.
Next, we’ll discuss the steps to import your contacts into another account or email service based on your specific requirements.
Step 5: Import Your Contacts to Another Account
Once you have exported your contacts and saved the exported file, you can easily import them into another account or email service. This step allows you to transfer your contacts seamlessly and maintain a unified address book. Here are the options available for importing your contacts:
- Option 1: Import to another Google Account: If you want to transfer your contacts to another Google account, follow these steps:
- Access the Google Contacts platform in the target Google account.
- Click on the “More” button above the contacts list.
- Select “Import…”.
- Choose the appropriate import option based on the format of your exported file (e.g., Google CSV, vCard).
- Select the exported file from your device and follow the on-screen instructions to complete the import process.
- Option 2: Import to Outlook: If you want to import your contacts into Outlook, the steps may vary depending on the version of Outlook you are using. Generally, you can follow these instructions:
- Open Outlook and go to the Contacts section.
- Click on “File” in the menu bar.
- Select “Open & Export” and then choose “Import/Export”.
- In the Import and Export Wizard, choose “Import from another program or file” and click “Next”.
- Select the appropriate import option based on the format of your exported file (e.g., CSV, vCard).
- Click “Next” and follow the prompts to locate and import the exported file.
- Option 3: Import to a different email provider: If you want to import your contacts to an email provider other than Google or Outlook, the steps may vary. In general, you will need to access the import function or settings in the target email provider, choose the appropriate import format (e.g., CSV, vCard), and select the exported file to complete the import process.
Follow the specific instructions provided by the target email provider to ensure a successful import of your contacts. By importing your exported contacts to another account, you can maintain a consistent contact list across different platforms and email services.
It’s important to note that some email clients or platforms may have limitations on the number of contacts you can import or the supported contact formats. In such cases, you may need to adjust the import process accordingly or consult the documentation provided by the target email service for further guidance.
Now that you know how to import your contacts to another account or email service, you can easily transfer your contacts and continue accessing them in your preferred environment.
Option 1: Import to another Google Account
If you want to transfer your contacts to another Google account, you can easily do so by following these steps:
- Access the Google Contacts platform in the target Google account. You can do this by signing out of your current Google account and signing in to the target account.
- Once you’re logged in to the target Google account, click on the “More” button located above the contacts list.
- In the dropdown menu that appears, select “Import…”
- Choose the appropriate import option based on the format of your exported file. For example, if you exported your contacts in Google CSV format, select the “Google CSV” import option.
- Now, click on the “Select file” button and navigate to the location on your device where you saved the exported file.
- Once you’ve selected the exported file, click on the “Import” button to begin the import process.
- Google Contacts will import the contacts from the CSV or vCard file and add them to the contact list in the target Google account.
By following these steps, you can effortlessly transfer your contacts from one Google account to another. This option is particularly useful if you’re switching to a new Google account or consolidating your contacts under a single account.
After the import is complete, it’s a good idea to review your imported contacts to ensure everything transferred correctly. Check for any missing or duplicate contacts and make any necessary updates or modifications.
Please note that the import process may take some time, especially if you have a large number of contacts or if the imported file is complex. Be patient and allow the platform to complete the import before making any changes to your contacts.
Now that you know how to import your contacts to another Google account, you can easily manage your contacts across different Google accounts and enjoy seamless access to your contact information.
Option 2: Import to Outlook
If you want to import your contacts into Outlook, the process may vary slightly depending on the version of Outlook you are using. Follow these general steps to import your contacts:
- Open Outlook and navigate to the Contacts section.
- In the menu bar, click on “File”.
- From the dropdown menu, select “Open & Export” and then choose “Import/Export”.
- In the Import and Export Wizard window, select “Import from another program or file” and click “Next”.
- Choose the option that corresponds to the format of your exported file. For example, if you exported your contacts as a CSV file, select “Comma Separated Values” and click “Next”.
- Click on the “Browse” button and locate the exported file on your device.
- Once you have selected the file, click “Next” to proceed.
- Choose the folder in Outlook where you want to import the contacts. This can be the default Contacts folder or a custom folder that you have created.
- Click “Finish” to initiate the import process.
Outlook will start importing the contacts from the chosen file into the selected folder. The time it takes to complete the import depends on the size of the file and the number of contacts being imported. Once the import is finished, you can go to the Contacts section in Outlook and verify that the contacts have been successfully imported.
It’s worth noting that the steps provided above are a general guide, and there may be slight variations depending on the specific version of Outlook you are using. If you encounter any difficulties or need further assistance, refer to the Outlook Help documentation or the support resources provided by Microsoft.
By following these steps to import your contacts into Outlook, you can easily transfer your Gmail contacts and continue managing them in the familiar environment of Outlook.
Option 3: Import to a Different Email Provider
If you want to import your contacts to an email provider other than Google or Outlook, the specific steps may vary depending on the email service you are using. However, the general process for importing contacts remains similar across different platforms. Here’s a general guide on how to import your contacts to a different email provider:
- Sign in to your email account with the target email service.
- Locate the settings or options menu within the email service. This is usually represented by an icon or text link, such as “Settings” or “Options”.
- In the settings or options menu, look for an option related to contacts or address book management.
- Within the contacts or address book settings, search for an import or import/export feature. The location and labeling of this option may differ between email providers, so you may need to explore the settings or refer to the provider’s documentation for assistance.
- Select the appropriate import option based on the format of your exported file. Common formats supported by different email services include CSV and vCard.
- Click on the “Browse” or “Choose File” button and locate the exported file on your device.
- Once you have selected the file, initiate the import process by clicking on the “Import” or “Upload” button.
- Allow the email provider some time to process the import. The time required can vary depending on the size of the file and the number of contacts being imported.
- Once the import is complete, the contacts should be available in the address book or contacts list of your email account.
It’s important to note that the specific steps and options for importing contacts may differ between different email providers. If you encounter any difficulties or are unsure about the import process, consult the documentation or support resources provided by the email service for more guidance on importing contacts.
By following these general steps to import your contacts to a different email provider, you can easily transfer your contacts and continue managing them within the new email environment.