
Step 1: Export your Outlook.com data
In order to import your Outlook.com email messages and contacts into Gmail, the first step is to export your data from Outlook.com. By following these simple instructions, you can easily extract your data and prepare it for the import process:
- Sign in to your Outlook.com account: Open your preferred web browser and navigate to Outlook.com. Enter the email address and password associated with your Outlook.com account to log in.
- Access the settings: Once you are logged in, locate the settings icon in the top-right corner of the screen. It looks like a gear or a cogwheel. Click on it to open the settings menu.
- Choose “View all Outlook settings”: In the settings menu, scroll down and click on “View all Outlook settings” at the bottom of the list. This will take you to the advanced settings page.
- Select “Mail”: On the advanced settings page, click on the “Mail” tab in the left sidebar. This will open the mail-related options.
- Export your email: Under the “Mail” tab, click on the “Sync email” option. This will allow you to export your Outlook.com email messages. Choose the desired time range for the export, such as “Last 7 days” or “All”.
- Choose the export format: Select the preferred format for the export. You can choose between “CSV” (Comma Separated Values) or “PST” (Personal Storage Table). The CSV format is recommended for email messages, while the PST format is suitable for contacts.
- Start the export process: Once you have chosen the format and time range, click on the “Export” button to start the process. Depending on the size and complexity of your data, it may take a few moments to complete.
Once the export process is finished, you will have a file containing your Outlook.com email messages or contacts in the chosen format. This file will be used in the next step to import your data into Gmail. Make sure to keep the exported file in a safe location on your computer.
Step 2: Import your Outlook.com data into Gmail
Now that you have exported your Outlook.com data, it’s time to import it into Gmail. By following these straightforward instructions, you can seamlessly transfer all your email messages and contacts from Outlook.com to your Gmail account:
- Sign in to your Gmail account: Open your preferred web browser and go to the Gmail website. Enter your Gmail email address and password to log in.
- Access the settings: Once logged in, locate the settings gear icon in the top-right corner of the Gmail interface. Click on it to open the settings menu.
- Navigate to the “Accounts and Import” tab: In the settings menu, click on the “Accounts and Import” tab to access the import options.
- Choose “Import mail and contacts”: Under the “Accounts and Import” tab, you will find the option to “Import mail and contacts”. Click on it to proceed.
- Provide your Outlook.com credentials: You will be asked to enter your Outlook.com email address. Input the email address associated with your Outlook.com account and click “Continue”.
- Enter your password: Next, enter the password for your Outlook.com account and click “Continue”. This step ensures that you are the authorized user and have permission to import the data.
- Configure import settings: Gmail will prompt you to configure the import settings. Select the desired options for importing email messages, such as whether to import all mail or only mail from specific folders. You can also choose to import contacts during this step.
- Start the import process: Once you have configured the import settings, click on the “Start import” button. Gmail will begin importing your Outlook.com email messages and contacts according to the chosen settings.
It may take some time to complete the import process, depending on the size of your Outlook.com data. Gmail will notify you when the import is finished.
When the import is complete, you will find all your Outlook.com email messages and contacts in your Gmail account. The imported messages will be categorized and labeled for easy organization, and your contacts will be added to your Gmail contacts list.
Step 3: Importing email messages
After successfully importing your Outlook.com data into Gmail, it’s time to focus on importing your email messages specifically. With Gmail’s intuitive interface, this process can be done seamlessly. Follow these steps to import your email messages:
- Open your Gmail account: Launch your web browser and navigate to the Gmail website. Sign in using your Gmail email address and password.
- Access the “Settings” menu: Once logged in, find the gear icon in the top-right corner of the Gmail interface and click on it. From the dropdown menu, select “Settings”.
- Choose the “Accounts and Import” tab: Within the Gmail settings, locate and click on the “Accounts and Import” tab. This will take you to the import options.
- Click “Import mail and contacts”: Under the “Accounts and Import” tab, find the option to “Import mail and contacts” and click on it.
- Enter your Outlook.com email address: In the following window, enter the email address associated with your Outlook.com account. Then, click “Continue”.
- Provide your Outlook.com password: You will be prompted to enter your Outlook.com password. Input your password and click “Continue”. This step verifies your authorization to import the email messages.
- Configure import settings: Gmail will display the import settings for your email messages. Choose your preferences, such as whether to import all messages or only from specific folders. You can also select the option to skip importing duplicates.
- Initiate the import: After configuring the settings, click on the “Start import” button to begin importing your Outlook.com email messages. Gmail will display the progress of the import process.
Depending on the size of your email archive, the import process may take some time. Gmail will notify you when the import is complete, and your Outlook.com email messages will appear in your Gmail inbox.
Once the import is finished, you can browse through your Outlook.com email messages in Gmail, take advantage of Gmail’s powerful search and organization tools, and enjoy the seamless email experience Gmail offers.
Step 4: Importing contacts
Importing your contacts from Outlook.com into Gmail is a crucial step to ensure a smooth transition. By following these steps, you can easily import your Outlook.com contacts into Gmail:
- Access your Gmail account: Launch your preferred web browser and go to the Gmail website. Sign in using your Gmail email address and password.
- Open the “Settings” menu: Once logged in, locate the gear icon in the top-right corner of the Gmail interface and click on it. From the dropdown menu, select “Settings”.
- Navigate to the “Accounts and Import” tab: Within the Gmail settings, click on the “Accounts and Import” tab to access the import options.
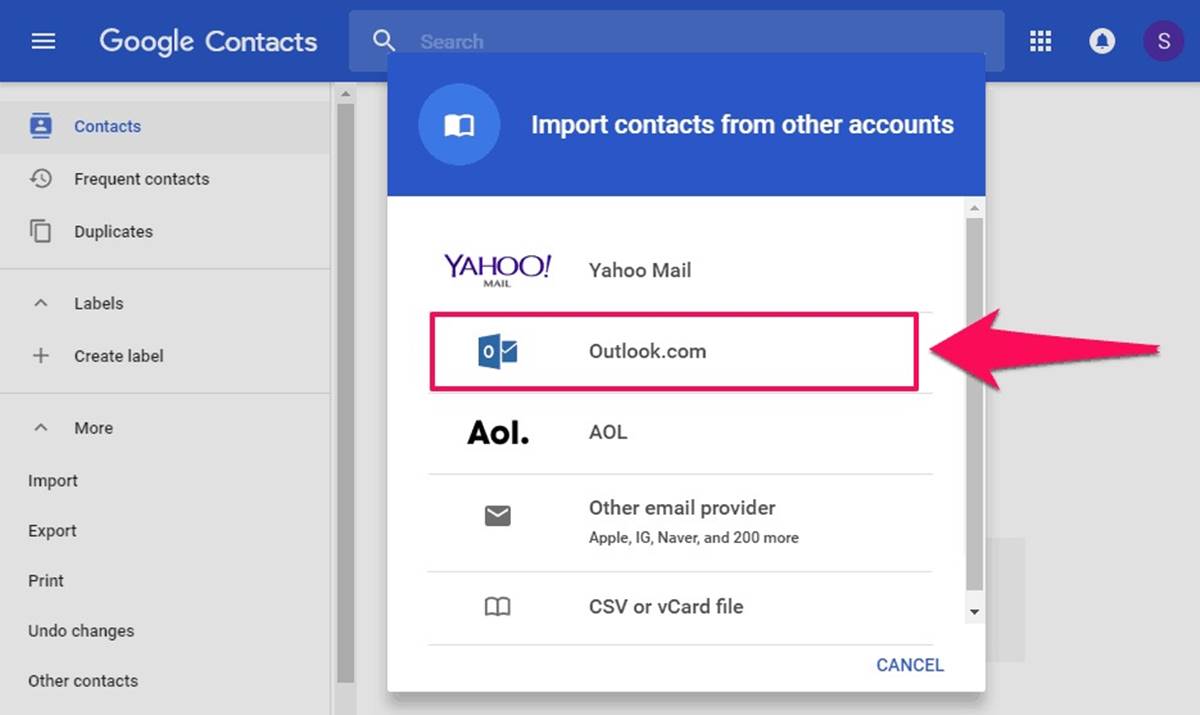
- Choose “Import mail and contacts”: Under the “Accounts and Import” tab, find the option to “Import mail and contacts” and click on it.
- Enter your Outlook.com email address: In the pop-up window, enter the email address associated with your Outlook.com account. Then, click “Continue”.
- Provide your Outlook.com password: Gmail will prompt you to enter your Outlook.com password. Input the password and click “Continue” to authorize the import process.
- Configure import settings: You will see the import settings for your contacts. Select the option to import your Outlook.com contacts and decide whether to create a new label for them.
- Start the import: After configuring the settings, click on the “Start import” button to initiate the import process. Gmail will display the progress of the import on the screen.
The time required for the import will depend on the number of contacts being transferred. Once the import is complete, Gmail will notify you, and you can access your Outlook.com contacts within Gmail’s contact list.
With your Outlook.com contacts successfully imported into Gmail, you can easily manage and access all your contacts from a single platform. Enjoy the convenience of Gmail’s contact management features, such as grouping, labeling, and easy search capabilities.
Step 5: Troubleshooting common issues
While importing your Outlook.com data into Gmail, you may encounter some common issues. Below are a few troubleshooting tips to help you overcome these challenges:
- Authentication errors: If you receive authentication errors during the import process, double-check that you entered the correct Outlook.com email address and password. Ensure that your login credentials are accurate, and try again.
- Import failure: In case the import fails or encounters errors, make sure you have followed all the instructions properly. Try exporting your Outlook.com data again and re-importing it into Gmail.
- Duplicates: It’s common for duplicate contacts or email messages to occur during the import process. To avoid duplicates, use the option to skip duplicates when configuring the import settings.
- Missing data: If some email messages or contacts are missing after the import, review your export settings in Outlook.com. Ensure that you selected the correct time range and exported all the necessary data.
- Incompatible formats: Ensure that you choose the appropriate file format when exporting your data from Outlook.com. For email messages, the CSV format is recommended, while the PST format is suitable for contacts.
- Unsupported email clients: If you’re using an unsupported email client, you may encounter difficulties during the import process. Make sure you’re using a compatible web browser and that both Outlook.com and Gmail are up-to-date.
- Third-party applications: If you have any third-party applications or browser extensions installed that may interfere with the import process, temporarily disable them and retry the import.
If you continue to experience difficulties or encounter issues that are not covered here, consider reaching out to the technical support teams of both Outlook.com and Gmail. They can provide you with further assistance and guidance specific to your situation.
Remember to stay patient and follow the instructions carefully. With a little troubleshooting, you’ll be able to successfully import your Outlook.com data into Gmail and enjoy the benefits of having all your email messages and contacts in one place.
Step 6: Keeping both accounts synced
After completing the import process and successfully transferring your Outlook.com data to Gmail, it’s important to keep both accounts synced to ensure any changes or updates are reflected in both platforms. Here are some tips to help you achieve this:
- Enable Gmail’s “Fetch mail” feature: In Gmail’s settings, navigate to the “Accounts and Import” tab and click on “Add a mail account” under the “Check mail from other accounts” section. Follow the prompts to set up your Outlook.com account to be fetched by Gmail. This feature allows Gmail to pull in new email messages from your Outlook.com account automatically.
- Set up email forwarding: Another option is to set up email forwarding in your Outlook.com account to automatically forward incoming emails to your Gmail account. This ensures that any new messages received in Outlook.com are forwarded directly to your Gmail inbox.
- Schedule regular data exports: To keep your data synced, you can schedule regular exports of your Outlook.com data and import it into Gmail. This ensures that any changes or additions made in Outlook.com are reflected in Gmail.
- Enable two-way contact syncing: Consider using a contact syncing service or tool that enables two-way syncing between Outlook.com and Gmail. These services allow changes made in either account to be automatically synced and updated in the other.
- Update your email signature: It’s a good idea to update your email signature in both Outlook.com and Gmail to reflect any changes in contact information or job titles. This ensures consistency across both platforms.
- Regularly review and manage contacts: Periodically review and manage your contacts in both Outlook.com and Gmail. Remove any duplicates, update contact details, and ensure that any new contacts are added to both platforms.
- Maintain a backup: As an extra precaution, always maintain a backup of your data from both Outlook.com and Gmail. This way, if any syncing issues or data loss occurs, you can easily restore your information.
By implementing these strategies, you can keep both your Outlook.com and Gmail accounts synced, ensuring that any changes or updates made in one account are reflected in the other. This will help you maintain an organized and up-to-date email and contact management system across both platforms.