
Benefits of Creating a Poll in Outlook
Using Outlook to create polls offers various benefits that can streamline your communication and decision-making processes. Whether you are organizing a team meeting, planning an event, or seeking input on a particular topic, conducting a poll in Outlook can significantly enhance your productivity and efficiency. Here are some key benefits of utilizing the poll feature in Outlook:
- Simplicity and Accessibility: Creating a poll in Outlook is a straightforward and user-friendly process. Since Outlook is a widely-used email client, most people are familiar with its interface, making it easy for both senders and recipients to interact with the poll.
- Time Savings: Conducting a poll in Outlook eliminates the need for manual tracking and collation of responses. Instead of sending individual emails or using external polling tools, Outlook centralizes the entire process, saving you time and effort.
- Real-Time Results: By creating a poll in Outlook, you can quickly gather real-time results and insights. As soon as recipients respond to the poll, you can view and analyze the data without delays, enabling you to make informed decisions promptly.
- Efficient Decision-Making: Polls in Outlook enable you to gather feedback and opinions from multiple individuals simultaneously. This accelerates the decision-making process and ensures that everyone’s input is considered, leading to more efficient and inclusive outcomes.
- Reduced Email Clutter: Instead of receiving multiple individual responses via email, creating a poll in Outlook allows respondents to provide their input in a centralized manner. This reduces email clutter and ensures that all responses are easily accessible in one place.
- Anonymity and Privacy: Outlook polls offer the option to allow respondents to remain anonymous, which can encourage more honest and candid responses. This feature can be particularly useful when seeking feedback on sensitive topics or issues.
- Engagement and Participation: Polls are an interactive and engaging way to involve your recipients. By providing them with the opportunity to express their opinions, you can increase engagement and encourage active participation in decision-making processes.
By leveraging the benefits of creating polls in Outlook, you can streamline your communication, gather valuable insights, and make informed decisions efficiently. The next section will guide you through the step-by-step process of accessing and creating a poll in Outlook.
Step 1: Accessing the Poll Option in Outlook
Before you can create a poll in Outlook, you need to ensure that you have the necessary access to the poll feature. Follow these steps to access the poll option in Outlook:
- Open Outlook: Launch the Outlook application on your computer or access it through your web browser by logging into your Outlook account.
- Create a New Email: To access the poll option, you need to create a new email. Click on the “New Email” button or the “Compose” option to open a new email composition window.
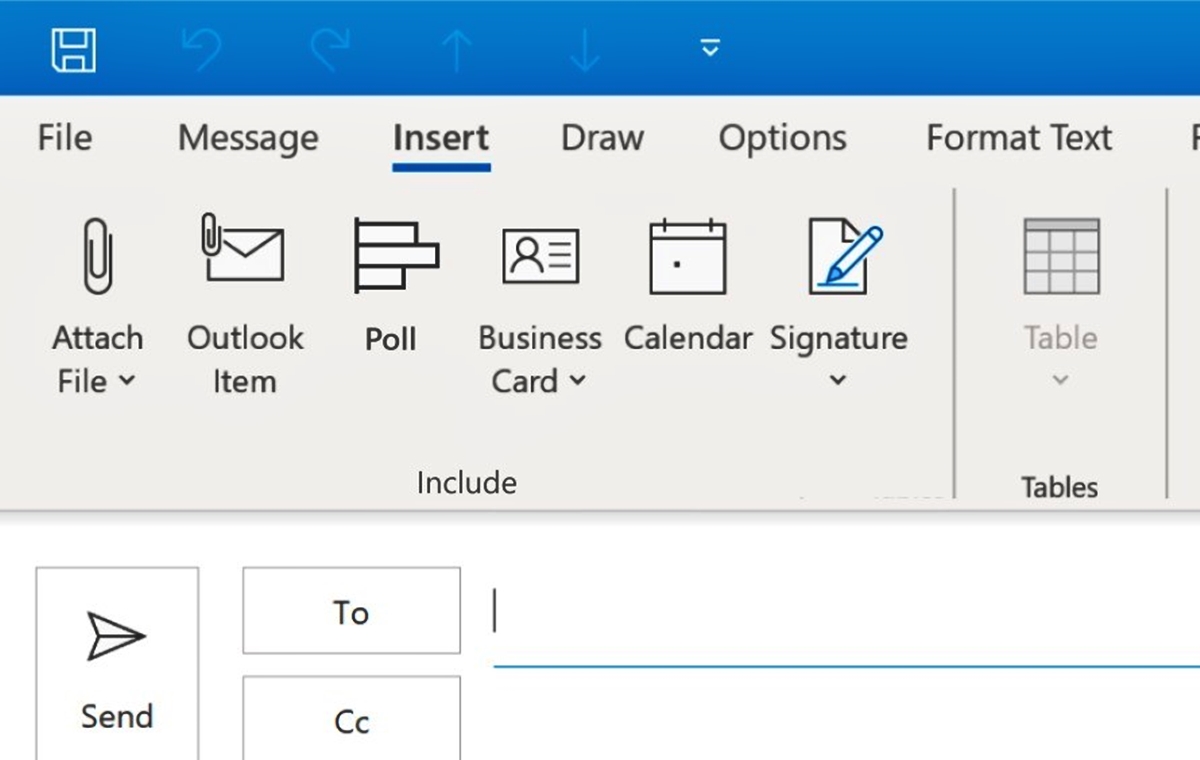
- Enable the Poll Option: In the email composition window, navigate to the toolbar at the top of the screen. Look for the “Options” or “Insert” tab, depending on your Outlook version.
- Locate the Poll Option: Once you are in the “Options” or “Insert” tab, look for the “Poll” or “Voting” button. It is usually represented by a checkmark or a bar chart icon.
- Click on the Poll Option: Once you have located the poll option, click on it to open the poll creation window. This will allow you to configure the poll settings and customize the options based on your requirements.
It is worth noting that the location and appearance of the poll option may vary depending on the version of Outlook you are using. If you are having difficulty finding the poll option, you can consult the Outlook Help documentation or search for specific instructions related to your Outlook version.
Now that you have accessed the poll option in Outlook, you are ready to proceed with creating your poll. The next section will guide you through the process of creating a new email and inserting the poll into the email body.
Step 2: Creating a New Email in Outlook
Once you have accessed the poll option in Outlook, the next step is to create a new email to host your poll. Follow these steps to create a new email in Outlook:
- Open Outlook: Launch the Outlook application on your computer or access it through your web browser by logging into your Outlook account.
- Click on “New Email”: In the Outlook interface, locate the “New Email” button and click on it. This will open a new email composition window.
- Fill in the Recipients: In the “To” field, enter the email addresses of the recipients to whom you want to send the poll. You can add multiple recipients by separating their email addresses with commas or semicolons.
- Add a Subject: Enter a subject for your email. This should provide a brief and descriptive summary of the purpose of the poll.
- Compose your Message: In the body of the email, you can add any additional information or instructions related to the poll. Keep it concise and clear to ensure that recipients understand the purpose and context of the poll.
- Format the Email (Optional): You can apply formatting to your email, such as bold or italicized text, bullet points, or numbered lists, to make it visually appealing and easy to read. However, keep in mind that the primary focus is on the poll itself.
By following these steps, you will create a new email in Outlook that is ready to host your poll. In the next section, we will explore how to insert the poll into the email body.
Step 3: Inserting the Poll in the Email Body
Now that you have created a new email in Outlook, it’s time to insert the poll into the email body. Follow these steps to successfully insert the poll:
- Navigate to the Poll Option: In the email composition window, look for the poll option that you accessed from the previous step. It may be located in the “Options” or “Insert” tab of the toolbar, depending on your Outlook version.
- Click on the Poll Option: Once you have located the poll option, click on it to open the poll creation window.
- Configure the Poll Options: In the poll creation window, you can set the details of your poll. This includes defining the question or topic of the poll and specifying the multiple-choice options that recipients can choose from. You can also choose whether to allow respondents to select multiple answers or only one.
- Customize the Poll Options: Outlook provides customization options for your poll. You can choose to insert a deadline for respondents to submit their answers or set a reminder for yourself. Additionally, you can select whether to display the poll results to participants after they submit their responses.
- Save the Poll: After configuring the poll options to your liking, click on the “OK” or “Save” button to save the poll settings and close the poll creation window. The poll will be inserted into the email body.
Once you have inserted the poll into the email body, you can make any additional edits to the email if needed. You can proofread the content, modify the formatting, or add any supplementary information that you think is necessary.
Now that you have successfully inserted the poll, it’s time to move on to the next step: customizing the poll options. This will allow you to further tailor the poll to meet your specific needs and requirements.
Step 4: Customizing the Poll Options
After inserting the poll into the email body in Outlook, you have the option to customize the poll options to suit your specific requirements. Follow these steps to customize the poll options:
- Edit the Question: To modify the poll question, click on the existing question text in the email body. You can then edit the text to reflect the specific question or topic you want to gather feedback on.
- Add or Remove Options: Outlook allows you to include multiple-choice options for respondents to select from. To add a new option, click on the existing options and type in the new text. To remove an option, simply delete the corresponding text.
- Allow Selection of Multiple Answers: By default, Outlook allows respondents to select a single answer. However, if you want to allow participants to choose multiple answers, you can enable this option. Look for an option like “Allow multiple responses” or “Allow participants to select multiple answers” and check the corresponding box.
- Set a Deadline: If you wish to specify a deadline for respondents to submit their answers, you can do so in the poll options. Look for an option to set the deadline and enter the desired date and time. This can help ensure that you receive responses within a specific timeframe.
- Show Results to Respondents: By default, Outlook does not display the poll results to participants after they submit their responses. However, if you want to share the results with respondents, you can enable this option. Look for a checkbox or toggle switch stating “Show results to participants” and select it if desired.
It is important to note that the available customization options may vary depending on your version of Outlook. The steps outlined above are applicable to most versions, but you might encounter slight variations in the user interface or terminology.
Once you have customized the poll options to your liking, review the email to ensure that everything is accurate and ready for sending. The next step will guide you through the process of sending the poll to your intended recipients.
Step 5: Sending the Poll
Once you have customized the poll options in Outlook, you are ready to send the poll to your intended recipients. Follow these steps to successfully send the poll:
- Review the Email: Before sending the poll, take a moment to review the entire email to ensure that all the details and customization options are accurately set. Double-check the recipient list, subject line, poll question, answer options, and any other relevant information.
- Add any Additional Context: If you think it is necessary, you can include any additional context or instructions in the email body to provide more clarity to the recipients. Be concise and clear in your communication to ensure that everyone understands the purpose and scope of the poll.
- Click on “Send”: Once you are confident that everything is in order, click on the “Send” button to send the email with the inserted poll to all the recipients you listed in the “To” field.
After sending the email, the poll will be delivered directly to the recipients’ inboxes. They can then open the email, read the poll question, and select their preferred answer option(s) by simply checking the corresponding boxes.
It is important to note that the recipients do not need to have Outlook installed to participate in the poll. They can respond to the poll directly from their email client, regardless of the platform or device they are using.
Now that you have successfully sent the poll to your recipients, it’s time to move on to the next step: viewing and analyzing the poll responses.
Step 6: Viewing and Analyzing the Poll Responses
Once you have sent the poll in Outlook, you can easily view and analyze the responses from the recipients. Follow these steps to successfully view and analyze the poll responses:
- Access the Sent Email: Locate the email containing the poll in your “Sent Items” folder or the relevant folder where you saved the email.
- Open the Email: Double-click on the email to open it.
- View the Responses: In the opened email, you will be able to see the responses received in the poll. Outlook will display the selected answer options for each respondent.
- Analyze the Data: Take a closer look at the responses to gain insights and analyze the data. You can observe the trends, identify the most popular answer choices, and make informed decisions based on the collected feedback.
- Export Data (Optional): If you want to further analyze or share the poll data outside of Outlook, you may consider exporting the responses. Outlook provides options to export the data to various file formats, such as Excel or CSV, for further manipulation or integration with other tools.
Outlook makes it convenient to view and analyze the poll responses within the same email thread, allowing for a streamlined and efficient process. By taking the time to understand the feedback and patterns from the responses, you can make informed decisions, refine your strategies, and enhance your communication and collaboration efforts.
Now that you have successfully viewed and analyzed the poll responses, you are equipped with valuable insights to drive your decision-making process. By leveraging this information, you can take appropriate actions and continue to optimize your communication and engagement with others.
Tips for Creating Effective Polls in Outlook
Creating effective polls in Outlook can help you gather valuable feedback and insights from your recipients. To ensure the success of your polls, consider the following tips:
- Keep it Simple and Clear: Formulate questions in a concise and straightforward manner. Make sure the options provided are easy to understand and relevant to the poll topic.
- Focus on Relevance: Ensure that your poll is relevant to the recipients and aligned with the purpose of the communication. Tailor the questions and answer options to address the specific topic or objective.
- Design Balanced Answer Choices: Provide a balanced set of answer choices that cover various perspectives or options. Avoid biased or leading options that may influence the respondents’ answers.
- Use Multiple-Choice for Clarity: Multiple-choice options are usually easier for respondents to understand and select from. Avoid open-ended questions unless specifically necessary.
- Consider Including an “Other” Option: Sometimes, respondents may have an answer that doesn’t fit within the provided options. Adding an “Other” option allows them to express their unique responses.
- Set a Deadline: When appropriate, specify a deadline for respondents to submit their answers. This helps create a sense of urgency and ensures that you receive responses within the desired timeframe.
- Provide Context and Instructions: Offer context and clear instructions to help respondents understand the purpose and expectations of the poll. This enhances the quality and accuracy of their responses.
- Consider Anonymous Responses: Anonymity can encourage respondents to provide honest and candid answers, particularly for sensitive or delicate topics. Enable the option for anonymous responses if confidentiality is crucial.
- Promote Engagement: Encourage active participation by creating polls that are interesting and relevant to the recipients. Use engaging language and incentives when appropriate to boost response rates.
- Review and Analyze the Results: After collecting the responses, carefully review and analyze the data to gain insights, identify trends, and inform your decision-making process.
By following these tips, you can create effective polls in Outlook that engage recipients, gather valuable feedback, and help you make informed decisions. Remember to tailor your approach based on the specific context and audience to maximize the effectiveness of your polls.