
Enabling Read Receipts in Outlook
Read receipts can be a valuable tool in Microsoft Outlook that allows you to confirm if and when your sent emails have been opened by the recipients. By enabling this feature, you can gain insights into the effectiveness of your communication and ensure that important messages are received and acknowledged.
To enable read receipts in Outlook, follow these steps:
- Open Microsoft Outlook and go to the “File” tab.
- Click on “Options” in the left-hand sidebar to open the Outlook Options window.
- In the Outlook Options window, select “Mail” from the left-hand menu.
- Scroll down to the “Tracking” section and check the box next to “Read all standard mail in plain text”.
- Click “OK” to save the changes and exit the Outlook Options window.
With read receipts enabled, you can now request read receipts for individual emails or set up automated read receipts for all sent emails.
Note: Keep in mind that read receipts rely on the recipient’s email client supporting this feature. While most email clients support it, some recipients may have disabled read receipts or may be using email clients that do not support this feature.
By enabling read receipts in Outlook, you can have a better understanding of when your emails are being read and acknowledged by recipients, enabling you to follow up or take appropriate action accordingly.
Requesting Read Receipts for Individual Emails
In Microsoft Outlook, you have the ability to manually request read receipts for specific emails. This can be especially useful for important or time-sensitive messages where you need confirmation of receipt.
To request a read receipt for an individual email in Outlook, follow these steps:
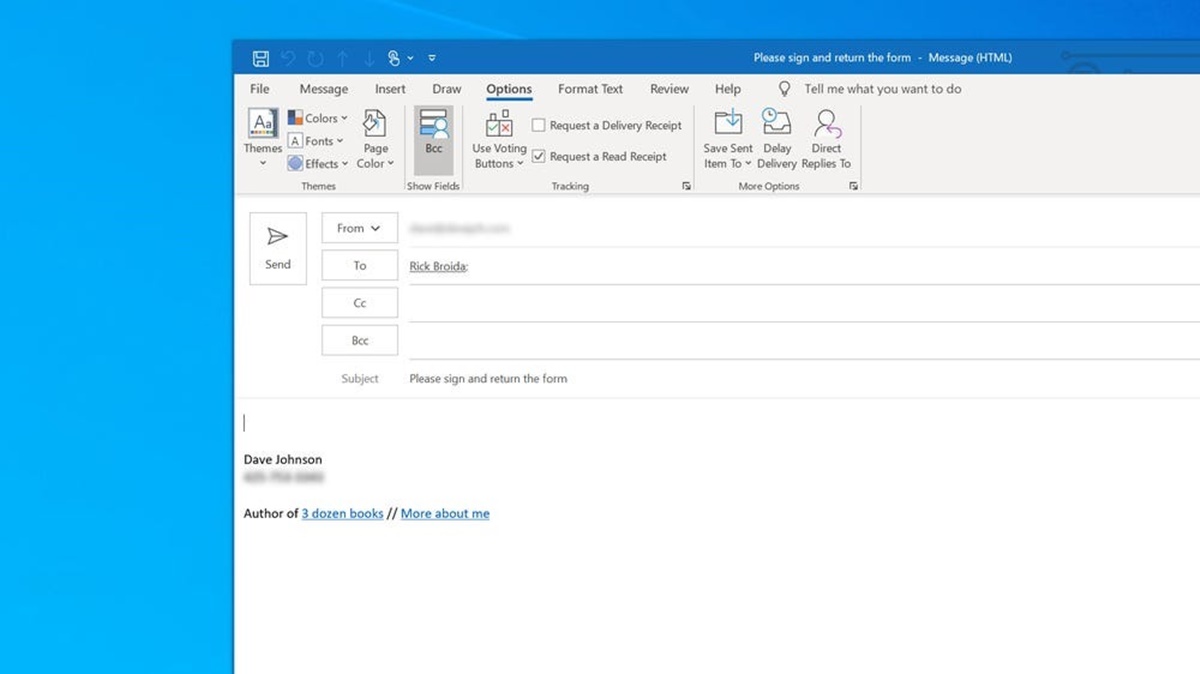
- Compose a new email or open an existing email in your Outlook inbox.
- Click on the “Options” tab at the top of the email compose window.
- In the “Tracking” group, check the box next to “Request a Read Receipt”.
- Finish composing your email and click “Send” to send the email with the read receipt request.
When the recipient opens your email, they will be prompted to send a read receipt. However, it’s important to note that the recipient has the option to decline sending the read receipt.
Once the recipient receives your email and agrees to send the read receipt, you will receive a notification in your Outlook inbox confirming that the email has been read. This notification will typically include the date and time when the email was opened.
Tip: It’s important to use read receipts respectfully and sparingly. While it can be useful to have confirmation of email receipt, requesting read receipts for every email may come across as intrusive or excessive. Consider using this feature selectively for important or time-sensitive messages.
Now that you know how to request read receipts for individual emails in Outlook, you can ensure that your important messages are acknowledged by the recipients.
Requesting Read Receipts for All Sent Emails
In Microsoft Outlook, you can configure the settings to automatically request read receipts for all emails you send. This eliminates the need to manually enable read receipts for each individual email and ensures consistent tracking of read status for your sent messages.
Here’s how you can set up Outlook to request read receipts for all sent emails:
- Open Microsoft Outlook and go to the “File” tab.
- Click on “Options” in the left-hand sidebar to open the Outlook Options window.
- In the Outlook Options window, select “Mail” from the left-hand menu.
- Scroll down to the “Tracking” section.
- Check the box next to “Automatically send a read receipt for all messages I send”.
- Click “OK” to save the changes and exit the Outlook Options window.
With this setting enabled, every email you send will automatically include a read receipt request. When recipients open your emails, they will be prompted to send a read receipt. However, keep in mind that the recipient has the option to decline sending the read receipt.
Once a recipient agrees to send the read receipt, you will receive a notification in your Outlook inbox confirming that the email has been read. This provides you with valuable information about when your sent emails are being viewed by recipients.
Note: It’s important to respect the recipients’ privacy and preferences when using read receipts. Some individuals may choose to disable their read receipt functionality, and others may be using email clients that do not support read receipts. Additionally, remember to use this feature judiciously and only for emails that truly require read confirmation.
By setting up automatic read receipt requests for all sent emails in Outlook, you can streamline your workflow and have a consistent way of tracking the read status of your messages.
Customizing Read Receipts Settings
In Microsoft Outlook, you have the option to customize the read receipt settings according to your preferences. These settings allow you to control how Outlook handles read receipts and tailor the functionality to meet your specific needs.
To customize the read receipt settings in Outlook, follow these steps:
- Open Microsoft Outlook and go to the “File” tab.
- Click on “Options” in the left-hand sidebar to open the Outlook Options window.
- In the Outlook Options window, select “Mail” from the left-hand menu.
- Scroll down to the “Tracking” section.
- Click on the “Tracking Options” button to open the Tracking Options window.
In the Tracking Options window, you will find several customization options, including:
- Never send a read receipt: Select this option if you don’t want to send read receipts for any of your emails.
- Always send a read receipt: Choose this option if you want read receipts to be sent automatically for all emails without prompting the recipient.
- Ask each time whether to send a read receipt: If you prefer to decide on a per-email basis whether to send a read receipt, select this option.
Additionally, you can choose to:
- Never respond to a read receipt request: This setting is useful if you don’t want to send read receipts to any senders who request them.
- Always respond to a read receipt request: Choose this option if you want to automatically send read receipts to all senders who request them.
- Ask me before responding to a read receipt request: This option allows you to decide on a per-email basis whether to send a read receipt in response to a request.
Once you have made your desired customizations, click “OK” to save the changes and exit the Tracking Options window. Your read receipt settings will now be adjusted according to your preferences.
By customizing the read receipt settings in Outlook, you can have greater control over how read receipts are handled for your emails. This allows you to align the functionality with your communication style and needs.
Tracking Read Receipts
In Microsoft Outlook, tracking read receipts can provide valuable insights into the status of your sent emails. By knowing when your emails are opened by recipients, you can gauge the effectiveness of your communication and follow up accordingly. Here’s how you can track read receipts in Outlook:
1. Enable Read Receipts: Before you can start tracking read receipts, ensure that you have enabled read receipt functionality in Outlook. You can do this by following the steps outlined earlier in this guide.
2. Request Read Receipts: When composing an email, make sure to check the “Request a Read Receipt” box before sending. This will prompt the recipient to send a read receipt when they open the email.
3. Receive Read Receipt Notifications: Once the recipient opens your email and agrees to send a read receipt, you will receive a notification in your Outlook inbox. The notification will typically include the date and time when the email was read.
4. Check the Read Receipt Status: You can check the read receipt status of your emails by opening the email and navigating to the “Message” tab. Look for the “Tracking” group, where you will find options to view the read receipt details.
4.1 Display the Read Receipt Icon: In Outlook, you can choose to display the read receipt icon for emails that have been read. To enable this feature, go to the “File” tab, select “Options,” then click on “Mail” and scroll down to the “Tracking” section. Check the box next to “Automatically process meeting requests and responses to meeting requests and polls.”
5. View Read Receipt Reports: In addition to individual read receipt notifications, you can also generate read receipt reports to track the overall read status of your emails. To do this, go to the “File” tab, select “Options,” then click on “Mail” and scroll down to the “Tracking” section. Click on “E-mail Tracking Options” to configure your tracking preferences and generate reports.
By tracking read receipts in Outlook, you can gain valuable insights into the effectiveness of your emails and improve your communication strategies. However, it’s important to note that read receipts depend on the recipient’s email client supporting this feature and their agreement to send the receipt. Some recipients may choose to disable read receipts or use email clients that do not support this functionality.
Use the information obtained from read receipts responsibly and strategically, making sure to respect recipients’ privacy and preferences. By doing so, you can enhance your communication and engagement with your contacts in Outlook.
Managing Read Receipts in Outlook
In Microsoft Outlook, managing read receipts can help you organize and keep track of the status of your sent emails. Whether you want to view read receipts, delete them, or customize how they are handled, Outlook provides various options to manage your read receipt notifications.
Here are some ways to manage read receipts in Outlook:
1. View Read Receipts: To view read receipts for specific emails, open the email in question and navigate to the “Message” tab. In the “Tracking” group, click on “Tracking Options.” This will display the read receipt details, including the date and time when the email was read.
2. Delete Read Receipts: If you no longer need to keep track of read receipt notifications, you can delete them from your Outlook inbox. Simply select the read receipt notifications and press the “Delete” key or use the delete option in the toolbar.
3. Disable Read Receipt Notifications: If you find read receipt notifications overwhelming or unnecessary, you can disable them. Go to the “File” tab, select “Options,” then click on “Mail.” In the “Tracking” section, uncheck the box next to “Display a notification when a read receipt is received.” This will prevent read receipt notifications from appearing in your inbox.
4. Customize Read Receipt Settings: As mentioned earlier, you can customize the read receipt settings in Outlook according to your preferences. This includes choosing when to send read receipts, whether to respond to read receipt requests, and more. To adjust these settings, go to the “File” tab, select “Options,” then click on “Mail.” In the “Tracking” section, click on “Tracking Options” to customize your read receipt settings.
5. Archive or Organize Read Receipts: If you prefer to keep track of read receipt notifications for reference or record-keeping purposes, consider archiving or organizing them in specific folders within your Outlook inbox. This allows for easy retrieval when needed.
By effectively managing read receipts in Outlook, you can maintain a clutter-free inbox, stay organized, and have a clear overview of the read status of your sent emails. Remember to adjust the read receipt settings and notifications according to your preferences and communication needs to optimize your email management workflow.
Limitations of Read Receipts in Outlook
While read receipts in Microsoft Outlook can be a valuable tool for tracking the status of your sent emails, it’s important to be aware of their limitations. Understanding these limitations will help you manage your expectations and use read receipts effectively. Here are some limitations of read receipts in Outlook:
1. Recipient Consent: Read receipts rely on the recipient’s email client supporting and enabling the read receipt feature. However, recipients have the option to decline sending read receipts or have them disabled by default. As a result, you may not receive read receipts for all emails, even if you have requested them.
2. Non-Supported Email Clients: Not all email clients support read receipts. While popular email clients like Outlook, Gmail, and Apple Mail typically offer this feature, there are still some clients that do not support it. If a recipient is using an email client without read receipt functionality, you will not receive a read receipt for your email.
3. Manual Override: Even if a recipient’s email client supports read receipts, they can choose to manually disable or ignore read receipt requests. This means that even if you request a read receipt, the recipient may decline to send one or simply ignore the request. This can make it difficult to accurately track the read status of your emails.
4. False Positives: Sometimes, read receipts may not accurately reflect whether an email has actually been read. In certain cases, an email client may automatically generate a read receipt without the recipient actually opening or reading the email. This can lead to false-positive read receipts, giving an incorrect impression of email engagement.
5. Read-Only Outlook Clients: If a recipient is using the Outlook client in a read-only mode, they may not be able to send read receipts. This can occur in situations where the recipient’s mailbox is accessed via a mobile device or a shared mailbox with limited permissions.
6. External Email Servers: Read receipts may not function as expected when sending emails to recipients outside of your organization’s email server. External email servers may have different policies or configurations that prevent the proper delivery and processing of read receipt requests.
Despite these limitations, read receipts can still provide valuable insights into the read status of your sent emails in many cases. However, it’s important to use read receipts alongside other communication indicators and follow-up strategies to ensure that your message is received and understood by your recipients.
By understanding and acknowledging these limitations, you can set realistic expectations for read receipt functionality in Outlook and utilize it as a supplementary tool for effective email communication.
Tips for Requesting Read Receipts Effectively
Requesting read receipts in Microsoft Outlook can be a useful way to ensure your emails have been received and read by the recipients. To maximize the effectiveness of this feature, consider the following tips:
1. Use Read Receipts Selectively: Request read receipts only for emails that truly require confirmation of receipt or when you need to track the engagement of important messages. Avoid requesting read receipts for every email as it can be perceived as intrusive or excessive.
2. Clearly Communicate the Need: In your email, clearly state the reason for requesting a read receipt, especially if it relates to time-sensitive or critical information. The recipient is more likely to understand the importance of confirming receipt if they are aware of why it is necessary.
3. Be Respectful of Recipient Preferences: Respect the recipient’s decision if they choose to decline sending a read receipt. Some individuals disable read receipt functionality altogether or may have privacy concerns about reporting their email activities. It’s important to understand and accept their preferences.
4. Follow-Up Appropriately: If you have requested a read receipt and have not received one within a reasonable timeframe, it may be worth following up with a polite email to ensure the recipient has received your message. However, use discretion and only follow up when necessary to avoid appearing overly pushy.
5. Provide Alternative Contact Methods: In situations where read receipts may not be practical or feasible, consider providing alternative contact methods for the recipient to acknowledge receipt or respond to your email. This can include phone numbers, instant messaging, or other forms of communication that may be more appropriate for the situation.
6. Respect Email Client Limitations: Be aware that read receipt functionality can vary depending on the recipient’s email client. While most email clients support read receipts, there may be differences in how they handle these requests. Understand that some email clients may restrict or limit read receipt functionality, which could impact the reliability of read receipts.
7. Monitor and Analyze Read Receipt Data: Take advantage of the information provided by read receipts to gain insights into your email communication. Analyze patterns, response times, and engagement levels to improve your email strategies and tailor future communications for better outcomes.
Remember, read receipts should be used as a tool to enhance your communication and not as a means of exerting control over recipients. Utilize read receipts judiciously and respect the recipient’s preferences and privacy. By using read receipts effectively, you can improve your email communication and ensure important messages are received and acknowledged.