
Connect your Google Calendar
Your Google Calendar is an essential tool for organizing your schedule and staying on top of events and appointments. To fully utilize its capabilities, you need to connect it to your Google account. Here’s how:
1. Open your web browser and go to Google Calendar.
2. Sign in to your Google account. If you don’t have one, you can create a new account by clicking on “Create account.”
3. Once you’re signed in, you will see your calendar interface. Take a moment to explore the different features and options available.
4. To sync your calendar with other devices, such as your smartphone or tablet, click on the gear icon in the top right corner and select “Settings.”
5. In the Settings menu, navigate to the “Mobile Setup” tab. Here, you can set up synchronization with your mobile device by following the instructions provided.
6. If you are using a desktop calendar application like Microsoft Outlook or Apple Calendar, you can also sync your Google Calendar with them. In the Settings menu, click on the “Calendar” tab and look for the “Integrate Calendar” section. Follow the instructions to sync with your preferred application.
7. Additionally, you can access your Google Calendar on your mobile device by downloading the Google Calendar app from your device’s app store. Once downloaded, sign in with your Google account and enjoy the convenience of accessing your calendar on the go.
By connecting your Google Calendar to your Google account, you ensure that your schedule is easily accessible across devices. Whether you’re in front of your computer, on your phone, or using a third-party calendar application, you can stay organized and never miss an important event.
Change calendar visibility settings
Controlling the visibility of your Google Calendar is important to maintain privacy and control who can see your events. Here’s how you can change your calendar visibility settings:
1. Open your Google Calendar and click on the three horizontal lines in the top left corner to open the side menu.
2. Scroll down and click on “Settings” to access the Calendar Settings page.
3. In the Settings menu, select the calendar you want to adjust the visibility settings for from the list on the left-hand side.
4. Scroll down to the “Access permissions” section, where you can choose who can see your calendar.
5. To keep your calendar private, select “Only show free/busy” to display only your availability without revealing any event details.
6. If you want to share limited event details with specific people, choose “Limited details” and add the individuals you want to grant access to in the “Share with specific people” field.
7. For a more open visibility setting, select “See all event details” to allow anyone with the calendar link to view all event information, including descriptions and locations.
8. After selecting your desired visibility setting, click “Save” to apply the changes.
Remember to review and adjust the visibility settings regularly to ensure that your calendar is shared appropriately. You can always come back to the Calendar Settings page to make modifications as needed.
By customizing your calendar visibility settings, you have better control over who can see your events. Whether you prefer to keep your calendar private, share certain details with specific people, or make your calendar accessible to anyone, adjusting the visibility settings ensures that your privacy remains intact while maintaining the level of transparency you desire.
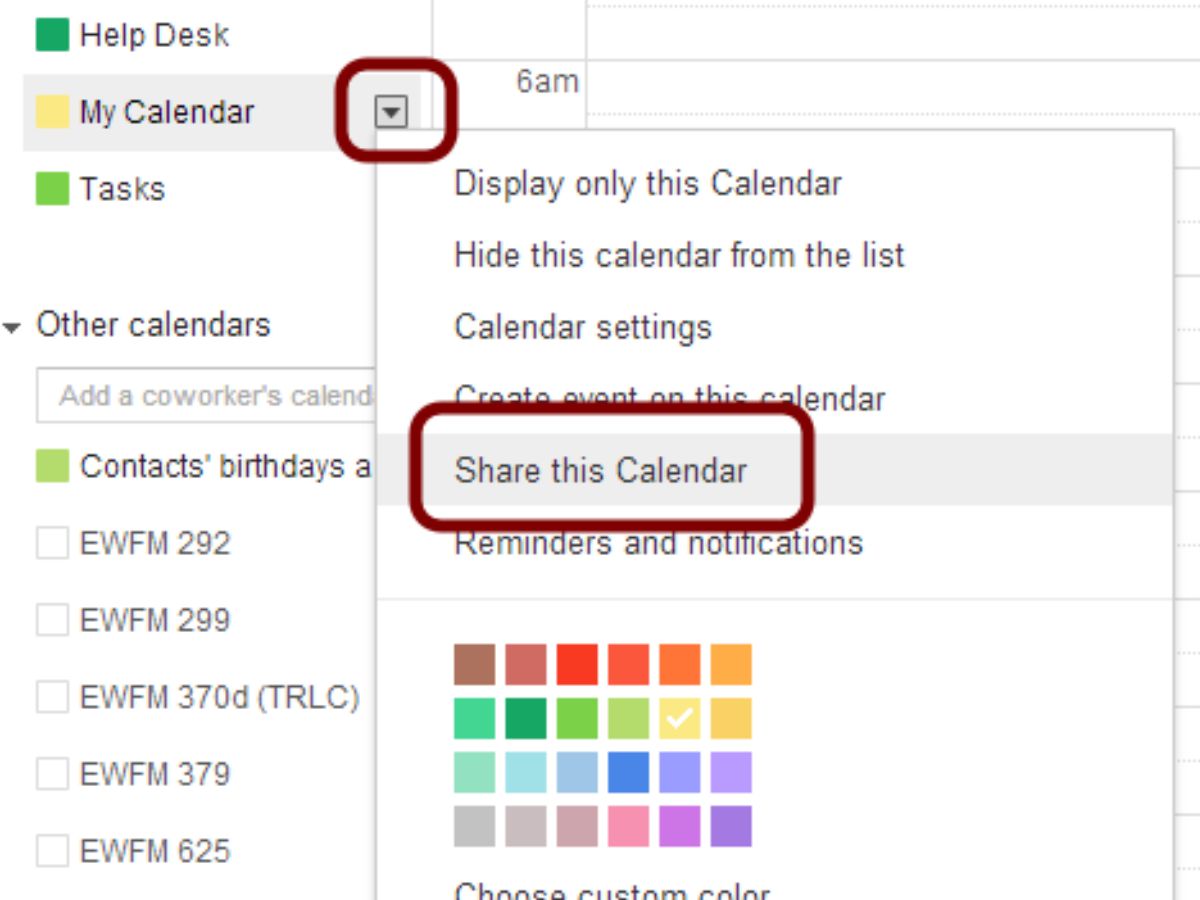
Share your calendar with specific people
Sharing your Google Calendar with specific people allows you to collaborate, coordinate events, and keep everyone in the loop. Follow these steps to share your calendar:
1. Open your Google Calendar and locate the calendar you want to share in the left-hand column.
2. Hover over the calendar name and click on the three dots that appear to open the options menu.
3. Select “Settings and sharing” from the menu to access the Calendar Settings page.
4. In the “Access permissions” section, you will find options to control the sharing settings.
5. To share your calendar with specific people, click on “Add People” under the “Share with specific people” section.
6. Enter the email addresses of the people you want to share your calendar with. You can add multiple email addresses by separating them with commas.
7. Choose the permission level you want to grant to each person. You can give them the ability to see only free/busy times or allow them to make changes and manage events.
8. Once you’ve added the people and selected their permissions, click “Send” to notify them about the shared calendar.
9. Each person you’ve shared the calendar with will receive an email invitation with a link to access the shared calendar. They can click on the link to view the calendar within their own Google account.
10. You can also revoke access or change the permission level of the shared individuals at any time. Simply return to the Calendar Settings page and make the necessary adjustments.
Sharing your calendar with specific people enables collaboration and keeps everyone informed about important events and appointments. Whether it’s among colleagues, family members, or friends, sharing your calendar helps streamline scheduling and ensures that everyone is on the same page.
Grant permissions to edit your calendar
Granting permissions to edit your Google Calendar allows selected individuals to make changes, add events, and manage the calendar alongside you. Here’s how you can grant such permissions:
1. Open your Google Calendar and access the Calendar Settings page for the calendar you want to grant editing permissions to.
2. Scroll down to the “Access permissions” section, where you control the sharing settings for your calendar.
3. Under the “Share with specific people” section, click on “Add People” if you haven’t already added the person you want to grant editing permissions to. If the person is already added, you can skip to step 5.
4. Enter the email address of the person you want to grant editing permissions to. You can add multiple email addresses by separating them with commas.
5. Once the person’s email address is added, click on the drop-down menu next to their name to select the permission level. Choose “Make changes AND manage sharing” to grant them the ability to edit your calendar.
6. If you also want to allow the person to invite other individuals to events on the calendar, check the box that says “Allow managing of sharing.”
7. Click “Send” to notify the person about the added editing permissions.
8. The person will receive an email invitation with a link to access and edit the calendar. They will also have the option to add the shared calendar to their own Google account.
9. To view and manage the list of individuals with editing permissions, return to the Calendar Settings page and review the “Share with specific people” section.
10. If you want to revoke editing permissions or change the permission level for any individual, click on the three dots next to their email address and select the desired option.
By granting permissions to edit your calendar, you enable collaboration and shared responsibility in managing events and appointments. This feature is especially useful for team projects, family schedules, or group activities, ensuring that everyone involved has the ability to contribute and keep the calendar up to date.
Share your calendar publicly
Sharing your Google Calendar publicly allows anyone with the calendar link to view all event details and access your schedule. Follow these steps to share your calendar publicly:
1. Open your Google Calendar and go to the Calendar Settings page for the calendar you want to share.
2. In the “Access permissions” section, locate the “Get shareable link” option.
3. Click on the option to generate a unique URL link that can be used to access your calendar.
4. Once the link is generated, you can choose the level of access to grant to those who have the link.
5. To allow anyone with the link to view all event details, select the “See all event details” option under “Share with specific people.”
6. You can copy the generated link or click the “Copy link” button to easily share it with others.
7. Share the link via email, messaging apps, or any other preferred communication method to make your calendar publicly accessible.
8. Anyone who has the link can click on it to view your calendar. They will see all event details, including event descriptions, locations, and timings.
9. If you want to revoke public access at any time, return to the Calendar Settings page and disable the “See all event details” option.
Sharing your calendar publicly can be useful for promoting events, publishing schedules, or providing access to information that is meant to be widely available. However, it is essential to carefully consider the level of privacy you are comfortable with when deciding to share your calendar publicly.
Embed your calendar on a website
Embedding your Google Calendar on a website allows visitors to view your calendar directly on the site, providing them with easy access to your schedule and upcoming events. Here’s how you can embed your calendar:
1. Open your Google Calendar and go to the Calendar Settings page for the calendar you want to embed.
2. In the “Integrate calendar” section, you will find an option called “Embed code.” Click on the “Copy” button next to the code provided.
3. Next, navigate to the website where you want to embed your calendar. Access the website’s content management system or HTML editor.
4. Create or edit the page where you want the calendar to appear. Make sure you are in the HTML editing mode.
5. Paste the code you copied from the Calendar Settings page into the desired location on the page.
6. Modify the width and height attributes of the code if you want to adjust the size of the embedded calendar.
7. Save or publish the changes you made to the website page. The embedded calendar should now be visible on the website.
8. Test the embedded calendar by accessing the website and ensuring that it displays correctly. Make any necessary adjustments if needed.
By embedding your calendar on a website, you provide visitors with a convenient way to stay updated with your schedule and events. Whether you have a personal blog, a business website, or an event page, embedding your Google Calendar adds a level of interactivity and helps users plan their activities accordingly.
Send your calendar to others via email
Sending your Google Calendar to others via email is a convenient way to share your schedule and ensure that recipients have access to your upcoming events. Follow these steps to send your calendar via email:
1. Open your Google Calendar and go to the Calendar Settings page for the calendar you want to send.
2. In the “Access permissions” section, locate the “Get shareable link” option.
3. Click on the option to generate a unique URL link that can be used to access your calendar.
4. Copy the generated link to your clipboard. This link will provide recipients with access to your calendar.
5. Open your email client or webmail service and create a new email message.
6. Enter the email addresses of the recipients in the “To” field. You can add multiple addresses by separating them with commas.
7. In the body of the email, provide some context or explanation about the shared calendar and its purpose.
8. Paste the shareable link into the body of the email to provide recipients with access to your calendar. You can also hyperlink the URL text if desired.
9. Review the email message to ensure that all the necessary information has been included.
10. Finally, click “Send” to deliver the email with the shared calendar link to the recipients.
Recipients can click on the link in the email to access your Google Calendar. They will be able to view your schedule and upcoming events without requiring a Google account.
By sending your calendar via email, you make it easy for others to view and stay informed about your schedule. Whether you’re coordinating with colleagues, sharing events with friends, or sending a schedule to clients, email is a simple and effective way to distribute your calendar to others.
Sync your calendar with other platforms
Syncing your Google Calendar with other platforms ensures that you have access to your schedule across multiple devices and applications. Here’s how you can sync your calendar:
1. Open your Google Calendar and go to the Calendar Settings page.
2. In the Settings menu, navigate to the “Integrate calendar” section.
3. Look for the options available to sync your calendar with other platforms or devices.
4. To sync your Google Calendar with a mobile device, click on the “Mobile Setup” tab. Follow the instructions provided to set up synchronization with your specific device.
5. If you’re using a popular desktop calendar application such as Microsoft Outlook or Apple Calendar, look for instructions on syncing your Google Calendar with these applications.
6. For example, to sync with Microsoft Outlook, click on the “Calendar” tab in the Settings menu. Look for the “Integrate calendar” section and follow the instructions provided to sync with Outlook.
7. Similarly, for Apple Calendar, there may be an option to sync your Google Calendar under the “Calendar” tab in the Settings menu. Follow the instructions to integrate your calendar with Apple Calendar.
8. Depending on the platform or application you choose to sync with, there may be additional steps or settings required. Make sure to carefully read and follow the instructions provided for each specific integration.
9. After syncing your calendar, any changes or updates made in your Google Calendar will reflect across all synced platforms and devices.
By syncing your Google Calendar with other platforms, you can seamlessly manage your schedule and access it across various devices. Whether you’re using your smartphone, tablet, desktop, or a specific calendar application, syncing ensures that you have the most up-to-date information and can stay organized wherever you go.
Revoke access to your calendar
Revoking access to your Google Calendar is important when you no longer want certain individuals to view or edit your schedule. Here’s how you can revoke access to your calendar:
1. Open your Google Calendar and go to the Calendar Settings page for the calendar from which you want to revoke access.
2. In the “Access permissions” section, you will find a list of individuals or groups who have access to your calendar.
3. Locate the person or group from whom you want to revoke access and click on the three dots next to their name or email address.
4. From the options that appear, choose “Remove access” or “Revoke access” to remove their permissions.
5. Confirm the action when prompted to complete the process.
6. If you have shared your calendar via a shareable link, it’s important to generate a new shareable link after revoking access. This prevents previously shared links from providing continued access to your calendar.
7. If necessary, you can repeat steps 3 to 5 for any additional individuals or groups from whom you want to revoke access.
By revoking access to your calendar, you maintain control over who can view and edit your schedule. This is particularly important when there are changes in relationships, confidentiality considerations, or organizational shifts that require limiting access to specific individuals or groups.
Regularly reviewing the list of individuals with access to your calendar and revoking permissions when necessary helps ensure the security and privacy of your schedule.