
What is Bcc in Outlook?
In the world of email communication, the term Bcc stands for “Blind Carbon Copy.” Bcc is a feature in Microsoft Outlook that allows you to send an email to multiple recipients without revealing their identities to each other. When you add recipients to the Bcc field, their email addresses are hidden from other recipients in the To and Cc fields.
Bcc is particularly useful in situations where you want to protect the privacy and confidentiality of the recipients. It can be used in various scenarios, such as sending newsletters to a large group of recipients, emailing job applicants for a position, or when you want to ensure that the recipients do not see each other’s email addresses.
By including recipients in the Bcc field, you are preventing any potential miscommunication or misuse of email addresses. This reduces the chances of spamming, phishing, or unauthorized access to personal details.
When you send an email with Bcc recipients, they receive the email just like any other recipient in the To or Cc field. However, the recipients in the Bcc field will not be aware of each other’s identities. This provides a sense of privacy and professionalism in your communication.
It is important to note that using Bcc does not exempt you from adhering to proper email etiquette. It is still essential to compose your email with clarity, professionalism, and respect for the privacy of the recipients. Always ensure that your message is relevant, concise, and easy to understand.
In the following sections, we will explore how to add Bcc recipients in different versions of Outlook, including Outlook 2010, Outlook 2013/2016, Outlook 365, and Outlook Web App.
Why use Bcc in Outlook?
The Bcc feature in Outlook offers a range of benefits and advantages for email communication. Let’s explore why you should consider using Bcc in Outlook:
- Maintaining privacy and confidentiality: One of the primary reasons to use Bcc is to ensure the privacy and confidentiality of your recipients. By adding them in the Bcc field, you prevent their email addresses from being visible to other recipients. This is particularly useful when sending emails to a large group, ensuring that recipients cannot see each other’s addresses.
- Preventing reply-all storms: We have all experienced the chaos of reply-all storms, where recipients unintentionally flood everyone’s inbox with unnecessary replies. By using Bcc, you can avoid this situation altogether. Since recipients in the Bcc field cannot see each other, they won’t have the ability to reply-all, keeping your inbox free from unnecessary clutter.
- Reducing the risk of spam and phishing: By hiding email addresses in the Bcc field, you minimize the chances of recipients’ addresses being harvested by spammers or used for phishing attempts. This protects the privacy and security of your recipients, giving them peace of mind when communicating with you.
- Enhancing professionalism: Using Bcc demonstrates a level of professionalism in your email communication. It shows that you are mindful of respecting the privacy of your recipients and are committed to maintaining confidentiality. This can leave a positive impression on your recipients, showcasing your professionalism and attention to detail.
- Streamlining communication: Bcc can be particularly helpful when sending emails to a large group or distribution list. Instead of cluttering everyone’s inbox with a long list of recipients, you can simply add them in the Bcc field. This keeps the email cleaner, more organized, and easier for recipients to read and digest.
By utilizing the Bcc feature in Outlook, you can maintain privacy, prevent reply-all storms, reduce the risk of spam and phishing, enhance professionalism, and streamline your communication. It is a powerful tool that helps you better manage your email correspondence and create a positive and efficient email environment.
How to Add Bcc Recipients in Outlook 2010
In Outlook 2010, adding Bcc recipients is a simple process. Follow these steps to include Bcc recipients in your email:
- Open Microsoft Outlook 2010 on your computer.
- Click on the “New Email” button to create a new email message.
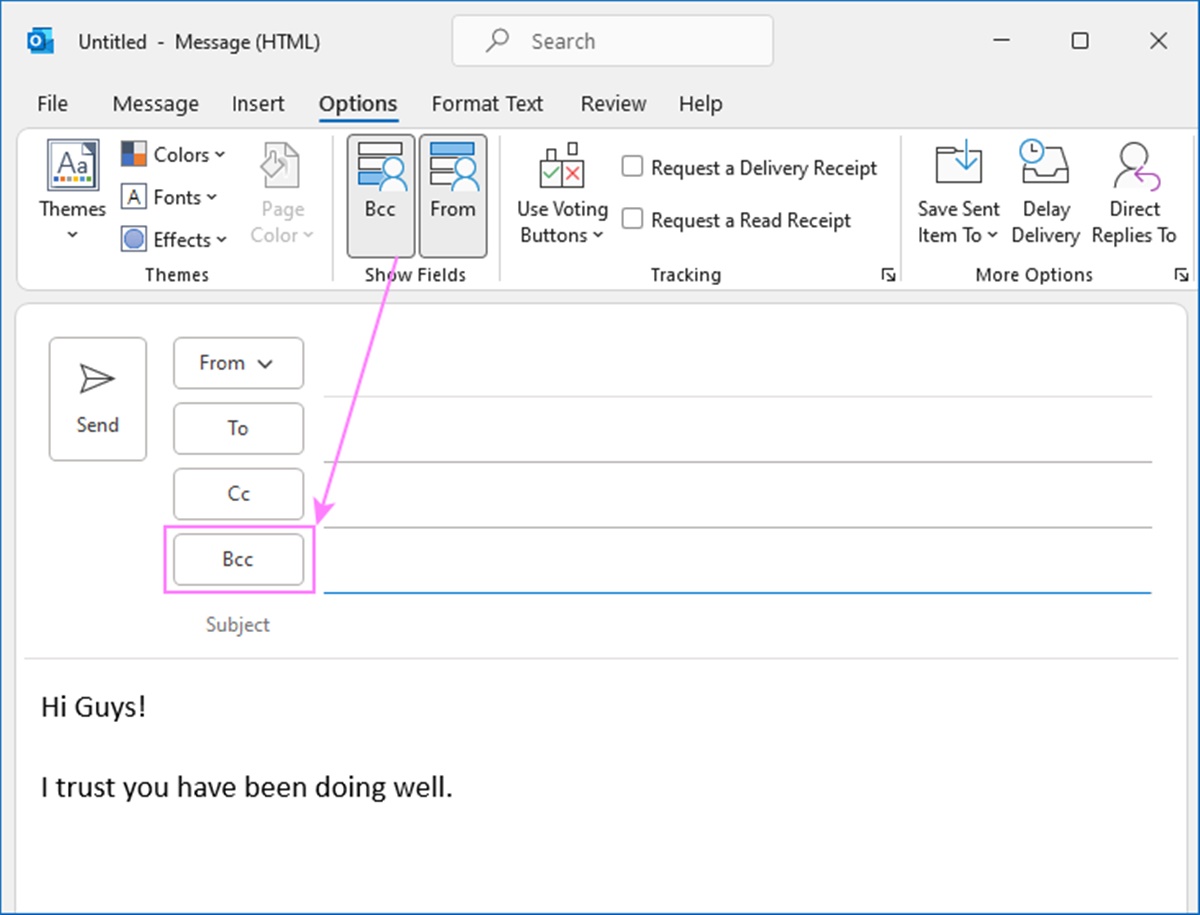
- In the new email window, you will notice that the “Bcc” field is not visible by default. To enable it, go to the “Options” tab in the ribbon.
- In the “Show Fields” section, click on the “Bcc” button. This will add the Bcc field to your email window.
- Now, you can enter the email addresses of the recipients you want to add to the Bcc field. You can either type the email addresses manually or click on the “Bcc” button to access your contacts and choose recipients from there.
- Once you have added the desired Bcc recipients, compose your email as usual, including the subject, message, and any attachments.
- When you’re ready to send the email, click on the “Send” button.
That’s it! Your email will be sent to the recipients in the To and Cc fields, while the Bcc recipients will receive a copy of the email without their email addresses being visible to others.
Using Bcc in Outlook 2010 allows you to maintain privacy, protect recipients’ identities, and communicate with a large group efficiently. It’s a useful feature that enhances the professionalism and effectiveness of your email correspondence.
How to Add Bcc Recipients in Outlook 2013/2016
Adding Bcc recipients in Outlook 2013/2016 is a straightforward process. Follow these steps to include Bcc recipients in your email:
- Open Microsoft Outlook 2013/2016 on your computer.
- Click on the “New Email” button to create a new email message.
- In the new email window, you may notice that the “Bcc” field is not visible by default. To enable it, go to the “Options” tab in the ribbon.
- In the “Show Fields” section, click on the “Bcc” button. This will add the Bcc field to your email window.
- Now, you can enter the email addresses of the recipients you want to add to the Bcc field. You can either type the email addresses manually or click on the “Bcc” button to access your contacts and choose recipients from there.
- Compose your email message, including the subject, body, and any attachments.
- When you are ready to send the email, click on the “Send” button.
That’s it! Your email will be sent to the recipients in the To and Cc fields, while the Bcc recipients will receive a copy of the email without their email addresses being visible to others.
Using the Bcc feature in Outlook 2013/2016 allows you to maintain privacy, protect recipients’ identities, and communicate with a large group effectively. It’s a useful tool for enhancing the professionalism and efficiency of your email communication.
How to Add Bcc Recipients in Outlook 365
Adding Bcc recipients in Outlook 365 is a simple process. Follow these steps to include Bcc recipients in your email:
- Open Outlook 365 on your computer.
- Click on the “New Email” button to create a new email message.
- In the new email window, you will notice that the “Bcc” field is not visible by default. To enable it, click on the ellipsis (…) icon in the toolbar at the bottom of the email composition window.
- From the options that appear, click on “Bcc”. This will add the Bcc field to your email window.
- Now, you can enter the email addresses of the recipients you want to add to the Bcc field. You can either type the email addresses manually or click on the “Bcc” button to access your contacts and choose recipients from there.
- Compose your email message, including the subject, body, and any attachments.
- When you are ready to send the email, click on the “Send” button.
That’s it! Your email will be sent to the recipients in the To and Cc fields, while the Bcc recipients will receive a copy of the email without their email addresses being visible to others.
Using Bcc in Outlook 365 allows you to maintain privacy, protect recipients’ identities, and communicate with a large group efficiently. It’s a useful feature that enhances the professionalism and effectiveness of your email correspondence in Outlook 365.
How to Add Bcc Recipients in Outlook Web App
To add Bcc recipients in Outlook Web App, follow the steps below:
- Open your preferred web browser and go to the Outlook Web App website.
- Sign in to your Outlook account using your login credentials.
- Click on “New” to create a new email message.
- In the new email window, you will find the “To” field at the top. To the right of the “To” field, click on the “Bcc” link.
- This will add the Bcc field to your email window.
- Now, you can enter the email addresses of the recipients you want to add to the Bcc field. You can either type the email addresses manually or select recipients from your contacts by clicking on the “To” button.
- Compose your email with the desired subject, message, and any attachments.
- When you are ready to send the email, click on the “Send” button.
That’s it! Your email will be sent to the recipients in the To and Cc fields, while the Bcc recipients will receive a copy of the email without their email addresses being visible to others.
Using Bcc in Outlook Web App allows you to maintain privacy, protect recipients’ identities, and communicate with a large group conveniently. It’s a valuable tool that improves the professionalism and efficiency of your email communication within the web app.
Tips for Using Bcc in Outlook
When using the Bcc feature in Outlook, there are a few tips to keep in mind to ensure smooth and effective communication:
- Double-check the recipients: Before sending an email with Bcc recipients, double-check the addresses you have entered to ensure accuracy. Sending an email to the wrong recipients can lead to embarrassment or misunderstandings.
- Use meaningful subject lines: To enhance the credibility and relevance of your email, use meaningful subject lines. This helps recipients understand the purpose of the email and improves their response rate.
- Personalize your messages: While using Bcc allows you to send the same email to multiple recipients, try to personalize the content of your message whenever possible. Personalization increases engagement and shows that you value each recipient individually.
- Test emails before sending: Before sending a mass email with Bcc recipients, it’s a good practice to send a test email to yourself and check how it appears in different email clients and devices. This ensures that the formatting, attachments, and overall appearance are intact.
- Avoid excessive use of Bcc: While Bcc can be useful, avoid excessive use of it. Sending emails with a long list of Bcc recipients can make your emails appear impersonal and generic. Use Bcc judiciously and consider other methods of communication, such as group emails or mailing lists, for larger distributions.
- Observe email etiquette: Regardless of whether you use Bcc or not, it’s crucial to follow proper email etiquette. Be courteous, concise, and professional in your emails. Avoid spam-like language, excessive capitalization, or excessive use of exclamation marks.
By keeping these tips in mind, you can maximize the benefits of using Bcc in Outlook and ensure effective and professional communication with your recipients.
FAQs about Bcc in Outlook
Here are some frequently asked questions about using the Bcc feature in Outlook:
- Can recipients in the Bcc field see each other?
No, recipients in the Bcc field cannot see each other. Their email addresses are hidden to maintain privacy and confidentiality. - Can I use Bcc for a large group of recipients?
Yes, you can use Bcc for a large group of recipients. However, keep in mind that some email providers or email clients may have limitations on the number of Bcc recipients allowed in a single email. - How does Bcc affect reply-all?
Recipients in the Bcc field will not be able to reply-all. This helps prevent reply-all storms and unnecessary response threads. - Is using Bcc the same as forwarding an email?
No, using Bcc is different from forwarding an email. When you forward an email, the original recipients are visible to the new recipients. In contrast, Bcc recipients are hidden. - Can I remove Bcc recipients after sending the email?
No, once the email is sent, you cannot remove or modify the Bcc recipients. Make sure to review and double-check the recipients before sending the email. - Can I add both Bcc and Cc recipients in the same email?
Yes, you can add both Bcc and Cc recipients in the same email. The Bcc recipients will receive a copy of the email without their email addresses being visible to others, while the Cc recipients will be visible to all other recipients.
These frequently asked questions provide a deeper understanding of how to use the Bcc feature in Outlook effectively. If you have any specific questions or concerns, refer to the Outlook documentation or reach out to customer support for further assistance.