
Tools and Materials Needed
Before you embark on installing floating shelves, it’s essential to gather all the necessary tools and materials to ensure a smooth and successful project. Here are the items you’ll need:
- Measuring tape
- Pencil
- Electronic stud finder
- Level
- Power drill
- Drill bits
- Screwdriver
- Wall anchors
- Wood screws
- Floating shelf brackets
- Shelf board
- Sandpaper
- Paint or stain (optional)
- Paintbrush or stain applicator (optional)
By having these tools and materials ready, you can streamline the installation process and avoid any unnecessary delays or trips to the hardware store.
Ensure that you have a measuring tape and pencil to mark the wall accurately. An electronic stud finder will help you locate the studs behind the wall, ensuring sturdy support for your shelves. It’s also crucial to have a level to ensure that your shelves are perfectly horizontal.
A power drill equipped with the right drill bits is necessary for creating holes and securing the brackets and shelf board. Additionally, you’ll need a screwdriver for tightening the screws.
Wall anchors are essential if you’re not able to directly attach the shelf brackets to studs. These anchors provide extra support and prevent the shelves from pulling away from the wall.
Lastly, you’ll need the actual shelf board and floating shelf brackets. Consider the dimensions and weight capacity of the shelves you require. Optionally, you may want to have sandpaper, paint, or stain on hand to customize the appearance of your shelves.
Now that you have all the tools and materials, you’re ready to move on to the next steps in installing your floating shelves.
Step 1: Choosing the Right Location
Choosing the right location is crucial when it comes to installing floating shelves. It not only affects the practicality and functionality of the shelves but also contributes to the overall aesthetics of the room. Here are the steps to follow:
- Evaluate the Purpose: Determine the purpose of the shelves. Are they meant for displaying decorative items or storing everyday essentials? Consider the items you plan to place on the shelves to determine the optimal location.
- Consider the Wall Type: Different wall types require different installation methods. Solid walls, such as concrete or brick, may require special hardware or drilling techniques compared to drywall. Take the wall type into account when choosing the location.
- Visualize the Space: Stand back and visualize the placement of the shelves. Consider the height and distance from other objects in the room. The shelves should fit harmoniously into the space without overwhelming or obstructing other items.
- Avoid Obstacles: Identify any potential obstacles such as electrical outlets, switches, or vents. Ensure that the chosen location doesn’t interfere with the functionality of these elements or create safety hazards.
- Accessibility: Consider ease of access when selecting the location. If the shelves are intended for frequently used items, make sure they are within reach and convenient for everyday use.
- Balance and Symmetry: If you plan to install multiple shelves, aim for balance and symmetry in their placement. This will create a visually appealing and cohesive look.
Remember, it’s important to take your time when choosing the location. Consider all the factors mentioned above and make a well-informed decision. Once you have finalized the location, you can move on to the next step of measuring and marking.
Step 2: Measuring and Marking
Accurate measurements and precise markings are essential for achieving a professional-looking installation of floating shelves. Follow these steps to ensure proper alignment and positioning:
- Measure the Wall: Use a measuring tape to determine the length and height of the wall space where you plan to install the shelves. Note down these measurements to ensure your shelves fit properly.
- Mark the Height: Decide on the desired height for your shelves and use a pencil to mark this height on the wall. Use a level to ensure that the mark is perfectly horizontal.
- Locate the Studs: Use an electronic stud finder to locate the studs behind the wall. Once you’ve found the studs, mark their positions with a pencil. It’s recommended to place your shelf brackets directly on the studs for maximum support.
- Measure and Mark Bracket Placement: Measure the length of your shelf brackets and mark their placement on the wall, aligning them with the stud marks if possible. Use a level to ensure the brackets are level and plumb.
- Confirm Spacing: If you are installing multiple shelves, measure the desired spacing between them and mark it on the wall. This will help you maintain consistency and ensure a visually pleasing arrangement.
- Double-Check Measurements: Before drilling any holes, double-check all your measurements and markings. Take the time to measure again and ensure the accuracy of your markings to avoid any mistakes.
Remember, precision is key when measuring and marking. Taking the time to meticulously measure and mark the wall will result in a smoother installation process and a more polished final outcome.
Step 3: Finding Studs and Securing Bracket
Finding and securing the brackets to the studs is crucial for ensuring the stability and strength of your floating shelves. Follow these steps to complete this important part of the installation:
- Drill Pilot Holes: Use a drill with a drill bit slightly smaller than the diameter of your screws. Drill pilot holes into the marked locations on the wall where the brackets will be positioned. Ensure that the pilot holes are deep enough to accommodate the screws.
- Attach Brackets: Place the brackets on the wall, aligning them with the pilot holes and stud marks. Insert the screws through the brackets and into the pilot holes. Use a screwdriver or power drill to securely tighten the screws, making sure the brackets are firmly attached to the wall.
- Double-Check Alignment: Use a level to confirm that the brackets are straight and level. Adjust them if necessary before fully tightening the screws.
- Test Stability: Gently apply pressure to the brackets to test their stability. They should feel secure and not wobble. If you notice any instability, recheck the attachment to the studs and make adjustments as needed.
- Repeat for Multiple Brackets: If you are installing multiple shelves with multiple brackets, repeat the above steps for each bracket, ensuring consistent alignment and stability.
Securing the brackets to the studs provides the necessary support for your floating shelves. By attaching them properly and ensuring their stability, you can have confidence in the shelf’s ability to hold the desired weight and remain securely in place.
Once you have securely attached the brackets, you are ready to move on to the next step of mounting the shelf itself.
Step 4: Mounting the Shelf
With the brackets securely in place, it’s time to mount the shelf onto the brackets. Follow these steps to successfully mount your floating shelf:
- Prepare the Shelf: Place the shelf board upside down on a clean surface. If desired, you can sand the edges or surfaces to achieve a smoother finish.
- Align the Shelf: Flip the shelf over and position it on top of the brackets, ensuring a proper fit. Align the shelf with the brackets, making sure it is centered and level.
- Screw the Shelf to the Brackets: Using a screwdriver or power drill, insert screws through the holes in the brackets and into the bottom of the shelf. Start with the center screws and, if applicable, work your way towards the outer edges.
- Tighten the Screws: Gradually tighten the screws, making sure not to over-tighten and risk damaging the shelf. Maintain alignment and levelness as you tighten each screw.
- Double-Check Stability: Once all the screws have been tightened, gently test the stability of the shelf. Apply light pressure to ensure it feels secure and does not shift or wobble.
Mounting the shelf onto the brackets is a critical step in the installation process. Take your time to align the shelf properly and tighten the screws securely, ensuring a stable and secure shelf that is ready to hold your items.
Once the shelf is mounted, you can move on to the final step of securing the shelf to the brackets.
Step 5: Securing the Shelf
Securing the shelf to the brackets is the final step in installing floating shelves. This step ensures that the shelf is firmly attached to the brackets and will stay in place. Follow these steps to secure your shelf:
- Check Alignment: Before securing the shelf, double-check its alignment. Ensure that it is centered and level on the brackets. Make any necessary adjustments if needed.
- Tighten Bracket Screws: Use a screwdriver or power drill to tighten the screws on the brackets. This will ensure that the brackets are securely fastened to the shelf and prevent any movement.
- Apply Adhesive (Optional): If desired or recommended by the manufacturer, apply a small amount of adhesive to the top of the brackets before placing the shelf on top. This will provide extra stability and prevent the shelf from shifting.
- Press Down Firmly: Carefully place the shelf on top of the brackets and press down firmly to ensure a snug fit. Apply even pressure across the entire length of the shelf.
- Test Stability: Test the stability of the shelf by gently applying pressure and slight movement. It should feel secure and not move or wobble. If any instability is noticed, check the alignment and tighten the screws further.
By securely attaching the shelf to the brackets, you can have confidence that your floating shelves are safely installed and ready to use. This step is crucial in ensuring the longevity and functionality of your shelves, allowing them to withstand the weight of your items.
Once you have confirmed the stability of your floating shelf, you can proceed to the final step of adding finishing touches to complete the installation process.
Step 6: Finishing Touches
Now that your floating shelf is securely installed, it’s time to add the finishing touches to enhance its appearance and ensure its longevity. Consider these steps to complete the installation process:
- Sand and Smooth (Optional): If necessary, use sandpaper to smooth out any rough edges or imperfections on the shelf. This step will give your shelf a polished and professional look.
- Paint or Stain (Optional): If desired, you can paint or stain the shelf to match your room decor or add a pop of color. Follow the manufacturer’s instructions for the paint or stain you choose, allowing it to fully dry before proceeding.
- Clean Up: Once the paint or stain has dried, be sure to clean up any dust or debris from the installation process. Wipe down the shelf and surrounding area, leaving it clean and tidy.
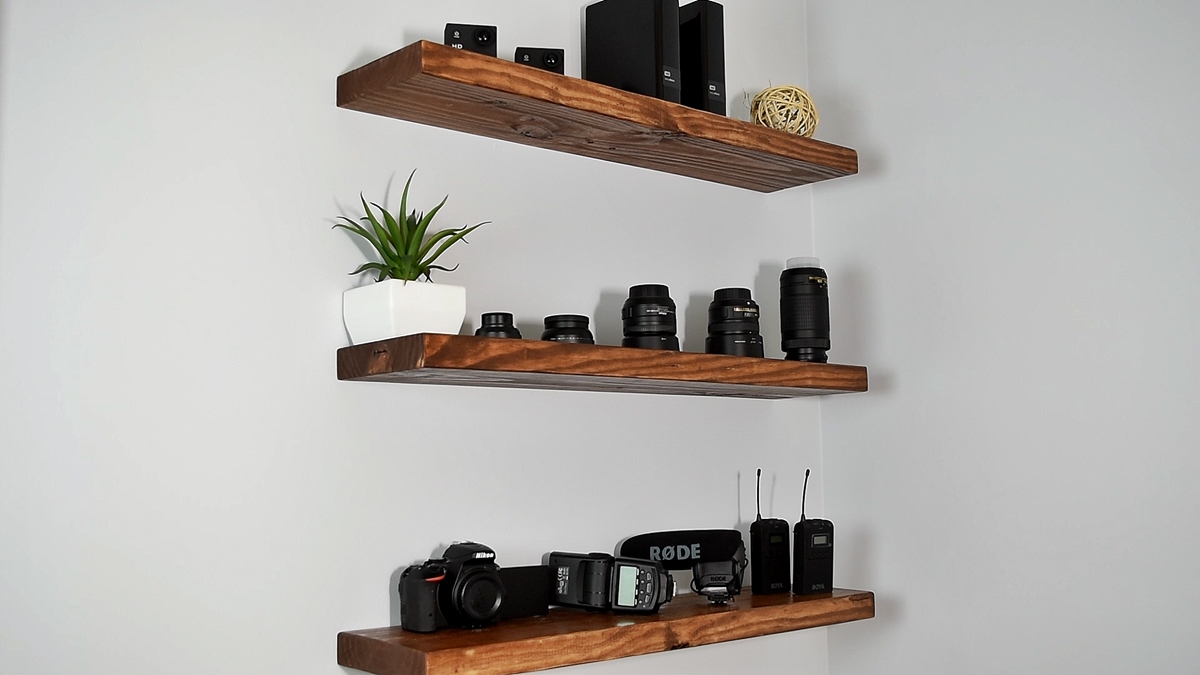
- Decorate and Style: Now comes the fun part! Arrange and display your items on the floating shelf, adding a personal touch to your space. Be mindful of weight distribution and avoid overcrowding the shelf to maintain its stability.
- Maintenance: Regularly dust and clean your floating shelf to keep it looking its best. Avoid placing excessively heavy items on the shelf and periodically check for any signs of wear or loosening of screws.
The finishing touches add aesthetic appeal and ensure that your floating shelf blends seamlessly into your room. By taking the time to sand, paint or stain, and clean up, you can create a visually pleasing and functional display space.
Remember to regularly assess and maintain your floating shelf to ensure its longevity and continued stability. With proper care, your newly installed floating shelf will be a stylish and practical addition to your home or office.
Tips and Tricks
Installing floating shelves can be a rewarding DIY project. Here are some helpful tips and tricks to ensure a successful installation:
- Use a stud finder: Locating studs behind the wall is essential for maximum support. Invest in a reliable electronic stud finder to accurately locate studs and attach your brackets securely.
- Pre-drill pilot holes: Before attaching the brackets, pre-drill pilot holes at the marked locations. This will prevent the wood from splitting and make it easier to insert the screws.
- Level is key: Take your time to ensure that your brackets and shelves are level. A slight imbalance can detract from the overall appearance and functionality of the shelves.
- Choose the right hardware: Depending on the weight of the items you plan to display, make sure to select appropriate hardware, including screws, wall anchors, and brackets. Refer to weight capacity guidelines provided by manufacturers.
- Consider floating shelf depth: Take into account the depth of your items when choosing the depth of your floating shelves. Ensure that the shelf is deep enough to hold your items without tipping over or protruding excessively.
- Frequent measurements: Double-check measurements at each step of the installation process. This will help avoid costly mistakes and ensure accurate alignment and placement of your shelves.
- Regular maintenance: Dust and clean your floating shelves regularly to maintain their appearance and prevent debris from accumulating. Additionally, periodically check the stability of the shelves and tighten any loose screws.
By following these tips and tricks, you can enhance the installation process and enjoy sturdy and aesthetically pleasing floating shelves in your space. Remember to always prioritize safety and take your time to ensure a successful outcome.
Common Mistakes to Avoid
While installing floating shelves can be a relatively straightforward process, there are common mistakes that can jeopardize the stability and overall success of your installation. Here are some mistakes to avoid:
- Skipping stud finding: Neglecting to locate and secure the brackets to studs can result in weak support, leading to shelves that are prone to sagging or even collapsing. Always use a stud finder to ensure proper attachment.
- Using incorrect hardware: Using hardware that is not appropriate for the weight and type of wall can compromise the strength and stability of your shelves. Refer to weight capacity guidelines and consult with professionals if needed.
- Overloading the shelves: It’s important to distribute weight evenly on the shelves and avoid exceeding the weight limit. Overloading can lead to excessive strain on the brackets and make the shelves more susceptible to damage or failure.
- Improper alignment: Failing to level the brackets or align the shelves correctly can result in unbalanced and visually unappealing installations. Take the time to ensure proper alignment and levelness before securing the brackets and mounting the shelf.
- Forgetting pilot holes: Neglecting to pre-drill pilot holes can cause the wood to split or crack when inserting screws. Always take the time to pre-drill pilot holes to facilitate an easier and more secure attachment.
- Ignoring weight distribution: Unevenly distributing weight on the shelves can cause them to tilt or become unstable. Be mindful of the weight distribution and ensure that heavier items are placed evenly across the shelf.
- Not considering wall type: Different wall types require different installation techniques. For example, installing shelves on drywall versus brick or concrete walls will require different hardware and drilling methods. Research the proper approach for your wall type.
Avoiding these common mistakes will help to ensure a smooth and successful installation of your floating shelves. By following proper techniques and taking the time to plan and execute the installation methodically, you can enjoy sturdy, attractive, and functional shelves in your space.