
Materials and Tools Needed
Before you begin installing your floating shelf, it’s important to gather all the necessary materials and tools. Having everything on hand will make the process smoother and more efficient. Here are the items you’ll need:
- Floating shelf kit: This typically includes the shelf board, mounting brackets, screws, and anchors.
- Tape measure: A reliable tape measure will help you accurately measure and mark the position of the shelf.
- Pencil: Use a pencil to mark the measurements and guidelines on the wall.
- Screwdriver: A screwdriver will be needed to secure the brackets and screws.
- Level: A level tool is essential for ensuring that the floating shelf is installed straight and level.
- Stud finder: This handy tool will help you locate and mark the wall studs, which are crucial for providing strong support for the shelf.
- Drill: If necessary, a drill can be used to create pilot holes for the screws or to install anchors.
- Wall anchors: These are used to provide extra support if the shelf is being installed on drywall or a plaster wall.
- Masking tape: Using masking tape can help prevent the wall from getting damaged during the installation process.
- Decorative items: Once the shelf is installed, you can add your personal touch by placing decorative items such as plants, picture frames, or books.
By having all of these materials and tools ready, you’ll be well-prepared to tackle the installation process and ensure a successful outcome.
Finding the Right Location for Your Floating Shelf
Choosing the optimal location for your floating shelf is essential to ensure both functionality and aesthetics. Here are some factors to consider when deciding where to install your shelf:
- Functionality: Think about how you plan to use the shelf. Will it be used to display decorative items, hold books and magazines, or store everyday essentials? Consider placing the shelf in a location that is easily accessible and suits its intended purpose.
- Wall space: Assess the available wall space in your room. Look for areas that are not obstructed by furniture, doors, or windows. You want to ensure that the shelf will fit well within the overall layout of the room.
- Height: Consider the height at which you want to install the shelf. Think about whether you want it within reach or higher up as a decorative focal point. Taking into account the items you plan to display and their visibility is also important.
- Weight capacity: Determine the weight capacity of the floating shelf you have chosen and ensure that the wall you select can support it. If you plan to place heavier items on the shelf, consider installing it nearer to wall studs for added stability.
- Aesthetic appeal: Think about how the shelf will complement the overall decor and style of the room. It should be placed in an area that enhances the visual appeal and doesn’t appear cramped or out of place.
- Safety: Avoid installing the floating shelf above areas where people frequently walk or sit, as items on the shelf could potentially fall and cause injury. Additionally, consider the presence of electrical outlets or other fixtures that might interfere with the installation process.
By taking these factors into account, you can choose the perfect location for your floating shelf. Remember to consider both functionality and aesthetics to create a visually pleasing and practical addition to your space.
Locating and Marking the Wall Studs
Locating and marking the wall studs is a crucial step in installing a floating shelf properly. Wall studs provide the necessary support for the shelf, ensuring it is securely attached to the wall. Here’s how you can locate and mark the wall studs:
- Use a stud finder: A stud finder is a handy tool that helps you detect the presence of wall studs. Follow the instructions provided with your stud finder to use it effectively.
- Start from an electrical outlet or switch: Wall studs are typically placed near electrical outlets or switches. Begin by locating these fixtures and use them as a starting point to find the studs.
- Scan the wall: Slowly move the stud finder horizontally across the wall, while keeping it flat against the surface. The stud finder will emit a signal or light up when it detects a stud. Take note of the stud’s position.
- Find additional studs: Continue scanning the wall to locate additional studs. Normally, studs are placed at intervals of 16 or 24 inches apart. Make sure to mark each stud you find.
- Confirm stud locations: Once you’ve marked the spots where you believe the studs are, use a small nail or awl to gently prod the wall at those locations. If you encounter resistance, it confirms the presence of a stud.
- Mark the stud locations: Use a pencil to mark the center of each stud’s position on the wall. You can draw vertical lines or simply place small dots to indicate where the studs are located.
Keep in mind that stud finders are not foolproof, and it’s always a good idea to double-check the stud locations using the nail or awl technique. Precisely marking the stud positions is crucial for accurately installing the floating shelf and ensuring its stability.
Measuring and Marking the Position of the Shelf
Accurate measurements and markings are essential when it comes to installing a floating shelf. Properly measuring and marking the position of the shelf ensures that it will be level and aligned with your desired location. Here’s how you can do it:
- Gather your tools: Before you begin, make sure you have a tape measure, pencil, and level on hand.
- Determine the height: Decide on the desired height for your floating shelf. Measure from the floor or a reference point on the wall and make a small mark with the pencil.
- Measure the length: Use the tape measure to measure the desired length of the shelf. Mark the endpoints with small pencil lines.
- Create a level guideline: Place the level horizontally or vertically along the pencil marks you made. Adjust it until the bubble in the level is centered. Lightly trace along the edge of the level with the pencil to create a straight guideline.
- Mark the bracket positions: Refer to the instructions provided with the floating shelf kit to determine the recommended bracket positions. Measure and mark the locations for the brackets along the level guideline.
- Confirm the positions: Take a step back and visually inspect the marked positions. Ensure that they align with your desired location and are evenly spaced.
- Make additional markings: If your floating shelf requires multiple brackets, continue measuring and marking the positions for each one, ensuring they are aligned with the level guideline.
By accurately measuring and marking the position of the shelf, you will have a clear guideline to follow during the installation process. Taking the time to do this step carefully will result in a professional-looking and well-aligned floating shelf.
Preparing the Wall for Installation
Preparing the wall before installing a floating shelf is crucial to ensure a secure and sturdy attachment. Taking the time to properly prepare the wall surface will help prevent any damage and ensure that the shelf stays in place. Here are the steps to follow:
- Clear the area: Remove any furniture, decorations, or objects that may obstruct your workspace. This will allow you to have a clear view of the wall and work freely.
- Remove existing fixtures: If there are any old shelves, brackets, or hooks on the wall, remove them carefully. Use a screwdriver or appropriate tool to remove any screws or fasteners holding them in place.
- Repair any damage: Inspect the wall for any holes, cracks, or uneven surfaces. Fill in any holes or cracks with spackling compound or wall putty. Smooth out any rough patches by sanding them down.
- Clean the wall: Use a damp cloth to wipe down the wall surface and remove any dirt, dust, or debris. This will ensure proper adhesion and help the brackets and shelf attach securely.
- Paint or touch up: If desired, this is a good time to paint or touch up the wall. Allow sufficient time for the paint to dry completely before proceeding with the installation.
It’s important to note that different wall surfaces may require specific preparation methods. For example, if you are installing the shelf on a tiled or brick wall, you may need to use specialized tools or techniques. It’s always recommended to refer to the manufacturer’s instructions and follow any specific guidelines they provide.
Taking the time to prepare the wall properly will ensure a smooth installation process and help maximize the longevity and stability of the floating shelf. By creating a clean and even surface, you’ll be ready to proceed with the next steps of the installation process.
Installing the Floating Shelf Bracket
The floating shelf bracket is a crucial component that provides support and stability to the shelf. Installing it properly is essential to ensure a secure attachment to the wall. Here is a step-by-step guide on how to install the floating shelf bracket:
- Refer to the manufacturer’s instructions: Read the instructions provided with the floating shelf kit to understand the specific installation process for your bracket. Follow any guidelines or recommendations provided.
- Hold the bracket against the wall: Position the bracket against the wall at the marked locations. Ensure the bracket is level and aligned with the pencil lines or marks you made during the measuring process.
- Mark the screw hole locations: Once the bracket is properly positioned, use a pencil to mark the screw hole locations on the wall. This will serve as a guide for drilling pilot holes.
- Drill pilot holes: Using an appropriate drill bit size, drill pilot holes at each of the marked locations. The size of the drill bit should match the size of the screws provided with the floating shelf kit.
- Place the bracket back against the wall: Align the bracket with the pilot holes and carefully place it back against the wall. Ensure that the screw holes on the bracket are positioned over the drilled pilot holes.
- Screw the bracket into place: Insert the screws provided into the pilot holes and tighten them with a screwdriver. Make sure to securely fasten the bracket to the wall, but be cautious not to over-tighten and risk damaging the wall or stripping the screws.
It’s important to follow the manufacturer’s instructions and guidelines throughout this process. Some floating shelf brackets may have additional steps or requirements, such as using wall anchors or specific fastening techniques.
By installing the floating shelf bracket securely, you create a solid foundation for your shelf. The bracket provides the necessary support for the shelf and ensures it stays firmly in place once mounted.
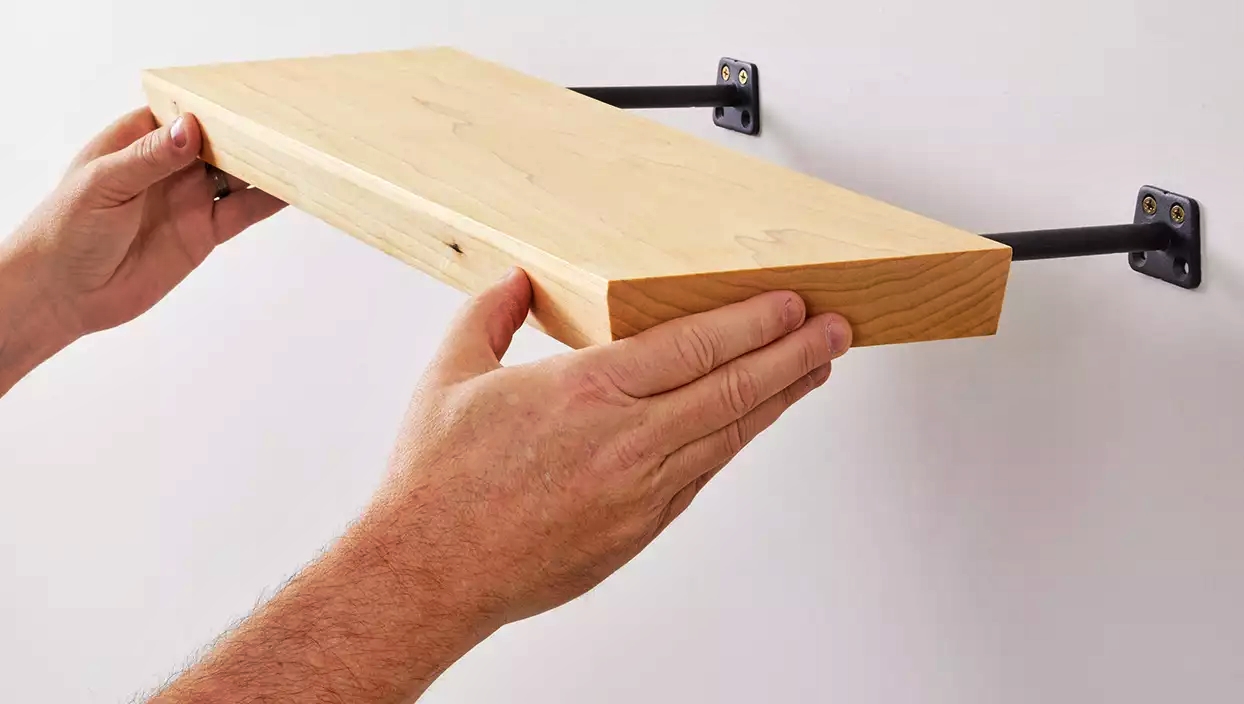
Mounting the Floating Shelf onto the Bracket
Mounting the floating shelf onto the bracket is the final step in the installation process. This step completes the assembly and allows you to enjoy the functionality and aesthetic appeal of your new shelf. Here’s how you can mount the floating shelf onto the bracket:
- Prepare the shelf: Ensure that the shelf is clean and free from any dust or debris. If necessary, wipe it down with a damp cloth and allow it to dry completely before proceeding.
- Position the shelf onto the bracket: Align the holes or slots on the back of the shelf with the corresponding tabs or slots on the bracket. Carefully slide the shelf onto the bracket, making sure it fits securely and is evenly aligned.
- Double-check the alignment: Step back and visually inspect the shelf to ensure it is level and centered over the bracket. Adjust if necessary by gently sliding the shelf or making slight adjustments to the position.
- Secure the shelf in place: Once you are satisfied with the alignment, use the screws provided with the floating shelf kit to secure the shelf onto the bracket. Insert the screws through the holes or slots on the bracket into the designated openings on the shelf.
- Tighten the screws: Using a screwdriver, tighten the screws just enough to secure the shelf onto the bracket. Be careful not to over-tighten, as this may cause damage to the shelf or compromise its stability.
It’s important to note that different floating shelf kits may have variations in their mounting mechanisms. Some may feature hidden brackets or unique attachment methods. Always refer to the manufacturer’s instructions for specific guidelines on mounting your particular shelf model.
Once the shelf is mounted securely onto the bracket, give it a gentle shake or push to ensure it is stable and properly attached. If everything feels secure, you can now start styling and decorating your floating shelf to showcase your personal style and enhance the overall aesthetics of your space.
Checking the Level and Adjusting if Necessary
Checking the level of your floating shelf after installation is crucial to ensure that it is straight and aligned properly. A level shelf not only looks visually appealing but also enhances functionality and prevents items from sliding or falling off. Here’s how you can check the level and make adjustments if necessary:
- Use a level tool: Grab a level tool and place it on top of the shelf. Ensure that the level is positioned horizontally or vertically, depending on the orientation of your shelf.
- Check the bubble: Examine the bubble in the level. If it is centered between the two guide lines, your shelf is perfectly level. If it’s not centered, adjustments are needed.
- Adjust side-to-side alignment: If the bubble is off-center horizontally, it means the shelf is not perfectly level from side to side. Gently slide the shelf to either side until the bubble is centered. Take care not to scratch the wall during this process.
- Adjust front-to-back alignment: If the bubble is off-center vertically, it indicates that the shelf is not level from front to back. In this case, carefully lift the shelf slightly and add or remove shims, such as thin cardboard or felt pads, between the shelf and the bracket to achieve a level position.
- Recheck the level: Once you make the necessary adjustments, reposition the level on top of the shelf and check the bubble again. Continue adjusting as needed until the shelf is perfectly level.
Remember to take your time during this process to ensure precision and accuracy. Even slight adjustments can make a noticeable difference in the overall appearance and functionality of your floating shelf.
By checking the level and making adjustments if necessary, you ensure that your floating shelf not only looks visually appealing but also provides a stable platform to showcase your decorative items or store your essentials.
Adding Extra Support for Heavy Items
If you plan on placing heavy items on your floating shelf, it’s important to provide additional support to ensure the shelf can handle the weight without sagging or becoming unstable. Here are some tips for adding extra support:
- Choose a sturdy shelf: Before adding extra support, ensure that your floating shelf itself is made of a durable material and has a weight capacity that can accommodate the items you intend to place on it.
- Reinforce the bracket: Consider adding extra brackets or reinforcing the existing bracket to increase the overall strength of the shelf. This can be done by installing additional brackets along the length of the shelf, especially if it is a long shelf or is expected to hold a significant amount of weight.
- Utilize wall anchors: If your floating shelf is mounted on drywall or a plaster wall, using wall anchors can provide extra support. These anchors distribute the weight across a larger area of the wall, reducing the strain on a single point of attachment.
- Install additional support brackets: For extremely heavy items or if you want to ensure maximum stability, consider installing additional support brackets beneath the shelf. These can be mounted directly into wall studs for added strength.
- Use support braces or corbels: Another option for providing extra support is to use decorative support braces or corbels. These accessories not only add visual appeal but also offer additional strength and stability to the shelf.
- Check weight distribution: Distribute the weight of heavy items evenly across the shelf by placing them in the center or spreading them out. Avoid placing all the weight on one side, as this can cause the shelf to tilt or become unbalanced.
It’s important to remember that even with additional support, there are limits to the weight that a floating shelf can safely hold. Always check the weight capacity specified by the manufacturer and avoid exceeding it to prevent any accidents or damage.
By adding extra support for heavy items, you can ensure the longevity and stability of your floating shelf, allowing you to display your items with confidence.
Tips for Styling and Decorating Your Floating Shelf
Once you have installed your floating shelf, it’s time to add the finishing touches by styling and decorating it. A well-styled shelf can enhance the look and feel of your space while showcasing your personal taste and creativity. Here are some tips to help you style and decorate your floating shelf:
- Consider the theme or style: Keep the overall theme or style of your room in mind when selecting items to display on the shelf. Whether it’s modern, rustic, minimalist, or eclectic, choose decorative items that align with the existing aesthetic.
- Use varying heights: Create visual interest by incorporating items of different heights on the shelf. This adds depth and dimension to the display and prevents it from looking flat or monotonous.
- Play with textures and materials: Mix and match textures and materials to create a visually appealing composition. Combine smooth surfaces with textured ones, and consider using a combination of wood, glass, metal, or ceramic items for added visual interest.
- Add greenery: Incorporate plants or flowers to bring a touch of nature and freshness to the shelf. Choose plants that thrive indoors and consider placing them in decorative pots or vases.
- Showcase personal items: Use the floating shelf as a platform to display personal mementos, such as framed photos, artwork, or cherished collectibles. This adds a personal touch and makes the display unique to you.
- Create visual balance: Arrange the items on the shelf in a way that creates a sense of balance and harmony. Distribute them evenly, both vertically and horizontally, and consider grouping them in odd numbers for a visually pleasing arrangement.
- Include functional and decorative elements: Combine functional items, such as storage boxes, with decorative elements to make the shelf both practical and visually appealing. This way, you can optimize the shelf’s functionality while maintaining an aesthetically pleasing display.
- Rotate and refresh: Periodically change the items displayed on the shelf to keep it fresh and interesting. This allows you to showcase different items or swap out seasonal decorations to reflect the changing seasons or holidays.
Remember to experiment and have fun with your floating shelf display. Play around with different arrangements and items until you achieve a look that reflects your personal style and complements the overall decor of your space.
By following these tips, you can transform your floating shelf into a visually stunning focal point that adds character and personality to your room.
Common Mistakes to Avoid When Installing a Floating Shelf
Installing a floating shelf may seem like a straightforward process, but there are some common mistakes that can lead to subpar results or even accidents. By being aware of these mistakes, you can ensure a successful and secure installation. Here are some common mistakes to avoid:
- Not locating wall studs: Failing to locate and secure the shelf to wall studs can result in a weak and unstable installation. Always use a stud finder to find the studs and position the brackets accordingly for added strength.
- Ignoring weight capacity: Each floating shelf has a weight capacity specified by the manufacturer. Overloading the shelf with items that exceed this weight limit can lead to sagging or even the shelf detaching from the wall. Always check and respect the weight capacity of your shelf.
- Using incorrect anchors or screws: Using inadequate anchors or screws can compromise the stability of the shelf. Make sure to use the appropriate hardware recommended by the shelf manufacturer and follow the instructions carefully.
- Not using a level: Installing the shelf without checking for levelness can result in a crooked or slanted shelf that detracts from the overall appearance. Always use a level to ensure a straight and level installation.
- Rushing the installation process: Taking shortcuts or rushing through the installation can lead to mistakes or missed steps. Carefully follow the instructions provided by the manufacturer and take your time to ensure a proper installation.
- Not considering wall material: Different types of walls require different installation methods. Failing to consider the wall material, such as drywall, plaster, or concrete, can lead to improper installation and reduced stability. Adjust your approach accordingly based on the wall material.
- Skipping pilot holes: Neglecting to drill pilot holes before installing screws can cause the wall or shelf to crack or split. Always take the time to create pilot holes to ensure smooth and secure installation.
- Not checking for clearance: For shelves installed above countertops or other furniture, ensure that there is enough clearance between the shelf and the surface. Failing to do so can result in limited functionality or potential damage to items placed beneath the shelf.
- Ignoring safety guidelines: Always follow proper safety precautions, such as wearing protective eyewear or gloves, when installing the shelf. It is important to prioritize safety throughout the installation process.
Avoiding these common mistakes will help ensure that your floating shelf is installed correctly and provides the stability and functionality you desire. By following the proper installation techniques and taking the time to do it right, you can enjoy your shelf for years to come.
Frequently Asked Questions About Floating Shelf Installation
Installing a floating shelf may raise some questions and uncertainties. To provide clarity, here are answers to some frequently asked questions about floating shelf installation:
- 1. How much weight can a floating shelf hold?
- 2. Can I install a floating shelf on any type of wall?
- 3. How do I make sure my floating shelf is level?
- 4. Can I install a floating shelf without wall studs?
- 5. Should I hire a professional for floating shelf installation?
- 6. How do I remove a floating shelf?
- 7. Can I install multiple floating shelves in a row?
- 8. Can I paint or stain my floating shelf?
The weight capacity of a floating shelf varies depending on the shelf’s design and materials. It is crucial to check the manufacturer’s specifications for the weight limit before placing heavy items on the shelf. Exceeding the weight capacity can compromise the stability and safety of the shelf.
Floating shelves can be installed on a variety of wall materials, including drywall, plaster, brick, or concrete. However, the installation method and hardware might differ based on the wall type. It’s important to use the appropriate anchors or screws designed for your specific wall material.
Using a level is essential to ensure a level installation. Place the level on top of the shelf and adjust the position until the bubble is centered. Make any necessary horizontal or vertical adjustments to achieve a level shelf.
While it is highly recommended to install floating shelves directly into wall studs for maximum support, there are other methods available for mounting on surfaces without studs. These include using wall anchors or hollow wall anchors, which provide additional support for the shelf.
The installation process for floating shelves is generally straightforward and can be done as a DIY project. However, if you lack experience or don’t feel confident in your abilities, hiring a professional can ensure a flawless installation. It’s important to consider your own skills and comfort level when deciding whether to hire a professional or do it yourself.
To remove a floating shelf, carefully unscrew or remove the brackets from the wall. Gently lift the shelf away from the brackets. Fill any holes or marks left on the wall with spackling compound or touch-up paint as needed.
Absolutely! Installing multiple floating shelves in a row can create a visually appealing display and provide additional storage or decorative space. Ensure proper measurements and use appropriate brackets to evenly space and align the shelves.
Many floating shelves come unfinished or in a natural wood tone, allowing you to paint or stain them to match your desired aesthetic. Follow the manufacturer’s instructions or consult a professional for guidance on the best approach to paint or stain your specific shelf material.
Remember, if you have specific questions or concerns, it’s always a good idea to consult the manufacturer’s instructions or seek professional advice to ensure a successful and safe installation.