
Materials Needed
Building outdoor curtain rods requires a few essential materials that will ensure a sturdy and long-lasting installation. Make sure you have the following items before getting started:
- 1-inch diameter metal or PVC pipes: These will serve as the main rods for hanging the outdoor curtains. Choose a material that can withstand outdoor conditions and is strong enough to support the weight of the curtains.
- Curtain brackets: These brackets will be used to secure the curtain rods to the wall or structure. Look for brackets that are designed for outdoor use and can withstand exposure to the elements.
- Screws and anchors: Depending on the type of surface you will be mounting the brackets on, you may need screws and anchors to secure them properly. Use screws and anchors that are suitable for outdoor applications and can securely hold the weight of the rods and curtains.
- Measuring tape: Accurate measurements are crucial for ensuring that the curtain rods are installed at the right height and distance from the wall. Use a measuring tape to measure the desired length and height for your outdoor curtains.
- Pencil or marker: Use a pencil or marker to mark the positions for drilling pilot holes and attaching the brackets to the wall. Make sure the markings are clear and easily visible.
- Power drill: A power drill will make the installation process much easier and faster. Choose a drill with the appropriate drill bit size for the pilot holes and screws you will be using.
- Level: To ensure that the curtain rods are installed straight and level, use a level to guide your installation process. This will help you achieve a professional and polished look.
- Optional: Finials and decorative accessories: If you want to add a decorative touch to your outdoor curtain rods, consider adding finials or other decorative accessories. These can be attached to the ends of the rods for added style and flair.
Gathering these materials beforehand will save you time and allow for a smooth and efficient installation process. Once you have everything ready, you can proceed to measure and mark the desired locations for your outdoor curtain rods.
Step 1: Measure and Mark
Before you begin installing your outdoor curtain rods, it’s important to take precise measurements and mark the locations where the rods will be placed. This will ensure that your curtains hang evenly and at the desired height. Here’s how to do it:
- Start by measuring the width of the area where you want to hang the curtains. This will help determine the length of the curtain rods you will need. Use a measuring tape and write down the measurement for reference.
- Next, decide on the height at which you want the curtains to hang. This will depend on your personal preference and the overall style of your outdoor space. Measure and mark this height on the wall or structure using a pencil or marker.
- If you plan to have multiple curtain rods, measure and mark the locations for each rod using the measurement from step 1. Make sure to evenly space the rods for a balanced look.
- Use a level to ensure that the marked locations are straight and even. Adjust as needed to achieve a straight line.
- If you’re installing the rods on a wall, make sure to take into account any obstructions such as windows, doors, or other structures. Adjust the rod placement accordingly to avoid any obstacles.
Taking accurate measurements and marking the locations will save you time and help you achieve the desired look for your outdoor curtains. Once you have completed this step, you can move on to drilling pilot holes for the brackets in the next step.
Step 2: Drill Pilot Holes
Once you have measured and marked the locations for your outdoor curtain rods, it’s time to drill pilot holes for the brackets. Pilot holes will make it easier to attach the brackets securely to the wall or structure. Follow these steps to drill the pilot holes:
- Start by selecting the appropriate drill bit size for your pilot holes. The size should match the screws or anchors you will be using to attach the brackets.
- Using the marked locations as a guide, place the tip of the drill bit on each mark and start drilling. Apply moderate pressure and drill straight into the wall or structure. Take care to drill to the desired depth, typically the length of the screw or anchor that will be inserted.
- Repeat this process for each marked location, ensuring that the pilot holes are evenly spaced and aligned with your measurements.
- Once all the pilot holes have been drilled, remove any dust or debris from the holes to ensure a clean and secure fit for the brackets.
By drilling pilot holes, you create a guide for the screws or anchors, making it easier to attach the brackets securely. This step is crucial in ensuring the stability and durability of your outdoor curtain rods. Once the pilot holes have been drilled, you are ready to move on to the next step: attaching the brackets.
Step 3: Attach Brackets
After drilling the pilot holes for your outdoor curtain rods, it’s time to attach the brackets. The brackets will provide the support and stability needed to hold the curtain rods securely in place. Follow these steps to attach the brackets:
- Take one bracket and align it with the pilot holes you drilled earlier. Make sure the bracket is level and centered over the hole.
- Insert a screw or anchor into the pilot hole, and using a screwdriver or drill, begin tightening it into place. Be careful not to overtighten, as this may damage the bracket or the wall.
- Repeat this process for the remaining brackets, ensuring that they are evenly spaced and aligned with the pilot holes.
- Once all the brackets are securely attached, double-check their alignment and make any necessary adjustments.
Attaching the brackets properly is essential for the stability and functionality of your outdoor curtain rods. Take your time during this step to ensure that the brackets are securely fastened. Once the brackets are in place, you’re ready to move on to the next step: inserting the curtain rods into the brackets.
Step 4: Insert Rods into Brackets
With the brackets securely attached, it’s time to insert the curtain rods into the brackets. This step will allow you to hang your outdoor curtains and complete the installation. Follow these steps to insert the rods into the brackets:
- Hold one end of the curtain rod and carefully align it with the bracket. The rod should fit snugly into the bracket.
- Slide the rod into the bracket, ensuring that it is seated properly and level. You may need to twist or adjust the rod slightly to align it correctly.
- Repeat this process for the other end of the curtain rod, inserting it into the corresponding bracket.
- Double-check that both ends of the rod are securely inserted and that the rod is level and straight.
By properly inserting the curtain rods into the brackets, you ensure that they will be securely held in place. Take your time during this step to make sure that the rods are inserted correctly and evenly. Once the rods are in place, you’re ready for the final step: hanging the outdoor curtains.
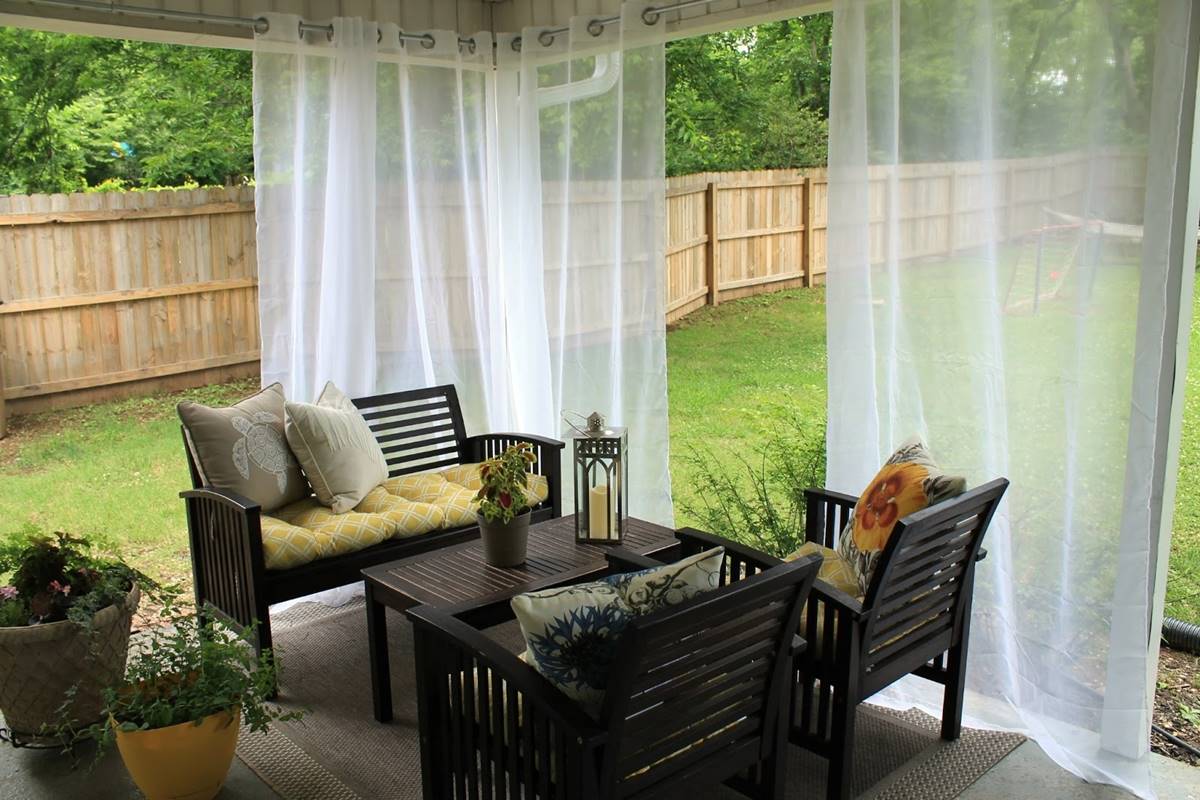
Step 5: Hang the Outdoor Curtains
Now that the curtain rods are securely in place, it’s time to hang your outdoor curtains. This step will bring the final touch to your outdoor space, creating a cozy and inviting atmosphere. Follow these steps to hang the curtains:
- Take one curtain panel and locate the built-in grommets, tabs, or hooks along the top edge.
- Slide each grommet, tab, or hook onto the curtain rod, starting from one side and working your way across. Ensure that the curtains are evenly distributed across the rod.
- Repeat this process for the remaining curtain panels, making sure to evenly space them on the rod.
- Once all the curtain panels are hung, step back and check that they are evenly aligned and hanging at the desired length.
- If necessary, make any adjustments to the curtain panels, such as adjusting the length or spacing for a more balanced appearance.
Hanging the outdoor curtains will not only provide privacy and shade, but also add a stylish touch to your outdoor space. Take your time during this step to ensure that the curtains are hung straight and evenly. Once the curtains are in place, your outdoor area will be transformed into a comfortable and inviting retreat.
Step 6: Optional: Add Finials for Decoration
If you want to add an extra touch of style and decoration to your outdoor curtain rods, consider adding finials. Finials are decorative pieces that can be attached to the ends of the curtain rods, giving them a polished and finished look. Follow these steps to add finials to your outdoor curtain rods:
- Choose finials that complement the style and theme of your outdoor space. There are various options available, from ornate and intricate designs to simple and modern styles.
- Remove the finials from their packaging and check if they come with any necessary attachment hardware.
- Insert the provided attachment hardware into the ends of the curtain rods. This may involve unscrewing a cap or inserting a screw into the rod end.
- Attach the finials to the curtain rod ends by screwing them onto the attachment hardware. Make sure they are securely fastened.
- Repeat this process for each curtain rod, attaching the finials to both ends.
- Step back and admire the finished look of your outdoor curtain rods with the added decorative finials.
Adding finials to your outdoor curtain rods can elevate the overall design and aesthetic of your outdoor space. They provide a finishing touch that enhances the appearance of the curtains and adds a personalized touch. Whether you choose elegant finials or whimsical ones, the addition of these decorative elements will undoubtedly enhance the visual appeal of your outdoor area.