
Materials Needed:
To make outdoor curtain rods from PVC pipe, you will need the following materials:
- PVC pipe: Choose a size and length according to your desired curtain rod dimensions. PVC pipes commonly come in 1-inch or 1.5-inch diameter.
- PVC connectors: These are fittings that will join the PVC pipes together. You will need T-connectors and elbow connectors.
- Saw: Use a saw suitable for cutting PVC pipe, such as a hacksaw or PVC pipe cutter.
- Sandpaper: Get some medium-grade sandpaper to smooth the edges of the cut PVC pipe.
- Measuring tape: This will help you accurately measure the length and width of the curtain rod.
- Pencil: Use a pencil to mark the PVC pipe where you need to make the cuts.
- Curtain rod brackets: These will be used to mount the curtain rod to the desired location. Choose brackets suitable for outdoor use.
- Drill: You will need a drill to install the curtain rod brackets onto the wall or other mounting surface.
- Screws: Select screws that are appropriate for the material you will be drilling into (e.g., wood, concrete).
- Outdoor curtains: Finally, choose the curtains that you want to hang on your newly created curtain rod. Opt for outdoor curtains that are durable and weather-resistant.
With these materials in hand, you will be well-equipped to create your own outdoor curtain rods from PVC pipe. The next steps will guide you through the process, from measuring and cutting the PVC pipe to hanging the curtains.
Step 1: Measure and Cut the PVC Pipe
The first step in making outdoor curtain rods from PVC pipe is to measure and cut the PVC pipe to your desired length. Follow these steps to ensure accurate measurements and clean cuts:
- Measure the desired length: Use a measuring tape to determine the length of the curtain rod you want to create. Take into account the space where you plan to install the rod and the width of your outdoor curtains. Mark the measurement on the PVC pipe using a pencil.
- Secure the PVC pipe: Secure the PVC pipe in a stable position, ensuring that it does not move while cutting.
- Make the cut: Using a saw suitable for cutting PVC pipe, such as a hacksaw or PVC pipe cutter, carefully cut the PVC pipe at the marked measurement. Apply firm and steady pressure to ensure a clean cut. Take your time and avoid rushing the process to minimize mistakes.
- Double-check the length: After making the cut, double-check the length of the PVC pipe to ensure it matches your desired measurement. Make any necessary adjustments if the length needs to be shortened or revised.
By accurately measuring and cutting the PVC pipe, you will lay the foundation for creating a sturdy and properly-sized curtain rod. The next step will focus on smoothing the edges of the cut PVC pipe to ensure a neat and polished appearance.
Step 2: Sand the Edges and Corners of the PVC Pipe
After cutting the PVC pipe to the desired length, the next step in creating outdoor curtain rods is to sand the edges and corners. Sanding will remove any rough or sharp edges, resulting in a smooth and polished finish. Here’s how to sand the PVC pipe:
- Gather sandpaper: Prepare a medium-grade sandpaper, which is suitable for smoothing PVC surfaces.
- Sand the edges: Using the sandpaper, carefully sand the edges of the cut PVC pipe in a back-and-forth motion. Focus on each edge individually, applying even pressure to achieve a smooth finish. This will help prevent any snags or tears in the curtains when they are hung.
- Sand the corners: Pay special attention to the corners of the PVC pipe, as they can be sharp. Use the sandpaper to round out the corners, creating a safer and more visually appealing shape.
- Inspect the surface: Once you have sanded the edges and corners, inspect the surface of the PVC pipe. Run your fingers along the sanded areas to ensure there are no remaining rough spots or sharp edges.
By sanding the edges and corners of the PVC pipe, you will create a curtain rod that is safe to handle and easy to install. The next step will guide you in assembling the PVC connectors to construct the curtain rod structure.
Step 3: Insert the PVC Connectors
With the PVC pipe cut and sanded, it’s time to insert the PVC connectors that will join the pieces together. The connectors will provide stability and support to the curtain rod structure. Follow these steps to insert the PVC connectors:
- Gather the T-connectors and elbow connectors: Depending on your curtain rod design, you will need a combination of T-connectors and elbow connectors. T-connectors create perpendicular connections, while elbow connectors create 90-degree angles.
- Plan the connector placement: Visualize the layout of your curtain rod and determine where the connectors will be placed. This will depend on the design and length of your curtain rod. Mark the positions where the connectors will be inserted on the PVC pipe using a pencil.
- Insert the connectors: Align the connectors with the marked positions on the PVC pipe. Apply firm pressure and insert them into the pipe. Ensure that they are securely attached and fully inserted.
- Adjust as needed: After inserting the connectors, double-check their alignment and make any necessary adjustments to ensure straight and level connections.
By inserting the PVC connectors, your curtain rod will have the necessary support to withstand the weight of the outdoor curtains. The next step will guide you through the process of assembling the curtain rod by connecting the PVC pipe sections.
Step 4: Assemble the Curtain Rod
Now that you have inserted the PVC connectors, it’s time to assemble the curtain rod by connecting the PVC pipe sections. Follow these steps to assemble the rod:
- Gather the cut PVC pipe sections: Collect the PVC pipe sections that you previously measured and cut.
- Connect the sections: Take the PVC pipe sections and slide them into the PVC connectors. If you are using T-connectors, insert the pipe sections into the open ends of the connector. If you are using elbow connectors, insert the sections into the openings at the desired angles. Apply steady pressure to ensure a secure fit.
- Double-check the alignment: Once all the sections are connected, double-check the alignment of the curtain rod. Ensure that it is straight and level, with no gaps or misalignments.
By assembling the PVC pipe sections, you will create a sturdy and functional curtain rod. The next step will focus on installing the curtain rod brackets to securely mount the rod.
Step 5: Install the Curtain Rod Brackets
Once you have assembled the curtain rod, it’s time to install the curtain rod brackets that will secure it in place. Installing the brackets properly will ensure that the rod remains stable and can support the weight of the outdoor curtains. Follow these steps to install the curtain rod brackets:
- Gather the curtain rod brackets: Select curtain rod brackets that are suitable for outdoor use and compatible with the size and design of your curtain rod.
- Choose the installation location: Determine where you want to mount the curtain rod and mark the positions for the brackets. Use a measuring tape to ensure that the brackets are evenly spaced.
- Prep the installation area: If you are mounting the brackets on a wall, use a pencil to mark the drilling points for the screws. Make sure the marks are level and aligned with each other.
- Secure the brackets: Using a drill, carefully screw the brackets into place. Make sure the screws are firmly tightened to provide stability and support.
- Double-check the alignment: After installing the brackets, double-check their alignment to ensure that they are straight and level. This will ensure that the curtain rod hangs properly and evenly.
By installing the curtain rod brackets securely, you can confidently hang your outdoor curtains without worrying about stability or sagging. The next step will guide you through the process of hanging the outdoor curtains on the rod.
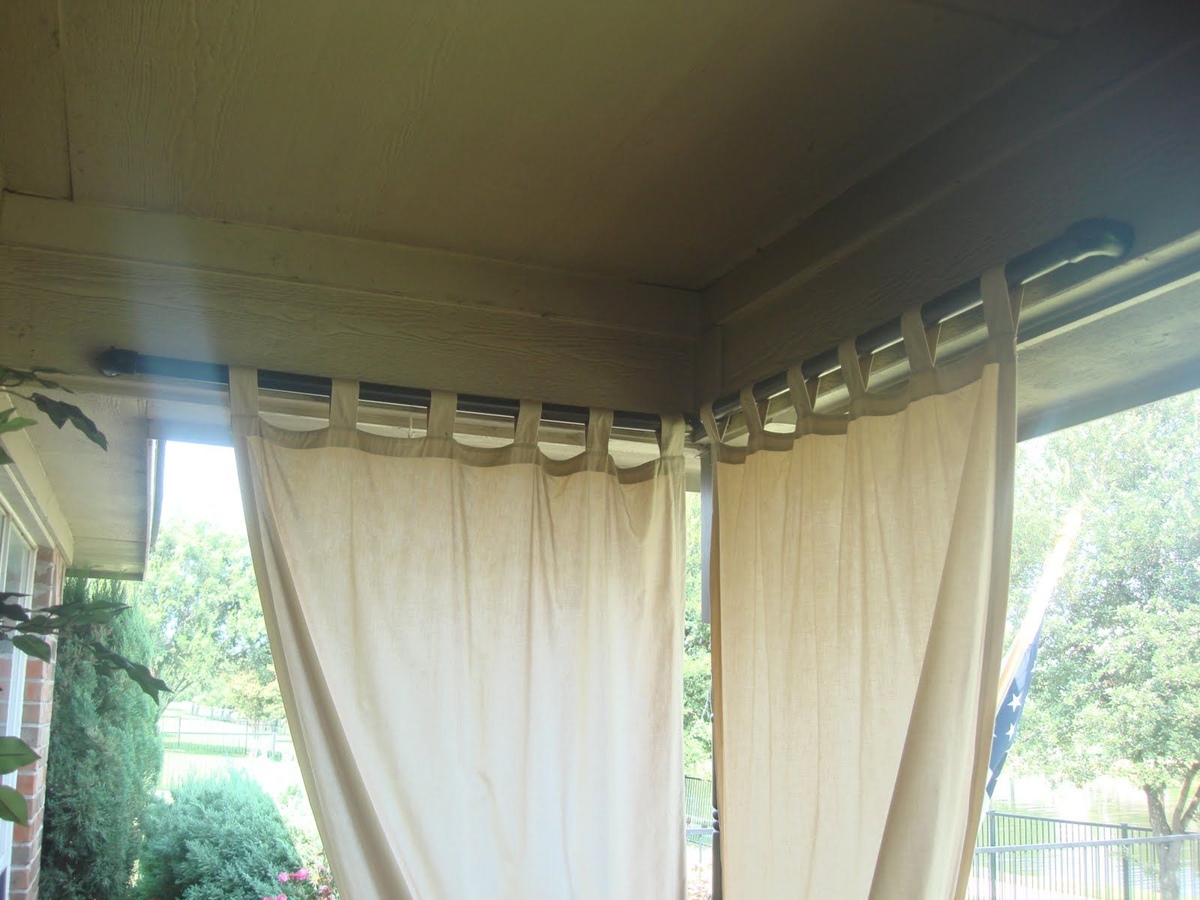
Step 6: Hang the Outdoor Curtains
Now that the curtain rod and brackets are in place, it’s time to finally hang the outdoor curtains. Follow these steps to ensure a smooth and aesthetically pleasing curtain installation:
- Prepare the curtains: If your outdoor curtains have grommets or loops, simply slide them onto the curtain rod. If your curtains don’t have built-in hanging mechanisms, you can use curtain rings or clips to attach them to the rod.
- Open the curtain rod: Loosen any locking mechanisms or screws on the curtain rod brackets to give yourself enough space to easily slide the curtains onto the rod.
- Slide the curtains onto the rod: Align the curtains with the curtain rod and begin sliding them onto the rod, one by one. Ensure that the curtains are evenly spaced and hanging straight along the rod.
- Adjust the curtain length: If needed, adjust the length of the curtains by folding or hemming the bottom edges. This will prevent the curtains from dragging on the ground and help achieve a clean, tailored look.
- Secure the curtain rod: Once all the curtains are properly hung, secure the curtain rod by tightening any locking mechanisms or screws on the brackets. This will ensure that the rod remains in place and the curtains stay securely attached.
By following these steps, you will successfully hang your outdoor curtains and create a beautiful and functional outdoor space. The next step is optional but can add a touch of personalization and style to your curtain rod.
Step 7: Optional: Paint or Decorate the Curtain Rod
While not necessary, painting or decorating the curtain rod can add a personal touch and enhance the overall look of your outdoor space. Follow these steps to paint or decorate the curtain rod:
- Clean the curtain rod: Before painting or decorating, make sure the curtain rod is clean and free from any dirt or debris. Use a damp cloth to wipe down the surface and let it dry completely.
- Choose a paint or decoration: Select a paint color or decoration that complements your outdoor decor. Opt for paint suitable for outdoor use and ensure that any decorations you choose are weather-resistant.
- Prepare the surface: If you decide to paint the curtain rod, lightly sand the surface to create a rough texture that will help the paint adhere better. If you plan to apply decorations, clean the surface to ensure proper adhesion.
- Apply the paint or decoration: Follow the instructions on the paint can or decoration packaging to apply the desired finish. Use thin, even coats of paint and let each coat dry before applying the next. When applying decorations, carefully arrange and secure them to the curtain rod.
- Allow for drying and curing: Once the paint or decorations are applied, allow the curtain rod to dry and cure fully. This typically takes a few hours or as specified by the paint or decoration manufacturer.
By painting or decorating the curtain rod, you can tailor it to your personal style and make it a focal point of your outdoor space. Remember to choose colors and decorations that complement your overall outdoor aesthetic. Now that your curtain rod is complete, let’s move on to the final step: maintenance and care.
Step 8: Maintenance and Care for the PVC Curtain Rods
Proper maintenance and care are essential to ensure the longevity and durability of your PVC curtain rods. Follow these guidelines to keep your curtain rods in optimal condition:
- Regular cleaning: Periodically clean the PVC curtain rods to remove dirt, dust, and any other debris. Use a mild soap and water solution, and gently scrub the surface with a soft cloth or sponge. Rinse thoroughly and allow the rods to dry completely before rehanging the curtains.
- Avoid excessive force: When opening or closing the outdoor curtains, handle them gently to avoid putting excessive force on the curtain rods. This will prevent any unnecessary strain or damage to the rods.
- Inspect for damage: Regularly inspect the curtain rods for any signs of damage, such as cracks, bends, or loose fittings. If you notice any issues, address them promptly to prevent further damage and ensure the stability and safety of the curtain rods.
- Protect from extreme weather conditions: If possible, remove the outdoor curtains and store them in a dry place during severe weather conditions, such as heavy rain, strong winds, or extreme temperatures. This will help prolong the lifespan of the curtains and prevent any potential damage to the curtain rods.
- Reinforce support: Over time, the curtain rods may require additional support to maintain their stability. If you notice any sagging or looseness, consider adding additional brackets or supports to strengthen the rods.
- Refinish as needed: If the paint or decorations on the curtain rods start to peel or fade, consider refinishing them to maintain their appearance. Follow the same steps as in Step 7 to repaint or reapply decorations.
By following these maintenance and care practices, you can ensure that your PVC curtain rods remain in excellent condition for years to come. Regular cleaning, gentle handling, and timely repairs will help prolong their lifespan and maintain their functionality. Enjoy your outdoor curtains and the ambiance they bring to your outdoor space!