
Choosing the Right Pipe for Your Curtain Rods
When it comes to making curtain rods out of pipe, choosing the right pipe is crucial for both functionality and aesthetics. The type of pipe you select will depend on your specific needs, style preferences, and budget. Here are some factors to consider when choosing the right pipe:
- Material: One of the most important considerations is the material of the pipe. Common options include steel, copper, brass, and PVC. Steel pipes are durable and can handle heavy drapes, while copper and brass offer a more elegant and decorative look. PVC pipes are budget-friendly and suitable for lightweight curtains.
- Diameter: The diameter of the pipe will determine how well it supports your curtains. Consider the weight and thickness of your curtains when choosing the diameter. For heavier or larger curtains, opt for a wider diameter to ensure adequate support.
- Finish: The finish of the pipe can make a significant impact on the overall aesthetic appeal of your curtain rods. Choose a finish that complements your existing décor, such as polished or brushed finishes for a modern look, or antiqued finishes for a vintage touch.
- Price: Pipe prices can vary depending on the material, diameter, and finish. Determine your budget and find a pipe that meets your needs without breaking the bank. Keep in mind that higher-quality materials may come with a higher price tag but can offer long-lasting durability.
Consider these factors carefully, as they will ensure that you choose the right pipe for your curtain rods. Taking the time to research and make a well-informed decision will result in curtain rods that not only function well but also enhance the overall aesthetic of your space.
Measuring the Length and Diameter of the Curtain Rod
Accurate measurements are essential when making curtain rods out of pipes to ensure a proper fit and functionality. Follow these steps to measure the length and diameter of your curtain rod:
- Decide on the Curtain Rod Length: Determine the desired length of your curtain rod by measuring the width of the window or the space where the curtains will hang. Add extra inches on each side to allow the curtains to fully cover the window when closed.
- Measure the Curtain Rod Diameter: The diameter of the curtain rod will depend on the type and thickness of your curtains. Measure the diameter by placing a tape measure or caliper around the rod, or if you’re using a pipe, measure the inner diameter of the pipe. This will help you choose the appropriate pipe size for your curtain rod.
- Consider Curtain Rod Supports: Take into account the type of curtain rod supports you’ll be using, such as brackets or hooks. Measure the depth of the supports to ensure the curtain rod will fit without obstruction.
- Double Check and Adjust: Once you have your initial measurements, double-check to ensure accuracy. It’s better to take a few extra minutes to measure again than to end up with a curtain rod that doesn’t fit properly. Adjust your measurements if necessary.
By taking precise measurements for the length and diameter of your curtain rod, you can ensure a snug fit and prevent any potential issues during installation. Remember to measure twice and cut once to save time and effort in the long run.
Cutting the Pipe to the Correct Length
Once you have determined the desired length of your curtain rod, it’s time to cut the pipe to the correct size. Follow these steps to accurately cut the pipe:
- Mark the Measurement: Use a measuring tape to mark the exact length on the pipe. Double-check the measurements to ensure accuracy.
- Select the Proper Cutting Tool: Depending on the type of pipe you’re using, choose the appropriate cutting tool. For steel or copper pipes, a hacksaw or pipe cutter will work well. PVC pipes can be easily cut with a PVC pipe cutter or a fine-toothed saw.
- Secure the Pipe: Place the pipe securely in a vise or clamp it down to ensure stability during the cutting process. This will help prevent any accidents and ensure a clean cut.
- Cut the Pipe: Using the selected cutting tool, carefully cut through the pipe along the marked measurement. Apply even, steady pressure to ensure a smooth and straight cut.
- Smooth the Edges: After cutting, use a file or sandpaper to smooth any rough edges or burrs on the cut ends of the pipe. This will prevent damage to your curtains and make it easier to insert the rod into curtain rod supports.
Remember to wear appropriate safety gear, such as goggles and gloves, when cutting the pipe. Take your time and be cautious to avoid any accidents or injuries during the cutting process.
With the pipe cut to the correct length, you’re one step closer to creating your custom-made curtain rods. Move on to the next step to prepare the pipe for installation.
Sanding and Finishing the Pipe
Once you have cut the pipe to the correct length, it’s important to sand and finish it to ensure a polished and professional look. Follow these steps to sand and finish your pipe curtain rod:
- Sand the Cut Ends: Use fine-grit sandpaper to smooth out any rough edges or burrs on the cut ends of the pipe. This will ensure a clean and safe surface for your curtains and make it easier to insert the rod into curtain rod supports.
- Remove Any Stickers or Labels: If there are any stickers or labels on the pipe, use a gentle solvent or adhesive remover to remove them. Wipe down the pipe with a clean cloth to remove any residue.
- Choose Your Finish: Decide on the type of finish you want for your curtain rod. If you’re using a metal pipe, you can leave it with a natural, industrial look or apply a clear coat to protect against rust. For copper or brass pipes, you can choose to keep their natural patina or apply a protective varnish or wax to maintain their shine.
- Apply the Finish: Follow the instructions on the product and apply the chosen finish to the pipe. Use a paintbrush, sponge, or cloth to evenly distribute the finish, making sure to cover all exposed surfaces. Allow the finish to dry according to the manufacturer’s recommendations.
- Optional: Decorative Touches: If you want to add some decorative elements to your curtain rod, consider using spray paint, stencils, or tape to create patterns or designs on the pipe. Be sure to let the paint fully dry before handling the rod.
By sanding and finishing the pipe, you’ll not only ensure a smooth and professional appearance but also protect the pipe from rust or damage. Take your time during this step to achieve the desired look for your curtain rods.
Now that your pipe is sanded and finished, you’re ready to move on to the next step – installing the pipe curtain rod brackets.
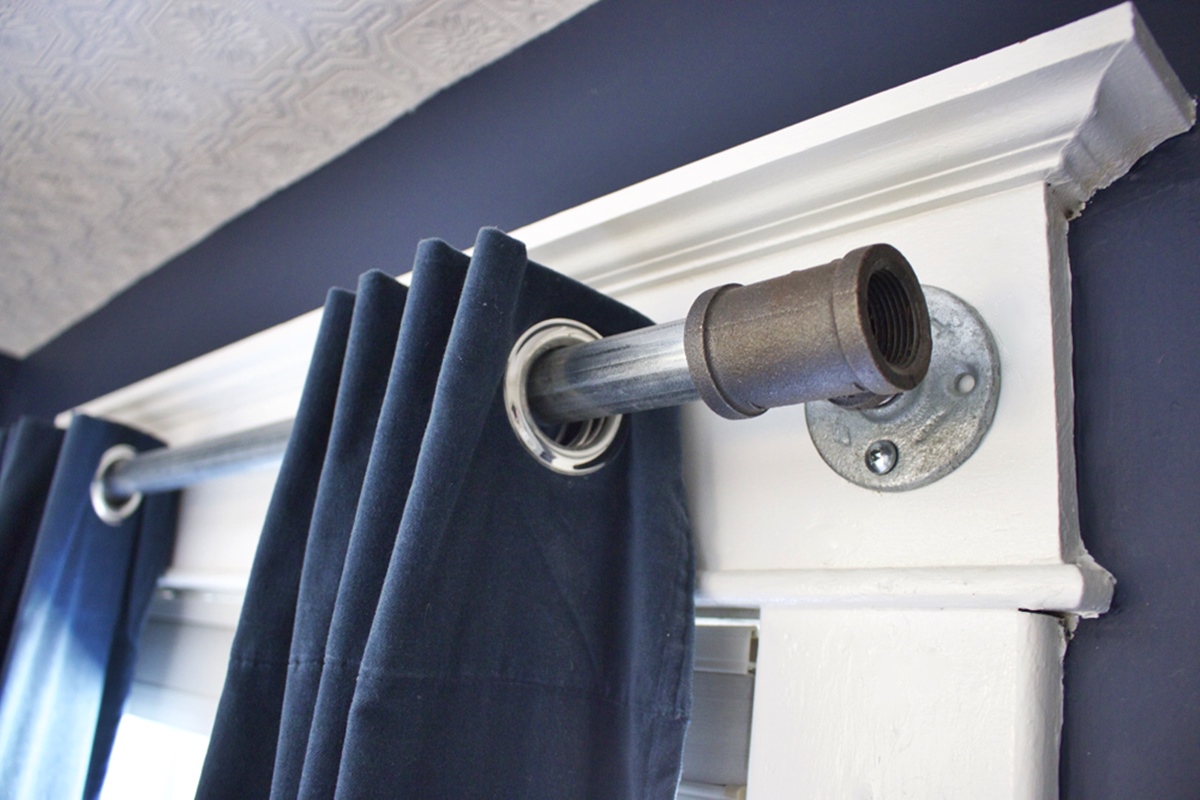
Installing the Pipe Curtain Rod Brackets
Installing the pipe curtain rod brackets is a critical step in ensuring the stability and functionality of your curtain rods. Follow these steps to properly install the brackets:
- Determine Bracket Placement: Measure and mark the desired height and distance for the curtain rod brackets. Ensure that they are evenly spaced and aligned with each other.
- Use a Level: Place a level along the marked spots to ensure that the brackets will be installed straight. Adjust the position if needed.
- Drill Pilot Holes: Using a drill and a drill bit slightly smaller than the screws provided with the brackets, create pilot holes at the marked spots. This will prevent the wood or wall from splintering when you attach the brackets.
- Secure the Brackets: Position the brackets over the pilot holes and attach them using the screws provided. Use a screwdriver or drill to tighten them, ensuring that they are firmly fixed to the surface.
- Double Check Stability: Once the brackets are attached, test their stability by gently applying pressure to see if they hold the weight of the curtain rod. Make any necessary adjustments or reinforcements to ensure a secure installation.
It’s important to follow the manufacturer’s instructions provided with the brackets for the specific installation process. Some brackets may have additional steps or requirements, so be sure to read and understand them before proceeding.
With the brackets securely in place, you’re ready for the final step – hanging the curtain rods and adorning your windows with beautiful curtains.
Hanging the Curtain Rods
The final step in making curtain rods out of pipe is to hang them and add the finishing touch to your windows. Follow these steps to successfully hang your curtain rods:
- Prepare the Curtain Rod: Slide the curtain rings onto the pipe and position them evenly along the length. If your curtains have tabs or grommets, ensure they are properly attached to the curtain rod.
- Place the Curtain Rod on the Brackets: Gently lift the curtain rod and position it onto the installed brackets. Ensure that the rod is level and properly seated in the brackets.
- Secure the Curtain Rod: Depending on the type of brackets used, follow the manufacturer’s instructions to secure the curtain rod in place. This may involve tightening screws or locking mechanisms to hold the rod firmly in position.
- Test the Movement: Give the curtain rod a gentle pull to ensure that it can slide smoothly along the brackets. Adjust as necessary to achieve the desired movement.
- Add the Curtains: Attach your curtains to the rod using the rings, tabs, or grommets. Slide them along the rod until they are positioned as desired.
Once the curtain rods are securely hung and the curtains are in place, step back and admire your handiwork. Enjoy the transformation these custom-made curtain rods have brought to your windows and the overall aesthetic of your space.
Remember to periodically check the stability of the curtain rods and make any necessary adjustments or repairs if needed, ensuring they continue to function effectively.
By following these steps, you can successfully hang your DIY pipe curtain rods and give your windows a unique and personalized touch.