
Use a Towel as a Drying Rack Substitute
When you don’t have a drying rack on hand, a simple towel can serve as a great alternative. The texture of the towel provides a surface for the clothes to rest on and allows for air circulation, aiding in the drying process.
To use a towel as a drying rack substitute, lay it flat on a clean, dry surface, such as a table or countertop. Gently arrange your clothes on top of the towel, making sure to leave some space between each item. This will allow for better airflow and prevent clothes from sticking together.
If you have a large number of clothes to dry, consider stacking multiple towels on top of each other to create additional drying space. Just make sure not to overcrowd the towels, as this can hinder air circulation and prolong drying time.
It’s important to note that towels can absorb moisture from wet clothes, so make sure to periodically check and replace the towels as they become damp. This will ensure that your clothes dry efficiently and prevent any unwanted odors or mildew from developing.
Remember, using a towel as a drying rack substitute is a temporary solution and may not be suitable for delicate or heavy garments. It’s always best to have a designated drying rack, but in a pinch, a towel can be a practical and effective alternative.
Utilize Furniture and Household Items
When you don’t have a dedicated drying rack, you can get creative and make use of furniture and household items to dry your clothes. Here are a few ideas:
1. Chairs: Utilize the backrests of sturdy chairs as makeshift drying racks. Place a towel or cloth over the top of the chairs to create a flat surface, and then drape your clothes over the backrests. This method works well for hanging shirts, pants, and dresses.
2. Shower curtain rods: If you have a shower curtain rod in your bathroom, take advantage of this convenient drying space. Hang clothes on hangers, such as shirts or lightweight items, and suspend them from the shower curtain rod. This method allows for good airflow and is especially useful for quick drying.
3. Bannisters and railings: If you have sturdy bannisters or railings in your home, use them as a makeshift clothesline. Attach clothespins or hangers to the railings to hang your garments. Make sure not to overload the railings to prevent them from bending or breaking.
4. Door frames: Hang clothes on hangers and place them on top of a door frame. Close the door gently to keep the hangers in place. This method is ideal for lightweight items and can be a space-saving solution.
Remember, when using furniture or household items as drying racks, it’s essential to balance the weight and ensure stability. Avoid overloading or placing too much weight on these items, as it can lead to damage or injury.
Utilizing furniture and household items as drying alternatives can be a creative and practical solution when you don’t have a traditional drying rack available. Just be cautious and consider the sturdiness and stability of the items you use to ensure the safety of your clothes and your home.
Hang Clothes on Shower Curtain Rods
If you don’t have a drying rack handy, one simple and effective alternative is to hang your clothes on shower curtain rods. This method is especially useful for small spaces like apartments or dorm rooms where a traditional drying rack may not fit.
To use shower curtain rods as a makeshift clothesline, start by removing the shower curtain and ensuring the rod is clean and dry. Then, gather your wet clothes and attach them to hangers. Make sure to evenly distribute the weight of the clothes to prevent the rod from sagging or falling.
Once your clothes are securely on hangers, hang them on the shower curtain rod. Space the hangers out evenly, allowing for proper airflow between the garments. This helps to speed up the drying process and prevents clothes from sticking together.
If you have a tension rod shower curtain rod, adjust the length of the rod so that it fits snugly between the walls or across the width of your shower enclosure. For a regular shower curtain rod, make sure it is securely fastened to the walls to support the weight of the clothes.
Another convenient feature of using shower curtain rods to dry clothes is that many bathrooms have exhaust fans installed. By turning on the exhaust fan, you can enhance air circulation and speed up the drying process even further.
Remember to check the weight capacity of your shower curtain rod and avoid placing too heavy or bulky items on it. Additionally, be mindful of the type of material your shower curtain rod is made of. Metal rods are generally more sturdy and can handle heavier loads, while plastic or lightweight rods may not be as durable.
Using shower curtain rods as a drying alternative is a practical and space-efficient solution. Just be sure to properly secure the hangers and monitor the weight and stability of the rod to ensure the safety of your clothes and your bathroom.
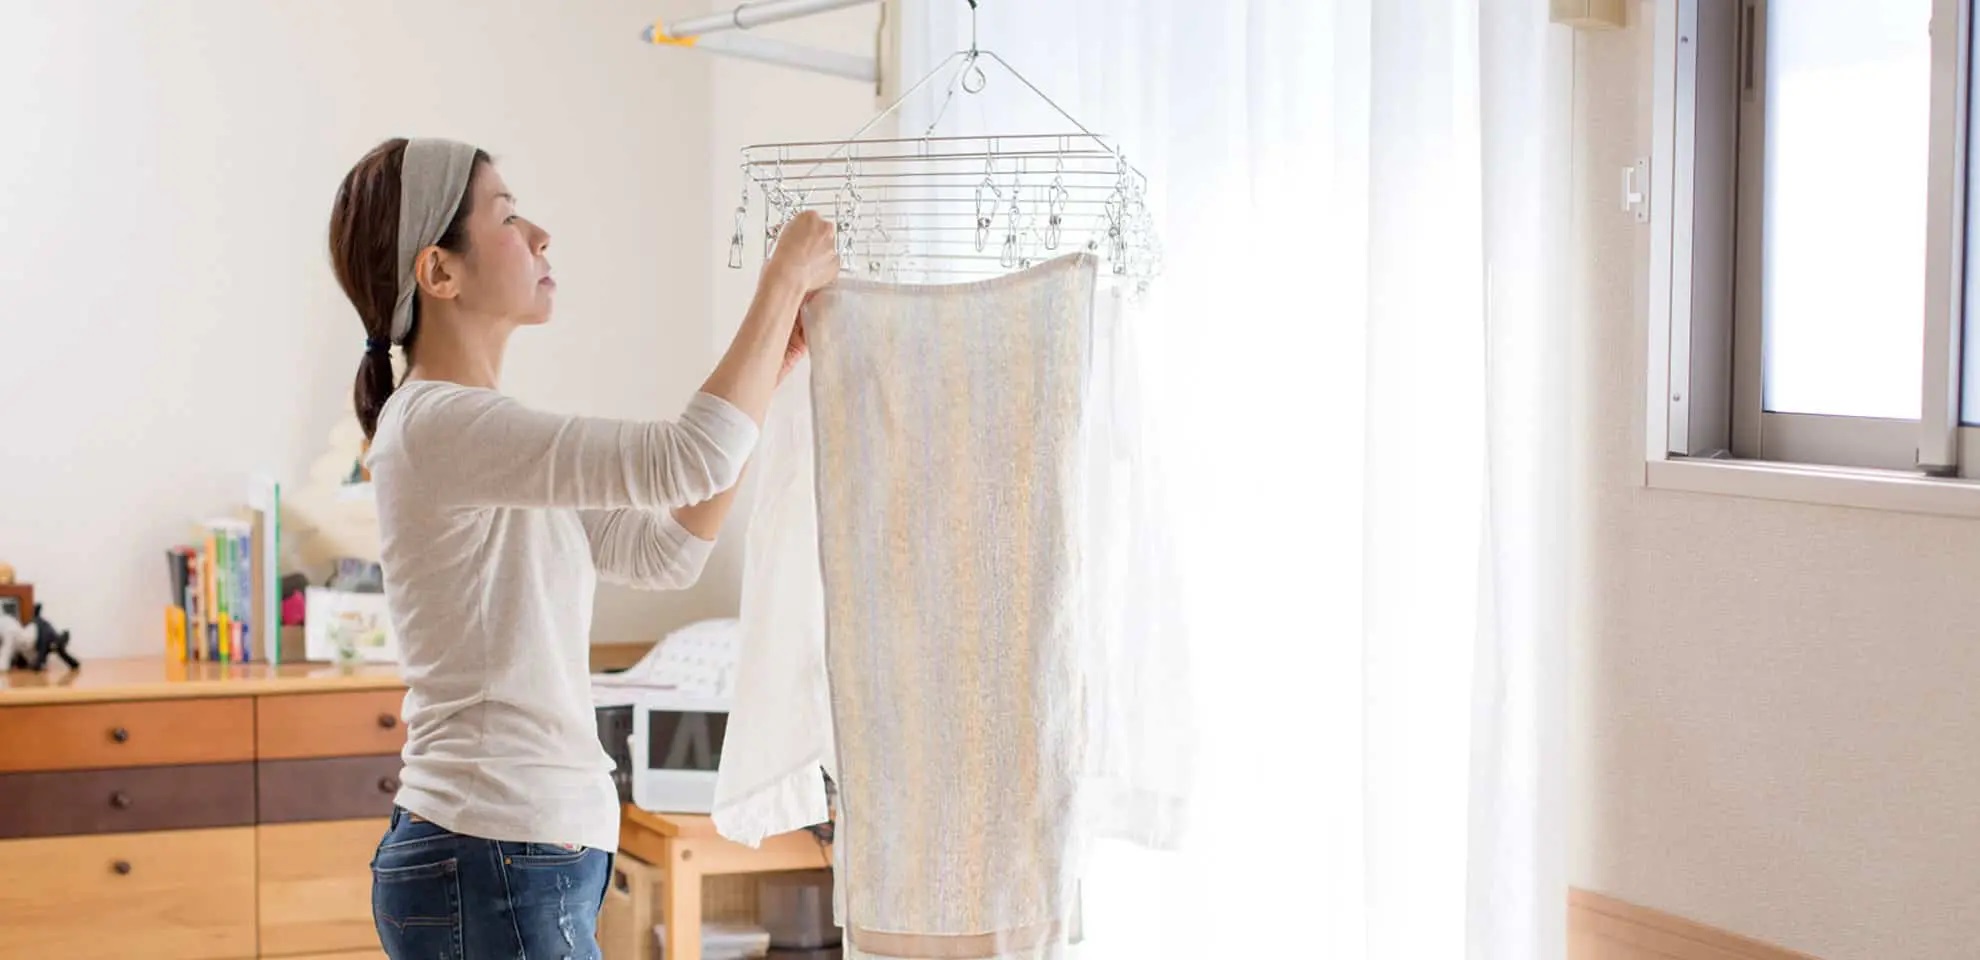
Dry Clothes on Hangers
Drying clothes on hangers is a simple and space-saving method that doesn’t require a drying rack. It allows you to hang your clothes directly from a rod, hook, or any elevated surface, providing sufficient airflow for quick and efficient drying.
To dry clothes on hangers, start by selecting the appropriate hangers for the type of clothing you want to dry. Use sturdy hangers with clips for pants, skirts, or delicate garments, and regular hangers with rounded edges for shirts, blouses, and dresses.
First, wring out any excess water from your clothes to avoid dripping. Then, gently shake out each garment to eliminate any wrinkles and ensure proper airflow. Attach the clothes to the hangers, making sure they are evenly distributed and not overcrowded. This helps prevent the clothes from sagging or losing their shape while drying.
Next, find a suitable location to hang the clothes. This could be a clothesline, shower curtain rod, garment rack, or even a sturdy curtain rod. Make sure that the location allows for adequate airflow around the garments and that they are spaced out enough to prevent them from touching each other.
If drying clothes indoors, choose a well-ventilated area to prevent excessive moisture buildup. Open windows, turn on fans, or use a dehumidifier to enhance air circulation and facilitate faster drying.
For outdoor drying, consider weather conditions such as direct sunlight, wind, and humidity. Hang the clothes in a shaded area to prevent fading and protect them from any potential damage caused by prolonged exposure to the sun.
Remember to periodically check the clothes to track the drying progress. This will help you determine if any adjustments are needed, such as rotating the hangers or transferring partially dried clothes to a different drying location.
Once the clothes are completely dry, carefully remove them from the hangers and fold or hang them in their designated storage area. Ensure that the hangers are free for future use.
Drying clothes on hangers is a versatile and efficient method that can be used in various settings. It not only saves space but also helps maintain the shape and quality of your clothes. Give it a try the next time you don’t have a drying rack available, and you’ll be surprised at how effective and convenient it can be.
Create a DIY Clothesline with Rope or Twine
When a traditional drying rack is not on hand, you can easily create your own DIY clothesline using rope or twine. This method allows you to hang multiple garments simultaneously, providing ample space for drying while utilizing minimal resources.
To create a DIY clothesline, start by finding two sturdy anchor points. This could be two trees in your backyard, two posts on your balcony, or even two hooks attached to your walls or ceiling. Make sure the anchor points are stable and can bear the weight of the clothes.
Next, cut a length of rope or twine that is suitable for your drying needs. Ensure the length is long enough to span the distance between the two anchor points with some additional slack for knotting. The thickness of the rope or twine should be sufficient to support the weight of the clothes without sagging excessively.
Tie one end of the rope or twine securely to the first anchor point. You can use a double knot or a secure hitch to ensure the rope stays in place. Then, stretch the rope across to the second anchor point and tie it off in the same manner.
Once the clothesline is secure, you can start hanging your clothes. Attach clothespins or hangers to the rope, spacing them evenly to allow for proper airflow between the garments. Be mindful not to overcrowd the clothesline, as this can hinder drying time and potentially cause items to touch and wrinkle.
If you need additional drying space, consider adding multiple lines parallel to each other. This can be done by attaching additional lengths of rope to the same anchor points, creating a tiered or stacked clothesline setup.
For outdoor drying, choose a location with good airflow and sunlight if possible. Direct sunlight helps to naturally disinfect and freshen clothes while aiding in the drying process. However, keep in mind that excessive exposure to sunlight can cause fabric fading over time.
If you prefer indoor drying, select a well-ventilated area or open windows to enhance air circulation. You can also place a fan nearby to help expedite the drying process.
Remember to periodically check the clothes for dryness and adjust the positioning of the items if needed. Once the clothes are completely dry, remove them from the clothesline, and fold or hang them in their designated storage area.
Creating a DIY clothesline with rope or twine is a cost-effective and convenient alternative to a traditional drying rack. It allows you to make use of available space while effectively drying multiple garments at once. Give it a try and enjoy the benefits of air-dried clothes!
Opt for Indoor Air Drying Methods
When you don’t have access to outdoor drying options or prefer to dry your clothes indoors, there are several effective air drying methods you can use. These methods utilize the natural airflow in your home to help dry your clothes without the need for a drying rack.
One indoor air drying method is to hang your clothes on hangers and place them on a shower rod, curtain rod, or any elevated surface with good ventilation. This allows for air circulation around the garments and encourages faster drying.
If you have limited hanging space, consider using a clothesline or tension rod stretched across a spare room or basement. Hang your clothes on the line or rod, allowing for adequate spacing between each item to allow for proper airflow.
Alternatively, you can use the back of chairs, the top of a folded table, or even a clothing rack to hang your clothes inside your home. Ensure that the area has good airflow, such as near an open window or a fan, to facilitate the drying process.
In addition to hanging, you can also lay flat items, such as sweaters or delicates, on a clean and dry surface like a towel or mesh rack. Flip the garment occasionally to aid in drying evenly.
To further enhance indoor air drying, open windows and doors to allow for cross ventilation. This creates a natural breeze that helps to evaporate moisture from your clothes more efficiently. You can also place a fan near your drying area to increase air circulation and expedite the drying process.
It’s important to note that indoor air drying may take longer than outdoor drying due to the absence of direct sunlight and limited airflow. To ensure the freshness of your clothes, avoid placing them in a damp or humid room, as this can lead to musty odors or mildew. Opt for well-ventilated areas within your home for better results.
Remember to adjust the drying location based on the fabric of your clothes. Delicate or sensitive fabrics may require a cooler or shaded area to avoid any damage or color fading.
Indoor air drying methods are a practical solution when outdoor drying options are not available or convenient. By utilizing the natural airflow within your home, you can effectively dry your clothes while maintaining their quality and freshness.
Take Advantage of Outdoor Drying
When weather conditions permit, outdoor drying is an excellent and natural way to dry your clothes. It not only saves energy but also leaves your clothes smelling fresh and gives them a natural crispness. Here are some tips for making the most of outdoor drying:
If you have access to a backyard or outdoor space, set up a clothesline between two fixed points. This can be two trees, posts, or a dedicated clothesline pole. Ensure that the clothesline is tightly secured, allowing for enough space between the two anchor points to hang your clothes.
When hanging your clothes on a clothesline, shake them out to remove any wrinkles and make sure they are fully extended. Use clothespins to secure the garments and prevent them from being blown off by the wind. Ensure that the clothes are not touching each other to allow for proper airflow.
Take advantage of sunny and breezy days for outdoor drying. Direct sunlight helps to naturally freshen and disinfect your clothes. Additionally, the wind aids in the drying process by increasing airflow and evaporation.
Rotate the clothes on the line periodically, especially if certain areas receive more sunlight and wind than others. This promotes even drying and prevents any parts of the garments from being overexposed.
Be mindful of potential obstacles that could hinder outdoor drying. For example, avoid hanging clothes near trees with pollen or sap, as they may leave stains or spots on the fabric. Similarly, avoid areas with bird droppings or excessive dirt.
Consider using a laundry drying rack specifically designed for outdoor use. These racks often have multiple tiers or arms that provide more hanging space and allow for better airflow.
If you live in an apartment or don’t have access to outdoor space, check if your building has a rooftop or balcony area designated for drying clothes. Confirm with the building management about any rules or restrictions regarding outdoor drying.
When using outdoor drying, keep an eye on the weather forecast. If rain or inclement weather is expected, promptly bring your clothes indoors to prevent them from getting wet.
Nature-friendly fabric softeners, such as line-drying fabric sheets, can be used to reduce stiffness and static cling that may occur during outdoor drying.
Remember to check local regulations regarding outdoor drying. Some neighborhoods, homeowners associations, or apartment complexes may have specific rules or limitations on hanging clothes outside.
Outdoor drying is not only beneficial for your clothes but also for the environment. By harnessing the power of the sun and wind, you can reduce energy consumption and enjoy the fresh air scent on your freshly dried laundry.
Make Use of Radiator Heaters
During the colder months, radiators can serve as a practical alternative for drying clothes indoors. Radiator heaters not only provide warmth to your living space but also create a convenient drying area for your damp garments. Here’s how you can make use of radiator heaters:
Start by wringing out any excess water from your clothes to minimize dripping. Then, gently shake out each garment to remove wrinkles and ensure better airflow during the drying process.
Next, find a suitable location to place your clothes on or near the radiator. Lay a towel, drying rack, or mesh fabric on top of the radiator to create a flat surface for your clothes to rest on. If using a drying rack, ensure that it is heat-resistant and designed specifically for use with radiators.
Arrange your clothes on the drying surface, making sure not to overcrowd them. Leave enough space between each garment to allow for proper airflow and ensure efficient drying.
Position the drying rack or garment on top of the radiator, making sure it is stable and securely placed. This will prevent any accidental tipping or displacement of the clothes during the drying process.
Take advantage of the warmth emitted by the radiator to aid in the drying process. The heat helps to evaporate moisture from the clothes, allowing them to dry faster. Keep in mind that delicate fabrics may require a lower heat setting to avoid damage or shrinking.
Periodically check the progress of the drying clothes and rotate them if necessary. This ensures that all sides of the garments are exposed to the heat and dries them evenly.
It’s important to maintain good ventilation in the room while using the radiator for drying clothes. Open windows or use a fan to enhance air circulation and prevent excessive moisture buildup in the room.
Once the clothes are dry, remove them from the radiator and allow them to cool down before folding or hanging them in their designated storage area.
Remember to clean the radiator surface regularly to prevent any dust or debris from accumulating and potentially transferring onto your clothes.
Using radiator heaters as a drying method can be a space-saving and energy-efficient solution. It maximizes the existing heat source in your home and eliminates the need for additional drying racks or equipment.
However, it is important to exercise caution and monitor the drying process closely. Make sure the clothes are not touching the hot parts of the radiator to avoid any damage or fire risk.
Take advantage of your radiator heaters as a convenient and effective way to dry clothes indoors, especially during the colder months. It combines functionality and warmth to provide you with dry, fresh garments in no time.
Take Advantage of Ceiling Fans
Ceiling fans can be a valuable tool in aiding the drying process of your clothes indoors. By utilizing the airflow generated by the ceiling fan, you can help evaporate moisture from your damp garments faster. Here’s how you can take advantage of ceiling fans for drying clothes:
First, gather your wet clothes and gently squeeze out any excess water to minimize dripping. Shake each garment to remove wrinkles and facilitate better airflow during drying.
Choose a suitable location in your home where you can hang your clothes. This could be a laundry room, bathroom, or any space with a ceiling fan installed.
Attach your clothes to hangers or place them on a drying rack. Ensure that the clothes are evenly spaced to allow for proper airflow and prevent them from touching each other.
Position the hangers or drying rack underneath the ceiling fan. Adjust the fan speed to a medium or high setting to generate a sufficient amount of airflow.
Turn on the ceiling fan and allow it to run for several hours or until the clothes are completely dry. The circulating air will help to expedite the drying process by increasing evaporation.
Periodically check the progress of the drying clothes and rotate them if needed. This ensures that all sides of the garments are exposed to the airflow and promotes even drying.
Keep in mind that delicate fabrics may require a lower fan speed to prevent damage or stretching. Adjust the fan speed accordingly to accommodate different fabric types.
If you have multiple ceiling fans in your home, you can strategically position the drying clothes under the nearest fans to maximize the airflow.
It’s important to ensure proper ventilation in the room while using the ceiling fan for drying clothes. Open windows or doors to allow fresh air to circulate and remove any excess moisture.
As an additional tip, you can place a dehumidifier in the room to help control humidity levels and facilitate faster drying.
Once the clothes are completely dry, remove them from the hangers or drying rack and fold or hang them in their designated storage area.
Using ceiling fans for drying clothes is an energy-efficient and effective method. It harnesses the natural airflow in your home to expedite the drying process without the need for additional equipment.
With the help of ceiling fans, you can enjoy fresh and dry clothes indoors regardless of the weather outside. Make the most of your ceiling fans to efficiently dry your garments and save time on laundry day.
Consider Using a Space Heater
When it comes to drying clothes indoors, a space heater can be a useful tool to expedite the drying process, especially during colder months. By using a space heater strategically, you can create a warm and dry environment that helps evaporate moisture from your clothes. Here’s how you can consider using a space heater for drying clothes:
Start by wringing out any excess water from your clothes to minimize dripping. Give each garment a gentle shake to remove wrinkles and improve airflow during drying.
Select a suitable location in your home where you can place the space heater. It should be a well-ventilated area and away from any flammable materials.
Set up a drying rack or use hangers to hang your clothes. Ensure that the clothes are spaced out adequately to allow for proper airflow.
Position the space heater near the drying area, aiming the heat towards the clothes. Adjust the heat setting accordingly, taking into consideration the type of fabric and the manufacturer’s instructions.
Turn on the space heater and allow it to run for several hours or until the clothes are completely dry. The warm air generated by the heater will help speed up the evaporation process.
Periodically check on the progress of the drying clothes and rotate them if necessary. This ensures that all sides of the garments are exposed to the heat and promotes even drying.
It’s essential to monitor the space heater closely and follow safety precautions. Keep the heater at a safe distance from the drying rack or hanging clothes to avoid any risk of fire or damage to the garments.
Make sure the space heater is placed on a stable and flat surface to prevent accidental tipping. Do not leave the space heater unattended while it’s running.
If you are concerned about energy consumption, consider using an energy-efficient space heater or setting a timer to turn it off automatically once your clothes are dry.
Once the clothes are completely dry, remove them from the drying rack or hangers, and fold or hang them in their designated storage area.
Using a space heater to dry clothes indoors can be a practical solution, especially when outdoor drying options are limited. It provides a controlled and warm environment that helps expedite the drying process.
Remember to exercise caution and prioritize safety when using a space heater for drying clothes. Follow the manufacturer’s instructions and never leave the space heater unattended.
Consider incorporating a space heater into your indoor drying routine to enjoy dry and fresh clothes even when the weather is less than ideal.