
Choosing the Right Drying Rack
When it comes to drying your clothes, having the right drying rack can make all the difference. With a wide variety of options available, it’s important to choose a drying rack that meets your specific needs. Here are some factors to consider when selecting the perfect drying rack for your laundry routine.
First and foremost, think about the amount of space you have available. If you have a small laundry area, a compact folding drying rack might be the best choice. These racks can be easily folded and stored when not in use, saving valuable space in your home. On the other hand, if you have ample space, consider a larger freestanding drying rack that can accommodate more clothes at once.
Next, consider the material of the drying rack. Look for a rack made of sturdy materials like stainless steel or coated metal. These materials are not only durable but also rust-resistant, ensuring a long-lasting and reliable drying solution.
Another important consideration is the type of drying surface. Some drying racks have rods, while others have mesh or fabric surfaces. Rods are ideal for hanging clothes, while mesh or fabric surfaces are great for laying delicate items flat to dry. Think about the types of clothes you frequently dry and choose a rack that can accommodate them.
Additionally, think about the stability of the drying rack. Look for features like sturdy legs or a weighted base to ensure that the rack remains stable even when loaded with wet clothes. This will help prevent accidents and ensure that your clothes dry evenly.
Lastly, consider any additional features that may be important to you. Some drying racks come with built-in hooks for hanging smaller items like socks or underwear. Others have adjustable height or folding wings to provide even more drying space. Think about your specific needs and choose a rack that offers the features that will make your laundry routine as efficient and convenient as possible.
By carefully considering these factors, you can choose the right drying rack that fits your space, accommodates your clothes, and enhances the efficiency of your laundry routine. Remember, the right drying rack can not only save you time and energy but also extend the lifespan of your clothes by ensuring proper drying and care.
Sorting and Preparing the Clothes
Before you start hanging your clothes on a drying rack, it’s important to first sort and prepare them. This will not only make the drying process more efficient but also help protect your garments and prevent damage. Here are some tips to help you effectively sort and prepare your clothes for drying:
1. Separate by Fabric Type: Sort your clothes into different piles based on their fabric type. This ensures that delicate items won’t get tangled with heavier ones, minimizing the risk of stretching or tearing. Additionally, it allows you to choose the appropriate drying method for each fabric.
2. Check for Stains and Treat Them: Before placing any clothes on the drying rack, inspect them for stains or spills. If you find any, treat them with a stain remover or pre-wash product. This will increase the chances of successfully removing the stains when you wash them later.
3. Empty Pockets and Close Zippers: Emptying the pockets of your clothes is important to prevent any small items, such as coins or tissues, from damaging both your garments and the drying rack. Additionally, make sure to zip up all zippers to avoid snagging or catching on other clothes.
4. Shake and Smooth Out Wrinkles: Give your clothes a gentle shake before hanging them to remove any excess wrinkles. Smooth out the fabric with your hands to eliminate any major creases. This will help your clothes dry evenly and reduce the need for ironing later.
5. Hang Similar Items Together: Group similar items, such as tops or bottoms, together on the drying rack. This makes it easier to organize and retrieve them once dry. It also ensures that items of similar weight and thickness will dry at the same rate.
6. Use Clothespins for Small Items: For smaller items like socks, underwear, or lightweight fabrics, consider using clothespins to secure them to the drying rack. This prevents them from falling off or getting lost in the process of drying your other clothes.
By following these sorting and preparation tips, you can ensure that your clothes dry efficiently and maintain their quality. Taking the time to properly care for your garments during the drying process will help them look their best and last longer.
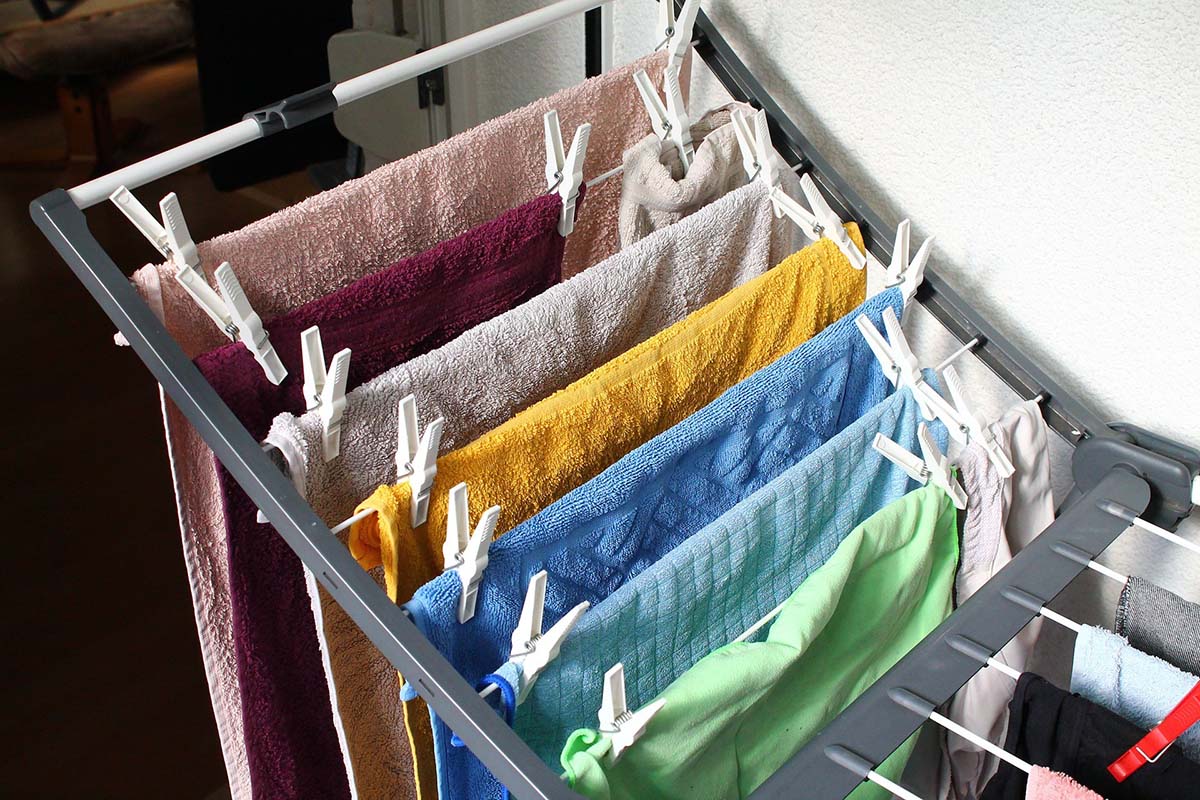
Spacing the Clothes on the Drying Rack
Properly spacing your clothes on the drying rack is essential for effective and efficient drying. It allows for maximum airflow and prevents clothes from touching, which can result in uneven drying or potential damage. Here are some tips to help you space your clothes effectively on the drying rack:
1. Allow Ample Space: Make sure to leave enough space between each garment on the drying rack. This will ensure that air can circulate freely and promote faster drying. Avoid overcrowding the rack, as this can lead to longer drying times and potential condensation issues.
2. Hang Clothes in Rows: Hang your clothes in neat rows to maximize space utilization. This helps to prevent garments from overlapping and touching each other during the drying process. If necessary, consider using additional racks or utilizing the wings or hooks of your drying rack for extra hanging space.
3. Separate Heavier and Lighter Items: To ensure even drying, separate heavier items like jeans or towels from lighter ones such as t-shirts or delicates. Hang the heavier items on the lower levels of the drying rack, as they require more airflow due to their thickness and absorbency.
4. Arrange by Size and Length: When hanging clothes on the drying rack, arrange them by size and length. Hang longer items like dresses or pants in one section, and shorter items like shirts or shorts in another. This helps to prevent tangling and ensures that each item receives adequate room for drying.
5. Avoid Overlapping: Try not to overlap clothes on the drying rack, as this can result in prolonged drying times and potential wrinkling. If you have limited space, consider folding larger items such as towels or bedsheets in half before hanging them to maximize the available space.
6. Utilize Additional Drying Accessories: Certain clothes, like socks or delicates, may require additional drying accessories such as clothespins or mesh bags. Use clothespins to secure smaller items to the drying rack, and place delicates inside mesh bags to protect them from stretching or snagging.
Remember, proper spacing of clothes on the drying rack ensures efficient airflow and promotes faster drying times. By following these tips, you can optimize your drying process and achieve perfectly dry clothes while extending their lifespan.
Hanging Heavy Items and Delicates
Hanging heavy items and delicates on a drying rack requires special attention to ensure that they dry properly without becoming misshapen or damaged. By following some simple guidelines, you can safely hang your heavy items and delicate garments on the drying rack:
1. Use Sturdy Hangers: For heavy items such as jeans or jackets, consider using sturdy hangers that can support the weight without bending or stretching. Hang these items on the drying rack using the hangers, making sure that the hangers are securely placed on the rack’s bars.
2. Spread Out Heavy Items: To prevent stretching and promote even drying, spread heavy items like jeans or sweaters out on the drying rack. Avoid hanging them in a way that causes excessive weight to be concentrated in one area. This will help maintain the shape of the garment.
3. Lay Delicates Flat: Delicate fabrics like silk or lace should not be hung on the drying rack. Instead, lay them flat on a clean towel on top of the drying rack or on a flat surface nearby. Gently reshape the garments if needed and allow them to air dry without any stretching or distortion.
4. Avoid Direct Sunlight: When drying heavy items or delicates, it’s best to avoid direct sunlight. Sunlight can cause fading or discoloration, especially for darker or more delicate fabrics. Find a spot in your home where the drying rack is away from direct sunlight or use a shaded area if drying outdoors.
5. Rotate Heavy Items: If you’re drying a heavy item like a wet bathrobe or a thick towel, periodically rotate it on the drying rack. This will ensure that it dries evenly and prevent moisture from being trapped in certain areas, which can lead to a musty smell or mildew.
6. Allow Ample Drying Time: Heavy items and delicates may take longer to dry compared to lighter fabrics. Give them ample time to air dry completely before storing or wearing them. Avoid rushing the drying process by using a dryer or applying heat, as this can cause shrinking or damage to the fabric.
By following these tips, you can safely and effectively dry your heavy items and delicates on a drying rack. Proper care and attention will help preserve the quality and shape of your garments, ensuring that they last longer and look great every time you wear them.
Maximizing Airflow for Efficient Drying
When using a drying rack, maximizing airflow is key to achieving efficient and effective drying results. Proper airflow allows moisture to evaporate quickly and prevents clothes from becoming damp or musty. Here are some strategies to help you maximize airflow for efficient drying:
1. Leave Ample Space Between Clothes: Make sure to leave enough space between each garment on the drying rack. Avoid overcrowding, as this can restrict airflow and prolong drying times. Optimal spacing allows air to circulate freely, ensuring that clothes dry evenly and thoroughly.
2. Utilize the Rack’s Design: Take advantage of the design features of your drying rack to maximize airflow. If your rack has adjustable wings or tiers, use them to create additional hanging space and promote better air circulation. Spread out the arms or wings of the rack to allow more room for clothes to breathe.
3. Hang Clothes in an Open Area: Set up your drying rack in an open area where air can freely move around the clothes. Avoid placing it in a confined space or against a wall, as this can hinder proper airflow. Choose a well-ventilated area that allows for good circulation to promote faster drying.
4. Use a Fan or Ventilation: Enhance airflow by using a fan or opening windows to create a cross breeze. Position the fan near the drying rack to improve air circulation, especially in areas with limited natural ventilation. This will help speed up the drying process and prevent clothes from becoming damp.
5. Flip and Rotate Clothes: To ensure that all sides of your clothes receive adequate airflow, periodically flip and rotate them on the drying rack. This helps to distribute moisture evenly and accelerates the drying process. Pay special attention to thicker items or areas that tend to retain moisture, such as pockets or cuffs.
6. Dry Clothes Indoors in Low Humidity: If possible, try to dry your clothes indoors during periods of low humidity. Low humidity environments promote faster evaporation, allowing clothes to dry more efficiently. Consider using a dehumidifier in the drying area to help maintain a dry environment and aid in moisture removal.
By incorporating these strategies, you can maximize airflow and optimize the drying process. Efficient airflow ensures that your clothes dry thoroughly, eliminates dampness, and reduces the risk of odors or mildew. Enjoy fresh, perfectly dried garments with the help of a well-ventilated drying setup.
Hanging Clothes with Care to Avoid Wrinkles
Hanging your clothes on a drying rack is not only about drying them but also about ensuring they remain wrinkle-free. By taking some extra care while hanging your clothes, you can prevent unwanted wrinkles and save time on ironing. Here are some tips to help you hang your clothes with care to avoid wrinkles:
1. Shake Out the Clothes: Before hanging your clothes on the drying rack, give them a gentle shake to remove any loose wrinkles. This helps to loosen the fabric and make it easier to hang them wrinkle-free. Spread the garment out and smooth it with your hands to get rid of major creases.
2. Hang Clothes Immediately: As soon as your laundry cycle is complete, hang the clothes on the drying rack promptly. Leaving them in the washing machine or a laundry basket for long periods can cause wrinkles to set in. Hanging them right away ensures that they retain their shape and form.
3. Use Proper Hangers: Using suitable hangers is crucial to prevent wrinkles. Avoid thin or wire hangers, as they may cause clothes to stretch or sag. Opt for sturdy hangers that are appropriate for the type of clothing you are hanging, such as padded or plastic hangers for delicate items or broad-shouldered hangers for jackets or dresses.
4. Hang Clothes Smoothly: When placing clothes on the drying rack, hang them smoothly without folding or bunching the fabric. Smooth out any wrinkles or folds as you hang each item, ensuring that it hangs straight and evenly. Properly hung clothes are less likely to develop new creases during the drying process.
5. Utilize Clothespins or Clips: For lightweight or delicate items, consider using clothespins or clips to secure them to the drying rack. This prevents them from drooping or slipping and helps maintain their shape while drying. Attach the clothespins or clips to the edges or seams of the garment rather than the fabric itself to avoid creating indentation marks.
6. Separate Layers and Turn Clothing Inside Out: If you are drying garments with multiple layers, such as hoodies, jackets, or reversible items, separate the layers and turn them inside out. This promotes better airflow inside the garment, preventing moisture accumulation and minimizing the chances of wrinkles.
Remember, taking a little extra care when hanging your clothes on the drying rack can save you time and effort in the long run. By following these tips, you can enjoy the convenience of air-dried clothes that are free from unsightly wrinkles.
Tips for Faster Drying Times
Waiting for your clothes to dry can be time-consuming, but there are several tips and tricks you can employ to reduce drying times. With these strategies, you can enjoy faster drying times on your drying rack:
1. Use High-Speed Spin Cycle: Before transferring your clothes to the drying rack, ensure that they have undergone a high-speed spin cycle in the washing machine. This helps to remove excess water from the garments, reducing the amount of time needed for drying.
2. Optimize Air Circulation: Enhance airflow around your drying rack by placing it near a natural source of ventilation, such as an open window or door. This allows fresh air to circulate and replace moist air, expediting the drying process.
3. Utilize a Fan or Drying Rack with Built-in Fans: Consider using a fan to direct airflow towards the drying rack. Position the fan in such a way that it blows air across the clothes, increasing evaporation rates. Alternatively, invest in a drying rack equipped with built-in fans for enhanced drying efficiency.
4. Use a Dehumidifier: If you are drying clothes indoors, especially in a high-humidity environment, employing a dehumidifier can help remove excess moisture from the air. This lowers the humidity levels, allowing your clothes to dry faster without the risk of mildew or odors.
5. Place Clothes in Sunlight: If weather permits, utilize natural sunlight by placing your drying rack outdoors. Sunlight can aid in faster evaporation due to the warmth and direct airflow. However, be cautious with dark-colored or delicate fabrics, as extended exposure to sunlight can cause fading or damage.
6. Turn Clothes Frequently: Regularly turning the clothes on your drying rack helps ensure that all sides are exposed to airflow, leading to more uniform drying. Flip garments inside out or rotate them at intervals to expedite the drying process.
7. Utilize Thin and Absorbent Fabrics: When possible, opt for lightweight and absorbent fabrics such as microfiber towels or thin cotton garments. These fabrics tend to dry faster compared to heavier materials like denim or thick knits.
8. Consider Pre-drying: For heavyweight items, such as bath towels or jeans, consider pre-drying them in a tumble dryer for a short period. This helps remove a significant amount of moisture before air drying, reducing the overall drying time.
By incorporating these tips, you can significantly reduce the time it takes for your clothes to dry on a drying rack. Faster drying times mean less waiting and more convenience when it comes to doing your laundry.
Using Additional Tools for Drying Efficiency
While a drying rack is a versatile and effective tool for air drying your clothes, there are additional tools you can use to enhance drying efficiency. These tools can help speed up the drying process and ensure that your clothes dry more effectively. Here are some additional tools you can utilize for optimal drying efficiency:
1. Drying Racks with Built-in Heat: Consider investing in a drying rack with built-in heat or heated bars. These racks provide a gentle heat source that aids in faster evaporation, especially during colder months or in areas with limited air circulation. The heat helps to accelerate the drying process, reducing overall drying times.
2. Portable Clothes Dryer: A portable clothes dryer is a convenient option when you need to dry clothes quickly and efficiently. These compact units often have powerful fans that generate warm airflow to expedite drying. They can be an excellent alternative to traditional drying racks, especially for larger items or during inclement weather.
3. Clothes Drying Mesh: Clothes drying mesh is a versatile and useful accessory that can be placed on your drying rack. It provides a flat surface for delicate items or woolens that are prone to stretching. The mesh allows air to circulate around the garment, facilitating faster and gentler drying.
4. Clothes Drying Clips: Clothes drying clips are small but handy tools that can be used to secure clothes to the drying rack without causing damage or leaving marks. They are particularly useful for lightweight items like socks, underwear, or baby clothes, ensuring that they stay in place during the drying process.
5. Over-the-Door Drying Racks: If you have limited floor space, consider using over-the-door drying racks. These racks attach to the back of a door and provide additional drying space without taking up valuable floor area. They are ideal for small living spaces or laundry rooms with limited drying options.
6. Clothes Drying Airers: Clothes drying airers are standalone racks with multiple tiers or bars that offer ample space for drying many clothes at once. These are particularly useful when you have a large volume of laundry to dry. Airers often come with various features such as foldable frames, adjustable heights, and collapsible design for easy storage.
By incorporating these additional tools into your drying routine, you can maximize drying efficiency, especially for larger or delicate items. These tools provide additional options and features that help you tailor your drying process to match your specific needs.
Utilizing Outdoor Space for Drying Clothes
When it comes to air drying clothes, the great outdoors can provide a fantastic option for efficient and eco-friendly drying. Utilizing outdoor space not only allows for faster drying times but also harnesses the power of natural sunlight and airflow. Here are some tips for effectively utilizing outdoor space for drying clothes:
1. Invest in a Clothesline: Installing a clothesline in your yard or on a balcony is a simple yet effective way to take advantage of outdoor drying. Opt for a sturdy clothesline made of weather-resistant materials. Ensure it is properly anchored and securely fastened to withstand the weight of wet clothes and any weather conditions.
2. Utilize Clothes Pegs: Using clothes pegs, also known as clothespins, is a must for outdoor drying. Secure each item of clothing to the clothesline by attaching the pegs to the fabric. This prevents clothes from falling off or being blown away by strong winds, ensuring they dry evenly.
3. Choose a Sunny and Well-Ventilated Spot: Look for a spot that receives ample sunlight, as the UV rays aid in the natural disinfection of the clothes and help eliminate any lingering odors. Additionally, select an area with good airflow to facilitate faster drying times. A location with a gentle breeze will provide optimal conditions for drying your clothes.
4. Rotate Clothes as Needed: To ensure that your clothes dry evenly, periodically rotate them on the clothesline. This allows all sides of the garments to be exposed to the sun and breeze. Consider turning heavier items inside out to ensure thorough drying and prevent fading from direct sunlight exposure.
5. Check the Weather Forecast: Before you hang your clothes outside, check the weather forecast to ensure that you have an appropriate drying window. Avoid hanging clothes on rainy or excessively windy days to prevent your clothes from getting wet or being blown away. Take advantage of dry and sunny days for efficient drying.
6. Protect Clothes from Dust and Pollen: If you live in an area with high levels of dust or pollen, consider covering your clothes with a thin cloth or mesh netting. This will protect them from accumulating dust particles or allergens while still allowing for good airflow and sunlight exposure.
7. Be Mindful of Neighborhood Regulations: Before setting up a clothesline, be aware of any local regulations or neighborhood restrictions regarding outdoor drying. Some places may have guidelines regarding the visibility or positioning of clotheslines. Ensure you comply with the rules or consider alternative options such as retractable clotheslines or portable drying racks.
By utilizing outdoor space for drying clothes, you can take advantage of natural sunlight and breezes, resulting in faster drying times and fresher-smelling garments. Embrace the benefits of outdoor drying and enjoy the eco-friendly and effective approach to air drying your laundry.
Maintaining and Cleaning the Drying Rack
Proper maintenance and cleaning of your drying rack are essential to ensure its longevity and functionality. Here are some tips to help you maintain and clean your drying rack:
1. Regular Inspection: Conduct periodic inspections of your drying rack to check for any signs of wear or damage. Look for loose or missing screws, cracks in the frame, or bent bars. Address any issues promptly to prevent further damage and ensure the rack remains stable and safe to use.
2. Clean the Rack Surface: Clean the surface of your drying rack regularly to remove any dust, lint, or debris that may accumulate. Use a damp cloth or sponge to wipe down the bars and any other surfaces. For stubborn stains or grime, mix mild soap with water and gently scrub the affected areas.
3. Address Rust or Corrosion: If your drying rack is made of metal and develops rust or corrosion, take immediate action to prevent further damage. Use a wire brush or sandpaper to remove any rust spots. Afterward, apply a layer of rust-resistant paint or clear sealant to protect the metal and prevent future corrosion.
4. Lubricate Moving Parts: If your drying rack has hinges, joints, or other moving parts, lubricate them periodically to ensure smooth operation. Apply a small amount of silicone or light machine oil to hinges and moving connections. This will prevent squeaking and ensure the folding or extending mechanisms function properly.
5. Store Properly: If you need to store your drying rack when not in use, make sure to do so properly. Clean and dry the rack thoroughly before folding or disassembling it for storage. Keep it in a dry and well-ventilated area to prevent mold or mildew growth. If possible, store the rack in an upright position to minimize the risk of warping or bending.
6. Address Mold or Mildew: If you notice any mold or mildew on your drying rack, address it immediately. Mix equal parts of water and white vinegar and use a cloth or sponge to wipe down the affected areas. For stubborn mold, use a mixture of hydrogen peroxide and water. This will help eliminate the spores and prevent further growth.
7. Follow Manufacturers’ Recommendations: Always refer to the manufacturers’ instructions and guidelines for proper maintenance and cleaning specific to your drying rack. Different materials and designs may require specific care instructions, so it’s important to follow them to avoid any damage or loss of functionality.
By following these maintenance and cleaning tips, you can ensure that your drying rack remains in excellent condition and provides years of reliable drying for your clothes. Regular upkeep will help extend its lifespan and optimize its performance.