
How to Access Voicemail on iPhone 13
Accessing voicemail on your iPhone 13 is a straightforward process that allows you to conveniently manage your messages. Whether you're using the latest iPhone 13 or any other compatible model, accessing your voicemail is essential for staying connected and informed. Here's how you can effortlessly access your voicemail on your iPhone 13:
-
Using the Phone App: Open the "Phone" app on your iPhone 13. At the bottom of the screen, you'll find the "Voicemail" tab, represented by an icon resembling an old-school tape recorder. Tap on this tab to access your voicemail.
-
Visual Voicemail: iPhone 13 offers a feature called Visual Voicemail, which presents your voicemail messages in a visual interface. This allows you to see a list of your voicemail messages and choose which ones to listen to or delete. To access Visual Voicemail, simply tap on the "Voicemail" tab within the "Phone" app.
-
Voicemail Notifications: If you receive a voicemail, you'll typically receive a notification on your iPhone 13. This notification may appear on your lock screen, in the Notification Center, or as a badge app icon. Tapping on the notification will directly take you to your voicemail messages.
-
Dialing Voicemail: Alternatively, you can access your voicemail by dialing your voicemail number. This is usually done by pressing and holding the "1" key on your iPhone's keypad. This method is useful if you prefer accessing voicemail through traditional phone call methods.
Once you've accessed your voicemail, you can listen to, delete, or manage your messages according to your preferences. By familiarizing yourself with these methods, you can efficiently stay on top of your voicemail communications on your iPhone 13.
Deleting Individual Voicemail Messages
Deleting individual voicemail messages on your iPhone 13 is a simple yet essential task for managing your voicemail inbox. Whether you want to clear out old messages or remove specific ones, the process is designed to be user-friendly and efficient. Here's a detailed guide on how to delete individual voicemail messages on your iPhone 13:
-
Accessing Voicemail: To begin, access your voicemail by opening the "Phone" app on your iPhone 13. Tap on the "Voicemail" tab located at the bottom of the screen. This will display a list of your voicemail messages, allowing you to select the specific message you wish to delete.
-
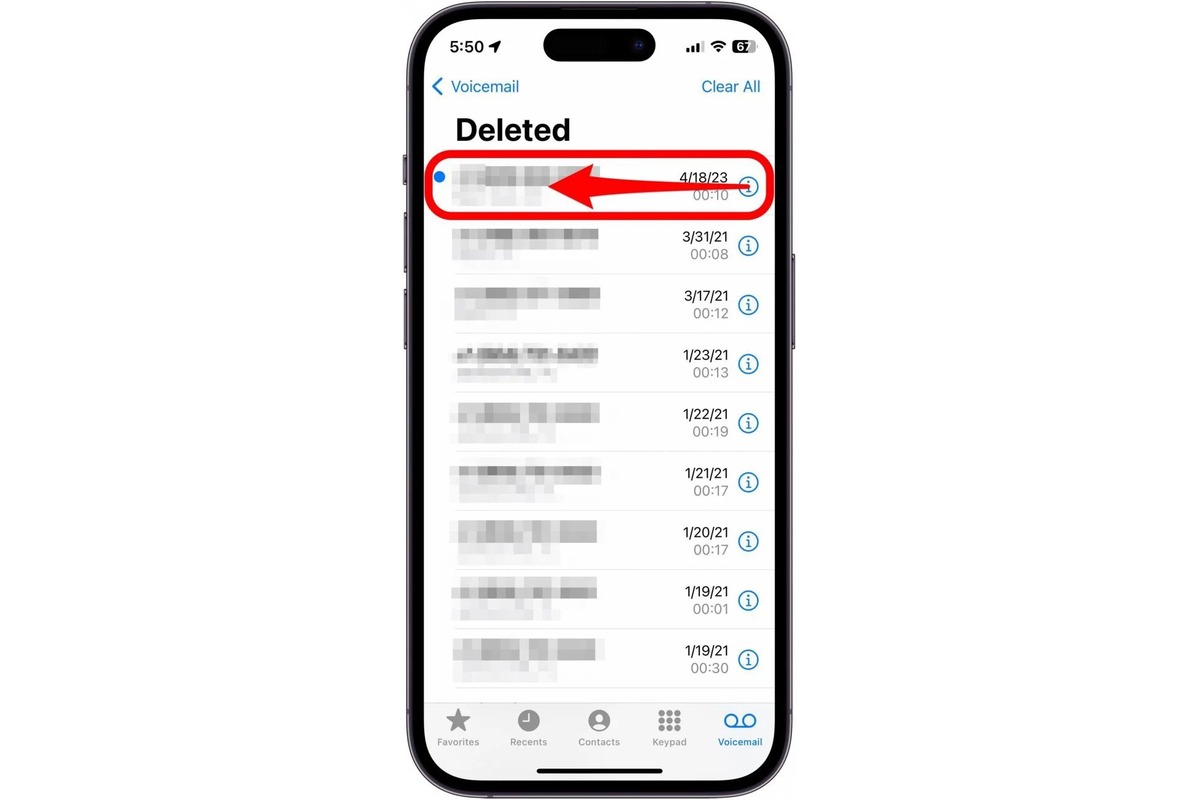
Selecting the Message: Once you're in the voicemail interface, browse through the list of messages and tap on the individual message you want to delete. This will open the selected voicemail, enabling you to listen to it and proceed with the deletion process.
-
Deleting the Message: After selecting the voicemail message, you'll typically find a "Delete" option or icon. Tap on this option to initiate the deletion process. A confirmation prompt may appear to ensure that you intend to delete the message. Confirm the deletion, and the selected voicemail message will be permanently removed from your inbox.
-
Visual Voicemail: If you're using Visual Voicemail on your iPhone 13, the process remains similar. You can navigate through your voicemail messages in the visual interface, select the individual message you want to delete, and proceed with the deletion as outlined above.
By following these steps, you can effectively manage your voicemail inbox by deleting individual messages that are no longer needed. This ensures that your voicemail remains organized and clutter-free, allowing you to focus on the most relevant and recent messages.
Deleting individual voicemail messages on your iPhone 13 is a seamless process that empowers you to maintain a tidy and efficient voicemail inbox. Whether you're clearing out old messages or removing specific ones, the ability to delete individual voicemail messages provides you with control over your voicemail communications.
Deleting Multiple Voicemail Messages
Managing multiple voicemail messages on your iPhone 13 is a crucial aspect of staying organized and efficient in your communications. Whether you need to clear out a backlog of messages or selectively remove specific groups of voicemails, the ability to delete multiple voicemail messages streamlines the process and optimizes your voicemail inbox. Here's a comprehensive guide on how to delete multiple voicemail messages on your iPhone 13:
-
Accessing Voicemail: Begin by opening the "Phone" app on your iPhone 13 and tapping on the "Voicemail" tab at the bottom of the screen. This will display a list of your voicemail messages, providing an overview of your inbox.
-
Selecting Multiple Messages: Within the voicemail interface, you can select multiple messages for deletion. Depending on your preference, you can tap on the "Edit" option, which allows you to choose multiple voicemail messages by selecting the corresponding checkboxes next to each message.
-
Bulk Deletion: Once you've selected the desired voicemail messages, a "Delete" option or icon will typically appear. Tap on this option to initiate the bulk deletion process. A confirmation prompt may appear to ensure that you intend to delete the selected messages. Confirm the deletion, and the chosen voicemail messages will be permanently removed from your inbox.
-
Visual Voicemail: If you're utilizing Visual Voicemail on your iPhone 13, the process remains efficient. You can navigate through your voicemail messages in the visual interface, select multiple messages for deletion, and proceed with the bulk deletion as outlined above.
By following these steps, you can effectively manage your voicemail inbox by deleting multiple messages in a streamlined manner. This capability empowers you to maintain a tidy and organized voicemail inbox, ensuring that you can focus on the most relevant and recent messages without being encumbered by unnecessary clutter.
Deleting multiple voicemail messages on your iPhone 13 is a seamless process that provides you with control over your voicemail communications. Whether you're clearing out a backlog of messages or selectively removing specific groups of voicemails, the ability to delete multiple voicemail messages optimizes your voicemail management, allowing for a more efficient and organized communication experience.
Setting up Voicemail Deletion Preferences
Setting up voicemail deletion preferences on your iPhone 13 allows you to customize how voicemail messages are managed, providing you with greater control over your communication experience. By configuring deletion preferences, you can streamline the management of your voicemail inbox and ensure that outdated or unnecessary messages are efficiently removed. Here's a detailed guide on how to set up voicemail deletion preferences on your iPhone 13:
-
Accessing Voicemail Settings: Begin by accessing the voicemail settings on your iPhone 13. To do this, open the "Phone" app and navigate to the "Voicemail" tab. Look for the option to access voicemail settings, which is typically represented by a gear or cog icon. Tap on this option to enter the voicemail settings menu.
-
Deletion Preferences: Within the voicemail settings menu, you'll find various preferences related to message deletion. These preferences may include options to automatically delete messages after a certain period, such as 30 days, or to prompt for confirmation before deleting a message. Customize these preferences according to your preferences and how you prefer to manage your voicemail messages.
-
Automatic Deletion: If you prefer a hands-off approach to managing your voicemail inbox, you can opt to enable automatic deletion of messages after a specified duration. This ensures that older messages are automatically removed, helping to keep your voicemail inbox organized and clutter-free without requiring manual intervention.
-
Confirmation Prompts: On the other hand, if you prefer more control over the deletion process, you can choose to enable confirmation prompts before deleting a message. This adds an extra layer of security, ensuring that you don't accidentally delete important messages and providing you with the opportunity to review before confirming the deletion.
-
Visual Voicemail Preferences: If you're utilizing Visual Voicemail on your iPhone 13, the deletion preferences may be integrated into the visual interface. You can customize settings related to message deletion within the Visual Voicemail interface, allowing you to tailor the deletion process to align with your preferences and usage habits.
By setting up voicemail deletion preferences on your iPhone 13, you can personalize how your voicemail messages are managed, ensuring that your inbox remains organized and optimized for efficient communication. Whether you prefer automatic deletion to minimize clutter or confirmation prompts for added control, customizing these preferences empowers you to tailor your voicemail management experience to suit your individual needs and preferences.